Multi-cluster networking is a valuable tool that enables use cases like regional high availability, globally distributed proximity to users for lower latency, and organizational isolation between teams. Google Kubernetes Engine (GKE) provides built-in capabilities for multi-cluster networking that you can enable and use at scale across a fleet of GKE clusters. This feature also lets you combine, or migrate deployed infrastructure between, GKE Standard and Autopilot to meet the architectural needs of each application.
With GKE Autopilot clusters, Google manages the infrastructure, including the control plane and the nodes. If you want to configure and manage your nodes instead, GKE provides Standard mode. For more information on the differences between modes, see Choose a cluster mode of operation.
This page demonstrates these features through several deployment topologies. You learn how to take an application deployed in a single GKE cluster and migrate it to a multi-cluster deployment across GKE Standard and Autopilot clusters. You use GKE multi-cluster Services for east-west traffic and multi-cluster Gateways to enable multi-cluster north-south networking.
This page is for cloud architects and operations teams that use, or plan to use, GKE to deploy services across multiple Kubernetes clusters. Before reading this page, ensure that you're familiar with Kubernetes.
Multi-cluster Services and multi-cluster Gateways
Kubernetes can run using a single control plane across disparate cloud zones to
provide resiliency and higher availability for your services.
GKE takes this one step further and provides
GKE
multi-cluster Services
(MCS) that provides a cross-cluster service discovery and invocation mechanism.
Services that use this feature are discoverable and accessible across clusters
with a virtual IP, which matches the behavior of a ClusterIP Service
accessible in a cluster. This approach allows for the following benefits:
- Services can be load-balanced across multiple clusters in the same region or different regions (east-west traffic).
- Cross-region service high availability options are achievable.
- Stateful and stateless workloads can be deployed and managed across separate clusters.
- Shared services are available across clusters.
To learn more about how to deploy MCS, see Configuring multi-cluster Services.
GKE provides an implementation of the Kubernetes Gateway API that uses the GKE Gateway controller. Gateway allows GKE to deploy Google Cloud load balancers to provide inbound (north-south) traffic routing for services deployed on GKE. GKE also provides multi-cluster Gateways (MCG) which extend the GKE Gateway controller to provision load balancers that route traffic to services deployed on disparate GKE clusters.
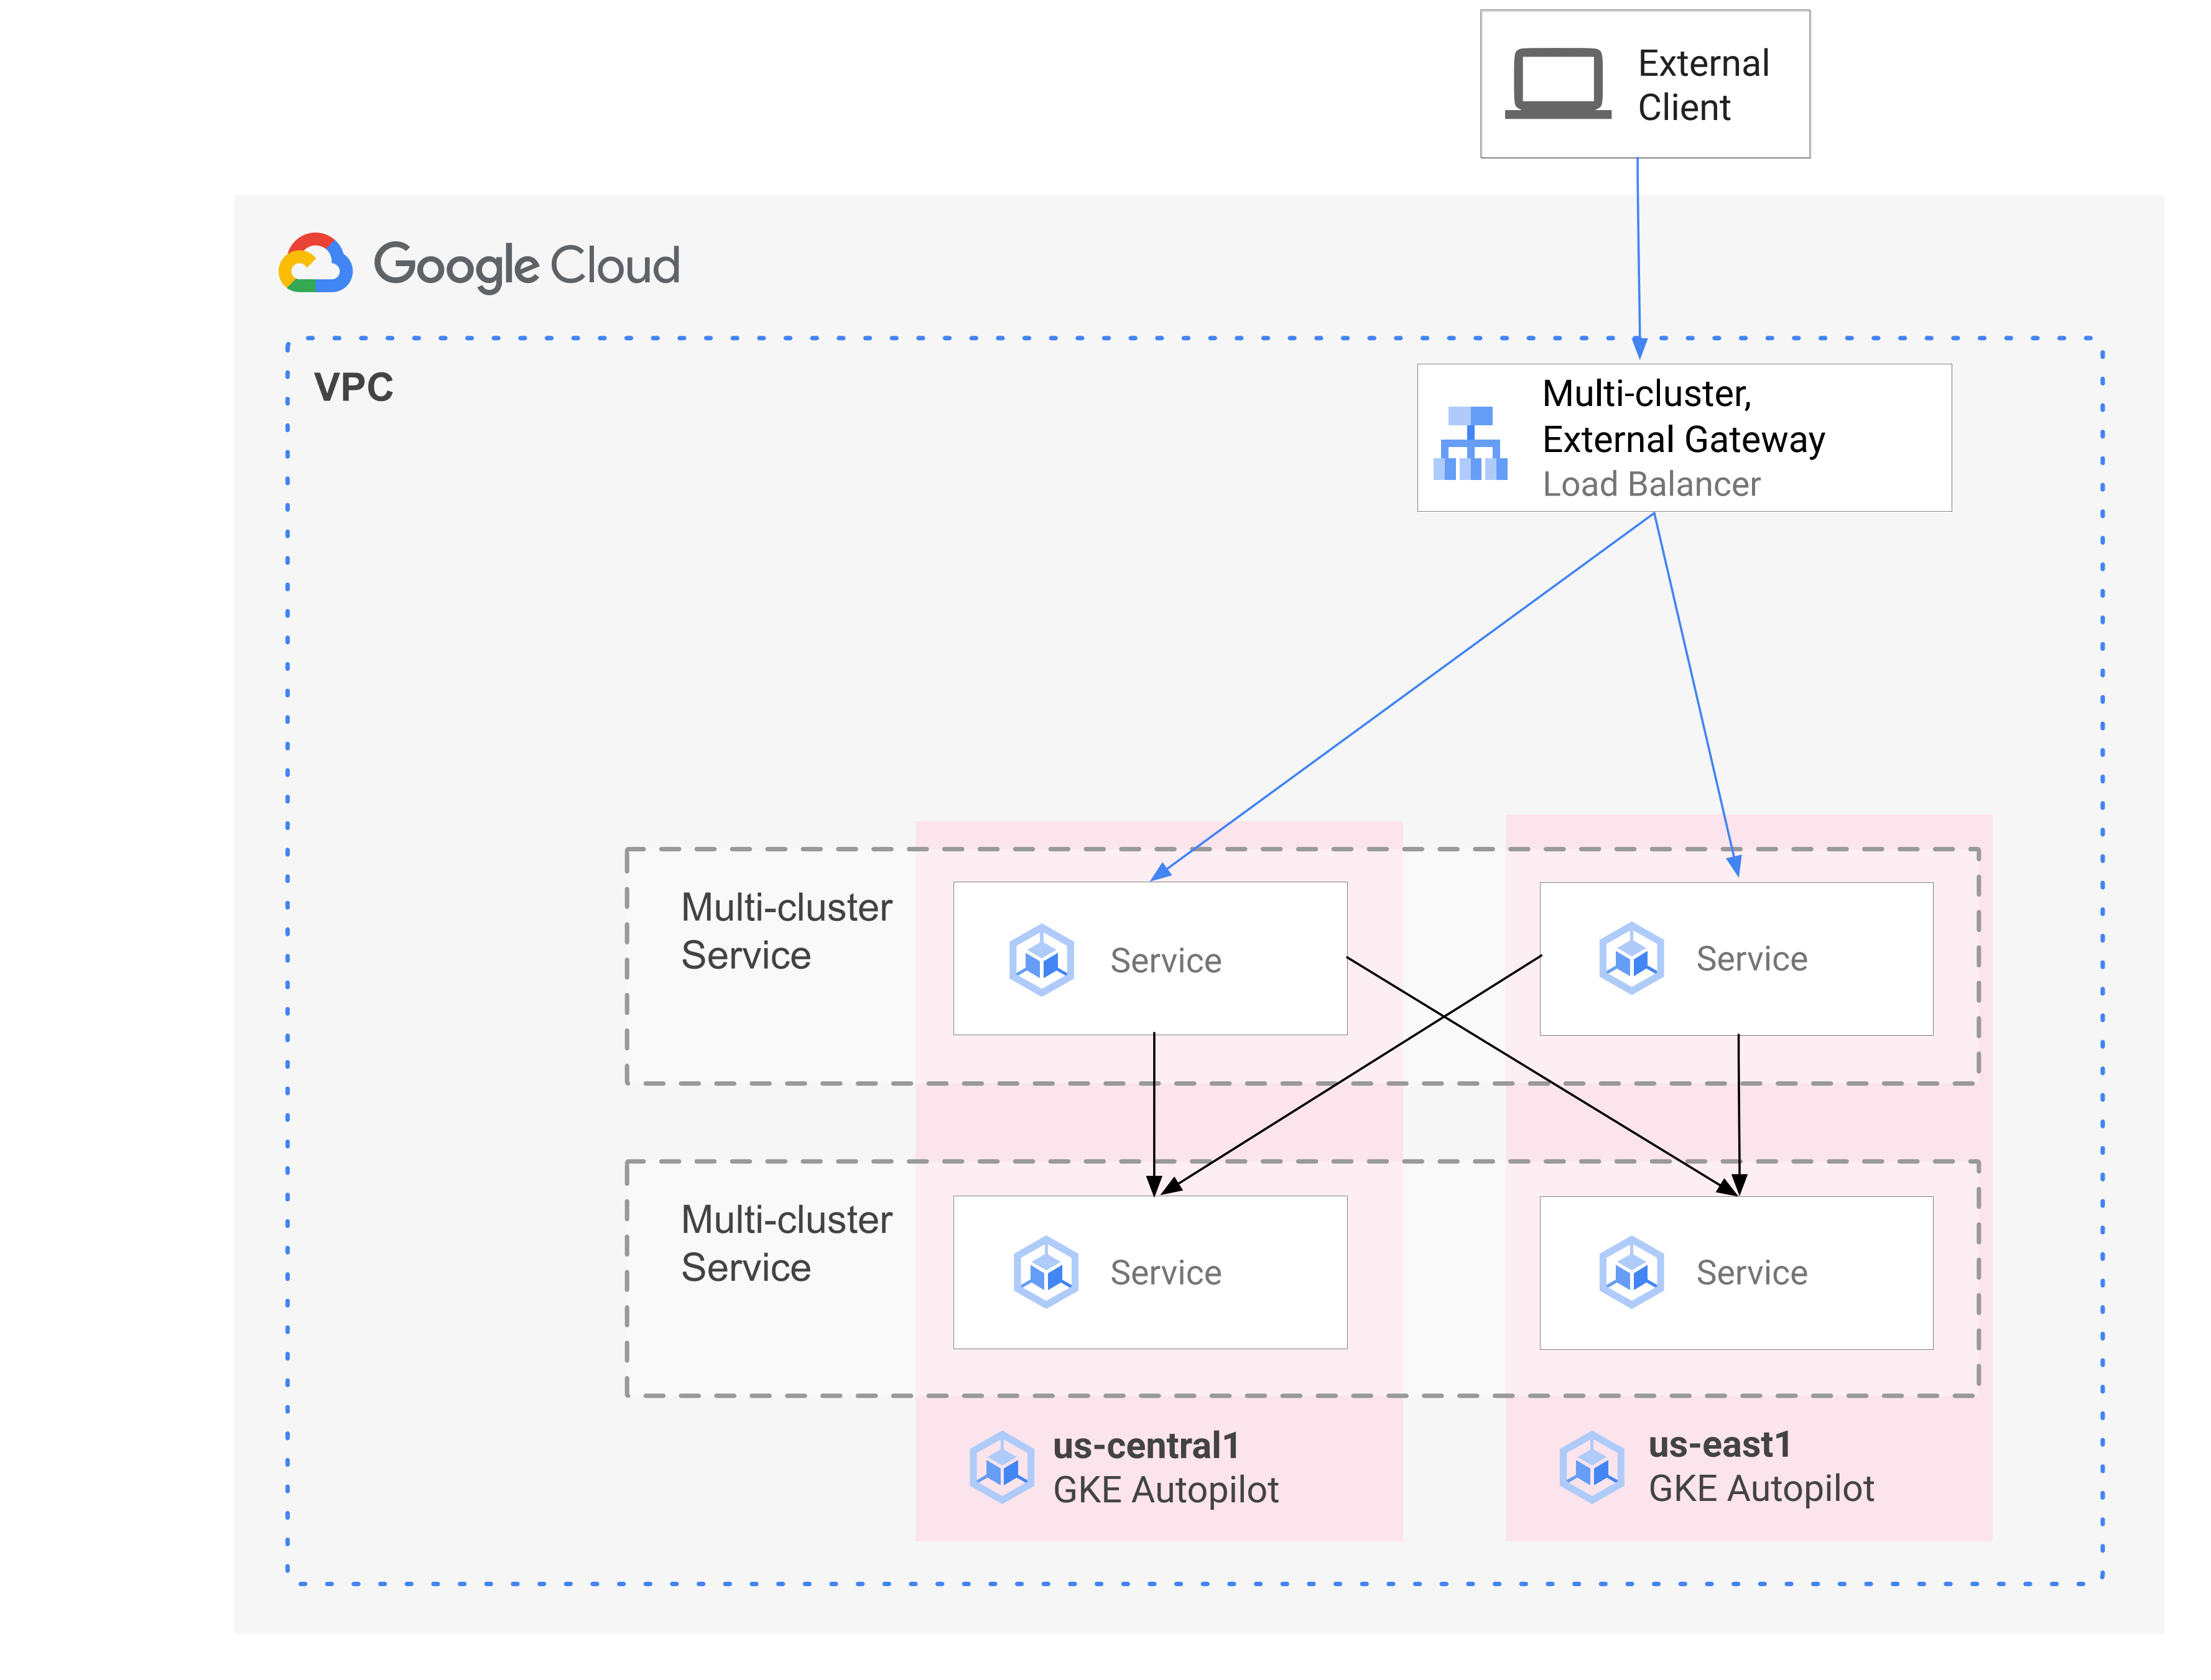
The following diagram shows how, when you combine MCS and MCG, you are able to manage the complementary aspects of service deployment and traffic routing from a single control plane:
For more information, see Deploying multi-cluster Gateways.
Overview of migration
GKE multi-cluster networking capabilities benefit workloads of various profiles. For example, you might have stateless components with bursty traffic that you wish to move to Autopilot because of its more efficient cost model.
Or, you might want to place your application frontends closer to users. This approach provides lower latency and caching that improves application performance and user experience. At the same time, you might have some stateful components that your application relies on that can only reside in one location. This configuration requires north-south, multi-cluster load balancing to send client traffic to the correct cluster in that location. You also need east-west, multi-cluster load balancing to send traffic between clusters to reach the stateful components.
This page uses the Online Boutique cloud microservices demo application to demonstrate a multi-cluster pattern that can be used to enhance the deployment of the single zone demo. You start with a single-zone version of the application. You then add elements of high availability and resilience by using multi-cluster Services and multi-cluster Gateways, and reduce operational toil by taking advantage of Autopilot.
Initial single-cluster deployment
In the following diagram, the Online Boutique application is initially deployed
to a single GKE Standard mode cluster named
std-west, and is exposed by using a LoadBalancer Service:

Migrate to multi-cluster Services
In the next intermediate step, you create two additional clusters, and the stateless services are deployed in additional regions. You create two GKE Autopilot clusters named auto-east and auto-central in two separate regions distinct from the single std-west GKE Standard cluster, and register the clusters to the Google Cloud fleet.
Fleets are a Google Cloud concept for logically organizing clusters and other resources, and let you use and manage multi-cluster capabilities and apply consistent policies across your systems.
You export the cartservice on the std-west cluster in the onlineboutique
namespace to the new fleet clusters by using
ServiceExport.
You deploy Online Boutique's frontend Service on all three clusters and expose
it through a
ClusterIP
service. You then export the service to the fleet using ServiceExports.
Services such as the middleware layer of the Online Boutique (like
productcatalog, shipping, and adservice) are also deployed to all three
clusters.
A Pod that runs in any cluster in the fleet can access an exported Service
by sending a request to the ClusterSet URI for that service. The request
routes to an endpoint that backs the service.
The frontend Service is able to consume the middleware services (such as productcatalogservice or currencyservice) locally in the same cluster. This architecture helps keep incoming requests local to the regions whose frontend responds to the request, and avoids unnecessary inter-region network traffic charges.
The following diagram illustrates the two multi-cluster Services. The stateless
frontend Service is deployed to three clusters, and the stateful backend
cartservice is deployed to one cluster. The diagram also shows that in this
intermediate step, inbound traffic for the frontend service remains routed to
the original GKE Standard cluster in us-west1
using an external passthrough Network Load Balancer created by the frontend-external
LoadBalancer Service:

Migrate to multi-cluster Gateway
In the final step, you route inbound traffic for the frontend Service from external client requests to services in multiple clusters in the fleet using a multi-cluster Gateway.
A fourth cluster named config-central is added to the fleet to host and manage
the configuration for the
Gateway
and
HTTPRoute
resources that are created as part of this configuration. The HTTPRoute
resource maps the / prefix to the frontend
ServiceImport.
Traffic for the Online Boutique's frontend is sent to a healthy
endpoint in one of the available regions. This approach adds elements of high
availability to the Online Boutique application architecture.
In the following diagram, the multi-cluster Gateway deploys a Global Cloud Load Balancer that routes external traffic to the stateless frontend Service deployed on each of the three application clusters in the fleet.

In the final state, this opinionated pattern demonstrates loose coupling between the stateful (cartservice and redis-cart) and stateless portions of the application (frontend, emailservice, checkoutservice, recommendationservice, paymentservice, productcatalogservice, currencyservice, shippingservice, and adservice). While outside the scope of this page, this approach gives you a future opportunity to add resilience and high availability to the stateful services layer.
Objectives
- Create and configure GKE Standard and Autopilot clusters.
- Deploy Online Boutique to a zonal GKE Standard cluster.
- Export multi-cluster
Services. - Deploy manifests to Standard and Autopilot clusters.
- Enable and configure multi-cluster Gateways.
- Test multi-region application behavior.
Costs
In this document, you use the following billable components of Google Cloud:
To generate a cost estimate based on your projected usage,
use the pricing calculator.
Before you begin
Security constraints defined by your organization might prevent you from completing the following steps. For troubleshooting information, see Develop applications in a constrained Google Cloud environment.
Before you begin, ensure you have the following requirements met:
- It is recommended that you use a new project for this guide, as the easiest way to clean up is to delete the project once you are finished.
- This guide assumes you have the Owner IAM role for your Google Cloud project. For production or real-world settings, it is best practice to scope permissions to least privilege. For more information, see Using IAM securely and Verify every access attempt explicitly.
- Familiarize yourself with the Online Boutique microservices demo application architecture.
Prepare the environment
In this guide, you use Cloud Shell to enter commands. Cloud Shell gives you access to the command line in the Google Cloud console and includes Google Cloud SDK and other tools, such as the Google Cloud CLI. Cloud Shell appears as a window at the bottom of the Google Cloud console. It can take several minutes to initialize, but the window appears immediately.
In the Google Cloud console, activate Cloud Shell.
In Cloud Shell, define environment variables used in this guide. Replace PROJECT_ID with your own project ID:
export PROJECT=PROJECT_ID
gcloud config set project ${PROJECT}
Enable the services required for the steps on this page:
gcloud services enable \
    gkehub.googleapis.com \
    multiclusteringress.googleapis.com \
    dns.googleapis.com \
    trafficdirector.googleapis.com \
    cloudresourcemanager.googleapis.com \
    multiclusterservicediscovery.googleapis.com \
    container.googleapis.com

gcloud container fleet multi-cluster-services enable
Multi-cluster Services manages Google Cloud components like Cloud DNS, firewall rules, and Cloud Service Mesh, so these APIs must also be enabled. For more information, see Cloud Service Mesh overview.
The output is similar to the following example:
Operation "operations/acf.p2-822685001869-ee4ebe78-6dd8-465e-b0fd-3b0e5f964bad"
finished successfully.

Waiting for Feature Multi-cluster Services to be created...done.
Verify that multi-cluster Services shows the ACTIVE state:
gcloud container fleet multi-cluster-services describeThe output is similar to the following example:
createTime: '2021-11-30T21:59:25.245190894Z'
name: projects/PROJECT_ID/locations/global/features/multiclusterservicediscovery
resourceState:
  state: ACTIVE
spec: {}
updateTime: '2021-11-30T21:59:27.459063070Z'
If the value of state is not ACTIVE, see the multi-cluster services troubleshooting details.
Create and configure GKE clusters
To demonstrate the multi-cluster pattern in this guide, you use three application clusters in three separate cloud regions, and one cluster to host the configuration for Gateway resources. You register all clusters with the fleet associated with your project. A Google Cloud project can only have a single fleet associated with it. This project is known as the fleet host project.
Create Standard and Autopilot GKE clusters:
gcloud container clusters create std-west \
    --location us-west1-a \
    --num-nodes=6 \
    --enable-ip-alias \
    --release-channel regular \
    --workload-pool=${PROJECT}.svc.id.goog \
    --async

gcloud container clusters create-auto auto-east \
    --location us-east1 \
    --release-channel regular \
    --async

gcloud container clusters create-auto auto-central \
    --location us-central1 \
    --release-channel regular \
    --async

gcloud container clusters create config-central \
    --location us-central1 \
    --num-nodes=1 \
    --enable-ip-alias \
    --release-channel regular \
    --workload-pool=${PROJECT}.svc.id.goog \
    --async
Workload Identity Federation for GKE is enabled by default on GKE Autopilot clusters so you don't have to use the
--workload-poolflag when you create those clusters like you do with the GKE Standard clusters.Wait for the clusters' STATUS to change from PROVISIONING to RUNNING. This process can take up to 10 minutes. You can monitor the progress by using a watch loop:
watch -n 20 --difference=permanent "gcloud container clusters list"The output is similar to the following example:
NAME: auto-central
LOCATION: us-central1
MASTER_VERSION: 1.21.5-gke.1802
MASTER_IP: 107.178.213.138
MACHINE_TYPE: e2-medium
NODE_VERSION: 1.21.5-gke.1802
NUM_NODES: 3
STATUS: PROVISIONING

NAME: config-central
LOCATION: us-central1
MASTER_VERSION: 1.21.5-gke.1802
MASTER_IP:
MACHINE_TYPE: e2-medium
NODE_VERSION: 1.21.5-gke.1802
NUM_NODES: 9
STATUS: PROVISIONING

NAME: auto-east
LOCATION: us-east1
MASTER_VERSION: 1.21.5-gke.1802
MASTER_IP: 35.229.88.209
MACHINE_TYPE: e2-medium
NODE_VERSION: 1.21.5-gke.1802
NUM_NODES: 3
STATUS: PROVISIONING

NAME: std-west
LOCATION: us-west1-a
MASTER_VERSION: 1.21.5-gke.1802
MASTER_IP: 35.197.93.113
MACHINE_TYPE: e2-medium
NODE_VERSION: 1.21.5-gke.1802
NUM_NODES: 6
STATUS: PROVISIONING
After all the clusters are in the RUNNING state, press
CTRL-Cto interrupt the command.Add an Identity and Access Management (IAM) policy binding granting the fleet host project MCS service account the Network User role for its own project:
gcloud projects add-iam-policy-binding ${PROJECT} \
    --member "serviceAccount:${PROJECT}.svc.id.goog[gke-mcs/gke-mcs-importer]" \
    --role "roles/compute.networkViewer"
You use Workload Identity Federation for GKE to grant the MCS service read access to your project VPC network configuration. As a result, the fleet host project's MCS Importer GKE service account needs this role.
The output is similar to the following example:
- members:
  - serviceAccount:PROJECT_ID.svc.id.goog[gke-mcs/gke-mcs-importer]
  role: roles/compute.networkViewer
[...]
Register the GKE Standard and Autopilot clusters to your project's fleet. See Registering a cluster for more details. This step can take up to 5 minutes:
gcloud container fleet memberships register std-west \
    --gke-cluster us-west1-a/std-west \
    --enable-workload-identity \
    --project=${PROJECT}

gcloud container fleet memberships register auto-east \
    --gke-cluster us-east1/auto-east \
    --enable-workload-identity \
    --project=${PROJECT}

gcloud container fleet memberships register auto-central \
    --gke-cluster us-central1/auto-central \
    --enable-workload-identity \
    --project=${PROJECT}

gcloud container fleet memberships register config-central \
    --gke-cluster us-central1/config-central \
    --enable-workload-identity \
    --project=${PROJECT}
For each command, the output is similar to the following example:
Waiting for membership to be created...done.
Created a new membership [projects/PROJECT_ID/locations/global/memberships/std-west] for the cluster [std-west]
Generating the Connect Agent manifest...
Deploying the Connect Agent on cluster [std-west] in namespace [gke-connect]...
Deployed the Connect Agent on cluster [std-west] in namespace [gke-connect].
Finished registering the cluster [std-west] with the Hub.
Connect to the clusters and generate kubeconfig entries:
gcloud container clusters get-credentials std-west \
    --location us-west1-a --project $PROJECT

gcloud container clusters get-credentials auto-east \
    --location us-east1 --project $PROJECT

gcloud container clusters get-credentials auto-central \
    --location us-central1 --project $PROJECT

gcloud container clusters get-credentials config-central \
    --location us-central1 --project $PROJECT
For each command, the output is similar to the following example:
Fetching cluster endpoint and auth data.
kubeconfig entry generated for std-west.
Rename contexts for clusters so that they are easier to work with in the rest of this page:
kubectl config rename-context \
    gke_${PROJECT}_us-west1-a_std-west \
    std-west

kubectl config rename-context \
    gke_${PROJECT}_us-east1_auto-east \
    auto-east

kubectl config rename-context \
    gke_${PROJECT}_us-central1_auto-central \
    auto-central

kubectl config rename-context \
    gke_${PROJECT}_us-central1_config-central \
    config-central
In this guide, the contexts are named based on their location. Although you can provide alternate names, the remaining steps in this guide use the names used in this step.
Deploy Online Boutique on GKE Standard
In the first step of the demonstration deployment, you deploy the full set of Online Boutique application services to the single GKE Standard cluster std-west in us-west1.
Create the namespace onlineboutique on std-west:
kubectl create namespace onlineboutique --context std-westThe output is similar to the following example:
namespace/onlineboutique createdClone the Online Boutique GitHub repository and set up a WORKDIR variable:
cd ~

git clone --branch release/v0.4.1 \
    https://github.com/GoogleCloudPlatform/microservices-demo.git

cd microservices-demo/release && export WORKDIR=`pwd`
Deploy Online Boutique on std-west. This process creates
DeploymentsandServicesfor all of Online Boutique's microservices, and includes a LoadBalancer type Service which externally exposes Online Boutique's frontend service:cd $WORKDIR kubectl apply -f kubernetes-manifests.yaml \ -n onlineboutique --context=std-westWait for the
LoadBalancerService to get an external IP:watch -n 20 --difference=permanent \ "kubectl get svc frontend-external -n onlineboutique --context=std-west"Initially, the output is similar to the following example:
NAME                TYPE           CLUSTER-IP   EXTERNAL-IP   PORT(S)        AGE
frontend-external   LoadBalancer   10.60.5.62   <pending>     80:30359/TCP   43s
When the
Serviceis ready the EXTERNAL-IP column displays the public IP address of the load balancer.After the
Serviceis ready, get the external IP address of the load balancer and use curl to verify that the frontend is ready. If this curl command returns an error, wait a few moments before you try again:curl $(kubectl get svc frontend-external \ -n onlineboutique --context=std-west \ -o=jsonpath="{.status.loadBalancer.ingress[0].ip}") | \ grep -e Cluster -e Zone -e PodThe successful output of the curl command is similar to the following example:
<b>Cluster: </b>std-west<br/>
<b>Zone: </b>us-west1-a<br/>
<b>Pod: </b>frontend-b7bddcc97-wdjsk
You now have a single-zone version of Online Boutique running in us-west1-a.
You can also use a web browser to navigate to the external IP assigned to the
frontend-external LoadBalancer Service to access the application and observe
its behavior. This initial single deployment is shown in the following diagram:
Export cartservice as a multi-cluster Service
In this section, you start to add elements of high availability to the application. You export the backend cartservice as a multi-cluster Service to the GKE Autopilot clusters.
Create the namespace onlineboutique on the remaining clusters:
kubectl create namespace onlineboutique --context auto-east

kubectl create namespace onlineboutique --context auto-central

kubectl create namespace onlineboutique --context config-central
For each command, the output is similar to the following example:
namespace/onlineboutique createdExport cartservice from the std-west cluster to all other clusters in the
ClusterSet. TheServiceExportobject registers the cartservice Service, with GKE multi-cluster Services, for export to all clusters in the fleet that have the namespace onlineboutique present. For more details, see registering a service for export.cat <<EOF>> $WORKDIR/cartservice-export.yaml kind: ServiceExport apiVersion: net.gke.io/v1 metadata: namespace: onlineboutique name: cartservice EOF kubectl apply -f $WORKDIR/cartservice-export.yaml \ -n onlineboutique --context=std-west
Apply application manifests for multi-cluster pattern
In this section you apply two curated manifests to deploy the multi-cluster pattern. These manifests contain selected portions of the kubernetes-manifests.yaml that you previously applied to the std-west cluster:
- The first manifest is used for the frontend
Deployment,Service, andServiceExport. - The second manifest is used to deploy the middleware
Services(emailservice, checkoutservice, recommendationservice, paymentservice, productcatalogservice, currencyservice, shippingservice, and adservice) to all regions that have a frontend running. By keeping a request local to a region for as long as possible, you avoid unnecessary inter-region network traffic charges.
A Pod that runs in any cluster in the fleet can access an exported Service
by sending a request to the ClusterSet URI for that service in the format
SERVICE_NAME.NAMESPACE.svc.clusterset.local. For example, the frontend
Deployments in all three example clusters are able to consume the
cartservice, in the onlineboutique namespace, by making a request to
cartservice.onlineboutique.svc.clusterset.local.
For this reason, in each manifest, the hostname for the cartservice has been
updated to its ClusterSet URI. This step is critical. If this service hostname
is not updated, the frontend Service would ask kube-dns for cartservice
instead of cartservice.onlineboutique.svc.clusterset.local. This behavior
would result in HTTP Status 500 errors on clusters where a local version of
cartservice is not available, and cause the frontend pods to be unhealthy.
Set an environment varianble for the GitHub repository that contains the manifests:
export MANIFEST_REPO_PATH=https://raw.githubusercontent.com/GoogleCloudPlatform/gke-networking-recipes/master/gateway/docs/cluster-migrationApply the manifests to deploy the frontend layer to all three workload clusters:
kubectl apply -f ${MANIFEST_REPO_PATH}/onlineboutique-frontend-manifests.yaml \
    -n onlineboutique --context=std-west

kubectl apply -f ${MANIFEST_REPO_PATH}/onlineboutique-frontend-manifests.yaml \
    -n onlineboutique --context=auto-east

kubectl apply -f ${MANIFEST_REPO_PATH}/onlineboutique-frontend-manifests.yaml \
    -n onlineboutique --context=auto-central
Apply the manifests to deploy the middleware layer to all three workload clusters:
kubectl apply -f ${MANIFEST_REPO_PATH}/onlineboutique-middleware-manifests.yaml \
    -n onlineboutique --context=std-west

kubectl apply -f ${MANIFEST_REPO_PATH}/onlineboutique-middleware-manifests.yaml \
    -n onlineboutique --context=auto-east

kubectl apply -f ${MANIFEST_REPO_PATH}/onlineboutique-middleware-manifests.yaml \
    -n onlineboutique --context=auto-central
You now have the frontend Deployment, Service, and ServiceExport active
in clusters std-west, auto-east, and auto-central. You also have locally
running Online Boutique middleware services in each cluster. However, external
traffic is still routed only to the Service that runs in the initial cluster
in us-west1, as shown in the following diagram:
Enable and configure multi-cluster Gateways
In this section, you route traffic to and load balance external traffic across frontends in all three clusters. To achieve this configuration, you use multi-cluster Gateways (MCG). These steps to set up MCG follow the guidance described in more detail on Enabling multi-cluster Gateways.
In these steps, you use the config-central cluster to host the configuration for Gateway resources.
Confirm that all clusters have successfully registered to the fleet:
gcloud container fleet memberships list --project=$PROJECTThe following example output shows that all the clusters are successfully registered:
NAME: auto-central
EXTERNAL_ID: 21537493-32ea-4a41-990d-02be2c1b319f

NAME: config-central
EXTERNAL_ID: 4369423e-ea7b-482d-a0eb-93b560e67b98

NAME: std-west
EXTERNAL_ID: 7fcb048b-c796-476b-9698-001a00f91ab3

NAME: auto-east
EXTERNAL_ID: aae2d2ff-b861-4a38-bcaf-612f14810012
Install the Gateway API custom resource definition on the config-central cluster:
kubectl --context=config-central kustomize "github.com/kubernetes-sigs/gateway-api/config/crd?ref=v0.5.0" \
    | kubectl apply -f -
This step installs the Gateway API custom resource definitions including the
GatewayClass,Gateway, andHTTPRouteresources. The custom resource definitions are maintained by the Kubernetes Network Special Interest Group. Once installed, you can use the GKE Gateway controller.Enable Multi Cluster Ingress for your fleet if you haven't done so already. Enabling this feature also enables the multi-cluster Gateway controller.
gcloud container fleet ingress enable \
    --config-membership=config-central \
    --project=$PROJECT

gcloud container fleet ingress describe --project=$PROJECT
The output is similar to the following example:
createTime: '2021-12-08T23:10:52.505888854Z'
name: projects/PROJECT_ID/locations/global/features/multiclusteringress
resourceState:
  state: ACTIVE
spec:
  multiclusteringress:
    configMembership: projects/zl-mcs-expf61cbd13/locations/global/memberships/config-central
state:
  state:
    code: OK
    description: Ready to use
    updateTime: '2021-12-08T23:11:37.994971649Z'
updateTime: '2021-12-08T23:11:38.098244178Z'
If the value of state is not ACTIVE, see Troubleshooting and operations for Multi Cluster Ingress.
Confirm that
GatewayClassesare available on the config-central cluster:kubectl get gatewayclasses --context=config-centralThe output is similar to the following example:
NAME                                  CONTROLLER                  AGE
gke-l7-global-external-managed        networking.gke.io/gateway   18s
gke-l7-global-external-managed-mc     networking.gke.io/gateway   19s
gke-l7-regional-external-managed      networking.gke.io/gateway   18s
gke-l7-regional-external-managed-mc   networking.gke.io/gateway   19s
gke-l7-gxlb                           networking.gke.io/gateway   74s
gke-l7-gxlb-mc                        networking.gke.io/gateway   16s
gke-l7-rilb                           networking.gke.io/gateway   74s
gke-l7-rilb-mc                        networking.gke.io/gateway   16s
Different
GatewayClassresources have different capabilities. For more information on when to use which type, see GatewayClass capabilities.Deploy the
external-httpGateway resource toconfig-central:cat <<EOF>> $WORKDIR/external-http-gateway.yaml kind: Gateway apiVersion: gateway.networking.k8s.io/v1 metadata: name: external-http namespace: onlineboutique spec: gatewayClassName: gke-l7-global-external-managed-mc listeners: - protocol: HTTP port: 80 name: http EOF kubectl apply -f external-http-gateway.yaml \ -n onlineboutique --context=config-centralAs indicated by the
gatewayClassNamefield, this resource is ofGatewayClassgke-l7-global-external-managed-mc which manages Layer 7 external Cloud Load Balancing and exposes the multi-cluster applicationDeploy the
HTTPRoutenamed public-frontend-route on config-central:cat <<EOF>> $WORKDIR/public-frontend-route.yaml kind: HTTPRoute apiVersion: gateway.networking.k8s.io/v1 metadata: name: public-frontend-route namespace: onlineboutique spec: parentRefs: - name: "external-http" hostnames: - "store.example.com" rules: - matches: - path: type: PathPrefix value: / backendRefs: - name: frontend group: net.gke.io kind: ServiceImport port: 80 EOF kubectl apply -f public-frontend-route.yaml \ -n onlineboutique --context=config-centralWhen you deploy the
HTTPRouteresource it creates an external Layer 7 Cloud Load Balancing resource and exposes the frontendServiceImportbacked by the frontend services that run in the std-west, auto-east, and auto-central clusters.The following diagram shows how, after the multi-cluster Gateway is deployed, traffic can be routed to any of the frontend multi-cluster Services on any of the three application clusters:
Wait for the load balancer to be ready with a provisioned external IP address before proceeding to the next step. It can take up to 10 minutes for the IP address to be assigned. You can monitor progress by using a watch loop. The load balancer has a name in the pattern like gkemcg-onlineboutique-external-http-k09mfhk74gop:
watch -n 20 --difference=permanent \
    "gcloud compute forwarding-rules list \
        | grep -A 5 NAME..*external-http"
The output is similar to the following example:
NAME: gkemcg-onlineboutique-external-http-k09mfhk74gop
REGION:
IP_ADDRESS: 34.149.29.176
IP_PROTOCOL: TCP
TARGET: gkemcg-onlineboutique-external-http-k09mfhk74gop
Once the load balancer is ready, run the following command in Cloud Shell to export the external IP address of the load balancer created through the application of external-http-gateway.yaml and public-frontend-route.yaml manifests:
export EXTERNAL_LB_IP=$(kubectl --context=config-central \
                            -n onlineboutique get gateway external-http \
                            -o=jsonpath='{.status.addresses[0].value}')
When you send a request to the load balancer with the appropriate headers, it returns the HTML contents served by the frontend service. For example, since you configured the
HTTPRouteresource to map thestore.example.comhostname to the frontendServiceImport, you must supply theHOSTheader when you make the HTTP request. If the following curl example returns an error, wait a few minutes and try again:curl -H 'HOST: store.example.com' $EXTERNAL_LB_IP | \ grep -e Cluster -e Zone -e PodThe successful output of the curl command is similar to the following example:
<b>Cluster: </b>auto-central<br/>
<b>Zone: </b>us-central1-f<br/>
<b>Pod: </b>frontend-7c7d596ddc-jdh8f
Test application multi-region routing behavior
One of the powerful features obtained by using multi-cluster Services and multi-cluster Gateways is that external requests are routed to the geographically closest cluster.
To test application multi-region behavior, generate traffic that originates from
the various regions where you have clusters deployed. Create three small pods,
one in each of the serving clusters (std-west, auto-east, and
auto-central), that you can use to send HTTP requests to the load balancer
endpoint. The results let you see which frontend Pod responds.
Create the client pods:
kubectl run --context=std-west \
            --image=radial/busyboxplus:curl client-west \
            -- sh -c 'while sleep 3600; do :; done'

kubectl run --context=auto-east \
            --image=radial/busyboxplus:curl client-east \
            -- sh -c 'while sleep 3600; do :; done'

kubectl run --context=auto-central \
            --image=radial/busyboxplus:curl client-central \
            -- sh -c 'while sleep 3600; do :; done'
After the pods are running, use a curl command to send a request to the load balancer endpoint from the client
Podin the std-west cluster and review the response:kubectl exec -it --context=std-west client-west \ -- curl -H 'HOST: store.example.com' $EXTERNAL_LB_IP | \ grep -e Cluster -e Zone -e PodThe successful output of the curl command is similar to the following example:
<b>Cluster: </b>std-west<br/>
<b>Zone: </b>us-west1-a<br/>
<b>Pod: </b>frontend-7cf48b79cf-trzc4
Run the same curl request from the client
Podin the auto-east cluster, and look at the response:kubectl exec -it --context=auto-east client-east \ -- curl -H 'HOST: store.example.com' $EXTERNAL_LB_IP | \ grep -e Cluster -e Zone -e PodThe successful output of the curl command is similar to the following example:
<b>Cluster: </b>auto-east<br/>
<b>Zone: </b>us-east1-d<br/>
<b>Pod: </b>frontend-6784b6df98-scdws
As this is an Autopilot cluster, the cluster may need to provision additional resources to schedule the
Pod. If you see output similar to the following example, wait a moment and try again:Error from server (BadRequest): pod client-east does not have a host assignedRun the curl from the client
Podin the auto-central cluster and check the response:kubectl exec -it --context=auto-central client-central \ -- curl -H 'HOST: store.example.com' $EXTERNAL_LB_IP | \ grep -e Cluster -e Zone -e PodThe successful output of the curl command is similar to the following example:
<b>Cluster: </b>auto-central<br/>
<b>Zone: </b>us-central1-b<br/>
<b>Pod: </b>frontend-6784b6df98-x2fv4
These results confirm that traffic routes to the corresponding pods in the locations closest to request origin.
Test application multi-region resiliency
In addition to efficient traffic routing, running your services in multiple regions provides resiliency in the rare, yet still possible, case of infrastructure failure.
Test the behavior by deleting the frontend Deployments in specific clusters
and then retry the curl command from the client Pod in those regions. Observe
that the application is still available, and look at the location of the Pod
that responds to the request.
Run the curl command from the client-west
Podin the std-west cluster, and see that the result comes from the frontend in us-west1:kubectl exec -it --context=std-west client-west \ -- curl -H 'HOST: store.example.com' $EXTERNAL_LB_IP | \ grep -e Cluster -e Zone -e PodThe successful output of the curl command is similar to the following example:
<b>Cluster: </b>std-west<br/>
<b>Zone: </b>us-west1-a<br/>
<b>Pod: </b>frontend-7cf48b79cf-trzc4
Delete the frontend
Deploymentin the std-west cluster:kubectl delete deploy frontend \ -n onlineboutique --context=std-westThe output is similar to the following example:
deployment.apps "frontend" deletedSend another request from the client-west
Podin the std-west cluster. You should see a response from one of the remaining frontendDeploymentslocated in the auto-east or auto-central clusters:kubectl exec -it --context=std-west client-west \ -- curl -H 'HOST: store.example.com' $EXTERNAL_LB_IP | \ grep -e Cluster -e Zone -e PodOutput similar to the following example indicates the location of the healthy
Podthat responds to this request:<b>Cluster: </b>auto-central<br/> <b>Zone: </b>us-central1-b<br/> <b>Pod: </b>frontend-6784b6df98-x2fv4or
<b>Cluster: </b>auto-east<br/>
<b>Zone: </b>us-east1-d<br/>
<b>Pod: </b>frontend-6784b6df98-scdws
Run the command several times to see alternating results.
With this demonstration deployment, you have added elements of resiliency and geographic distribution to the Online Boutique application using multi-cluster Services and multi-cluster Gateways. Requests are routed to the closest geographical region and even if the frontend or middleware services in a region experience issues, the end user is still able to successfully use the application.
Clean up
To avoid incurring charges to your Google Cloud account for the resources used in this tutorial, either delete the project that contains the resources, or keep the project and delete the individual resources.
- In the Google Cloud console, go to the Manage resources page.
- In the project list, select the project that you want to delete, and then click Delete.
- In the dialog, type the project ID, and then click Shut down to delete the project.
What's next
- Read more about Google Cloud fleet and multi-cluster management.
- Learn about how to register a cluster, including GKE clusters, to a Google Cloud fleet.
- Dive deeper into the Kubernetes Gateway API and the GKE Gateway.
- Explore reference architectures, diagrams, and best practices about Google Cloud. Take a look at our Cloud Architecture Center.