本文說明如何為使用 Agent Development Kit (ADK) 架構建構的 AI 代理程式進行插樁。這項儀表化作業採用 OpenTelemetry,可讓您收集使用者提示、代理程式回應和代理程式選項。
ADK 架構本身會使用 OpenTelemetry 擷取代理程式執行期間重要步驟的遙測資料。這項功能可提供立即可用的應用程式觀測功能。不過,這種可觀測性可能不足以滿足應用程式的使用案例。您可以使用 OpenTelemetry 新增其他檢測程式庫,從應用程式的其他部分擷取遙測資料,也可以使用自訂檢測功能擷取應用程式專屬資料,進一步提升可觀測性。
舉例來說,您可以在應用程式中編寫檢測程式碼,以執行下列操作:
- 追蹤代理程式叫用工具的資源用量。
- 追蹤應用程式專屬的驗證失敗、業務規則違規或自訂錯誤復原機制。
- 根據領域專屬條件追蹤專員回覆的品質分數。
檢測生成式 AI 應用程式,收集遙測資料
如要為 AI 代理程式進行檢測,以收集記錄、指標和追蹤記錄資料,請執行下列操作:
本節的其餘部分會說明上述步驟。
安裝 OpenTelemetry 套件
新增下列 OpenTelemetry 檢測和匯出工具套件:
pip install 'opentelemetry-instrumentation-google-genai' \
  'opentelemetry-instrumentation-sqlite3' \
  'opentelemetry-exporter-gcp-logging' \
  'opentelemetry-exporter-gcp-monitoring' \
  'opentelemetry-exporter-otlp-proto-grpc' \
  'opentelemetry-instrumentation-vertexai>=2.0b0'
記錄和指標資料會透過 Cloud Logging API 或 Cloud Monitoring API 傳送至 Google Cloud 專案。opentelemetry-exporter-gcp-logging 和 opentelemetry-exporter-gcp-monitoring 程式庫會叫用這些 API 中的端點。
追蹤資料會使用支援 OTLP 格式的遙測 (OTLP) API 傳送至 Google Cloud 。透過這個端點收到的資料也會以 OTLP 格式儲存。opentelemetry-exporter-otlp-proto-grpc 程式庫會叫用遙測 (OTLP) API 端點。
設定 OpenTelemetry,收集及傳送遙測資料
在 ADK 代理程式的初始化程式碼中,新增程式碼來設定 OpenTelemetry,以擷取遙測資料並傳送至 Google Cloud 專案:
如要查看完整範例,請按一下「更多」圖示 more_vert,然後選取「在 GitHub 上查看」。
編寫自訂進入點,以使用已設定的 OpenTelemetry
如要使用 OpenTelemetry 進行插樁,請為 ADK 應用程式建立自訂進入點。自訂進入點必須先設定 OpenTelemetry,才能啟動 ADK 代理程式。
在範例應用程式中,main 方法會做為自訂進入點,初始化 OpenTelemetry,然後啟動 FastAPI 伺服器,讓您與代理程式互動。
如要查看完整範例,請按一下「更多」圖示 more_vert,然後選取「在 GitHub 上查看」。
下載並執行範例應用程式
這個範例程式碼實作了使用 ADK 建構的生成式 AI 代理程式。代理程式會使用 OpenTelemetry 進行檢測,並設定為將指標、追蹤記錄和記錄檔傳送至您的 Google Cloud 專案。傳送至專案的遙測資料包括生成式 AI 提示和回覆。
ADK 服務專員
生成式 AI 代理程式定義為 SQL 專家,可完整存取暫時性 SQLite 資料庫。這個代理程式是使用代理程式開發套件建構而成,並透過 SQLDatabaseToolkit 存取資料庫。資料庫一開始是空的。
事前準備
-
In the Google Cloud console, activate Cloud Shell.
At the bottom of the Google Cloud console, a Cloud Shell session starts and displays a command-line prompt. Cloud Shell is a shell environment with the Google Cloud CLI already installed and with values already set for your current project. It can take a few seconds for the session to initialize.
-
Enable the Vertex AI, Telemetry, Cloud Logging, Cloud Monitoring, and Cloud Trace APIs.
-
如要取得範例應用程式寫入記錄、指標和追蹤資料所需的權限,請要求管理員為您授予專案的下列 IAM 角色:
-
Cloud 遙測資料追蹤記錄寫入者 (
roles/telemetry.tracesWriter) -
記錄寫入者 (
roles/logging.logWriter) -
Monitoring 指標寫入者 (
roles/monitoring.metricWriter) -
Vertex AI 使用者 (
roles/aiplatform.user)
-
Cloud 遙測資料追蹤記錄寫入者 (
-
In the Google Cloud console, activate Cloud Shell.
At the bottom of the Google Cloud console, a Cloud Shell session starts and displays a command-line prompt. Cloud Shell is a shell environment with the Google Cloud CLI already installed and with values already set for your current project. It can take a few seconds for the session to initialize.
複製存放區:
git clone https://github.com/GoogleCloudPlatform/opentelemetry-operations-python.git前往範例目錄:
cd opentelemetry-operations-python/samples/adk-sql-agent建立虛擬環境並執行範例:
python -m venv venv/
source venv/bin/activate
pip install -r requirements.txt
env $(cat opentelemetry.env | xargs) python main.py
應用程式會顯示類似以下的訊息:
Appplication startup complete
Uvicorn running on http://0.0.0.0:8080
如要與代理程式互動,請開啟瀏覽器,前往上一個步驟中列出的位址。
展開「選取服務專員」,然後從服務專員清單中選取
sql_agent。-
記錄檢視器 (
roles/logging.viewer) -
監控檢視器 (
roles/monitoring.viewer) -
Cloud Trace 使用者 (
roles/cloudtrace.user) -
前往 Google Cloud 控制台的「Trace Explorer」頁面:
您也可以透過搜尋列找到這個頁面。
在工具列中,依序選取「新增篩選器」和「範圍名稱」,然後選取
call_llm。下圖顯示篩選資料後的「Trace Explorer」頁面:
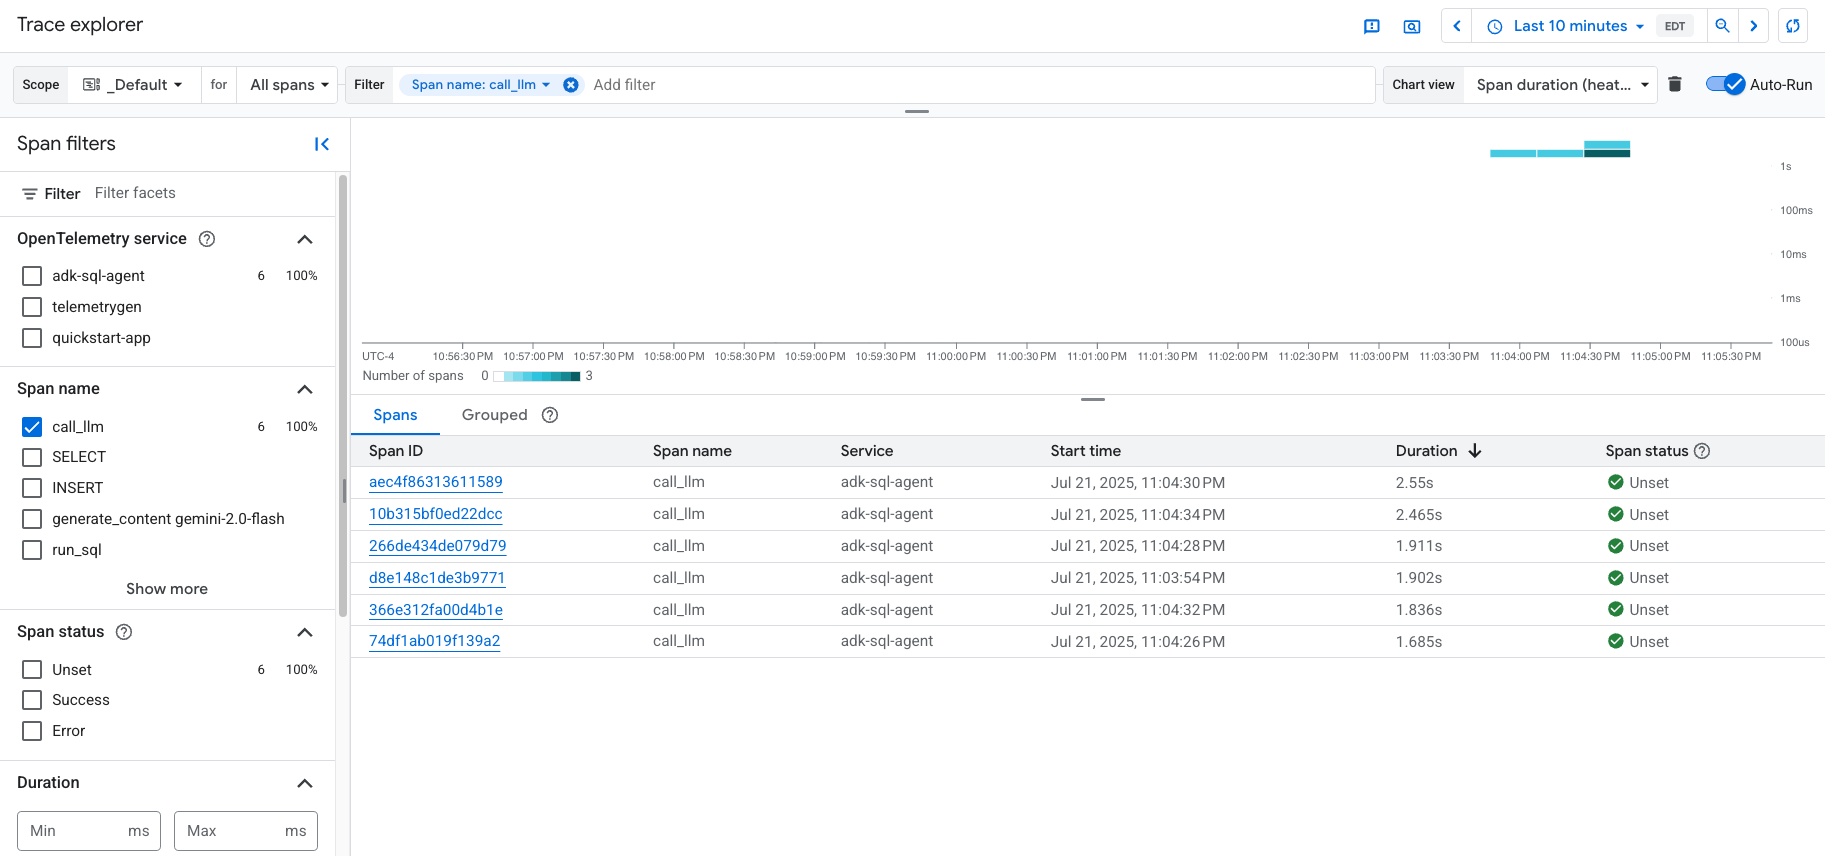
如果您從未使用過 Cloud Trace,Google Cloud Observability 就需要建立資料庫來儲存追蹤資料。建立資料庫可能需要幾分鐘,這段期間無法查看任何追蹤資料。
如要探索時距和記錄檔資料,請在「Spans」(時距) 表格中選取時距。
「詳細資料」頁面隨即開啟。這個頁面會顯示相關聯的追蹤記錄及其範圍。頁面上的表格會顯示所選時間範圍的詳細資訊。這類資訊包括:
「生成式 AI」GenAI分頁會顯示生成式 AI 代理的事件。 如要進一步瞭解這些事件,請參閱「查看生成式 AI 事件」一文。
下圖顯示追蹤記錄,其中一個範圍的名稱為
call_llm。該範圍會叫用為這個代理程式提供支援的 LLM (大型語言模型)。在本範例中,這是指 Gemini。 Gemini 時距包含生成式 AI 事件: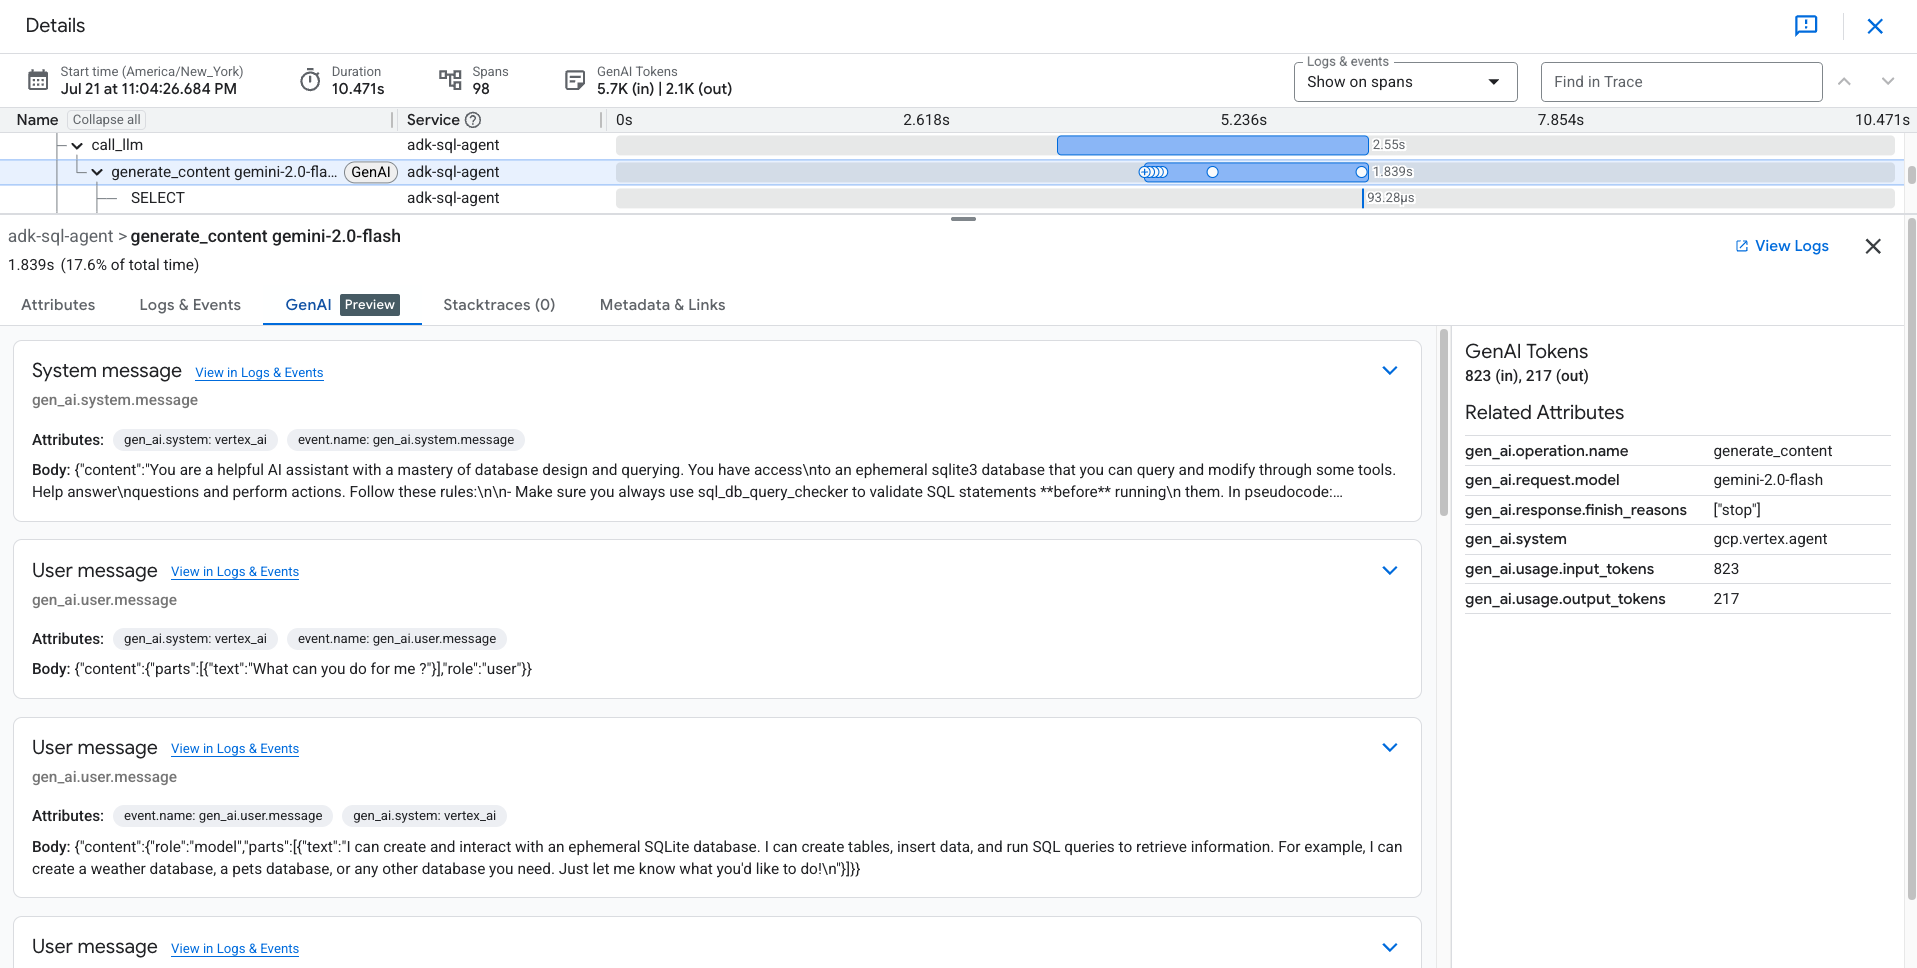
「記錄和事件」分頁會列出與時距相關聯的記錄項目和事件。如要在記錄檔探索工具中查看記錄資料,請在這個分頁的工具列中選取「查看記錄」。
記錄資料包括
sql_agent的回應。舉例來說,在範例執行中,JSON 酬載包含下列內容:{ "logName": "projects/my-project/logs/otel_python_inprocess_log_name_temp", "jsonPayload": { "content": { "role": "model", "parts": [ { "executable_code": null, "inline_data": null, "thought": null, "video_metadata": null, "code_execution_result": null, "function_response": null, "thought_signature": null, "text": "Okay, I will create a table named `weather` with columns `id`, `city`, `temperature`, and `date`. Then I will insert some sample rows into the table and display all the data in the table.\n", "file_data": null, "function_call": null } ] } }, ... }
啟動應用程式
如要啟動範例應用程式,請按照下列步驟操作:
與服務專員互動
如要與代理程式互動,請提問或下達指令。舉例來說,您可以提出下列問題:
What can you do for me ?
同樣地,由於 sql_agent 的角色是 SQL 專家,您可以要求它為應用程式建立資料表,並編寫查詢來操作所建立的資料表。代理程式只能建立由 .db 檔案支援的暫時性資料庫,該檔案是在執行應用程式的機器上建立。
以下說明 sql_agent 與使用者之間的互動範例:
Create a table for me to store weather data and also insert sample data in
the table. At the end show all data in the table you created.
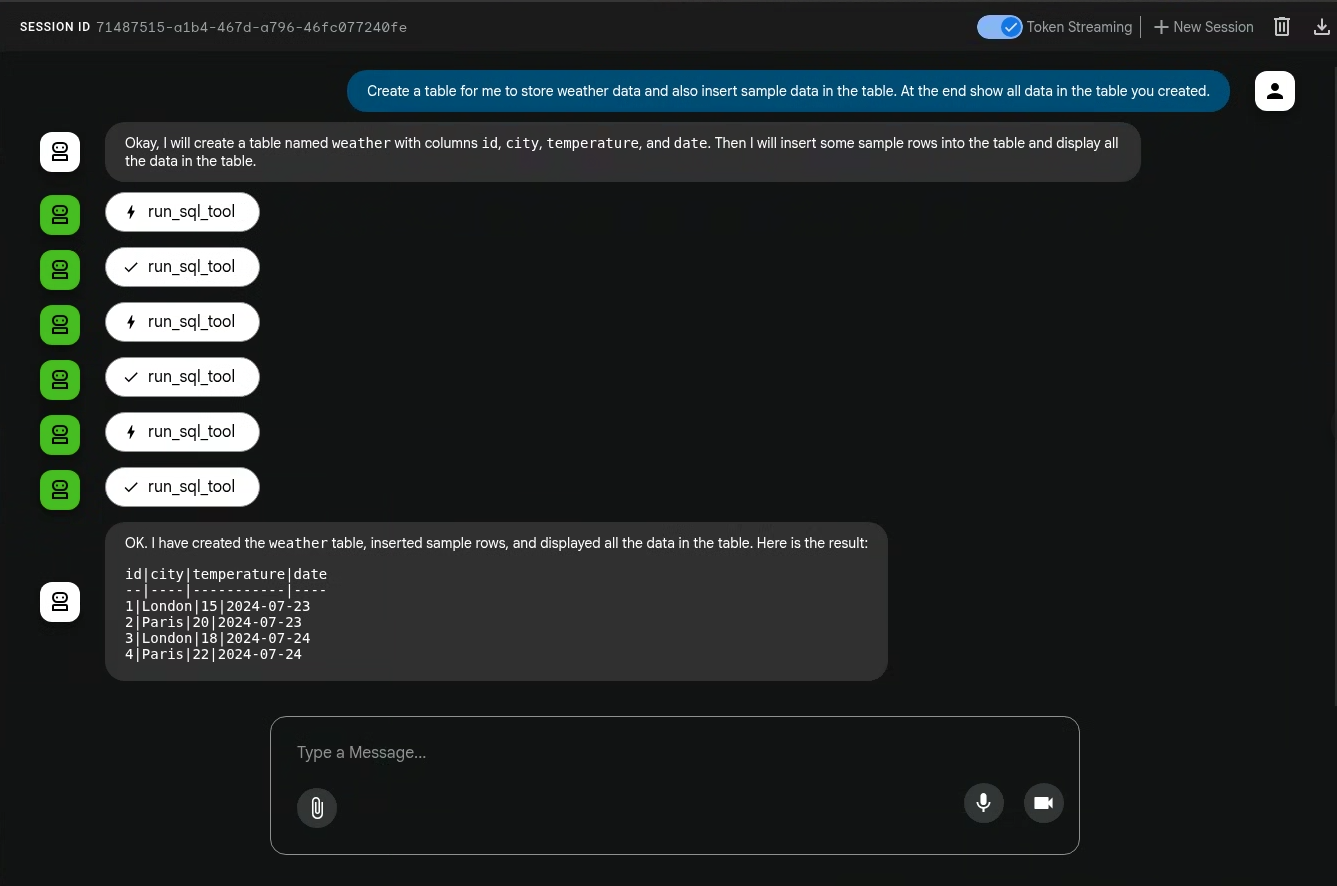
生成式 AI 代理程式執行的動作並非確定性,因此即使輸入相同的提示,回覆內容也可能不同。
結束應用程式
如要結束應用程式,請在用於啟動應用程式的殼層中輸入 Ctrl-C。
查看追蹤記錄、指標和記錄
本節說明如何查看生成式 AI 事件。
事前準備
如要取得查看記錄、指標和追蹤資料所需的權限,請要求管理員為您授予專案的下列 IAM 角色:
如要進一步瞭解如何授予角色,請參閱「管理專案、資料夾和機構的存取權」。
查看遙測資料
如要查看應用程式建立的生成式 AI 事件,請使用「Trace Explorer」頁面:
這個範例已完成儀表化,可將指標資料傳送至您的 Google Cloud 專案,但不會產生任何指標。