本教程介绍了如何使用 Azure Pipelines 和 Compute Engine 为 ASP.NET MVC Web 应用创建持续集成/持续部署 (CI/CD) 流水线。该应用使用 Microsoft Internet Information Services,并在 Windows Server 上运行。
CI/CD 流水线使用两个独立的环境,一个用于测试,一个用于生产。
在流水线的开端,开发者将提交对示例代码库的更改。此操作会触发流水线来构建应用、将其打包为 zip 文件,并将 zip 文件上传到 Cloud Storage。
然后,系统会使用滚动更新将文件包自动发布到开发环境。发布测试完成后,发布管理员随后可以提升该发布,以便将其部署到生产环境中。
本教程适用于开发者和 DevOps 工程师。本文假定您具备 .NET Framework、Windows Server、IIS、Azure Pipelines 和 Compute Engine 的基本知识。本教程还要求您对 Azure DevOps 帐号具有管理访问权限。
目标
- 使用 Compute Engine 托管实例组来实现滚动部署。
- 在 Azure Pipelines 中设置 CI/CD 流水线,以编排构建、创建和部署流程。
费用
在本文档中,您将使用 Google Cloud 的以下收费组件:
您可使用价格计算器根据您的预计使用情况来估算费用。
完成本文档中描述的任务后,您可以通过删除所创建的资源来避免继续计费。如需了解详情,请参阅清理。
查看 Azure DevOps 价格页面,了解使用 Azure DevOps 时可能需要支付的所有费用。
准备工作
通常建议使用不同的项目来处理开发工作负载与生产工作负载,这样就能分别授予身份和访问权限管理 (IAM) 角色与权限。为简单起见,本教程为开发和生产环境使用同一个项目。
-
In the Google Cloud console, on the project selector page, select or create a Google Cloud project.
-
Enable the Compute Engine and Cloud Storage APIs.
-
Make sure that billing is enabled for your Google Cloud project.
- 确保您拥有 Azure DevOps 帐号并具有管理员访问权限。 如果您还没有 Azure DevOps 帐号,可以在 Azure DevOps 首页上注册一个。
创建 Azure DevOps 项目
您可以使用 Azure DevOps 来管理源代码、运行构建和测试以及编排部署到 Compute Engine 的操作。首先,在 Azure DevOps 帐号中创建一个项目。
- 转到 Azure DevOps 首页 (https://dev.azure.com/YOUR_AZURE_DEVOPS_ACCOUNT_NAME)。
- 点击新建项目。
- 输入项目名称,例如
CloudDemo。 - 将可见性设置为私有,然后点击创建。
- 创建项目后,点击左侧菜单中的存储库。
- 点击导入,从 GitHub 创建
dotnet-docs-samples代码库分支,然后设置以下值:- 代码库类型:
Git - 克隆网址:
https://github.com/GoogleCloudPlatform/dotnet-docs-samples.git
- 代码库类型:
点击导入。
导入流程完成后,您将看到
dotnet-docs-samples代码库的源代码。在菜单中,点击 Repos(代码库)> Branches(分支)。
将鼠标指针悬停在
main分支上。右侧会显示 ... 按钮。点击 ... > Set as default branch(设置为默认分支)。
持续构建
您现在可以使用 Azure Pipelines 来设置构建流水线。对于推送到 Git 代码库的每次提交,Azure Pipelines 都会构建代码、将其打包为 zip 文件,并将生成的文件包发布到内部 Azure Pipelines 存储空间。
稍后,您将配置发布流水线,该流水线会使用 Azure Pipelines 存储空间中的文件包并将其部署到 Compute Engine。
创建 build 定义
在使用 YAML 语法的 Azure Pipelines 中创建新的构建定义:
- 使用 Visual Studio 或命令行
git客户端克隆新的 Git 代码库。 - 在代码库的根目录中,创建一个名为
azure-pipelines.yml的文件。 复制以下代码并粘贴到此文件中:
resources:
- repo: self
  fetchDepth: 1
trigger:
- main
variables:
  artifactName: 'CloudDemo.Mvc'
jobs:
- job: Build
  displayName: Build application
  condition: succeeded()
  pool:
    vmImage: windows-latest
    demands:
    - msbuild
    - visualstudio
  variables:
    Solution: 'applications/clouddemo/net4/CloudDemo.Mvc.sln'
    BuildPlatform: 'Any CPU'
    BuildConfiguration: 'Release'
    ArtifactName: 'CloudDemo.Web'
  steps:
  - task: NuGetCommand@2
    displayName: 'NuGet restore'
    inputs:
      restoreSolution: '$(Solution)'
  - task: VSBuild@1
    displayName: 'Build solution'
    inputs:
      solution: '$(Solution)'
      msbuildArgs: '/p:DeployOnBuild=true /p:WebPublishMethod=Package /p:PackageAsSingleFile=true /p:SkipInvalidConfigurations=true /p:PackageLocation="$(build.artifactstagingdirectory)\\"'
      platform: '$(BuildPlatform)'
      configuration: '$(BuildConfiguration)'
  - task: PublishBuildArtifacts@1
    displayName: 'Publish Artifact'
    inputs:
      PathtoPublish: '$(build.artifactstagingdirectory)/CloudDemo.Mvc.zip'
      ArtifactName: '$(ArtifactName)'
提交您的更改并将其推送到 Azure Pipelines。
Visual Studio
- 打开团队资源管理器,然后点击主页图标。
- 点击更改。
- 输入类似
Add pipeline definition的提交消息。 - 点击全部提交并推送。
命令行
暂存所有已修改的文件:
git add -A将更改提交到本地代码库:
git commit -m "Add pipeline definition"将更改推送到 Azure DevOps:
git push
在 Azure DevOps 菜单中,选择流水线,然后点击 创建流水线。
选择 Azure Repos Git。
选择您的代码库。
在查看流水线 YAML页面上,点击运行。
系统会触发新的构建。构建可能大约需要 2 分钟时间才能完成。构建结束时,您可以在内部 Azure Pipelines 工件存储区域中找到应用软件包
CloudDemo.Mvc.zip,其中包含 Web 应用的所有文件。
持续部署
现在 Azure Pipelines 会自动为每次提交构建代码,接下来您可以将注意力转向部署。
与其他一些持续集成系统不同,Azure Pipelines 对构建和部署进行了区分,并为所有与部署相关的任务提供了一组标记为“发布管理”的专用工具。
Azure Pipelines 版本管理围绕以下概念构建:
- “版本”是指构成应用特定版本的一组工件,通常是构建流程的结果。
- “部署”是指提取一个发布并将其部署到特定环境的流程。
- 一次部署会执行一组“任务”,这些任务可分组为多个“作业”。
- 使用“阶段”可以将流水线分段,并可将部署编排到多个环境,例如开发和测试环境。
您可以将发布流水线设置为在新构建完成时触发。该流水线由三个阶段组成:
- 在第一个阶段,该流水线会从 Azure Pipelines 工件存储区域获取应用软件包,并将其发布到 Cloud Storage 存储桶,以便 Compute Engine 可以访问该软件包。
- 在第二个阶段,该流水线会使用滚动更新来更新开发环境。
- 在最后一个阶段,获得批准后,该流水线会使用滚动更新来更新生产环境。
为构建工件创建 Cloud Storage 存储桶
创建一个 Cloud Storage 存储桶,用于存储应用软件包。稍后,您将配置 Compute Engine,以便新虚拟机实例可以自动从此存储桶中拉取应用软件包。
- 在 Google Cloud 控制台中,切换到新创建的项目。
打开 Cloud Shell。
为了节省时间,请为项目 ID 和 Compute Engine 地区设置默认值:
gcloud config set project PROJECT_ID
gcloud config set compute/zone ZONE
将 PROJECT_ID 替换为 Google Cloud 项目的 ID,并将 ZONE 替换为将用于创建资源的地区的名称。如果不确定要选择哪个地区,请使用
us-central1-a。示例:
gcloud config set project devops-test-project-12345
gcloud config set compute/zone us-central1-a
为应用软件包创建新的 Cloud Storage 存储桶:
gsutil mb gs://$(gcloud config get-value core/project)-artifacts
如果您不想保留所有构建的应用软件包,可以考虑配置对象生命周期规则以删除超过特定存在时间的文件。
为 Azure Pipelines 设置服务帐号
创建 Google Cloud 服务帐号,以便 Azure Pipelines 可用于访问您的 Google Cloud 项目。
为 Azure Pipelines 创建服务帐号:
AZURE_PIPELINES_SERVICE_ACCOUNT=$(gcloud iam service-accounts create azure-pipelines --format "value(email)")将 Storage Object Viewer (
roles/storage.objectViewer) 和 Storage Object Creator (roles/storage.objectCreator) IAM 角色授予azure-pipelines服务帐号,以便 Azure Pipelines 可以将应用软件包上传到 Cloud Storage:gcloud projects add-iam-policy-binding $(gcloud config get-value core/project) \ --member serviceAccount:$AZURE_PIPELINES_SERVICE_ACCOUNT \ --role roles/storage.objectViewer gcloud projects add-iam-policy-binding $(gcloud config get-value core/project) \ --member serviceAccount:$AZURE_PIPELINES_SERVICE_ACCOUNT \ --role roles/storage.objectCreator将 Compute Admin (
roles/compute.admin) 角色授予azure-pipelines服务帐号,以便 Azure Pipelines 可以管理虚拟机实例:gcloud projects add-iam-policy-binding $(gcloud config get-value core/project) \ --member serviceAccount:$AZURE_PIPELINES_SERVICE_ACCOUNT \ --role roles/compute.admin生成服务帐号密钥:
gcloud iam service-accounts keys create azure-pipelines-key.json \
  --iam-account=$AZURE_PIPELINES_SERVICE_ACCOUNT

cat azure-pipelines-key.json | base64 -w 0;echo

rm azure-pipelines-key.json
执行以下步骤之一时,需要用到服务帐号密钥。
配置开发环境
在配置 Azure Pipelines 中的步骤以自动化部署之前,必须准备开发环境。准备工作包括创建将管理 Web 服务器虚拟机实例的托管实例组,还包括创建 HTTP 负载均衡器。
在 Cloud Shell 中,为代管式实例组创建一个服务帐号:
DEV_SERVICE_ACCOUNT=$(gcloud iam service-accounts create clouddemo-dev --format "value(email)")将 Storage Object Viewer IAM 角色 (
roles/storage.objectViewer) 授予此服务帐号,以便虚拟机实例可以从 Cloud Storage 下载应用软件包:gcloud projects add-iam-policy-binding $(gcloud config get-value core/project) \ --member serviceAccount:$DEV_SERVICE_ACCOUNT \ --role roles/storage.objectViewer为
azure-pipelines服务帐号授予使用clouddemo-dev服务帐号的权限:gcloud iam service-accounts add-iam-policy-binding $DEV_SERVICE_ACCOUNT \ --member serviceAccount:$AZURE_PIPELINES_SERVICE_ACCOUNT \ --role roles/iam.serviceAccountUser创建一个实例模板,该模板使用标准 Windows Server 2019 Core 映像。您只会在开始时使用此模板,因为每个构建都将生成一个新模板。
gcloud compute instance-templates create clouddemo-initial \
    --machine-type n1-standard-2 \
    --image-family windows-2019-core \
    --image-project windows-cloud \
    --service-account $DEV_SERVICE_ACCOUNT \
    --scopes https://www.googleapis.com/auth/devstorage.read_only \
    --tags gclb-backend
创建 HTTP 健康检查。由于应用没有专用的健康检查端点,因此您可以查询路径
/。gcloud compute http-health-checks create clouddemo-dev-http \ --check-interval=10s --unhealthy-threshold=10 \ --request-path=/根据初始实例模板创建托管实例组。为简单起见,使用以下命令创建地区托管实例组。但是,您可以对跨多个地区分布虚拟机实例的区域托管实例组使用相同的方法。
gcloud compute instance-groups managed create clouddemo-dev \
    --template=clouddemo-initial \
    --http-health-check=clouddemo-dev-http \
    --initial-delay=2m \
    --size=1 && \
gcloud compute instance-groups set-named-ports clouddemo-dev --named-ports http:80
创建一个负载均衡器后端服务,该服务使用您之前创建的 HTTP 健康检查和托管实例组:
gcloud compute backend-services create clouddemo-dev-backend \
    --http-health-checks clouddemo-dev-http \
    --port-name http --protocol HTTP --global && \
gcloud compute backend-services add-backend clouddemo-dev-backend \
    --instance-group clouddemo-dev --global \
    --instance-group-zone=$(gcloud config get-value compute/zone)
创建负载均衡器前端:
gcloud compute url-maps create clouddemo-dev --default-service clouddemo-dev-backend && \
gcloud compute target-http-proxies create clouddemo-dev-proxy --url-map=clouddemo-dev && \
gcloud compute forwarding-rules create clouddemo-dev-fw-rule --global --target-http-proxy clouddemo-dev-proxy --ports=80
创建一条防火墙规则,使 Google 负载均衡器将 HTTP 请求发送到已使用
gclb-backend标记注释的实例。稍后您将此标记应用于 Web 服务虚拟机实例。gcloud compute firewall-rules create gclb-backend --source-ranges=130.211.0.0/22,35.191.0.0/16 --target-tags=gclb-backend --allow tcp:80
配置生产环境
设置生产环境需要执行一系列与配置开发环境类似的步骤。
在 Cloud Shell 中,创建 HTTP 健康检查:
gcloud compute http-health-checks create clouddemo-prod-http \
    --check-interval=10s --unhealthy-threshold=10 \
    --request-path=/
根据您之前创建的初始实例模板创建另一个托管实例组:
gcloud compute instance-groups managed create clouddemo-prod \
    --template=clouddemo-initial \
    --http-health-check=clouddemo-prod-http \
    --initial-delay=2m \
    --size=1 && \
gcloud compute instance-groups set-named-ports clouddemo-prod --named-ports http:80
创建一个负载均衡器后端服务,该服务使用您之前创建的 HTTP 健康检查和托管实例组:
gcloud compute backend-services create clouddemo-prod-backend --http-health-checks clouddemo-prod-http --port-name http --protocol HTTP --global && \
gcloud compute backend-services add-backend clouddemo-prod-backend --instance-group clouddemo-prod --global --instance-group-zone=$(gcloud config get-value compute/zone)
创建负载均衡器前端:
gcloud compute url-maps create clouddemo-prod --default-service clouddemo-prod-backend && \
gcloud compute target-http-proxies create clouddemo-prod-proxy --url-map=clouddemo-prod && \
gcloud compute forwarding-rules create clouddemo-prod-fw-rule --global --target-http-proxy clouddemo-prod-proxy --ports=80
配置版本流水线
创建新版本定义:
- 在 Azure DevOps 菜单中,选择 Pipelines(流水线)> Releases(发布)。
- 点击 New pipeline。
- 从模板列表中,选择 Empty job。
- 当系统提示您输入阶段名称时,请输入
Publish。 - 在屏幕顶部,将发布命名为
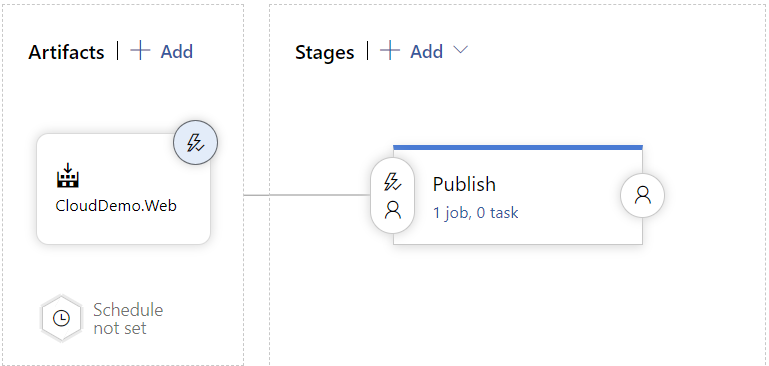
clouddemo-ComputeEngine。 - 在流水线图中,点击工件旁边的添加。
选择构建并添加以下设置:
- 来源:选择包含
azure-pipelines.yml文件的 Git 代码库。 - 默认版本:
Latest - 来源别名:
CloudDemo.Web
- 来源:选择包含
点击添加。
在项目框中,点击持续部署触发器(闪电图标)来添加部署触发器。
在持续部署触发器下,将开关设置为已启用。
点击保存。
如果需要,请输入注释,然后点击确定以确认。
流水线现在应如下所示:
发布到 Cloud Storage
现在您已创建了发布定义,接下来可以添加步骤以将应用软件包发布到 Cloud Storage。
- 在 Azure Pipelines 中,切换到任务标签页。
- 点击 Agent job(代理作业),并配置以下设置:
- Agent pool:Azure Pipelines
- Agent specification(代理规范):ubuntu-latest
- 在 Agent job(代理作业)旁边,点击 Add a task to agent job(向代理作业添加任务)。
- 选择 bash 任务,然后点击 Add(添加)。
点击新添加的任务并配置以下设置:
- Display name:
Publish to Cloud Storage - Type(类型):inline(内嵌)
脚本:
cat << "EOF" > CloudDemo.Mvc.deploy.ps1
    $ErrorActionPreference = "Stop"

    # Download application package from Cloud Storage
    gsutil cp gs://$(CloudDemo.ProjectId)-artifacts/CloudDemo.Mvc-$(Build.BuildId)-$(Release.ReleaseId).zip $env:TEMP\app.zip

    # Install IIS
    Enable-WindowsOptionalFeature -Online -FeatureName `
        NetFx4Extended-ASPNET45, `
        IIS-WebServerRole, `
        IIS-WebServer, `
        IIS-CommonHttpFeatures, `
        IIS-HttpErrors, `
        IIS-HttpRedirect, `
        IIS-ApplicationDevelopment, `
        IIS-HealthAndDiagnostics, `
        IIS-HttpLogging, `
        IIS-LoggingLibraries, `
        IIS-RequestMonitor, `
        IIS-HttpTracing, `
        IIS-Security, `
        IIS-RequestFiltering, `
        IIS-Performance, `
        IIS-WebServerManagementTools, `
        IIS-IIS6ManagementCompatibility, `
        IIS-Metabase, `
        IIS-DefaultDocument, `
        IIS-ApplicationInit, `
        IIS-NetFxExtensibility45, `
        IIS-ISAPIExtensions, `
        IIS-ISAPIFilter, `
        IIS-ASPNET45, `
        IIS-HttpCompressionStatic

    # Extract application package to wwwroot
    New-Item -ItemType directory -Path $env:TEMP\app
    Add-Type -AssemblyName System.IO.Compression.FileSystem
    [System.IO.Compression.ZipFile]::ExtractToDirectory("$env:TEMP\app.zip", "$env:TEMP\app")
    Remove-Item $env:TEMP\app.zip
    Move-Item -Path $(dir -recurse $env:TEMP\app\**\PackageTmp | % { $_.FullName }) -Destination c:\inetpub\wwwroot\app -force

    # Configure IIS web application pool and application
    Import-Module WebAdministration
    New-WebAppPool clouddemo-net4
    Set-ItemProperty IIS:\AppPools\clouddemo-net4 managedRuntimeVersion v4.0
    New-WebApplication -Name clouddemo -Site 'Default Web Site' -PhysicalPath c:\inetpub\wwwroot\app -ApplicationPool clouddemo-net4

    # Grant read/execute access to the application pool user
    &icacls C:\inetpub\wwwroot\app\ /grant "IIS AppPool\clouddemo-net4:(OI)(CI)(RX)"
EOF

gcloud auth activate-service-account \
    --quiet \
    --key-file <(echo $(ServiceAccountKey) | base64 -d)

gsutil cp $(System.ArtifactsDirectory)/CloudDemo.Web/CloudDemo.Web/CloudDemo.Mvc.zip gs://$(CloudDemo.ProjectId)-artifacts/CloudDemo.Mvc-$(Build.BuildId)-$(Release.ReleaseId).zip
gsutil cp CloudDemo.Mvc.deploy.ps1 gs://$(CloudDemo.ProjectId)-artifacts/CloudDemo.Mvc-$(Build.BuildId)-$(Release.ReleaseId).deploy.ps1
此脚本会执行以下操作:
- 生成一个启动脚本,以配置 IIS。
- 将 Google Cloud CLI 配置为使用环境变量中的服务帐号密钥向 Google Cloud 进行身份验证。
- 将应用软件包和启动脚本上传到 Cloud Storage。
- Display name:
切换到变量标签页,然后添加以下变量。
名称 值 Secret ServiceAccountKey之前为 azure-pipelines-deployer创建的服务帐号密钥。是 CloudDemo.ProjectId您的 Google Cloud 项目的 ID。 CloudDemo.Zone您之前在运行 gcloud config set compute/zone时指定的地区(例如us-central1-a)点击保存。
如果需要,请输入注释,然后点击确定以确认。
部署开发环境
您现在可以添加步骤以启动对开发环境的滚动部署。
- 在 Azure Pipelines 中,切换到 Pipelines 标签页。
- 在 Stages(阶段)框中,选择 Add(添加)> New stage(新阶段)。
- 从模板列表中,选择 Empty job。
- 当系统提示您输入阶段名称时,请输入
Dev。 - 点击新创建阶段的闪电形图标。
进行以下设置:
- 选择触发器:
After stage - 阶段:
Publish
- 选择触发器:
将鼠标悬停在 Tasks(任务)标签页上,然后点击 Tasks(任务)> Dev(开发)。
点击 Agent job 并配置以下设置:
- Agent pool:Azure Pipelines
- Agent specification(代理规范):ubuntu-latest
在 Agent job(代理作业)旁边,点击 Add a task to agent job(向代理作业添加任务)。
选择 bash 任务,然后点击 Add(添加)。
点击新添加的任务并配置以下设置:
- Display name:
Rolling deploy - Type(类型):inline(内嵌)
脚本:
INSTANCE_TEMPLATE=clouddemo-$(Build.BuildId)-$(Release.ReleaseId)

gcloud auth activate-service-account \
    --quiet \
    --key-file <(echo $(ServiceAccountKey) | base64 -d)

gcloud compute instance-templates create $INSTANCE_TEMPLATE \
  --machine-type n1-standard-2 \
  --image-family windows-2019-core \
  --image-project windows-cloud \
  --service-account clouddemo-dev@$(CloudDemo.ProjectId).iam.gserviceaccount.com \
  --scopes https://www.googleapis.com/auth/devstorage.read_only \
  --tags gclb-backend \
  --metadata sysprep-specialize-script-url=gs://$(CloudDemo.ProjectId)-artifacts/CloudDemo.Mvc-$(Build.BuildId)-$(Release.ReleaseId).deploy.ps1 \
  --project $(CloudDemo.ProjectId) \

gcloud compute instance-groups managed set-instance-template clouddemo-dev \
  --template $INSTANCE_TEMPLATE \
  --project $(CloudDemo.ProjectId) \
  --zone $(CloudDemo.Zone)

gcloud compute instance-groups managed rolling-action start-update clouddemo-dev \
  --version template=$INSTANCE_TEMPLATE \
  --type proactive \
  --max-unavailable 0 \
  --project $(CloudDemo.ProjectId) \
  --zone $(CloudDemo.Zone)
此脚本会执行以下操作:
- 将 Google Cloud CLI 配置为使用环境变量中的服务帐号密钥向 Google Cloud 进行身份验证。
- 创建一个新实例模板,该模板使用上一阶段生成的启动脚本。
- 将现有实例组更新为使用这一新实例模板。请注意,此命令并未导致任何现有虚拟机被替换或更新,它仅确保此实例组中的任何未来虚拟机均会从新模板创建。
- 启动滚动更新,使现有实例组以滚动方式将现有虚拟机替换为新虚拟机。
- Display name:
点击保存。
如果需要,请输入注释,然后点击确定以确认。
部署生产环境
最后,您需要配置针对生产环境的部署。
- 在 Azure Pipelines 中,切换到 Pipelines 标签页。
- 在 Stages(阶段)框中,选择 Add(添加)> New stage(新阶段)。
- 从模板列表中,选择 Empty job。
- 当系统提示您输入阶段名称时,请输入
Prod。 - 点击新创建阶段的闪电形图标。
进行以下设置:
- 选择触发器:
After stage - 阶段:
Dev - Pre-deployment approvals:(启用)
- Approvers:选择您自己的用户名。
- 选择触发器:
将鼠标悬停在 Tasks(任务)标签页上,然后点击 Tasks(任务)> Prod(生产)。
点击 Agent job 并配置以下设置:
- Agent pool:Azure Pipelines
- Agent specification(代理规范):ubuntu-latest
在 Agent job 旁边,点击 Add a task to agent job 以向阶段添加步骤。
选择 bash 任务,然后点击 Add(添加)。
点击新添加的任务并配置以下设置:
- Display name:
Rolling deploy - Type(类型):inline(内嵌)
脚本:
INSTANCE_TEMPLATE=clouddemo-$(Build.BuildId)-$(Release.ReleaseId)

gcloud auth activate-service-account \
    --quiet \
    --key-file <(echo $(ServiceAccountKey) | base64 -d)

gcloud compute instance-templates create $INSTANCE_TEMPLATE \
  --machine-type n1-standard-2 \
  --image-family windows-2019-core \
  --image-project windows-cloud \
  --service-account clouddemo-prod@$(CloudDemo.ProjectId).iam.gserviceaccount.com \
  --scopes https://www.googleapis.com/auth/devstorage.read_only \
  --tags gclb-backend \
  --metadata sysprep-specialize-script-url=gs://$(CloudDemo.ProjectId)-artifacts/CloudDemo.Mvc-$(Build.BuildId)-$(Release.ReleaseId).deploy.ps1 \
  --project $(CloudDemo.ProjectId) \

gcloud compute instance-groups managed set-instance-template clouddemo-prod \
  --template $INSTANCE_TEMPLATE \
  --project $(CloudDemo.ProjectId) \
  --zone $(CloudDemo.Zone)

gcloud compute instance-groups managed rolling-action start-update clouddemo-prod \
  --version template=$INSTANCE_TEMPLATE \
  --type proactive \
  --max-unavailable 0 \
  --project $(CloudDemo.ProjectId) \
  --zone $(CloudDemo.Zone)
- Display name:
点击保存。
如果需要,请输入注释,然后点击确定以确认。
运行流水线
现在您已经配置了整个流水线,接下来可通过更改源代码来测试该流水线:
- 在本地计算机上,从您之前克隆的 Git 代码库中打开
applications\clouddemo\net4\CloudDemo.Mvc\Views\Home\Index.cshtml文件。 - 将
ViewBag.Title的值从Home Page更改为This app runs on GKE。 提交您的更改并将其推送到 Azure Pipelines。
Visual Studio
- 打开团队资源管理器,然后点击主页图标。
- 点击更改。
- 输入类似
Change site title的提交消息。 - 点击全部提交并推送。
命令行
暂存所有已修改的文件:
git add -A将更改提交到本地代码库:
git commit -m "Change site title"将更改推送到 Azure Pipelines:
git push
在 Azure DevOps 菜单中,选择管道。
系统会触发构建。
构建完成后,选择 Pipelines(流水线)> Releases(发布)。系统会启动发布流程。
点击 Release-1(发布 1)打开详情页面,等待 Dev(开发)阶段的状态切换为 Succeeded(成功)。
在 Google Cloud 控制台中,选择网络服务 > 负载均衡 > clouddemo-dev。
记下前端的 IP 地址。
打开新的浏览器窗口,然后前往以下地址:
http://IP_ADDRESS/clouddemo/
其中
IP_ADDRESS是前端的 IP 地址。观察应用是否已部署并正在使用自定义标题。
您可能会先看到一个错误,因为负载均衡器在几分钟后才能使用。
在 Azure Pipelines 中,点击 Prod 阶段下方的 Approve 按钮,以将部署提升到生产环境。
如果您没有看到该按钮,则可能需要先批准或拒绝以前的版本。
必要时,请输入注释,然后点击 Approve 进行确认。
等待 Prod(生产)环境的状态切换为 Succeeded(成功)。
在 Google Cloud 控制台中,选择网络服务 > 负载均衡 > clouddemo-prod。
记下前端的 IP 地址。
打开新的浏览器窗口,然后前往以下地址:
http://IP_ADDRESS/clouddemo/
其中
IP_ADDRESS是前端的 IP 地址。观察应用是否已部署并正在使用自定义标题。
清理
学完本教程后,请删除您创建的实体,避免日后再为这些实体付费。
删除 Azure Pipelines 项目
如需删除 Azure Pipelines 项目,请参阅 Azure DevOps Services 文档。删除 Azure Pipelines 项目会导致所有源代码更改丢失。
删除 Google Cloud 开发和生产项目
- In the Google Cloud console, go to the Manage resources page.
- In the project list, select the project that you want to delete, and then click Delete.
- In the dialog, type the project ID, and then click Shut down to delete the project.
后续步骤
- 了解管理映像的最佳做法。
- 了解如何在 Compute Engine 上部署高可用性 SQL Server 组。
- 了解如何在 Google Cloud Platform 上使用 .NET。
- 安装 Cloud Tools for Visual Studio。
- 探索有关 Google Cloud 的参考架构、图表和最佳做法。查看我们的 Cloud Architecture Center。