This document describes how to use the Google Cloud console to create a metric-based alerting policy that sends notifications when values of a metric are more than, or less than, the threshold for a specific retest window. For example, the condition of an alerting policy might be met when the CPU utilization is higher than 80% for at least five minutes.
This content does not apply to log-based alerting policies. For information about log-based alerting policies, which notify you when a particular message appears in your logs, see Monitoring your logs.
This document doesn't describe the following:
- How to be notified when data stops arriving. For more information, see Create metric-absence alerting policies.
- How to be notified based on the predicted value of a metric. For more information, see Create forecasted metric-value alerting policies.
How to create an alerting policy by using the Cloud Monitoring API. For more information, see Create alerting policies by using the API.
How to create an alerting policy whose condition includes a Monitoring Query Language (MQL) query. These policies can use a static or dynamic threshold. For more information, see the following documents:
This feature is supported only for Google Cloud projects. For App Hub configurations, select the App Hub host project or management project.
Before you begin
-
To get the permissions that you need to create and modify alerting policies by using the Google Cloud console, ask your administrator to grant you the Monitoring Editor (
roles/monitoring.editor) IAM role on your project. For more information about granting roles, see Manage access to projects, folders, and organizations.You might also be able to get the required permissions through custom roles or other predefined roles.
For more information about Cloud Monitoring roles, see Control access with Identity and Access Management.
Ensure that you're familiar with the general concepts of alerting policies. For information about these topics, see Alerting overview.
Configure the notification channels that you want to use to receive any notifications. For redundancy purposes, we recommend that you create multiple types of notification channels. For more information, see Create and manage notification channels.
Create alerting policy
To create an alerting policy that compares the value of that metric to a static threshold, do the following:
-
In the Google Cloud console, go to the notifications Alerting page:
If you use the search bar to find this page, then select the result whose subheading is Monitoring.
- In the toolbar of the Google Cloud console, select your Google Cloud project. For App Hub configurations, select the App Hub host project or management project.
- Select Create policy.
Select the time series to be monitored:
Click Select a metric, navigate through the menus to select a resource type and metric type, and then click Apply.
The Select a metric menu contains features that help you find the metric types available:
- To find a specific metric type, use the
filter_list Filter bar.
For example, if you by enter
util, then you restrict the menu to show entries that includeutil. Entries are shown when they pass a case-insensitive "contains" test.
- To show all metric types, even those without data, click Active. By default, the menus only show metric types with data. For more information, see Metric not listed in menu.
You can monitor any built-in metric or any user-defined metric.
- To find a specific metric type, use the
filter_list Filter bar.
For example, if you by enter
Optional: To monitor a subset of the time series that match the metric and resource types you selected in the previous step, click Add filter. In the filter dialog, select the label by which to filter, a comparator, and then the filter value. For example, the filter
zone =~ ^us.*.a$uses a regular expression to match all time-series data whose zone name starts withusand ends witha. For more information, see Filter the selected time series.Optional: To change how the points in a time series are aligned, in the Transform data section, set the Rolling window and Rolling window function fields.
If you are monitoring a log-based metric, then we recommend that the Rolling window menu is set to at least 10 minutes.
These fields specify how the points that are recorded in a window are combined. For example, assume that the window is 15 minutes and the window function is
max. The aligned point is the maximum value of all points in the most recent 15 minutes. For more information, see Alignment: within-series regularization.You can also monitor the rate at which a metric value changes by using the Rolling window function field to percent change. For more information, see Monitor a rate of change.
Optional: Combine time series when you want to reduce the number of time series monitored by a policy, or when you want to monitor only a collection of time series. For example, instead of monitoring the CPU utilization of each VM instance, you might want to compute the average of the CPU utilization for all VMs in a zone, and then monitor that average. By default, time series aren't combined. For general information, see Reduction: combining time series.
To combine all time series, do the following:
- In the Across time series section, click expand_more Expand.
- Set the Time series aggregation field to a value other than
none. For example, to display the average value of the time series, selectmean. - Ensure that the Time series group by field is empty.
To combine, or group, time series by label values, do the following:
- In the Across time series section, click expand_more Expand.
- Set the Time series aggregation field to a value other than
none. - In the Time series group by field, select the labels by which to group.
For example, if you group by the
zonelabel and then set the aggregation field to a value ofmean, then the chart displays one time series for each zone for which there is data. The time series shown for a specific zone is the average of all time series with that zone.Click Next.
Configure the condition trigger:
Leave the Condition type field at the default value of Threshold.
Optional: Update the Alert trigger menu, which has the following values:
Any time series violates: Default setting. Any time series violating the threshold for the entire retest window causes the condition to be met.
Percent of time series violates: A percentage of time series must violate the threshold for the entire retest window before the condition is met. For example, you could be notified when 50% of the monitored time series violate the threshold for the entire retest window.
Number of time series violates: A specific number of time series must violate the threshold for the entire retest window before the condition is met. For example, you could be notified when 32 of the monitored time series violate the threshold for the entire retest window.
All time series violate: All time series must violate the threshold for the entire retest window before the condition is met.
For information about the intervals that Monitoring uses to align and measure time series data, see Alignment periods and retest windows.
Enter when the value of a metric violates the threshold by using the Threshold position and Threshold value fields. For example, if you set these values to Above threshold and
0.3, then any measurement higher than0.3violates the threshold.Optional: To select how long measurements must violate the threshold before Monitoring sends a notification, expand Advanced options and then use the Retest window menu.
The default value is No retest. With this setting, a single measurement can result in a notification. For more information and an example, see Alignment period and duration settings.
Optional: To specify how Monitoring evaluates the condition when data stops arriving, expand Advanced options, and then use the Evaluation missing data menu.
The Evaluation missing data menu is disabled when the value of the Retest window is No retest.
Google Cloud console
"Evaluation of missing data" fieldSummary Details Missing data empty Open incidents stay open.
New incidents aren't opened.For conditions that are met, the condition continues to be met when data stops arriving. If an incident is open for this condition, then the incident stays open. When an incident is open and no data arrives, the auto-close timer starts after a delay of at least 15 minutes. If the timer expires, then the incident is closed.
For conditions that aren't met, the condition continues to not be met when data stops arriving.
Missing data points treated as values that violate the policy condition Open incidents stay open.
New incidents can be opened.For conditions that are met, the condition continues to be met when data stops arriving. If an incident is open for this condition, then the incident stays open. When an incident is open and no data arrives for the auto-close duration plus 24 hours, the incident is closed.
For conditions that aren't met, this setting causes the metric-threshold condition to behave like a
metric-absence condition. If data doesn't arrive in the time specified by the retest window, then the condition is evaluated as met. For an alerting policy with one condition, the condition being met results in an incident being opened.Missing data points treated as values that don't violate the policy condition Open incidents are closed.
New incidents aren't opened.For conditions that are met, the condition stops being met when data stops arriving. If an incident is open for this condition, then the incident is closed.
For conditions that aren't met, the condition continues to not be met when data stops arriving.
Click Next.
Optional: Create an alerting policy with multiple conditions.
Most policies monitor a single metric type, for example, a policy might monitor the number of bytes written to a VM instance. When you want to monitor multiple metric types, create a policy with multiple conditions. Each condition monitors one metric type. After you create the conditions, you specify how the conditions are combined. For information, see Policies with multiple conditions.
To create an alerting policy with multiple conditions, do the following:
- For each additional condition, click Add alert condition and then configure that condition.
- Click Next and configure how conditions are combined.
- Click Next to advance to the notifications and documentation set up.
Configure the notification and add user labels:
Expand the Notifications and name menu and select your notification channels. For redundancy purposes, we recommend that you add to an alerting policy multiple types of notification channels. For more information, see Manage notification channels.
Optional: To use a custom subject line in your notification instead of the default, update the Notification subject line field.
Optional: To be notified when an incident is closed, select Notify on incident closure. By default, when you create an alerting policy with the Google Cloud console, a notification is sent only when an incident is created.
Optional: To change how long Monitoring waits before closing an incident after data stops arriving, select an option from the Incident autoclose duration menu. By default, when data stops arriving, Monitoring waits seven days before closing an open incident.
Optional: To associate your alerting policy with an App Hub application, in the Application labels section, select an application and either a service or workload. Incidents and notifications display these labels.
Optional: Select an option from the Policy severity level menu. Incidents and notifications display the severity level.
Optional: To add custom labels to the alerting policy, in the Policy user labels section, do the following:
- Click Add label, and in the Key field enter a name for the
label. Label names must start with a lowercase letter, and they can
contain lowercase letters, numerals, underscores, and dashes.
For example, enter
severity. - Click Value and enter a value for your label. Label values can
contain lowercase letters, numerals, underscores, and dashes.
For example, enter
critical.
For information about how you can use policy labels to help you manage your notifications, see Annotate incidents with labels.
- Click Add label, and in the Key field enter a name for the
label. Label names must start with a lowercase letter, and they can
contain lowercase letters, numerals, underscores, and dashes.
For example, enter
Optional: In the Documentation section, enter any content that you want included with the notification.
To format your documentation, you can use plain text, Markdown, and variables. You can also include links to help users debug the incident, such as links to internal playbooks, Google Cloud dashboards, and external pages. For example, the following documentation template describes a CPU utilization incident for a
gce_instanceresource and includes several variables to reference the alerting policy and condition REST resources. The documentation template then directs readers to external pages to help with debugging.When notifications are created, Monitoring replaces the documentation variables with their values. The values replace the variables only in notifications. The preview pane and other places in the Google Cloud console show only the Markdown formatting.
Preview
## CPU utilization exceeded

### Summary

The ${metric.display_name} of the ${resource.type}
${resource.label.instance_id} in the project ${resource.project} has
exceeded 90% for over 15 minutes.

### Additional resource information

Condition resource name: ${condition.name}
Alerting policy resource name: ${policy.name}

### Troubleshooting and Debug References

Repository with debug scripts: example.com
Internal troubleshooting guide: example.com
${resource.type} dashboard: example.com
Format in notification
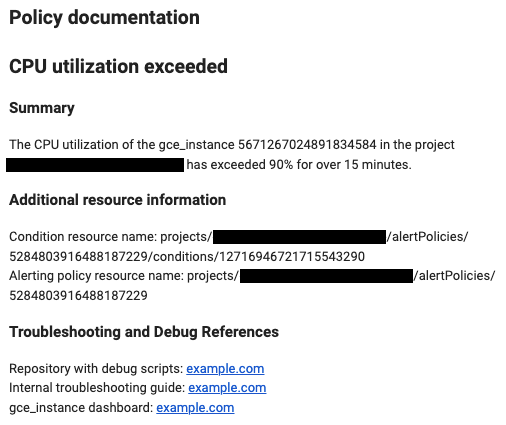
For more information, see Annotate notifications with user-defined documentation and Using channel controls.
Click Alert name and enter a name for the alerting policy.
Click Create policy.
Filter the selected time series
Filters ensure that only time series that meet some set of criteria are monitored. When you apply filters, you might reduce the number of lines on the chart, which can improve the performance of the chart. You can also reduce the amount of data being monitored by applying aggregation. Filters ensure that only time series that meet some set of criteria are used. When you apply filters, there are fewer time series to evaluate, which can improve the performance of the alert.
A filter is composed of a label, a comparator, and a value. For example,
to match all time series whose zone label starts with "us-central1", you
could use the filter zone=~"us-central1.*", which uses a regular expression
to perform the comparison.
When you filter by the project ID or the resource container,
you must use the equals operator, (=). When you filter by
other labels, you can use any supported comparator.
Typically, you can filter metric and resource labels, and by
resource group.
When you supply multiple filtering criteria, only the time series that meet all criteria are monitored.
To add a filter, click Add filter, complete the dialog, and then click Done. In the dialog, you use the Filter field to select the criterion by which to filter, select the comparison operator, and then select or input the value. The drop-down menu only lists values that appear over the last week, but you can input any value. Each row in the following table lists a comparison operator, its meaning, and an example:
| Operator | Meaning | Example |
|---|---|---|
= |
Equality | resource.labels.zone = "us-central1-a" |
!= |
Inequality | resource.labels.zone != "us-central1-a" |
=~ |
Regular expression2 equality | monitoring.regex.full_match("^us.*") |
!=~ |
Regular expression2 inequality | monitoring.regex.full_match("^us.*") |
starts_with |
Value starts with | resource.labels.zone = starts_with("us") |
ends_with |
Value ends with | resource.labels.zone = ends_with("b") |
has_substring |
Value contains | resource.labels.zone = has_substring("east") |
one_of |
One of | resource.labels.zone = one_of("asia-east1-b", "europe-north1-a") |
!starts_with |
Value doesn't start with | resource.labels.zone != starts_with("us") |
!ends_with |
Value doesn't ends with | resource.labels.zone != ends_with("b") |
!has_substring |
Value doesn't contain | resource.labels.zone != has_substring("east") |
!one_of |
Value isn't one of | resource.labels.zone != one_of("asia-east1-b", "europe-north1-a") |
Troubleshoot
This section contains troubleshooting tips.
Metric not listed in menu of available metrics
To monitor a metric that isn't listed in the Select a metric menu, do one of the following:
To create an alerting policy that monitors a Google Cloud metric, expand the Select a metric menu and then click Active. When disabled, the menu lists all metrics for Google Cloud services, and all metrics with data.
To configure a condition for a custom metric type before that metric type generates data, you must specify the metric type by using a Monitoring filter:
- Select ? on the Select metric section header and then select Direct filter mode in the tooltip.
Enter a monitoring filter or a time series selector. For information about syntax, see the following documents:
Monitor a rate of change
To monitor the rate of change of a metric value, set the Rolling window function field to percent change. When the condition is evaluated, Monitoring calculates the rate of change of the metric as a percentage, and then compares that percentage to the condition's threshold. This comparison process follows two steps:
- If the time series has a
DELTAorCUMULATIVEmetric kind, then the time series is converted to one that has aGAUGEmetric kind. For information about the conversion, see Kinds, types, and conversions. - Monitoring computes the percentage changed by comparing the average value in the most recent 10-minute sliding window to the average value from the 10-minute sliding window before the beginning of the alignment period.
You can't change the 10-minute sliding window used for comparisons in a rate-of-change alerting policy. However, you do specify the alignment period when you create the condition.
What's next
- To create a policy that compares the value of a time series to a dynamic threshold, you must use MQL. For more information, see Create dynamic severity levels using MQL.
The instructions on this page apply to any alerting policy. The following documents provide guidance for specific configurations: