This tutorial describes how to deploy a containerized web application to a Google Kubernetes Engine (GKE) Autopilot cluster, and use a Google Spanner database in the backend to store data. The sample application manages a table of game players. You can add and delete players through the app's graphical user interface (GUI).
Spanner is a fully managed, horizontally scalable, globally distributed, relational database service that provides ACID transactions and SQL semantics without compromising on performance and high availability.
Before reading this page, ensure that you're familiar with Kubernetes.
Why GKE and Spanner
As a developer, you might not want to spend time figuring out the amount of storage and compute resources your application needs, or predicting RAM and CPU consumption during periods of fluctuating demands, or worrying about application failure at peak load.
By using GKE Autopilot as a fully managed Kubernetes service, and Spanner as a fully managed database service, you can develop and deploy apps faster on a stable infrastructure that simplifies configuring and managing resources. GKE Autopilot handles configuring and scaling the infrastructure for hosting your app by adding or removing nodes to or from the cluster, based on the requirements at runtime. Similarly, Spanner can dynamically scale out and in with minimal manual intervention, as storage or compute requirements change.
For example, consider you are launching the next blockbuster game which you expect to go viral, and therefore attract heavy web traffic during its launch week. Spanner can help you accommodate this surging throughput by providing the ability to instantly increase, decrease, or reallocate compute resources while still maintaining maximum application availability with GKE Autopilot.
Objectives
In this tutorial, you learn how to:
Create a Spanner database that stores a registry of players.
Deploy a sample web app called
hello-app-cloud-spanner, with a graphical user interface.
The following table describes the Google Cloud resources you create or use, the variables they are identified with, and the values prescribed for them for the purpose of this tutorial:
| Resource | Variable | Value |
|---|---|---|
| Google Cloud project ID | PROJECT_ID
|
The Project ID generated when you create a project.
Example: |
| Compute region | COMPUTE_REGION |
The Compute Engine region where you want to create the Spanner instance and GKE cluster. We recommend that you choose a region closest to your customers' geographical location, but for this tutorial, use |
| Spanner instance | - | hello-instance |
| Spanner database | - | hello-database |
| GKE Autopilot cluster | CLUSTER_NAME |
hello-cluster |
| Kubernetes namespace | NAMESPACE |
hello-namespace |
| Kubernetes service account | KSA_NAME |
ksa-helloapp |
| IAM service account | GSA_NAME |
gsa-helloapp |
| Project ID of the IAM service account | GSA_PROJECT |
Your Google Cloud PROJECT_ID. |
For the purpose of this tutorial, we recommend creating new resources, which makes deleting them easy and risk free after you have deployed the sample app. However, if you have any existing namespaces, IAM service accounts, and Kubernetes service accounts, you can use them.
Costs
In this document, you use the following billable components of Google Cloud:
- Compute Engine instances used by GKE
- Spanner
- Cloud Load Balancing
To generate a cost estimate based on your projected usage,
use the pricing calculator.
When you finish the tasks that are described in this document, you can avoid continued billing by deleting the resources that you created. For more information, see Clean up.
Before you begin
Make sure to complete the following prerequisites:
Select or create a project
You can use an existing project, or create a new one for this tutorial.
- Sign in to your Google Cloud account. If you're new to Google Cloud, create an account to evaluate how our products perform in real-world scenarios. New customers also get $300 in free credits to run, test, and deploy workloads.
-
In the Google Cloud console, on the project selector page, select or create a Google Cloud project.
Roles required to select or create a project
- Select a project: Selecting a project doesn't require a specific IAM role—you can select any project that you've been granted a role on.
-
Create a project: To create a project, you need the Project Creator
(
roles/resourcemanager.projectCreator), which contains theresourcemanager.projects.createpermission. Learn how to grant roles.
-
Verify that billing is enabled for your Google Cloud project.
-
In the Google Cloud console, on the project selector page, select or create a Google Cloud project.
Roles required to select or create a project
- Select a project: Selecting a project doesn't require a specific IAM role—you can select any project that you've been granted a role on.
-
Create a project: To create a project, you need the Project Creator
(
roles/resourcemanager.projectCreator), which contains theresourcemanager.projects.createpermission. Learn how to grant roles.
-
Verify that billing is enabled for your Google Cloud project.
Enable the APIs
Enable the Artifact Registry, Compute Engine, GKE, and IAM Service Account Credentials APIs.
Roles required to enable APIs
To enable APIs, you need the Service Usage Admin IAM
role (roles/serviceusage.serviceUsageAdmin), which
contains the serviceusage.services.enable permission. Learn how to grant
roles.
Set up Cloud Shell
In this tutorial, you use Cloud Shell to run gcloud and kubectl
commands. Cloud Shell is a shell environment for managing
resources hosted on Google Cloud. It comes preinstalled with the
Google Cloud CLI and kubectl
command-line tool.
In the Google Cloud console, activate Cloud Shell.
A Cloud Shell session opens inside a frame lower on the console.
Before you run commands in this tutorial, make sure that your default project is set to the project ID where you want to deploy the sample app. If it's not already set, run the following command in the Cloud Shell:
gcloud config set project PROJECT_ID
Replace PROJECT_ID with your project ID.
Grant IAM roles
Ensure that your Google Cloud account has the required IAM roles for this tutorial.
Make sure that you have the following role or roles on the project: roles/iam.serviceAccountAdmin, roles/serviceusage.serviceUsageConsumer, roles/iam.serviceAccountUser, roles/iam.securityAdmin, roles/spanner.admin, roles/container.admin
Check for the roles
-
In the Google Cloud console, go to the IAM page.
Go to IAM - Select the project.
-
In the Principal column, find all rows that identify you or a group that you're included in. To learn which groups you're included in, contact your administrator.
- For all rows that specify or include you, check the Role column to see whether the list of roles includes the required roles.
Grant the roles
-
In the Google Cloud console, go to the IAM page.
Go to IAM - Select the project.
- Click Grant access.
-
In the New principals field, enter your user identifier. This is typically the email address for a Google Account.
- In the Select a role list, select a role.
- To grant additional roles, click Add another role and add each additional role.
- Click Save.
Configure Spanner
To configure Spanner, you need to create a Spanner instance and a Spanner database.
Create a Spanner instance
A Spanner instance is an allocation of resources that is used by Spanner databases created in that instance.
Create a Spanner instance called hello-instance with a regional
configuration, and compute capacity of 100 processing units.
gcloud spanner instances create hello-instance \
    --config=regional-COMPUTE_REGION \
    --description="Spanner sample instance" \
    --processing-units=100
Replace COMPUTE_REGION with us-west1 for this tutorial.
Create a Spanner database
A Spanner database includes your tables, views, and indexes. A database inherits properties from its parent instance, such as its configuration (regional or multi-regional), available compute capacity, and storage.
Create a Spanner database called hello-database with a table called
Players, by using the GoogleSQL dialect. Run the following query in
your Cloud Shell:
gcloud spanner databases create hello-database \
    --instance=hello-instance \
    --database-dialect=GOOGLE_STANDARD_SQL \
    --ddl="CREATE TABLE Players (
        PlayerUuid STRING(36) NOT NULL,
        FirstName STRING(1024),
        LastName STRING(1024),
        BirthDate DATE) PRIMARY KEY(PlayerUuid)"
Create a GKE Autopilot cluster
After you've configured Spanner, create an Autopilot cluster and use Workload Identity Federation for GKE to access your database in a secure and manageable way.
Create an Autopilot cluster named hello-cluster. Autopilot
clusters have Workload Identity Federation for GKE enabled by default.
gcloud container clusters create-auto CLUSTER_NAME \
  --location=CONTROL_PLANE_LOCATION
Replace the following:
CLUSTER_NAME:hello-clusterCONTROL_PLANE_LOCATION: the Compute Engine region of the control plane of your cluster. For this tutorial, use the same region,us-west1, where you created the Spanner instance. We recommend that you create the Spanner instance and the GKE Autopilot cluster within the same region to reduce latency.
It can take up to 8-10 minutes to create the cluster.
The output is similar to the following:
NAME: hello-cluster
LOCATION: us-west1
MASTER_VERSION: 1.26.5-gke.1200
MASTER_IP: 192.0.2.1
MACHINE_TYPE: e2-medium
NODE_VERSION: 1.26.5-gke.1200
NUM_NODES: 3
STATUS: RUNNING
Configure the cluster to use Workload Identity Federation for GKE
Configure your cluster to authenticate to Google Cloud using Workload Identity Federation for GKE before you deploy the app.
Get credentials to access your cluster:
gcloud container clusters get-credentials CLUSTER_NAME \
  --location=CONTROL_PLANE_LOCATION
Replace the following:
CLUSTER_NAME:hello-clusterCONTROL_PLANE_LOCATION:us-west1
This updates a
kubeconfigfile with appropriate credentials and endpoint information to pointkubectlat your cluster.Create a namespace to use for the Kubernetes service account. You can also use the default namespace, or any existing namespace.
kubectl create namespace NAMESPACEReplace
NAMESPACEwithhello-namespace, the name for the new namespace you are creating.Create a Kubernetes service account for your application to use:
kubectl create serviceaccount KSA_NAME \
  --namespace NAMESPACE
Replace the following:
KSA_NAME:ksa-helloapp, the name for the new Kubernetes service account you are creating.NAMESPACE:hello-namespace
Create an IAM service account for your application:
gcloud iam service-accounts create GSA_NAME \
  --project=GSA_PROJECT
Replace the following:
GSA_NAME:gsa-helloapp, the name for the new IAM service account you are creating.GSA_PROJECT: your Google Cloud project ID. In this tutorial, you are creating the IAM service account in the same Google Cloud project where you are deploying the sample app. Hence yourGSA_PROJECTand Google CloudPROJECT_IDare the same.
Add an IAM policy binding for your IAM service account to read and write to Spanner:
gcloud projects add-iam-policy-binding PROJECT_ID \
  --member "serviceAccount:GSA_NAME@PROJECT_ID.iam.gserviceaccount.com" \
  --role "roles/spanner.admin"
Replace the following:
PROJECT_ID: your Google Cloud project IDGSA_NAME:gsa-helloapp
Example:
gcloud projects add-iam-policy-binding my-gcp-project \
  --member "serviceAccount:gsa-helloapp@my-gcp-project.iam.gserviceaccount.com" \
  --role "roles/spanner.admin"
Allow the Kubernetes service account to impersonate the IAM service account by adding an IAM policy binding between the two service accounts. This binding allows the Kubernetes service account to act as the IAM service account, so that the Kubernetes service account can read and write to Spanner.
gcloud iam service-accounts add-iam-policy-binding GSA_NAME@GSA_PROJECT.iam.gserviceaccount.com \
  --role roles/iam.workloadIdentityUser \
  --member "serviceAccount:PROJECT_ID.svc.id.goog[NAMESPACE/KSA_NAME]"
Replace the following:
GSA_NAME:gsa-helloappGSA_PROJECT: your Google Cloud project IDPROJECT_ID: your Google Cloud project IDNAMESPACE:hello-namespaceKSA_NAME:ksa-helloapp
Example:
gcloud iam service-accounts add-iam-policy-binding gsa-helloapp@my-gcp-project.iam.gserviceaccount.com \
  --role roles/iam.workloadIdentityUser \
  --member "serviceAccount:my-gcp-project.svc.id.goog[hello-namespace/ksa-helloapp]"
Annotate the Kubernetes service account with the email address of the IAM service account. This lets your sample app know which service account to use to access Google Cloud services. So when the app uses any standard Google API Client Libraries to access Google Cloud services, it uses that IAM service account.
kubectl annotate serviceaccount KSA_NAME \
  --namespace NAMESPACE \
  iam.gke.io/gcp-service-account=GSA_NAME@GSA_PROJECT.iam.gserviceaccount.com
Replace the following:
KSA_NAME:ksa-helloappNAMESPACE:hello-namespaceGSA_NAME:gsa-helloappGSA_PROJECT: your Google Cloud project ID
Example:
kubectl annotate serviceaccount ksa-helloapp \
  --namespace hello-namespace \
  iam.gke.io/gcp-service-account=gsa-helloapp@my-gcp-project.iam.gserviceaccount.com
Deploy the sample app to the cluster
Now that you have set up GKE and Spanner with the necessary
services and authentication, you are ready to deploy the sample app
hello-app-cloud-spanner.
Clone the sample app from the GitHub repository to your Cloud Shell:
git clone https://github.com/GoogleCloudPlatform/kubernetes-engine-samples.gitLaunch the Cloud Shell Editor by clicking
 Open Editor on the toolbar of the terminal window.
For more information, see Cloud Shell Editor interface overview.
Open the Cloud Shell Editor's Explorer pane, and browse to the
kubernetes-engine-samples/databases/hello-app-cloud-spanner/k8sdirectory.Open the
deployment.yamlfile, and update theserviceAccountNamefield by replacing<KSA_NAME>withksa-helloapp, the name of your Kubernetes service account.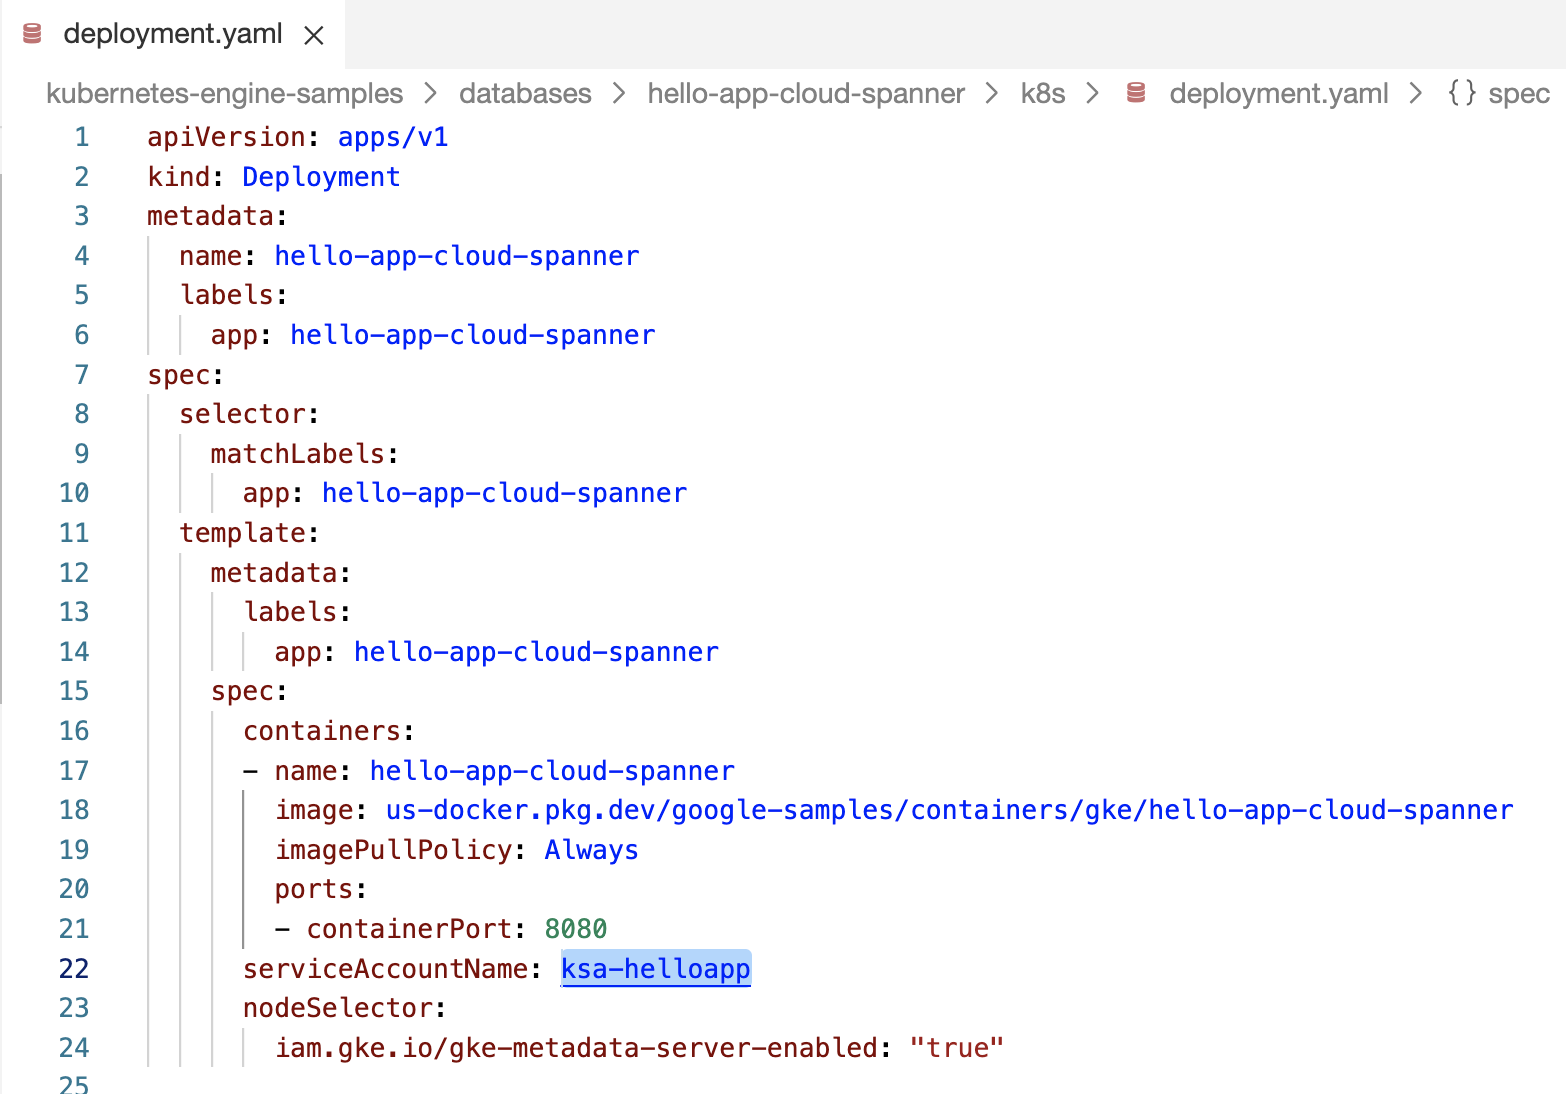
Figure 1. Update Kubernetes service account name in the deployment file. Close the Cloud Shell Editor, and return to the Cloud Shell terminal.
In the Cloud Shell terminal, navigate to the
hello-app-cloud-spannerdirectory:cd kubernetes-engine-samples/databases/hello-app-cloud-spannerDeploy the application:
kubectl apply -f k8s/deployment.yaml -n=NAMESPACEReplace
NAMESPACEwithhello-namespace.Wait for the application to be deployed with
STATUSasRunning:kubectl get pods -n=NAMESPACE --watchReplace
NAMESPACEwithhello-namespace.The output is similar to the following:
NAME                                       READY   STATUS              RESTARTS   AGE
hello-app-cloud-spanner-765c9b8779-lfcrc   0/1     ContainerCreating   0          87s
hello-app-cloud-spanner-765c9b8779-lfcrc   1/1     Running             0          3m15s
Press Ctrl+C on your keyboard to return to the command prompt to run further commands.
Expose the sample app to the internet
To expose a Kubernetes Service outside the cluster, create a Service of type
LoadBalancer.
This type of Service generates an external load balancer IP address for your
Pods, reachable through the internet.
Deploy the load balancer:
kubectl apply -f k8s/service.yaml -n=NAMESPACEReplace
NAMESPACEwithhello-namespace.Watch for an external IP address to be assigned:
kubectl get service -n=NAMESPACE --watchReplace
NAMESPACEwithhello-namespace.Once assigned, copy the
EXTERNAL-IP(for example,203.0.113.0) and open it in a browser. A web interface opens that displays and manages the database of players.You can use the app GUI to create or delete player records, and they are saved in the Spanner database.
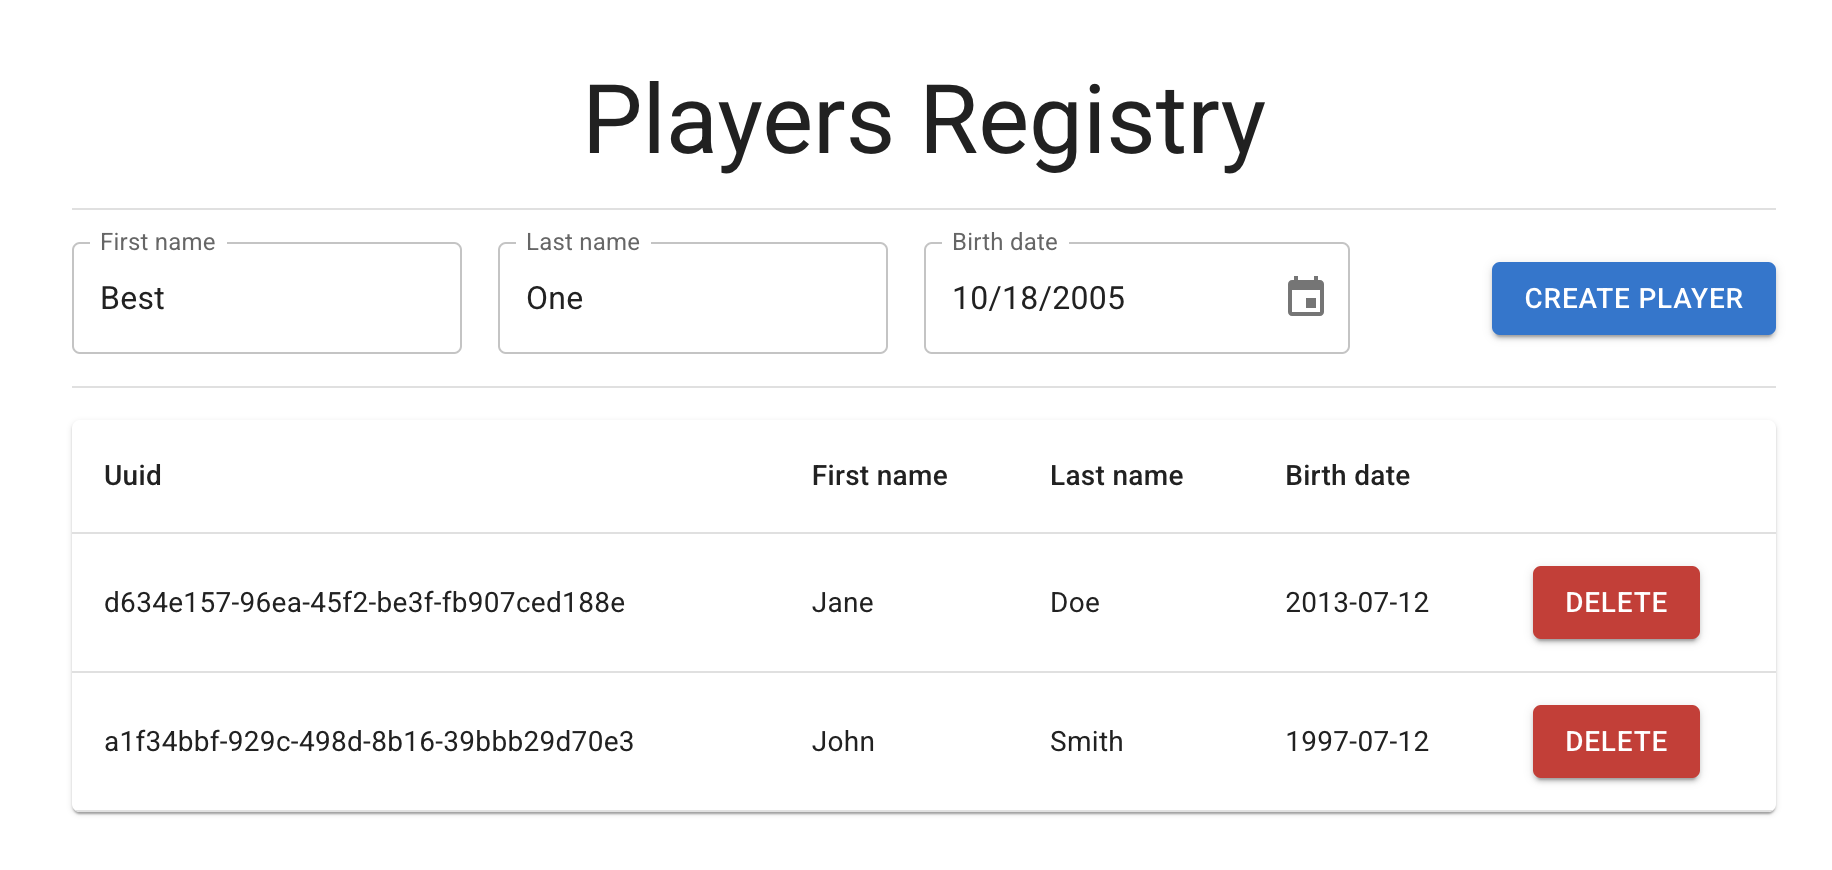
Figure 2. Create or delete players in the registry. Run the following query to verify if the Spanner database has been updated with your entries:
gcloud spanner databases execute-sql hello-database \
  --instance=hello-instance \
  --sql="SELECT * FROM Players LIMIT 10"
The output is similar to the following:
PlayerUuid: a1f34bbf-929c-498d-8b16-39bbb29d70e3
FirstName: John
LastName: Smith
BirthDate: 1997-07-12

PlayerUuid: d634e157-96ea-45f2-be3f-fb907ced188e
FirstName: Jane
LastName: Doe
BirthDate: 2013-07-12
Clean up
To avoid incurring charges to your Google Cloud account for the resources used in this tutorial, either delete the project that contains the resources, or keep the project and delete the individual resources.
Delete your project
The easiest way to avoid billing is to delete the project you created for this tutorial.
If you deleted the project, your clean up is complete. If you didn't delete the project, proceed to delete the GKE and Spanner resources.
Delete GKE resources
Delete the service. This deallocates the Google Cloud load balancer created for your Service:
kubectl delete service hello-app-cloud-spanner -n=NAMESPACEReplace
NAMESPACEwithhello-namespace.Delete the GKE cluster. This deletes the resources that constitute a cluster, such as the compute instances, disks, and network resources:
gcloud container clusters delete CLUSTER_NAME --location=CONTROL_PLANE_LOCATION
Delete Spanner resources
Delete the Spanner database:
gcloud spanner databases delete hello-database --instance=hello-instanceDelete the Spanner instance:
gcloud spanner instances delete hello-instance
What's next
- Learn how to create a GKE cluster for your Agones install.
- Learn the best practices for using Spanner as a gaming database.
- Learn how you can deploy a highly-available PostgreSQL database on GKE.
- Learn the best practices for deploying databases on GKE.