このページでは、App Engine スタンダード環境用の Cloud Endpoints Frameworks を使用してバックエンド API を構築およびデプロイする開発環境をセットアップする方法について説明します。このページでは、Endpoints Frameworks バージョン 2.0 スケルトンのコードサンプルを使用して、最初に必要となる基本的なソフトウェアとコンポーネントについて説明します。
Endpoints Frameworks バージョン 2.0 の新しいプロジェクトを作成するには、Apache Maven と App Engine プラグインの使用(Google Cloud CLI ベース)で説明されている endpoints-skeleton-archetype または hello-endpoints-archetype を使用できます。
Endpoints Frameworks を使用してサンプル API をデプロイするのに必要な手順について詳しく理解するには、App Engine での Endpoints Frameworks スタートガイドのチュートリアルをご覧ください。
始める前に
- Sign in to your Google Cloud account. If you're new to Google Cloud, create an account to evaluate how our products perform in real-world scenarios. New customers also get $300 in free credits to run, test, and deploy workloads.
-
In the Google Cloud console, on the project selector page, select or create a Google Cloud project.
Roles required to select or create a project
- Select a project: Selecting a project doesn't require a specific IAM role—you can select any project that you've been granted a role on.
-
Create a project: To create a project, you need the Project Creator
(
roles/resourcemanager.projectCreator), which contains theresourcemanager.projects.createpermission. Learn how to grant roles.
-
Verify that billing is enabled for your Google Cloud project.
-
In the Google Cloud console, on the project selector page, select or create a Google Cloud project.
Roles required to select or create a project
- Select a project: Selecting a project doesn't require a specific IAM role—you can select any project that you've been granted a role on.
-
Create a project: To create a project, you need the Project Creator
(
roles/resourcemanager.projectCreator), which contains theresourcemanager.projects.createpermission. Learn how to grant roles.
-
Verify that billing is enabled for your Google Cloud project.
- 後で必要になるため、 Google Cloud プロジェクト ID をメモしておきます。
- Java 8 がインストールされていない場合は、Oracle のサイトから Java Development Kit(JDK)をダウンロードしてインストールします。
- Maven または Gradle をインストールします。
Maven
- Apache Maven バージョン 3.3.9 以降をダウンロードします。
- Maven をインストールし、ローカル開発環境に合わせて構成します。
Gradle
- Google Cloud CLI をダウンロードして初期化します。
- 次のコマンドを実行します。
- gcloud CLI が Google Cloudのデータとサービスにアクセスできるように承認されていることを確認します。
gcloud auth login
- 次のアプリケーションのデフォルト認証情報を使用します。
gcloud auth application-default login
- Google Cloud SDK
app-engine-javaのコンポーネントをインストールします。gcloud components install app-engine-java
- Google Cloud SDK とすべてのコンポーネントを最新バージョンに更新します。
gcloud components update
- gcloud CLI が Google Cloudのデータとサービスにアクセスできるように承認されていることを確認します。
- App Engine アプリケーションを作成します。
-
デフォルト プロジェクトを実際の Google Cloud プロジェクト ID に設定します。
gcloud config set project YOUR_PROJECT_ID
YOUR_PROJECT_IDは、実際の Google Cloudプロジェクト ID に置き換えます。他にも Google Cloud プロジェクトがあり、gcloudを使用してそれらのプロジェクトを管理する場合は、gcloud CLI 構成の管理をご覧ください。 - App Engine アプリケーションを作成するリージョンを選択します。リージョンの一覧については、App Engine のロケーションをご覧ください。
- App Engine アプリケーションを作成します。
YOUR_PROJECT_IDは実際の Google Cloud プロジェクト ID に、YOUR_REGIONは App Engine アプリケーションを作成するリージョンに置き換えます。gcloud app create \ --project=YOUR_PROJECT_ID \ --region=YOUR_REGION
-
デフォルト プロジェクトを実際の Google Cloud プロジェクト ID に設定します。
ローカルマシンにサンプル リポジトリのクローンを作成します。
git clone https://github.com/GoogleCloudPlatform/java-docs-samplesEndpoints Frameworks スケルトン サンプルを含むディレクトリに移動します。
cd java-docs-samples/appengine-java8/endpoints-v2-skeleton/サンプルのディレクトリ構造は以下のとおりです。
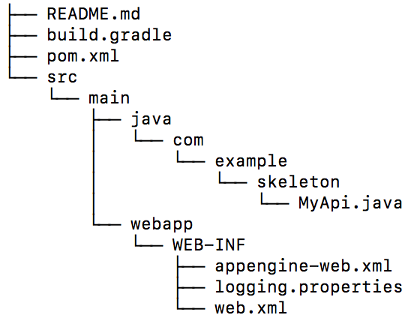
MyApi.javaには、API を作成する際に使用できる空のクラスが含まれています。作業開始にあたって役立つサンプルコードについては、echo のサンプルをご覧ください。appengine-web.xmlは、Java 8 を使用して App Engine スタンダード環境に API をデプロイする際に必要な情報を定義します。pom.xmlには、プロジェクトをビルドして API を App Engine にデプロイするために Maven が使用するプロジェクトと構成の情報が含まれています。build.gradleには、プロジェクトをビルドして API を App Engine にデプロイするために Gradle が使用するプロジェクトと構成の情報が含まれています。
endpoints-framework依存関係には、API を作成するために必要なクラスが含まれます。- App Engine Standard API SDK(
appengine-api-sdk)は、プロジェクトを App Engine スタンダード環境にデプロイするために必要となります。 - 標準の
javax.servletパッケージは、サーブレットをビルドするために必要となります。 - 標準の
javax.injectパッケージは、依存関係の挿入をサポートするために必要となります。 maven-war-pluginによりjavaプラグインが拡張され、ウェブ アプリケーションの組み立てサポートが追加されます。appengine-maven-pluginは、App Engine で API を実行するために必要となります。endpoints-framework-maven-pluginは、Endpoints Frameworks プロジェクトをビルドするためのタスクと構成を提供します。- Endpoints Frameworks Gradle プラグインは、OpenAPI ドキュメントの生成とクライアント ライブラリの生成に使用されます。
- App Engine Gradle プラグインは、プロジェクトを App Engine にデプロイするために必要となります。
javaプラグインは、Java 固有のコンパイルおよびビルドステップをプロジェクトに追加します。warプラグインによりjavaプラグインが拡張され、ウェブ アプリケーションの組み立てサポートが追加されます。endpoints-framework-serverプラグインは、Endpoints Frameworks Gradle プラグインにサーバー側のサポートを提供します。appengineプラグインは、App Engine で API を実行するために必要となります。endpoints-framework依存関係には、API を作成するために必要なクラスが含まれます。- App Engine Standard API SDK(
appengine-api-sdk)は、プロジェクトを App Engine スタンダード環境にデプロイするために必要となります。 - 標準の
javax.servletパッケージは、サーブレットをビルドするために必要となります。 - 標準の
javax.injectパッケージは、依存関係の挿入をサポートするために必要となります。 - バックエンド API コードを作成し、アノテーションを付ける。
- アノテーションについての詳細。
- API 管理を追加する。
- API をデプロイしてテストする。
- 対応するパラメータと戻り値の型に関する詳細。
必須ソフトウェアをインストールして構成する
Endpoints Frameworks スケルトン サンプルの入手
Endpoints Frameworks バージョン 2.0 のスケルトン サンプルには、Maven と Gradle 向けの必要なビルド スクリプトが含まれています。また、初めて API を作成する際に必要なファイルも含まれています。
ビルドファイルを構成する
このセクションでは、サンプルコードに含まれている Maven の pom.xml ファイルと Gradle の build.gradle ファイルについて説明します。ビルドファイルを使用して、API の作成をすぐに開始できます。独自の Google Cloud プロジェクト ID を入力すると、それをホスト名で使用できるようになります。
最小構成について
このセクションでは、ビルドファイルに必要な最小構成について説明します。
Maven
最小の依存関係
作業開始にあたって pom.xml に必要な最小限の依存関係を以下に示します。
プラグインを適用する
以下のプラグインが適用され、有効になります。
Gradle
プラグインの依存関係
API をビルドするために必要なプラグインを以下に示します。
プラグインを適用する
以下のプラグインが適用され、Gradle ビルド スクリプトで有効になります。
プロジェクトの依存関係
プロジェクトでは以下の依存関係が使用されます。
サービスのホスト名を定義する
Endpoints Frameworks は DNS と互換性のある名前を使用してサービスを一意に識別します。 Google Cloud プロジェクト ID はグローバルに一意であることが保証されているので、API のサービス名の一部として Google Cloud プロジェクト ID を使用してください。
サービスのホスト名を構成するには、 Google Cloud プロジェクト ID をビルドファイルに追加する必要があります。ホスト名は次の形式にします。
YOUR_PROJECT_ID.appspot.com
App Engine に API をデプロイすると、YOUR_PROJECT_ID.appspot.com という形式の名前を持つ DNS エントリが自動的に作成されます。ホスト名は、Cloud Endpoints サービスの名前であり、API へのリクエスト送信に使用するドメイン名でもあります。
Maven
hostname フィールドで、YOUR_PROJECT_ID を実際の Google Cloud プロジェクト ID に置き換えます。
Gradle
変数 projectID を Google Cloudプロジェクト ID に設定します。例:
def projectId = 'example-project-12345'
Endpoints サーブレットの構成
Endpoints サーブレットは受信リクエストを処理し、App Engine で実行されているバックエンド サービスにこれらのリクエストを転送します。API を Endpoints で管理するには、Endpoints サーブレットが必要です。
web.xml の詳細については、デプロイ記述子: web.xml をご覧ください。
App Engine のデプロイの構成
appengine-web.xml ファイルは、API のデプロイ時に App Engine スタンダード環境の構成を定義するために使用されます。詳細については、appengine-web.xml リファレンスをご覧ください。