Prima di iniziare
Se non l'hai ancora fatto, configura un progetto Google Cloud e due (2) bucket Cloud Storage.
Configura il progetto
- Sign in to your Google Cloud account. If you're new to Google Cloud, create an account to evaluate how our products perform in real-world scenarios. New customers also get $300 in free credits to run, test, and deploy workloads.
-
In the Google Cloud console, on the project selector page, select or create a Google Cloud project.
Roles required to select or create a project
- Select a project: Selecting a project doesn't require a specific IAM role—you can select any project that you've been granted a role on.
-
Create a project: To create a project, you need the Project Creator
(
roles/resourcemanager.projectCreator), which contains theresourcemanager.projects.createpermission. Learn how to grant roles.
-
Verify that billing is enabled for your Google Cloud project.
-
Enable the Dataproc, Compute Engine, Cloud Storage, and Cloud Run functions APIs.
Roles required to enable APIs
To enable APIs, you need the Service Usage Admin IAM role (
roles/serviceusage.serviceUsageAdmin), which contains theserviceusage.services.enablepermission. Learn how to grant roles. -
Install the Google Cloud CLI.
-
Se utilizzi un provider di identità (IdP) esterno, devi prima accedere a gcloud CLI con la tua identità federata.
-
Per inizializzare gcloud CLI, esegui questo comando:
gcloud init -
In the Google Cloud console, on the project selector page, select or create a Google Cloud project.
Roles required to select or create a project
- Select a project: Selecting a project doesn't require a specific IAM role—you can select any project that you've been granted a role on.
-
Create a project: To create a project, you need the Project Creator
(
roles/resourcemanager.projectCreator), which contains theresourcemanager.projects.createpermission. Learn how to grant roles.
-
Verify that billing is enabled for your Google Cloud project.
-
Enable the Dataproc, Compute Engine, Cloud Storage, and Cloud Run functions APIs.
Roles required to enable APIs
To enable APIs, you need the Service Usage Admin IAM role (
roles/serviceusage.serviceUsageAdmin), which contains theserviceusage.services.enablepermission. Learn how to grant roles. -
Install the Google Cloud CLI.
-
Se utilizzi un provider di identità (IdP) esterno, devi prima accedere a gcloud CLI con la tua identità federata.
-
Per inizializzare gcloud CLI, esegui questo comando:
gcloud init - In the Google Cloud console, go to the Cloud Storage Buckets page.
- Click Create.
- On the Create a bucket page, enter your bucket information. To go to the next
step, click Continue.
-
In the Get started section, do the following:
- Enter a globally unique name that meets the bucket naming requirements.
- To add a
bucket label,
expand the Labels section (),
click add_box
Add label, and specify a
keyand avaluefor your label.
-
In the Choose where to store your data section, do the following:
- Select a Location type.
- Choose a location where your bucket's data is permanently stored from the Location type drop-down menu.
- If you select the dual-region location type, you can also choose to enable turbo replication by using the relevant checkbox.
- To set up cross-bucket replication, select
Add cross-bucket replication via Storage Transfer Service and
follow these steps:
Set up cross-bucket replication
- In the Bucket menu, select a bucket.
In the Replication settings section, click Configure to configure settings for the replication job.
The Configure cross-bucket replication pane appears.
- To filter objects to replicate by object name prefix, enter a prefix that you want to include or exclude objects from, then click Add a prefix.
- To set a storage class for the replicated objects, select a storage class from the Storage class menu. If you skip this step, the replicated objects will use the destination bucket's storage class by default.
- Click Done.
-
In the Choose how to store your data section, do the following:
- Select a default storage class for the bucket or Autoclass for automatic storage class management of your bucket's data.
- To enable hierarchical namespace, in the Optimize storage for data-intensive workloads section, select Enable hierarchical namespace on this bucket.
- In the Choose how to control access to objects section, select whether or not your bucket enforces public access prevention, and select an access control method for your bucket's objects.
-
In the Choose how to protect object data section, do the
following:
- Select any of the options under Data protection that you
want to set for your bucket.
- To enable soft delete, click the Soft delete policy (For data recovery) checkbox, and specify the number of days you want to retain objects after deletion.
- To set Object Versioning, click the Object versioning (For version control) checkbox, and specify the maximum number of versions per object and the number of days after which the noncurrent versions expire.
- To enable the retention policy on objects and buckets, click the Retention (For compliance) checkbox, and then do the following:
- To enable Object Retention Lock, click the Enable object retention checkbox.
- To enable Bucket Lock, click the Set bucket retention policy checkbox, and choose a unit of time and a length of time for your retention period.
- To choose how your object data will be encrypted, expand the Data encryption section (), and select a Data encryption method.
- Select any of the options under Data protection that you
want to set for your bucket.
-
In the Get started section, do the following:
- Click Create.
- Crea il modello di workflow.
  gcloud dataproc workflow-templates create wordcount-template \
      --region=us-central1
- Aggiungi il job di conteggio parole al modello di workflow.
-
Specifica output-bucket-name prima di eseguire
il comando (la funzione fornirà il bucket di input).
Dopo aver inserito il nome del bucket di output, l'argomento
del bucket di output dovrebbe essere il seguente:
gs://your-output-bucket/wordcount-output". -
L'ID passaggio "count"
è obbligatorio e identifica il job Hadoop aggiunto.
          gcloud dataproc workflow-templates add-job hadoop \
              --workflow-template=wordcount-template \
              --step-id=count \
              --jar=file:///usr/lib/hadoop-mapreduce/hadoop-mapreduce-examples.jar \
              --region=us-central1 \
              -- wordcount gs://input-bucket gs://output-bucket-name/wordcount-output
-
Specifica output-bucket-name prima di eseguire
il comando (la funzione fornirà il bucket di input).
Dopo aver inserito il nome del bucket di output, l'argomento
del bucket di output dovrebbe essere il seguente:
- Utilizza un cluster
gestito,
a un solo nodo
per eseguire il flusso di lavoro. Dataproc creerà il cluster, eseguirà il workflow e lo eliminerà al termine del workflow.
gcloud dataproc workflow-templates set-managed-cluster wordcount-template \ --cluster-name=wordcount \ --single-node \ --region=us-central1 - Fai clic sul nome di
wordcount-templatenella pagina Workflows di Dataproc nella console Google Cloud per aprire la pagina Dettagli modello di flusso di lavoro. Conferma gli attributi wordcount-template.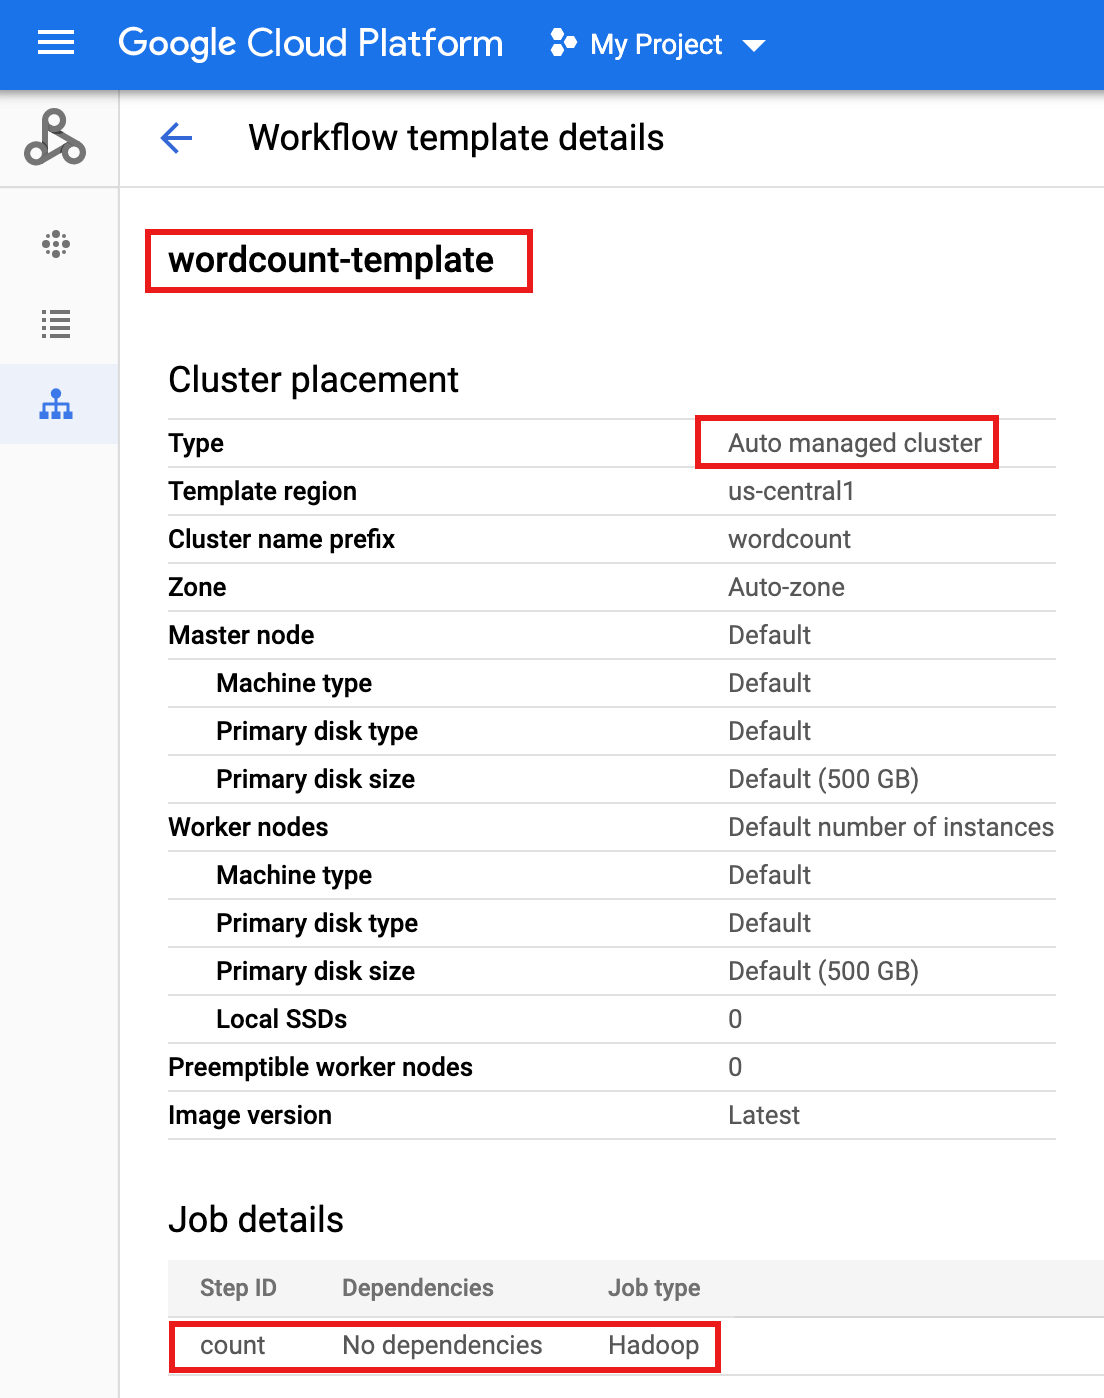
- Esporta il modello di workflow in un file di testo
wordcount.yamlper la parametrizzazione.gcloud dataproc workflow-templates export wordcount-template \ --destination=wordcount.yaml \ --region=us-central1
- Utilizzando un editor di testo, apri
wordcount.yaml, quindi aggiungi un bloccoparametersalla fine del file YAML in modo che INPUT_BUCKET_URI di Cloud Storage possa essere trasmesso comeargs[1]al binario wordcount quando viene attivato il flusso di lavoro.Di seguito è riportato un file YAML esportato di esempio. Per aggiornare il modello, puoi adottare uno dei due approcci seguenti:
- Copia e incolla l'intero file per sostituire il file
wordcount.yamlesportato dopo aver sostituito your-output_bucket con il nome del bucket di output OPPURE - Copia e incolla solo la sezione
parametersalla fine del filewordcount.yamlesportato.
jobs: - hadoopJob: args: - wordcount - gs://input-bucket - gs://your-output-bucket/wordcount-output mainJarFileUri: file:///usr/lib/hadoop-mapreduce/hadoop-mapreduce-examples.jar stepId: count placement: managedCluster: clusterName: wordcount config: softwareConfig: properties: dataproc:dataproc.allow.zero.workers: 'true' parameters: - name: INPUT_BUCKET_URI description: wordcount input bucket URI fields: - jobs['count'].hadoopJob.args[1] - Copia e incolla l'intero file per sostituire il file
- Importa il file di testo
wordcount.yamlcon parametri. Digita "Y" per sovrascrivere il modello.gcloud dataproc workflow-templates import wordcount-template \ --source=wordcount.yaml \ --region=us-central1
Apri la pagina Cloud Run Functions nella console Google Cloud , poi fai clic su CREA FUNZIONE.
Nella pagina Crea funzione, inserisci o seleziona le seguenti informazioni:
- Name: wordcount
- Memoria allocata:mantieni la selezione predefinita.
- Trigger:
- Cloud Storage
- Tipo di evento: Finalizza/crea
- Bucket: seleziona il bucket di input (vedi Creare un bucket Cloud Storage nel tuo progetto). Quando un file viene aggiunto a questo bucket, la funzione attiva il flusso di lavoro. Il flusso di lavoro eseguirà l'applicazione wordcount, che elaborerà tutti i file di testo nel bucket.
Codice sorgente:
- Editor in linea
- Runtime: Node.js 8
- scheda
INDEX.JS: sostituisci lo snippet di codice predefinito con il seguente codice, poi modifica la rigaconst projectIdper fornire -your-project-id- (senza "-" iniziale o finale).
const dataproc = require('@google-cloud/dataproc').v1; exports.startWorkflow = (data) => { const projectId = '-your-project-id-' const region = 'us-central1' const workflowTemplate = 'wordcount-template' const client = new dataproc.WorkflowTemplateServiceClient({ apiEndpoint: `${region}-dataproc.googleapis.com`, }); const file = data; console.log("Event: ", file); const inputBucketUri = `gs://${file.bucket}/${file.name}`; const request = { name: client.projectRegionWorkflowTemplatePath(projectId, region, workflowTemplate), parameters: {"INPUT_BUCKET_URI": inputBucketUri} }; client.instantiateWorkflowTemplate(request) .then(responses => { console.log("Launched Dataproc Workflow:", responses[1]); }) .catch(err => { console.error(err); }); };- Scheda
PACKAGE.JSON: sostituisci lo snippet di codice predefinito con il seguente codice.
{ "name": "dataproc-workflow", "version": "1.0.0", "dependencies":{ "@google-cloud/dataproc": ">=1.0.0"} }- Funzione da eseguire: inserisci "startWorkflow".
Fai clic su CREA.
Copia il file pubblico
rose.txtnel tuo bucket per attivare la funzione. Inserisci your-input-bucket-name (il bucket utilizzato per attivare la funzione) nel comando.gcloud storage cp gs://pub/shakespeare/rose.txt gs://your-input-bucket-name
Attendi 30 secondi, poi esegui questo comando per verificare che la funzione sia stata completata correttamente.
gcloud functions logs read wordcount
...
Function execution took 1348 ms, finished with status: 'ok'
Per visualizzare i log della funzione dalla pagina di elenco Funzioni nella console Google Cloud , fai clic sul nome della funzione
wordcount, quindi su VISUALIZZA LOG nella pagina Dettagli funzione.
Puoi visualizzare la cartella
wordcount-outputnel bucket di output dalla pagina Browser di archiviazione nella consoleGoogle Cloud .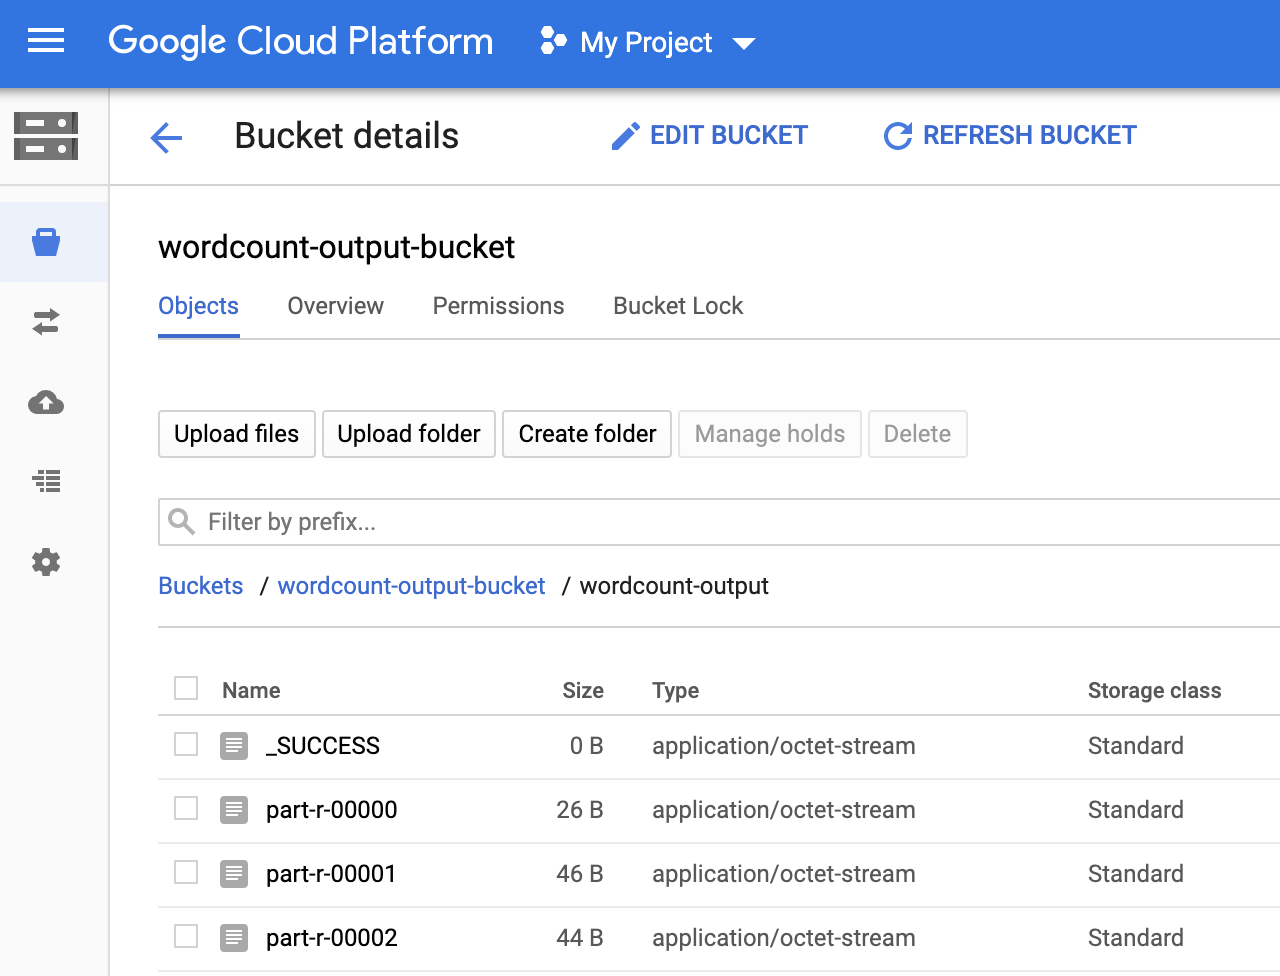
Al termine del workflow, i dettagli del job vengono conservati nella consoleGoogle Cloud . Fai clic sul job
count...elencato nella pagina Job di Dataproc per visualizzare i dettagli del job del flusso di lavoro.
- In the Google Cloud console, go to the Manage resources page.
- In the project list, select the project that you want to delete, and then click Delete.
- In the dialog, type the project ID, and then click Shut down to delete the project.
- In the Google Cloud console, go to the Cloud Storage Buckets page.
- Click the checkbox for the bucket that you want to delete.
- To delete the bucket, click Delete, and then follow the instructions.
- Vedi Panoramica dei modelli di flusso di lavoro Dataproc.
- Vedi Soluzioni di pianificazione del flusso di lavoro.
Crea o utilizza due bucket Cloud Storage nel tuo progetto
Nel tuo progetto avrai bisogno di due bucket Cloud Storage: uno per i file di input e un altro per l'output.
Crea un modello di flusso di lavoro
Per creare e definire un modello di workflow, copia ed esegui i seguenti comandi in una finestra del terminale locale o in Cloud Shell.
Parametrizzare il modello di workflow
Parametrizza la variabile del bucket di input da passare al modello di workflow.
Crea una funzione Cloud
Testare la funzione
Esegui la pulizia
Il flusso di lavoro di questo tutorial elimina il cluster gestito al termine del flusso di lavoro. Per evitare costi ricorrenti, puoi eliminare altre risorse associate a questo tutorial.
Eliminare un progetto
Elimina bucket Cloud Storage
Eliminare il modello di workflow
gcloud dataproc workflow-templates delete wordcount-template \
    --region=us-central1
Elimina la funzione Cloud
Apri la pagina Cloud Run Functions nella
console Google Cloud , seleziona la casella a sinistra della funzione wordcount,
quindi fai clic su Elimina.