Questa pagina descrive come configurare la pipeline di dati per leggere i dati da una tabella Microsoft SQL Server.
Prima di iniziare
- Sign in to your Google Cloud account. If you're new to Google Cloud, create an account to evaluate how our products perform in real-world scenarios. New customers also get $300 in free credits to run, test, and deploy workloads.
-
In the Google Cloud console, on the project selector page, select or create a Google Cloud project.
Roles required to select or create a project
- Select a project: Selecting a project doesn't require a specific IAM role—you can select any project that you've been granted a role on.
-
Create a project: To create a project, you need the Project Creator
(
roles/resourcemanager.projectCreator), which contains theresourcemanager.projects.createpermission. Learn how to grant roles.
-
Verify that billing is enabled for your Google Cloud project.
-
Enable the Cloud Data Fusion, BigQuery, Cloud Storage, and Dataproc APIs.
Roles required to enable APIs
To enable APIs, you need the Service Usage Admin IAM role (
roles/serviceusage.serviceUsageAdmin), which contains theserviceusage.services.enablepermission. Learn how to grant roles. - Crea un'istanza Cloud Data Fusion.
- Il database SQL Server deve accettare connessioni da Cloud Data Fusion. Per motivi di sicurezza, utilizza un'istanza Cloud Data Fusion privata.
Nella console Google Cloud , vai alla pagina Istanze di Cloud Data Fusion.
Nella colonna Azioni per l'istanza, fai clic su Visualizza istanza per aprire l'istanza in Cloud Data Fusion.
Apri l'istanza Cloud Data Fusion
Archivia la password di SQL Server come chiave sicura
Aggiungi la password di SQL Server come chiave sicura nell'istanza Cloud Data Fusion.
In Cloud Data Fusion, fai clic su Amministratore di sistema.
Fai clic sulla scheda Configuration (Configurazione).
Fai clic su Effettua chiamate HTTP.

Seleziona PUT.
Nel campo del percorso, inserisci
namespaces/NAMESPACE_ID/securekeys/password.Nel campo Corpo, inserisci
{"data":"password"}. Sostituisci password con la password di SQL Server.Fai clic su Invia.
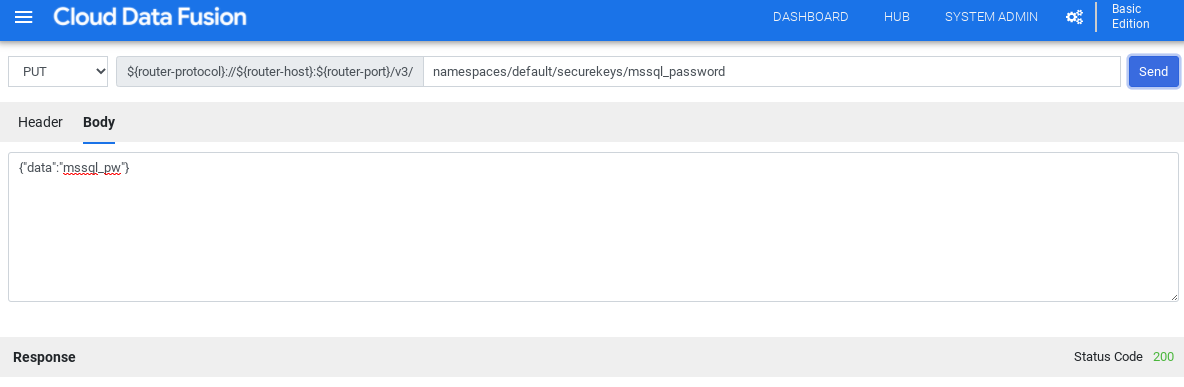
Per continuare, la risposta deve avere il codice di stato 200.
Ottieni il driver JDBC per SQL Server
Puoi ottenere il driver dall'hub o in Pipeline Studio in Cloud Data Fusion.
Hub
Nella UI di Cloud Data Fusion, fai clic su Hub.
Nella barra di ricerca, inserisci
SQL Server JDBC Drivere seleziona il driver.Fai clic su Scarica. Segui i passaggi di download mostrati.
Fai clic su Esegui il deployment. Carica il file JAR del passaggio precedente.
Fai clic su Fine.
Pipeline Studio
Vai su Microsoft.com.
Scegli il download e fai clic su Scarica.
In Cloud Data Fusion, fai clic su menu Menu e vai alla pagina Pipeline Studio.
Fai clic su Aggiungi.
Per il driver, fai clic su Carica.
Seleziona il file JAR, che si trova nella cartella
jre7.Fai clic su Avanti.
Per configurare il driver, inserisci un nome e un nome della classe.
Fai clic su Fine.
Esegui il deployment del plug-in SQL Server
In Cloud Data Fusion, fai clic su Hub.
Nella barra di ricerca, inserisci
SQL Server Plugins.Fai clic su Plug-in SQL Server.
Fai clic su Esegui il deployment.
Fai clic su Fine.
Fai clic su Crea una pipeline.
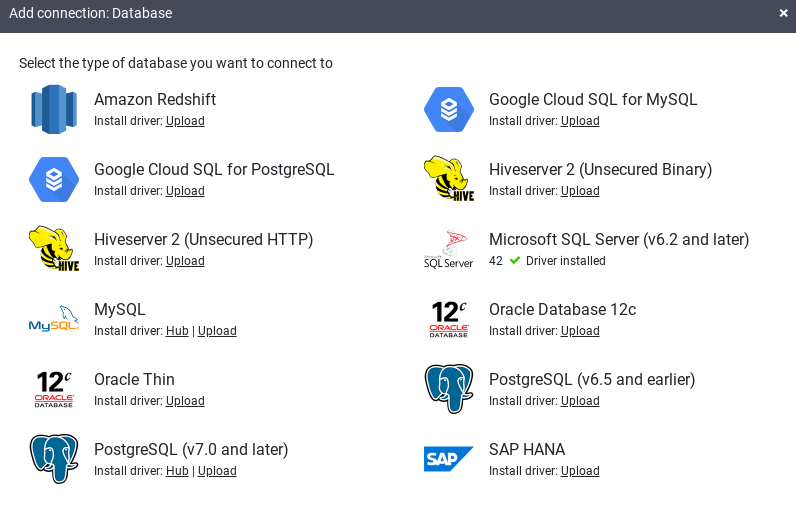
Connettiti a SQL Server
Puoi connetterti a SQL Server da Cloud Data Fusion in Wrangler o Pipeline Studio.
Wrangler
In Cloud Data Fusion, fai clic su menu Menu e vai alla pagina Wrangler.
Fai clic su Aggiungi connessione.
Si apre una finestra Aggiungi connessione.
Fai clic su SQL Server per verificare che il driver sia installato.
Inserisci i dettagli nei campi di connessione richiesti. Nel campo Password, seleziona la chiave sicura che hai memorizzato in precedenza. Garantisce che la password venga recuperata utilizzando Cloud KMS.
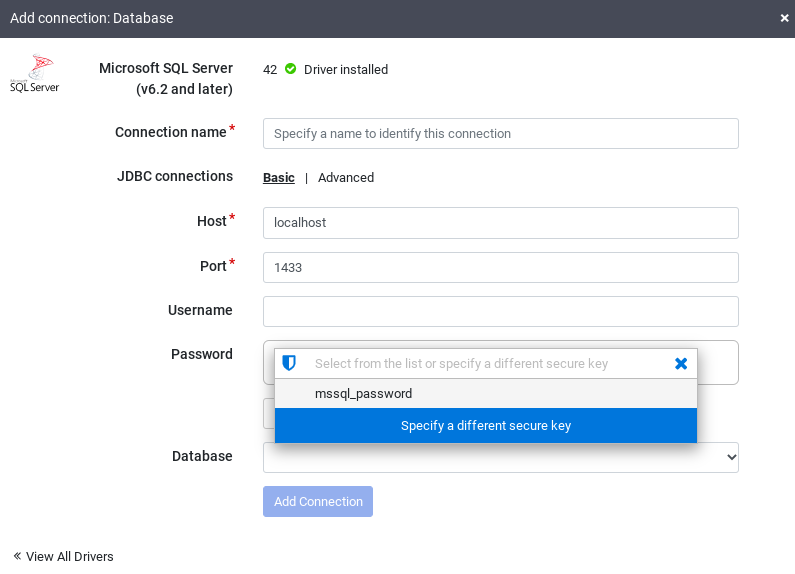
Per verificare che sia possibile stabilire una connessione con il database, fai clic su Prova connessione.
Fai clic su Aggiungi connessione.
Dopo aver connesso il database SQL Server e creato una pipeline che legge dalla tabella SQL Server, puoi applicare trasformazioni e scrivere l'output in un sink.
Pipeline Studio
Apri l'istanza Cloud Data Fusion e vai alla pagina Pipeline Studio.
Espandi il menu Origine e fai clic su SQL Server.

Nel nodo SQL Server, fai clic su Properties (Proprietà).
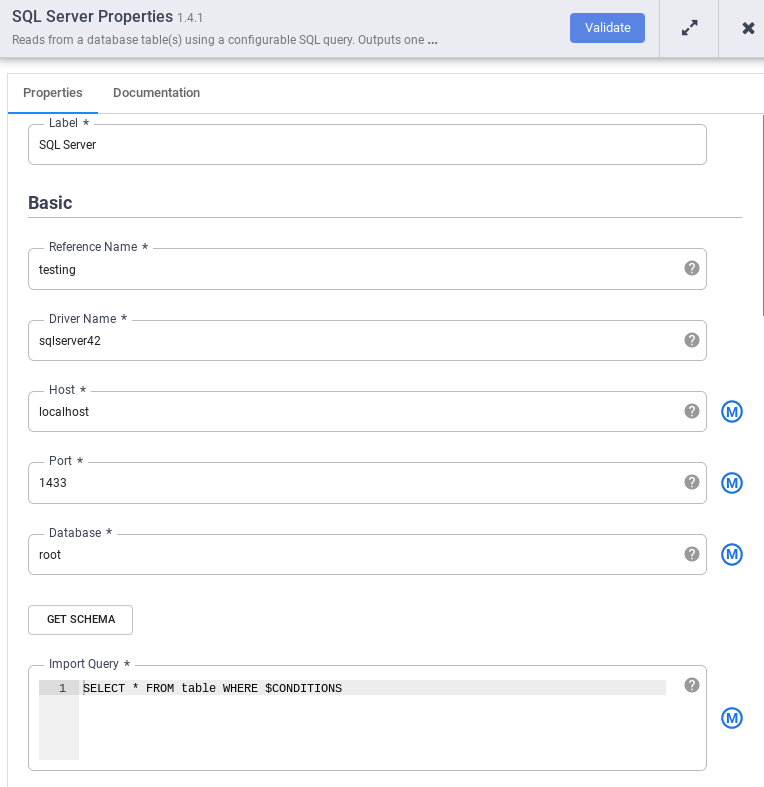
Nel campo Nome di riferimento, inserisci un nome che identifichi l'origine SQL Server.
Nel campo Database, inserisci il nome del database a cui connetterti.
Nel campo Importa query, inserisci la query da eseguire. Ad esempio,
SELECT * FROM table WHERE $CONDITIONS.Fai clic su Validate (Convalida).
Fai clic su Chiudi .
Dopo aver connesso il database SQL Server e creato una pipeline che legge dalla tabella SQL Server, aggiungi le trasformazioni che preferisci e scrivi l'output in un sink.
Passaggi successivi
- Scopri come leggere i dati da più tabelle SQL Server.
- Scopri di più su Cloud Data Fusion.
- Segui uno dei tutorial.