Google Cloud NetApp Volumes는 공유 파일 서비스 및 스토리지 관리 기능을 신속하게 프로비저닝하여 클라우드 기반 애플리케이션 배포 속도를 높입니다. NetApp Volumes를 VMware Engine에 연결하면 워크로드 가상 머신(VM)의 게스트 OS 내에서 NetApp Volumes 볼륨을 마운트할 수 있습니다.
다음은 VMware Engine에 NetApp Volumes를 사용할 수 있는 일반적인 사용 사례입니다.
가상 데스크톱 인프라(VDI)
VM 홈 디렉터리 만들기
파일 서비스 설정
애플리케이션 및 데이터베이스용 공유 파일 스토리지
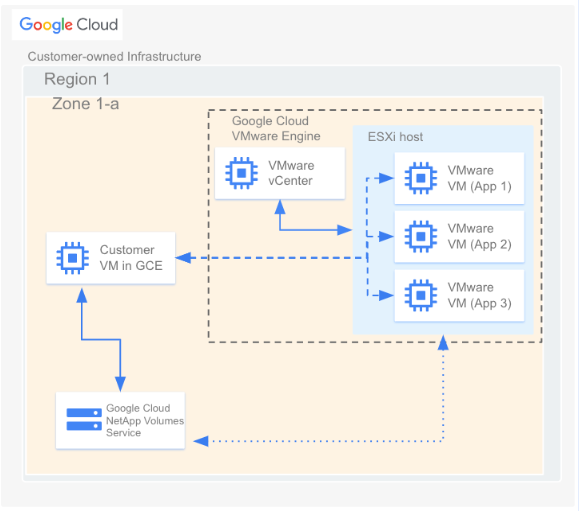
또한 Compute Engine과 Google Cloud VMware Engine의 VM은 모두 동일한 볼륨을 마운트할 수 있습니다. 다음 다이어그램은 VMware Engine 및 Compute Engine과 함께 사용되는 Google Cloud NetApp Volumes를 보여줍니다.
시작하기 전에
이 문서의 단계에서는 다음 작업을 완료했다고 가정합니다.
선택한 위치, 서비스 수준, 용량, 데이터 암호화, AD 정책을 사용하여 스토리지 풀을 만들었습니다.
특정 리전에서 선택한 매개변수(예: 할당된 용량 및 프로토콜 유형)가 있는 기존 스토리지 풀에 볼륨을 만들었습니다. 이 문서에서 설명하는 연결에 NFSv3, NFSv4 또는 SMB 볼륨을 사용할 수 있습니다.
프로젝트의 NetApp Volumes에서 만든 피어링 연결을 선택합니다.
연결 이름은 sn-netapp-prod입니다.
피어링된 VPC 네트워크가 두 개 이상 있는 경우 동일한 이름의 피어링 연결이 여러 개 표시될 수 있습니다. VPC 네트워크 피어링 연결을 설정하는 사람은 VMware Engine에 사용할 연결을 결정하는 데 도움을 줄 수 있습니다.
각각 netapp으로 시작하고 -tp로 끝나는 피어링된 VPC 네트워크 및 피어링된 프로젝트 ID 필드를 복사합니다.
기존 네트워크에 피어링 연결 만들기
VMware Engine과 NetApp Volumes 서비스 간에 연결을 설정하려면 테넌트 호스트 프로젝트 간에 일회성 피어링을 수행합니다. 2023년 11월 12일 이전에 VMware Engine 프로젝트 및 프라이빗 클라우드를 만든 경우 이전 버전의 VMware Engine 네트워크를 사용합니다. 이전 버전의 VMware Engine 네트워크를 사용하는 환경에서는 다음을 수행합니다.
[[["이해하기 쉬움","easyToUnderstand","thumb-up"],["문제가 해결됨","solvedMyProblem","thumb-up"],["기타","otherUp","thumb-up"]],[["이해하기 어려움","hardToUnderstand","thumb-down"],["잘못된 정보 또는 샘플 코드","incorrectInformationOrSampleCode","thumb-down"],["필요한 정보/샘플이 없음","missingTheInformationSamplesINeed","thumb-down"],["번역 문제","translationIssue","thumb-down"],["기타","otherDown","thumb-down"]],["최종 업데이트: 2024-12-21(UTC)"],[],[],null,["# Connecting workload VMs to Google Cloud NetApp Volumes\n======================================================\n\n[Google Cloud NetApp Volumes](/architecture/partners/netapp-cloud-volumes) speeds up the deployment of\ncloud-based applications through rapid provisioning of shared file services and\nstorage management features. Connecting NetApp Volumes to\nVMware Engine lets you mount NetApp Volumes volumes\nfrom within the guest OS of your workload virtual machines (VMs).\n\nHere are some common use cases for using NetApp Volumes with\nVMware Engine:\n\n- Virtual desktop infrastructure (VDI)\n- Creating VM home directories\n- Setting up file services\n- Shared file storage for applications and databases\n\nAdditionally, VMs in Compute Engine and Google Cloud VMware Engine can both mount\nthe same volumes. Here's a diagram that shows Google Cloud NetApp Volumes being\nused with VMware Engine and Compute Engine:\n\nBefore you begin\n----------------\n\nThe steps in this document assume that you have done the following:\n\n- [Created a Storage Pool](/netapp/volumes/docs/configure-and-use/storage-pools/create-storage-pool) with the chosen location, service level, capacity, data encryption, and AD policy.\n- [Created a Volume](/netapp/volumes/docs/configure-and-use/volumes/create-volume) in a pre-existing storage pool with the selected parameters (like allocated capacity and protocol type) in a given region. You can use NFSv3, NFSv4, or SMB volumes for the connection described in this document.\n- [Created a private cloud](/vmware-engine/docs/private-clouds/howto-create-private-cloud) in the same region as your volume.\n\nGet VPC network details\n-----------------------\n\nWhen creating a peering connection between VMware Engine and\nNetApp Volumes, you need some details about the VPC network\nused by NetApp Volumes. To get these details, do the following:\n\n1. In the Google Cloud console, go to the **VPC Network peerings** page.\n\n [Go to VPC Network peerings](https://console.cloud.google.com/vmwareengine/network-peerings)\n2. Click **Select a project** and then select the organization, folder, or project that\n contains the peering connection.\n\n3. Select the peering connection created in NetApp Volumes for\n your project.\n The connection is named `sn-netapp-prod`.\n\n You might see multiple peering connections with the same name if you\n have more than one peered VPC network. The person who set up the\n VPC Network Peering connections can help you determine which connection\n to use for VMware Engine.\n4. Copy the **Peered VPC network** and **Peered project ID** fields, which\n begin with *netapp* and end with *-tp*, respectively.\n\nCreate a peering connection\n---------------------------\n\nIf your VMware Engine project and private clouds were created after\nNov 12, 2023, do the following. For more information on how to create VPC\npeerings for such environments, see [Peer a VPC network](/vmware-engine/docs/networking/peer-vpc-network).\n\n1. In the Google Cloud console, go to the **VPC Network peerings** page.\n\n [Go to VPC Network peerings](https://console.cloud.google.com/vmwareengine/network-peerings)\n2. Click **Select a project** and then select the organization, folder, or project where\n you want to create the peering connection.\n\n3. Click **Create**.\n\n4. In the **Name** field, provide a name for your networking peering. For\n example, `peering-2-netapp-volumes`.\n\n5. In the **VMware Engine network** section, keep the default **\"In current\n project\"** selected. Specify the VMware Engine network you want to\n peer, for example `ven1`.\n\n6. For **Peering** , select **Google Cloud NetApp Volumes**.\n\n7. In the **Service tenant project ID** field, enter the *peered project ID* of\n the Google Cloud project containing your volume.\n\n8. In the **Service tenant VPC name** field, enter the name of the *peered VPC\n network* your volume is in.\n\n9. In the **Route exchange** section, keep the default settings.\n\n10. Click **Create**.\n\nMount a volume\n--------------\n\nOnce the peering status is listed as *Active*, you can mount your NetApp Volumes\nvolume.\nPerform the mounting process from within the guest OS of your VMware VM.\n\nTo mount an NFS volume, do the following:\n\n1. In the Google Cloud console, go to **NetApp Volumes \\\u003e\n Volumes**.\n\n [Go to the Volumes page](https://console.cloud.google.com/netapp/cloud-volumes/volumes)\n2. Click **Select a project** and then select the organization, folder, or project that\n contains the volume.\n\n3. Click the NFS volume for which you want to mount NFS exports.\n\n4. Go to the right, click **More**\n *more_vert* , and then click\n **Mount Instructions**.\n\n5. Follow the instructions in the **Mount Instructions for NFS** window that\n appears. The mounting instructions might be slightly different depending on\n which NFS protocol you have configured for the volume.\n\nTo mount an SMB volume, do the following:\n\n1. In the Google Cloud console, go to **NetApp Volumes \\\u003e\n Volumes**.\n\n [Go to the Volumes page](https://console.cloud.google.com/netapp/cloud-volumes/volumes)\n2. Click **Select a project** and then select the organization, folder, or project that\n contains the volume.\n\n3. Click the SMB volume for which you want to map an SMB share.\n\n4. Go to the right, click **More**\n *more_vert* , and then click\n **Mount Instructions**.\n\n5. Follow the instructions in the **Mount Instructions for SMB** window that\n appears.\n\nAfter you mount your volume, you can manage the volume using the standard\ninterfaces described by [Edit a volume](/netapp/volumes/docs/configure-and-use/volumes/edit-volume)."]]