Organiza tus páginas con colecciones
Guarda y categoriza el contenido según tus preferencias.
Cómo conectar las VMs de la carga de trabajo a Google Cloud NetApp Volumes
Google Cloud NetApp Volumes acelera la implementación de
aplicaciones basadas en la nube mediante un aprovisionamiento rápido de servicios de archivos compartidos y
funciones de administración de almacenamiento. Conectar NetApp Volumes a
VMware Engine te permite activar volúmenes de NetApp Volumes
desde el SO invitado de las máquinas virtuales (VM) de carga de trabajo.
Estos son algunos casos de uso comunes para usar volúmenes de NetApp con
VMware Engine:
Infraestructura de escritorio virtual (VDI)
Crea directorios de inicio de VM
Configura servicios de archivos
Almacenamiento de archivos compartido para aplicaciones y bases de datos
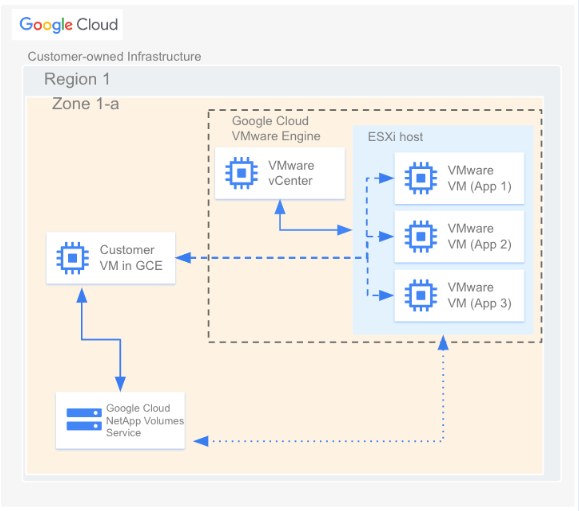
Además, las VMs en Compute Engine y Google Cloud VMware Engine pueden activar
los mismos volúmenes. En el siguiente diagrama, se muestra que Google Cloud NetApp Volumes se usa
con VMware Engine y Compute Engine:
Antes de comenzar
En los pasos de este documento, se supone que hiciste completaste los siguientes pasos:
Creaste un grupo de almacenamiento con la ubicación, el nivel de servicio, la capacidad, la encriptación de datos y la política de AD elegidos.
Creaste un volumen en un grupo de almacenamiento preexistente con los
parámetros seleccionados (como capacidad asignada y tipo de protocolo) en una
región determinada. Puedes usar volúmenes NFSv3, NFSv4 o SMB para la conexión
descrita en este documento.
Cuando creas una conexión de intercambio de tráfico entre VMware Engine y NetApp Volumes, necesitas algunos detalles sobre la red de VPC que usa NetApp Volumes. Para obtener estos detalles, haz lo siguiente:
En la Google Cloud consola, ve a la página Intercambio de tráfico entre redes de VPC.
Haz clic en Seleccionar un proyecto y, luego, selecciona la organización, la carpeta o el proyecto que contiene la conexión de intercambio.
Selecciona la conexión de intercambio de tráfico creada en NetApp Volumes para
tu proyecto.
La conexión se llama sn-netapp-prod.
Es posible que veas varias conexiones de intercambio de tráfico con el mismo nombre si
tienes más de una red de VPC con intercambio de tráfico. La persona que configuró
las conexiones de intercambio de tráfico de la red de VPC puede ayudarte a determinar qué
conexión usar para VMware Engine.
Copia los campos Red de VPC con intercambio de tráfico y ID del proyecto de intercambio de tráfico, que comienzan con netapp y terminan con -tp, respectivamente.
Crear conexión de intercambio de tráfico
Si tu proyecto de VMware Engine y tus nubes privadas se crearon después del 12 de noviembre de 2023, haz lo siguiente: Para obtener más información sobre cómo crear intercambios de tráfico entre VPC para esos entornos, consulta Cómo establecer un intercambio de tráfico entre una red de VPC.
En la Google Cloud consola, ve a la página Intercambio de tráfico entre redes de VPC.
Haz clic en Seleccionar un proyecto y, luego, selecciona la organización, la carpeta o el proyecto en el que deseas crear la conexión de intercambio.
Haz clic en Crear.
En el campo Nombre, proporciona un nombre para el intercambio de tráfico de red. Por ejemplo, peering-2-netapp-volumes.
En la sección Red de VMware Engine, mantén seleccionada la opción predeterminada "En el proyecto actual". Especifica la red de VMware Engine con la que deseas establecer la vinculación, por ejemplo, ven1.
En Intercambio de tráfico, selecciona Google Cloud NetApp Volumes.
En el campo ID de proyecto del usuario del servicio, ingresa el ID del proyecto de intercambio de tráfico del
proyecto Google Cloud que contiene tu volumen.
En el campo Nombre de la VPC del usuario del servicio, ingresa el nombre de la red de VPC con intercambio de tráfico en la que se encuentra tu volumen.
En la sección Cambio de ruta, mantén la configuración predeterminada.
Haz clic en Crear.
Activa un volumen
Una vez que el estado del intercambio de tráfico aparezca como Activo, podrás activar tu volumen de
NetApp Volumes.
Realiza el proceso de activación desde el SO invitado de tu VM de VMware.
Para activar un volumen NFS, sigue estos pasos:
En la Google Cloud consola, ve a NetApp Volumes >
Volumes.
Haz clic en Seleccionar un proyecto y, luego, selecciona la organización, la carpeta o el proyecto que contiene el volumen.
Haz clic en el volumen NFS para el que deseas activar las exportaciones de NFS.
Ve a la derecha, haz clic en Másmore_vert y, luego, en Instrucciones de activación.
Sigue las instrucciones en la ventana Instrucciones de activación para NFS que
aparece. Las instrucciones de activación pueden ser un poco diferentes según
el protocolo NFS que hayas configurado para el volumen.
Para activar un volumen SMB, sigue estos pasos:
En la Google Cloud consola, ve a NetApp Volumes >
Volumes.
[[["Fácil de comprender","easyToUnderstand","thumb-up"],["Resolvió mi problema","solvedMyProblem","thumb-up"],["Otro","otherUp","thumb-up"]],[["Difícil de entender","hardToUnderstand","thumb-down"],["Información o código de muestra incorrectos","incorrectInformationOrSampleCode","thumb-down"],["Faltan la información o los ejemplos que necesito","missingTheInformationSamplesINeed","thumb-down"],["Problema de traducción","translationIssue","thumb-down"],["Otro","otherDown","thumb-down"]],["Última actualización: 2025-09-04 (UTC)"],[],[],null,["# Connecting workload VMs to Google Cloud NetApp Volumes\n======================================================\n\n[Google Cloud NetApp Volumes](/architecture/partners/netapp-cloud-volumes) speeds up the deployment of\ncloud-based applications through rapid provisioning of shared file services and\nstorage management features. Connecting NetApp Volumes to\nVMware Engine lets you mount NetApp Volumes volumes\nfrom within the guest OS of your workload virtual machines (VMs).\n\nHere are some common use cases for using NetApp Volumes with\nVMware Engine:\n\n- Virtual desktop infrastructure (VDI)\n- Creating VM home directories\n- Setting up file services\n- Shared file storage for applications and databases\n\nAdditionally, VMs in Compute Engine and Google Cloud VMware Engine can both mount\nthe same volumes. Here's a diagram that shows Google Cloud NetApp Volumes being\nused with VMware Engine and Compute Engine:\n\nBefore you begin\n----------------\n\nThe steps in this document assume that you have done the following:\n\n- [Created a Storage Pool](/netapp/volumes/docs/configure-and-use/storage-pools/create-storage-pool) with the chosen location, service level, capacity, data encryption, and AD policy.\n- [Created a Volume](/netapp/volumes/docs/configure-and-use/volumes/create-volume) in a pre-existing storage pool with the selected parameters (like allocated capacity and protocol type) in a given region. You can use NFSv3, NFSv4, or SMB volumes for the connection described in this document.\n- [Created a private cloud](/vmware-engine/docs/private-clouds/howto-create-private-cloud) in the same region as your volume.\n\nGet VPC network details\n-----------------------\n\nWhen creating a peering connection between VMware Engine and\nNetApp Volumes, you need some details about the VPC network\nused by NetApp Volumes. To get these details, do the following:\n\n1. In the Google Cloud console, go to the **VPC Network peerings** page.\n\n [Go to VPC Network peerings](https://console.cloud.google.com/vmwareengine/network-peerings)\n2. Click **Select a project** and then select the organization, folder, or project that\n contains the peering connection.\n\n3. Select the peering connection created in NetApp Volumes for\n your project.\n The connection is named `sn-netapp-prod`.\n\n You might see multiple peering connections with the same name if you\n have more than one peered VPC network. The person who set up the\n VPC Network Peering connections can help you determine which connection\n to use for VMware Engine.\n4. Copy the **Peered VPC network** and **Peered project ID** fields, which\n begin with *netapp* and end with *-tp*, respectively.\n\nCreate a peering connection\n---------------------------\n\nIf your VMware Engine project and private clouds were created after\nNov 12, 2023, do the following. For more information on how to create VPC\npeerings for such environments, see [Peer a VPC network](/vmware-engine/docs/networking/peer-vpc-network).\n\n1. In the Google Cloud console, go to the **VPC Network peerings** page.\n\n [Go to VPC Network peerings](https://console.cloud.google.com/vmwareengine/network-peerings)\n2. Click **Select a project** and then select the organization, folder, or project where\n you want to create the peering connection.\n\n3. Click **Create**.\n\n4. In the **Name** field, provide a name for your networking peering. For\n example, `peering-2-netapp-volumes`.\n\n5. In the **VMware Engine network** section, keep the default **\"In current\n project\"** selected. Specify the VMware Engine network you want to\n peer, for example `ven1`.\n\n6. For **Peering** , select **Google Cloud NetApp Volumes**.\n\n7. In the **Service tenant project ID** field, enter the *peered project ID* of\n the Google Cloud project containing your volume.\n\n8. In the **Service tenant VPC name** field, enter the name of the *peered VPC\n network* your volume is in.\n\n9. In the **Route exchange** section, keep the default settings.\n\n10. Click **Create**.\n\nMount a volume\n--------------\n\nOnce the peering status is listed as *Active*, you can mount your NetApp Volumes\nvolume.\nPerform the mounting process from within the guest OS of your VMware VM.\n\nTo mount an NFS volume, do the following:\n\n1. In the Google Cloud console, go to **NetApp Volumes \\\u003e\n Volumes**.\n\n [Go to the Volumes page](https://console.cloud.google.com/netapp/cloud-volumes/volumes)\n2. Click **Select a project** and then select the organization, folder, or project that\n contains the volume.\n\n3. Click the NFS volume for which you want to mount NFS exports.\n\n4. Go to the right, click **More**\n *more_vert* , and then click\n **Mount Instructions**.\n\n5. Follow the instructions in the **Mount Instructions for NFS** window that\n appears. The mounting instructions might be slightly different depending on\n which NFS protocol you have configured for the volume.\n\nTo mount an SMB volume, do the following:\n\n1. In the Google Cloud console, go to **NetApp Volumes \\\u003e\n Volumes**.\n\n [Go to the Volumes page](https://console.cloud.google.com/netapp/cloud-volumes/volumes)\n2. Click **Select a project** and then select the organization, folder, or project that\n contains the volume.\n\n3. Click the SMB volume for which you want to map an SMB share.\n\n4. Go to the right, click **More**\n *more_vert* , and then click\n **Mount Instructions**.\n\n5. Follow the instructions in the **Mount Instructions for SMB** window that\n appears.\n\nAfter you mount your volume, you can manage the volume using the standard\ninterfaces described by [Edit a volume](/netapp/volumes/docs/configure-and-use/volumes/edit-volume)."]]