このページでは、画像からオブジェクトを削除する方法について説明します。Vertex AI の Imagen では、インペインティングと呼ばれるマスク領域を指定して、画像からオブジェクトを削除できます。独自のマスクを使用することも、Vertex AI の Imagen でマスクを生成することもできます。
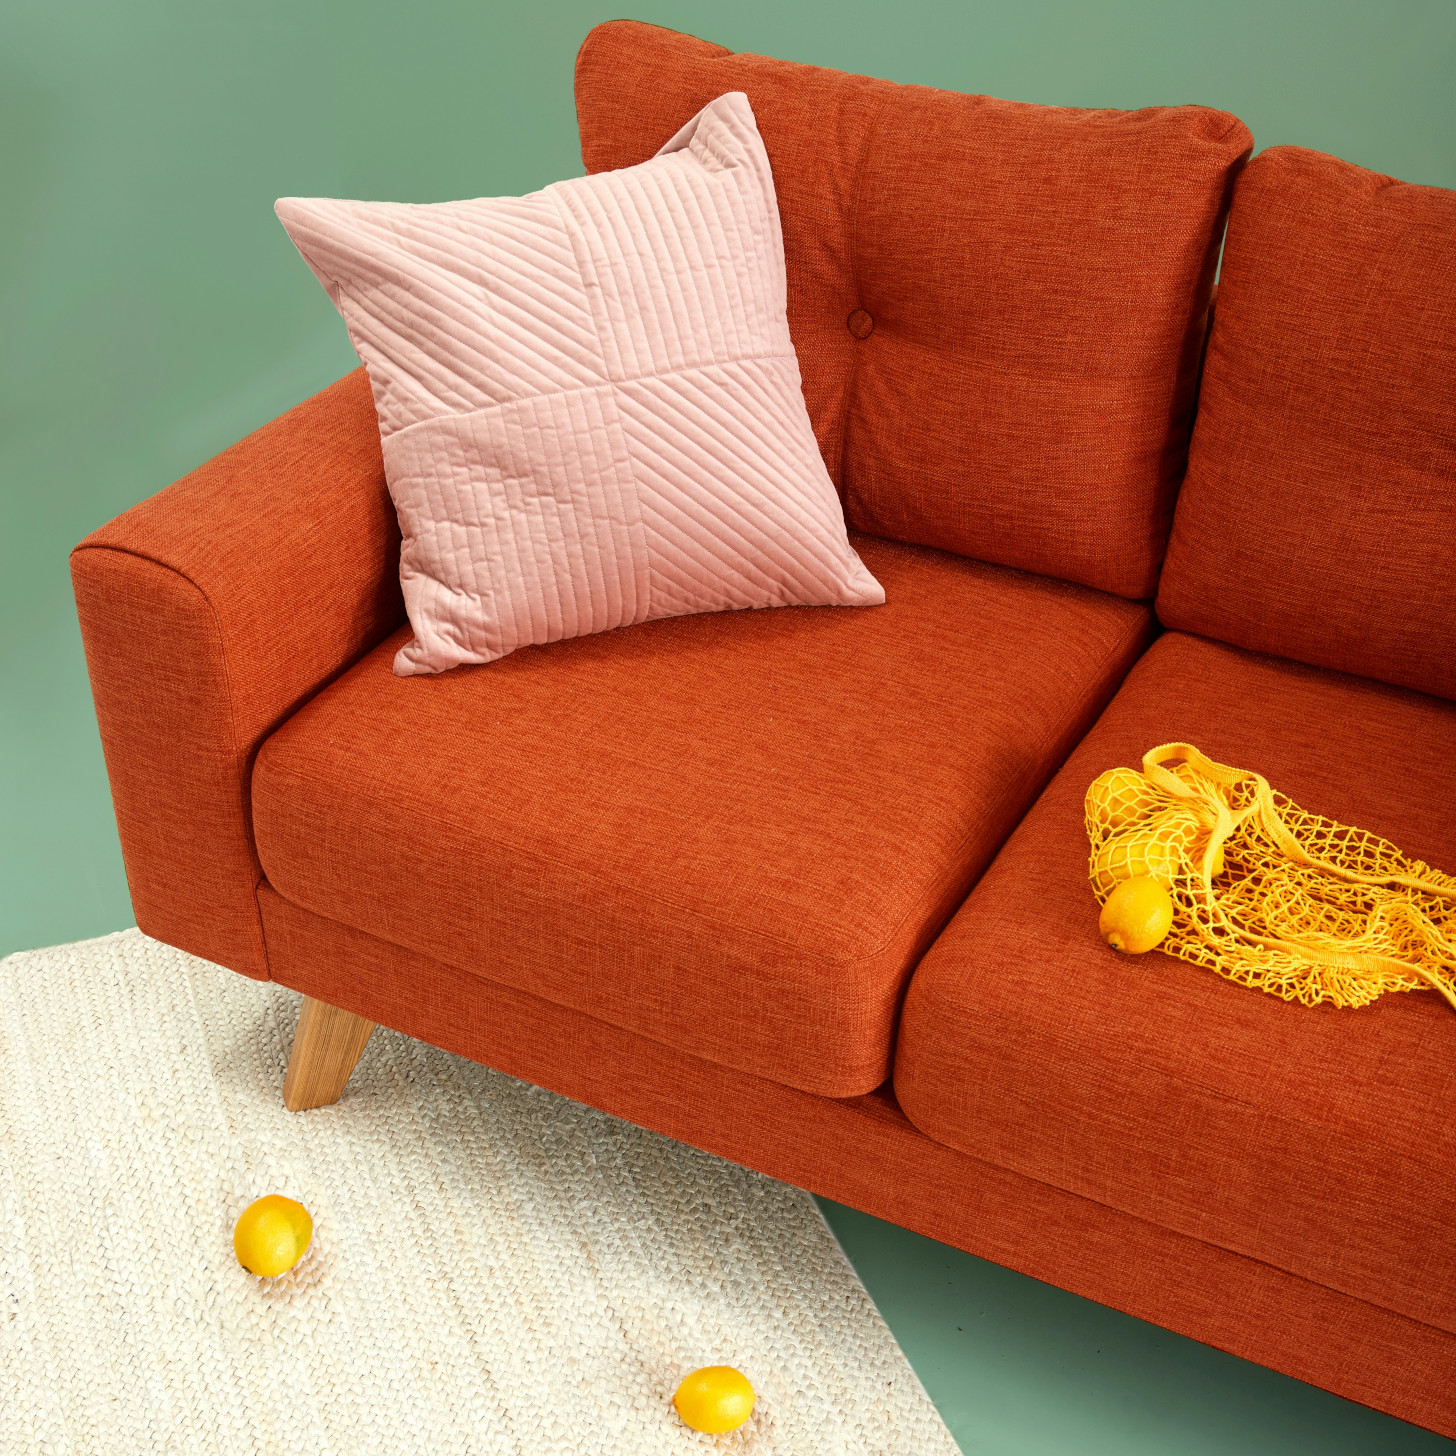
コンテンツの削除の例
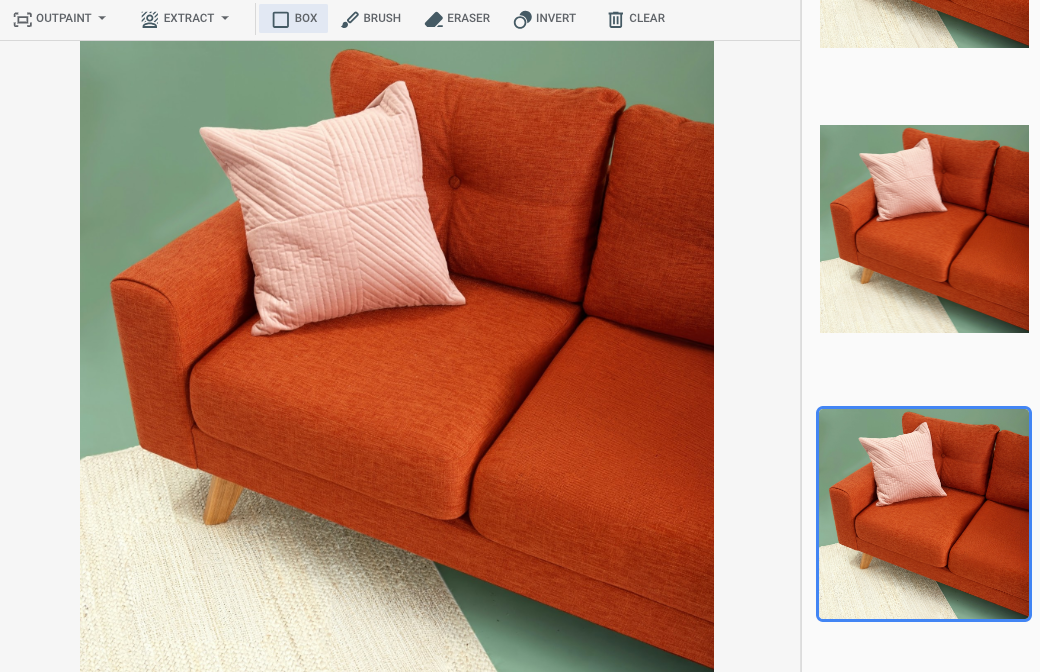
次の例では、インペインティングを使用して、画像マスクを使用して既存の画像からコンテンツを削除します。
入力
編集対象のベース画像* |
Google Cloud コンソールのツールで指定したマスク領域 |
テキスト プロンプト |
|---|---|---|
|
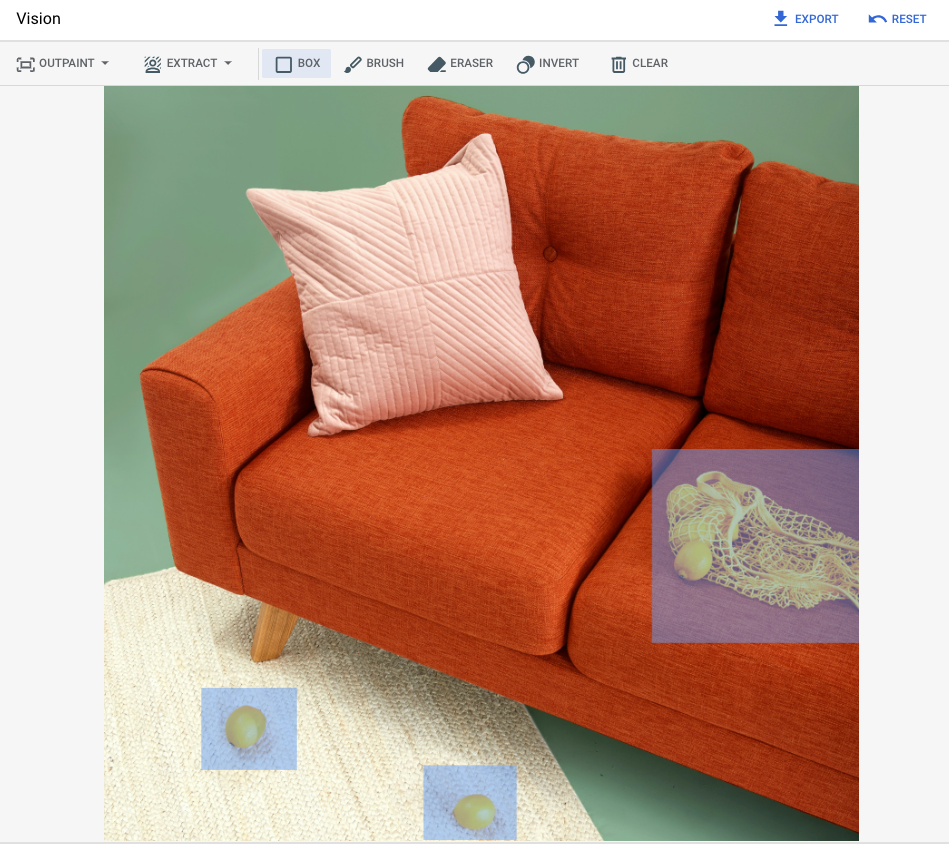
|
プロンプト: 画像から選択したオブジェクトを削除する |
* 画像クレジット: Inside Weather、Unsplash より
Google Cloud コンソールでマスク領域を指定した後の出力
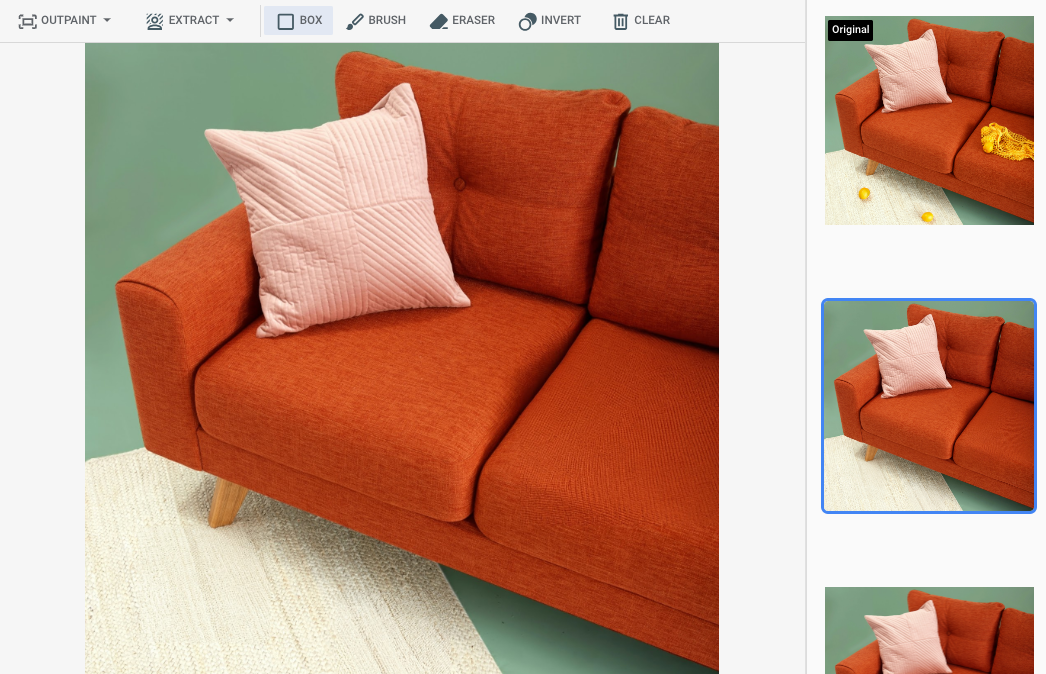
|
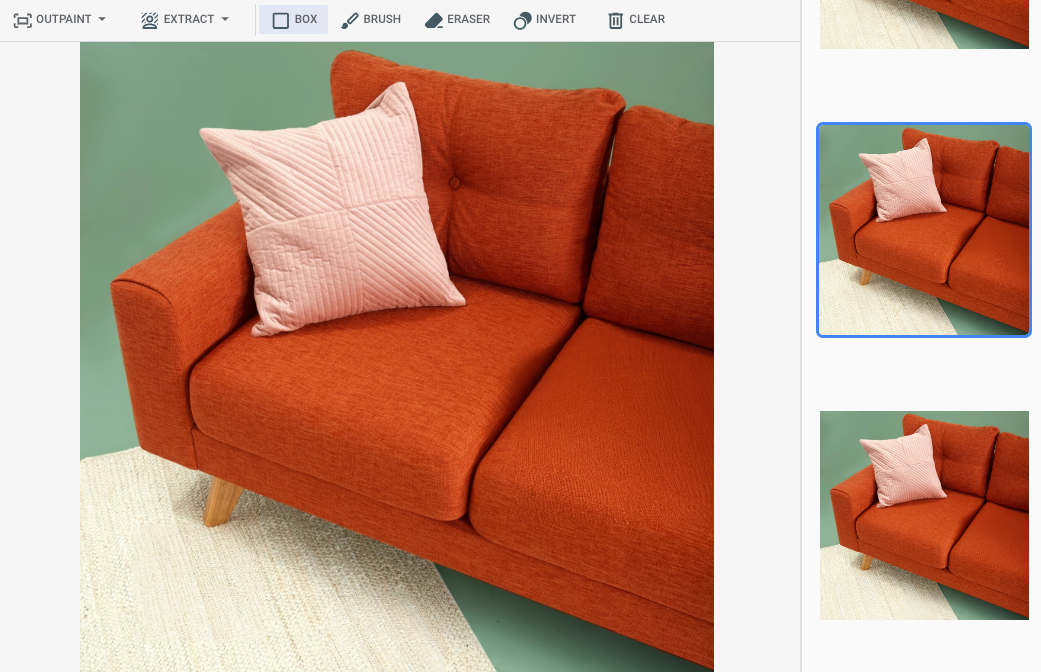
|
|
編集とカスタマイズ用 Imagen のモデルカードを表示する
始める前に
- Sign in to your Google Cloud account. If you're new to Google Cloud, create an account to evaluate how our products perform in real-world scenarios. New customers also get $300 in free credits to run, test, and deploy workloads.
-
In the Google Cloud console, on the project selector page, select or create a Google Cloud project.
Roles required to select or create a project
- Select a project: Selecting a project doesn't require a specific IAM role—you can select any project that you've been granted a role on.
-
Create a project: To create a project, you need the Project Creator
(
roles/resourcemanager.projectCreator), which contains theresourcemanager.projects.createpermission. Learn how to grant roles.
-
Verify that billing is enabled for your Google Cloud project.
-
Enable the Vertex AI API.
Roles required to enable APIs
To enable APIs, you need the Service Usage Admin IAM role (
roles/serviceusage.serviceUsageAdmin), which contains theserviceusage.services.enablepermission. Learn how to grant roles. -
環境の認証を設定します。
Select the tab for how you plan to use the samples on this page:
Console
When you use the Google Cloud console to access Google Cloud services and APIs, you don't need to set up authentication.
Java
ローカル開発環境でこのページの Java サンプルを使用するには、gcloud CLI をインストールして初期化し、ユーザー認証情報を使用してアプリケーションのデフォルト認証情報を設定します。
Google Cloud CLI をインストールします。
外部 ID プロバイダ(IdP)を使用している場合は、まず連携 ID を使用して gcloud CLI にログインする必要があります。
If you're using a local shell, then create local authentication credentials for your user account:
gcloud auth application-default login
You don't need to do this if you're using Cloud Shell.
If an authentication error is returned, and you are using an external identity provider (IdP), confirm that you have signed in to the gcloud CLI with your federated identity.
詳細については、 Google Cloud 認証ドキュメントのローカル開発環境の ADC の設定をご覧ください。
Node.js
ローカル開発環境でこのページの Node.js サンプルを使用するには、gcloud CLI をインストールして初期化し、ユーザー認証情報を使用してアプリケーションのデフォルト認証情報を設定します。
Google Cloud CLI をインストールします。
外部 ID プロバイダ(IdP)を使用している場合は、まず連携 ID を使用して gcloud CLI にログインする必要があります。
If you're using a local shell, then create local authentication credentials for your user account:
gcloud auth application-default login
You don't need to do this if you're using Cloud Shell.
If an authentication error is returned, and you are using an external identity provider (IdP), confirm that you have signed in to the gcloud CLI with your federated identity.
詳細については、 Google Cloud 認証ドキュメントのローカル開発環境の ADC の設定をご覧ください。
Python
ローカル開発環境でこのページの Python サンプルを使用するには、gcloud CLI をインストールして初期化し、ユーザー認証情報を使用してアプリケーションのデフォルト認証情報を設定します。
Google Cloud CLI をインストールします。
外部 ID プロバイダ(IdP)を使用している場合は、まず連携 ID を使用して gcloud CLI にログインする必要があります。
If you're using a local shell, then create local authentication credentials for your user account:
gcloud auth application-default login
You don't need to do this if you're using Cloud Shell.
If an authentication error is returned, and you are using an external identity provider (IdP), confirm that you have signed in to the gcloud CLI with your federated identity.
詳細については、 Google Cloud 認証ドキュメントのローカル開発環境の ADC の設定をご覧ください。
REST
このページの REST API サンプルをローカル開発環境で使用するには、gcloud CLI に指定した認証情報を使用します。
Google Cloud CLI をインストールします。
外部 ID プロバイダ(IdP)を使用している場合は、まず連携 ID を使用して gcloud CLI にログインする必要があります。
詳細については、 Google Cloud 認証ドキュメントの REST を使用して認証するをご覧ください。
定義されたマスク領域で削除する
次のサンプルを使用して、コンテンツを削除するインペインティングを指定します。これらのサンプルでは、ベース画像、テキスト プロンプト、マスク領域を指定して、ベース画像を変更します。
Imagen 3
次のサンプルを使用して、Imagen 3 モデルを使用してインペインティング リクエストを送信します。
コンソール
-
Google Cloud コンソールで、[Vertex AI] > [Media Studio] ページに移動します。
- [アップロード] をクリックします。表示されたファイル ダイアログで、アップロードするファイルを選択します。
- [インペイント] をクリックします。
- [パラメータ] パネルで、[インペイント(削除)] をクリックします。
-
次のいずれかを行います。
- 独自のマスクをアップロードする:
- パソコンでマスクを作成します。
- [マスクをアップロード] をクリックします。表示されたダイアログで、アップロードするマスクを選択します。
- 独自のマスクを定義する: 編集ツールバーからマスクツール( ボックス、 ブラシ、masked_transitions 反転ツール)を選択して、コンテンツを追加する領域を指定します。
- 独自のマスクをアップロードする:
-
省略可: [パラメータ] パネルで、次のオプションを調整します。
- モデル: 使用する Imagen モデル
- 検索結果の表示件数: 生成する結果の数
- ネガティブ プロンプト: 生成を回避するアイテム
- 画像を変更するために、プロンプトのフィールドにプロンプトを入力します。
- [生成] をクリックします。
Python
インストール
pip install --upgrade google-genai
詳しくは、SDK リファレンス ドキュメントをご覧ください。
Vertex AI で Gen AI SDK を使用するための環境変数を設定します。
# Replace the `GOOGLE_CLOUD_PROJECT` and `GOOGLE_CLOUD_LOCATION` values
# with appropriate values for your project.
export GOOGLE_CLOUD_PROJECT=GOOGLE_CLOUD_PROJECT
export GOOGLE_CLOUD_LOCATION=us-central1
export GOOGLE_GENAI_USE_VERTEXAI=True
REST
詳細については、画像編集 API リファレンスをご覧ください。
リクエストのデータを使用する前に、次のように置き換えます。
- PROJECT_ID: 実際の Google Cloud プロジェクト ID。
- LOCATION: プロジェクトのリージョン。たとえば、
us-central1、europe-west2、asia-northeast3です。使用可能なリージョンの一覧については、Vertex AI の生成 AI のロケーションをご覧ください。 prompt: 最良の結果を得るには、除去にインペインティングを使用するときにプロンプトとnegativePromptを省略してください。- B64_BASE_IMAGE: 編集またはアップスケールするベース画像。画像は base64 でエンコードされたバイト文字列として指定する必要があります。サイズの上限: 10 MB。
- B64_MASK_IMAGE: 元の画像の編集でマスクレイヤとして使用する白黒画像。画像は base64 でエンコードされたバイト文字列として指定する必要があります。サイズの上限: 10 MB。
- MASK_DILATION - フロート。このマスクを拡大する画像幅の割合。不完全な入力マスクを補正するには、値を
0.01にすることをおすすめします。 - EDIT_STEPS - 整数。ベースモデルのサンプリング ステップ数。インペインティングの削除の場合は、
12の手順から始めます。品質が要件を満たしていない場合は、ステップを75の上限まで増やします。ステップを増やすと、リクエストのレイテンシも大きくなります。 - EDIT_IMAGE_COUNT - 編集された画像の数。指定できるのは整数値(1~4)です。デフォルト値: 4。
HTTP メソッドと URL:
POST https://LOCATION-aiplatform.googleapis.com/v1/projects/PROJECT_ID/locations/LOCATION/publishers/google/models/imagen-3.0-capability-001:predict
リクエストの本文(JSON):
{
  "instances": [
    {
      "prompt": "",
      "referenceImages": [
        {
          "referenceType": "REFERENCE_TYPE_RAW",
          "referenceId": 1,
          "referenceImage": {
            "bytesBase64Encoded": "B64_BASE_IMAGE"
          }
        },
        {
          "referenceType": "REFERENCE_TYPE_MASK",
          "referenceId": 2,
          "referenceImage": {
            "bytesBase64Encoded": "B64_MASK_IMAGE"
          },
          "maskImageConfig": {
            "maskMode": "MASK_MODE_USER_PROVIDED",
            "dilation": MASK_DILATION
          }
        }
      ]
    }
  ],
  "parameters": {
    "editConfig": {
      "baseSteps": EDIT_STEPS
    },
    "editMode": "EDIT_MODE_INPAINT_REMOVAL",
    "sampleCount": EDIT_IMAGE_COUNT
  }
}
リクエストを送信するには、次のいずれかのオプションを選択します。
次のサンプル レスポンスは、curl
リクエスト本文を
request.jsonという名前のファイルに保存して、次のコマンドを実行します。curl -X POST \
-H "Authorization: Bearer $(gcloud auth print-access-token)" \
-H "Content-Type: application/json; charset=utf-8" \
-d @request.json \
"https://LOCATION-aiplatform.googleapis.com/v1/projects/PROJECT_ID/locations/LOCATION/publishers/google/models/imagen-3.0-capability-001:predict"PowerShell
リクエスト本文を
request.jsonという名前のファイルに保存して、次のコマンドを実行します。$cred = gcloud auth print-access-token
$headers = @{ "Authorization" = "Bearer $cred" }
Invoke-WebRequest `
-Method POST `
-Headers $headers `
-ContentType: "application/json; charset=utf-8" `
-InFile request.json `
-Uri "https://LOCATION-aiplatform.googleapis.com/v1/projects/PROJECT_ID/locations/LOCATION/publishers/google/models/imagen-3.0-capability-001:predict" | Select-Object -Expand Content"sampleCount": 2を含むリクエストに対するものです。レスポンスは、生成された画像のバイトを base64 でエンコードした 2 つの予測オブジェクトを返します。{ "predictions": [ { "bytesBase64Encoded": "BASE64_IMG_BYTES", "mimeType": "image/png" }, { "mimeType": "image/png", "bytesBase64Encoded": "BASE64_IMG_BYTES" } ] }Imagen 2
次のサンプルを使用して、Imagen 2 モデルを使用してインペインティング リクエストを送信します。
コンソール
-
Google Cloud コンソールで、[Vertex AI] > [Media Studio] ページに移動します。
-
下部のタスクパネルで [画像を編集] をクリックします。
-
[アップロード] をクリックして、編集する商品画像をローカルに保存されている画像から選択します。
-
編集ツールバーからマスクツール(ボックス、ブラシ、masked_transitions反転ツール)を選択して、コンテンツを削除する領域を指定します(複数の領域を指定できます)。
-
省略可: [パラメータ] パネルで、[検索結果の表示件数]、[ネガティブ プロンプト](削除の場合は省略可)、[テキスト プロンプト ガイダンス] などのパラメータを調整します。
-
プロンプト フィールドは空のままにします。
-
[生成] をクリックします。
REST
リクエストのデータを使用する前に、次のように置き換えます。
- PROJECT_ID: 実際の Google Cloud プロジェクト ID。
- LOCATION: プロジェクトのリージョン。たとえば、
us-central1、europe-west2、asia-northeast3です。使用可能なリージョンの一覧については、Vertex AI の生成 AI のロケーションをご覧ください。 - B64_BASE_IMAGE: 編集またはアップスケールするベース画像。画像は base64 でエンコードされたバイト文字列として指定する必要があります。サイズの上限: 10 MB。
- B64_MASK_IMAGE: 元の画像の編集でマスクレイヤとして使用する白黒画像。画像は base64 でエンコードされたバイト文字列として指定する必要があります。サイズの上限: 10 MB。
- EDIT_IMAGE_COUNT: 編集された画像の数。デフォルト値: 4。
HTTP メソッドと URL:
POST https://LOCATION-aiplatform.googleapis.com/v1/projects/PROJECT_ID/locations/LOCATION/publishers/google/models/imagegeneration@006:predict
リクエストの本文(JSON):
{
  "instances": [
    {
      "prompt": "",
      "image": {
          "bytesBase64Encoded": "B64_BASE_IMAGE"
      },
      "mask": {
        "image": {
          "bytesBase64Encoded": "B64_MASK_IMAGE"
        }
      }
    }
  ],
  "parameters": {
    "sampleCount": EDIT_IMAGE_COUNT,
    "editConfig": {
      "editMode": "inpainting-remove"
    }
  }
}
リクエストを送信するには、次のいずれかのオプションを選択します。
次のサンプル レスポンスは、curl
リクエスト本文を
request.jsonという名前のファイルに保存して、次のコマンドを実行します。curl -X POST \
-H "Authorization: Bearer $(gcloud auth print-access-token)" \
-H "Content-Type: application/json; charset=utf-8" \
-d @request.json \
"https://LOCATION-aiplatform.googleapis.com/v1/projects/PROJECT_ID/locations/LOCATION/publishers/google/models/imagegeneration@006:predict"PowerShell
リクエスト本文を
request.jsonという名前のファイルに保存して、次のコマンドを実行します。$cred = gcloud auth print-access-token
$headers = @{ "Authorization" = "Bearer $cred" }
Invoke-WebRequest `
-Method POST `
-Headers $headers `
-ContentType: "application/json; charset=utf-8" `
-InFile request.json `
-Uri "https://LOCATION-aiplatform.googleapis.com/v1/projects/PROJECT_ID/locations/LOCATION/publishers/google/models/imagegeneration@006:predict" | Select-Object -Expand Content"sampleCount": 2を含むリクエストに対するものです。レスポンスは、生成された画像のバイトを base64 でエンコードした 2 つの予測オブジェクトを返します。{ "predictions": [ { "bytesBase64Encoded": "BASE64_IMG_BYTES", "mimeType": "image/png" }, { "mimeType": "image/png", "bytesBase64Encoded": "BASE64_IMG_BYTES" } ] }Python
Vertex AI SDK for Python のインストールまたは更新の方法については、Vertex AI SDK for Python をインストールするをご覧ください。詳細については、Python API リファレンス ドキュメントをご覧ください。
Java
このサンプルを試す前に、Vertex AI クイックスタート: クライアント ライブラリの使用にある Java の設定手順を完了してください。詳細については、Vertex AI Java API のリファレンス ドキュメントをご覧ください。
Vertex AI に対する認証を行うには、アプリケーションのデフォルト認証情報を設定します。詳細については、ローカル開発環境の認証を設定するをご覧ください。
このサンプルでは、モデルを
EndpointNameの一部として指定します。EndpointNameは、PredictionServiceClientで呼び出されるpredictメソッドに渡されます。このサービスは、編集されたバージョンの画像を返します。この画像はローカルに保存されます。モデルのバージョンと機能の詳細については、Imagen モデルをご覧ください。
Node.js
このサンプルを試す前に、Vertex AI クイックスタート: クライアント ライブラリの使用にある Node.js の設定手順を完了してください。詳細については、Vertex AI Node.js API のリファレンス ドキュメントをご覧ください。
Vertex AI に対する認証を行うには、アプリケーションのデフォルト認証情報を設定します。詳細については、ローカル開発環境の認証を設定するをご覧ください。
このサンプルでは、PredictionServiceClientでpredictメソッドを呼び出します。このサービスは画像を生成し、ローカルに保存します。モデルのバージョンと機能の詳細については、Imagen モデルをご覧ください。自動マスク検出で削除する
次のサンプルを使用して、コンテンツを削除するインペインティングを指定します。これらのサンプルでは、ベースイメージとテキスト プロンプトを指定します。Imagen は、ベース画像を変更するマスク領域を自動的に検出して作成します。
Imagen 3
次のサンプルを使用して、Imagen 3 モデルを使用してインペインティング リクエストを送信します。
コンソール
-
Google Cloud コンソールで、[Vertex AI] > [Media Studio] ページに移動します。
- [アップロード] をクリックします。表示されたファイル ダイアログで、アップロードするファイルを選択します。
- [インペイント] をクリックします。
- [パラメータ] パネルで、[インペイント(削除)] を選択します。
- 編集ツールバーで、[background_replace抽出] をクリックします。
-
次のいずれかのマスク抽出オプションを選択します。
- 背景要素: 背景要素を検出し、その周囲にマスクを作成します。
- 前景要素: 前景のオブジェクトを検出し、その周囲にマスクを作成します。
- background_replace人物: 人物を検出し、その周囲にマスクを作成します。
-
省略可: [パラメータ] パネルで、次のオプションを調整します。
- モデル: 使用する Imagen モデル
- 検索結果の表示件数: 生成する結果の数
- ネガティブ プロンプト: 生成を回避するアイテム
- 画像を変更するために、プロンプトのフィールドに新しいプロンプトを入力します。
- [send生成] をクリックします。
Python
インストール
pip install --upgrade google-genai
詳しくは、SDK リファレンス ドキュメントをご覧ください。
Vertex AI で Gen AI SDK を使用するための環境変数を設定します。
# Replace the `GOOGLE_CLOUD_PROJECT` and `GOOGLE_CLOUD_LOCATION` values
# with appropriate values for your project.
export GOOGLE_CLOUD_PROJECT=GOOGLE_CLOUD_PROJECT
export GOOGLE_CLOUD_LOCATION=us-central1
export GOOGLE_GENAI_USE_VERTEXAI=True
REST
詳細については、画像編集 API リファレンスをご覧ください。
リクエストのデータを使用する前に、次のように置き換えます。
- PROJECT_ID: 実際の Google Cloud プロジェクト ID。
- LOCATION: プロジェクトのリージョン。たとえば、
us-central1、europe-west2、asia-northeast3です。使用可能なリージョンの一覧については、Vertex AI の生成 AI のロケーションをご覧ください。 prompt: 最良の結果を得るには、除去にインペインティングを使用するときにプロンプトとnegativePromptを省略してください。- B64_BASE_IMAGE: 編集またはアップスケールするベース画像。画像は base64 でエンコードされたバイト文字列として指定する必要があります。サイズの上限: 10 MB。
- MASK_MODE - モデルで使用する自動マスク作成のタイプを設定する文字列。使用可能な値:
MASK_MODE_BACKGROUND: 背景セグメンテーションを使用してマスクを自動的に生成します。この設定は、背景コンテンツの変更に使用します。MASK_MODE_FOREGROUND: 前景セグメンテーションを使用してマスクを自動的に生成します。この設定は、フォアグラウンド オブジェクトの削除(インペイントによる削除)など、フォアグラウンド コンテンツを変更する場合に使用します。MASK_MODE_SEMANTIC:maskImageConfig.maskClasses配列で指定したセグメンテーション クラスに基づいて、セマンティック セグメンテーションを使用してマスクを自動的に生成します。例:"maskImageConfig": { "maskMode": "MASK_MODE_SEMANTIC", "maskClasses": [175, 176], // bicycle, car "dilation": 0.01 }
- MASK_DILATION - フロート。このマスクを拡大する画像幅の割合。不完全な入力マスクを補正するには、値を
0.01にすることをおすすめします。 - EDIT_STEPS - 整数。ベースモデルのサンプリング ステップ数。インペインティングの削除の場合は、
12の手順から始めます。品質が要件を満たしていない場合は、ステップを75の上限まで増やします。ステップを増やすと、リクエストのレイテンシも大きくなります。 - EDIT_IMAGE_COUNT - 編集された画像の数。指定できるのは整数値(1~4)です。デフォルト値: 4。
HTTP メソッドと URL:
POST https://LOCATION-aiplatform.googleapis.com/v1/projects/PROJECT_ID/locations/LOCATION/publishers/google/models/imagen-3.0-capability-001:predict
リクエストの本文(JSON):
{
  "instances": [
    {
      "prompt": "",
      "referenceImages": [
        {
          "referenceType": "REFERENCE_TYPE_RAW",
          "referenceId": 1,
          "referenceImage": {
            "bytesBase64Encoded": "B64_BASE_IMAGE"
          }
        },
        {
          "referenceType": "REFERENCE_TYPE_MASK",
          "referenceId": 2,
          "maskImageConfig": {
            "maskMode": "MASK_MODE",
            "dilation": MASK_DILATION
          }
        }
      ]
    }
  ],
  "parameters": {
    "editConfig": {
      "baseSteps": EDIT_STEPS
    },
    "editMode": "EDIT_MODE_INPAINT_REMOVAL",
    "sampleCount": EDIT_IMAGE_COUNT
  }
}
リクエストを送信するには、次のいずれかのオプションを選択します。
次のサンプル レスポンスは、curl
リクエスト本文を
request.jsonという名前のファイルに保存して、次のコマンドを実行します。curl -X POST \
-H "Authorization: Bearer $(gcloud auth print-access-token)" \
-H "Content-Type: application/json; charset=utf-8" \
-d @request.json \
"https://LOCATION-aiplatform.googleapis.com/v1/projects/PROJECT_ID/locations/LOCATION/publishers/google/models/imagen-3.0-capability-001:predict"PowerShell
リクエスト本文を
request.jsonという名前のファイルに保存して、次のコマンドを実行します。$cred = gcloud auth print-access-token
$headers = @{ "Authorization" = "Bearer $cred" }
Invoke-WebRequest `
-Method POST `
-Headers $headers `
-ContentType: "application/json; charset=utf-8" `
-InFile request.json `
-Uri "https://LOCATION-aiplatform.googleapis.com/v1/projects/PROJECT_ID/locations/LOCATION/publishers/google/models/imagen-3.0-capability-001:predict" | Select-Object -Expand Content"sampleCount": 2を含むリクエストに対するものです。レスポンスは、生成された画像のバイトを base64 でエンコードした 2 つの予測オブジェクトを返します。{ "predictions": [ { "bytesBase64Encoded": "BASE64_IMG_BYTES", "mimeType": "image/png" }, { "mimeType": "image/png", "bytesBase64Encoded": "BASE64_IMG_BYTES" } ] }Imagen 2
次のサンプルを使用して、Imagen 2 モデルを使用してインペインティング リクエストを送信します。
コンソール
-
Google Cloud コンソールで、[Vertex AI] > [Media Studio] ページに移動します。
-
下部のタスクパネルで [画像を編集] をクリックします。
-
[アップロード] をクリックして、編集する商品画像をローカルに保存されている画像から選択します。
-
編集ツールバーで、[background_replace抽出] をクリックします。
-
次のいずれかのマスク抽出オプションを選択します。
- 背景要素 - 背景要素を検出し、その周囲にマスクを作成します。
- 前景要素 - フォアグラウンドのオブジェクトを検出し、その周囲にマスクを作成します。
- background_replace人 - 人物を検出し、その周囲にマスクを作成します。
-
省略可。[パラメータ] パネルで、[検索結果の表示件数]、[ネガティブ プロンプト]、[テキスト プロンプト ガイダンス] などのパラメータを調整します。
-
プロンプト フィールドは空のままにします。
-
[生成] をクリックします。
REST
リクエストのデータを使用する前に、次のように置き換えます。
- PROJECT_ID: 実際の Google Cloud プロジェクト ID。
- LOCATION: プロジェクトのリージョン。たとえば、
us-central1、europe-west2、asia-northeast3です。使用可能なリージョンの一覧については、Vertex AI の生成 AI のロケーションをご覧ください。 - B64_BASE_IMAGE: 編集またはアップスケールするベース画像。画像は base64 でエンコードされたバイト文字列として指定する必要があります。サイズの上限: 10 MB。
- EDIT_IMAGE_COUNT: 編集された画像の数。デフォルト値: 4。
- MASK_TYPE: モデルにマスクを生成するように指示します。マスクを指定する必要はありません。このパラメータを指定する場合は、
maskオブジェクトを省略する必要があります。使用可能な値:background: 画像内の主要なオブジェクト、人物、被写体以外のすべての領域のマスクを自動的に生成します。foreground: 画像内の主要なオブジェクト、人物、被写体に対するマスクを自動的に生成します。semantic: 自動セグメンテーションを使用して、1 つ以上のセグメンテーション クラスのマスク領域を作成します。classesパラメータとそれに対応するclass_id値を使用して、セグメンテーション クラスを設定します。最大 5 つのクラスを指定できます。セマンティック マスクタイプを使用する場合、maskModeオブジェクトは次のようになります。"maskMode": { "maskType": "semantic", "classes": [class_id1, class_id2] }
HTTP メソッドと URL:
POST https://LOCATION-aiplatform.googleapis.com/v1/projects/PROJECT_ID/locations/LOCATION/publishers/google/models/imagegeneration@006:predict
リクエストの本文(JSON):
{
  "instances": [
    {
      "prompt": "",
      "image": {
        "bytesBase64Encoded": "B64_BASE_IMAGE"
      }
    }
  ],
  "parameters": {
    "sampleCount": EDIT_IMAGE_COUNT,
    "editConfig": {
      "editMode": "inpainting-remove",
      "maskMode": {
        "maskType": "MASK_TYPE"
      }
    }
  }
}
リクエストを送信するには、次のいずれかのオプションを選択します。
次のサンプル レスポンスは、curl
リクエスト本文を
request.jsonという名前のファイルに保存して、次のコマンドを実行します。curl -X POST \
-H "Authorization: Bearer $(gcloud auth print-access-token)" \
-H "Content-Type: application/json; charset=utf-8" \
-d @request.json \
"https://LOCATION-aiplatform.googleapis.com/v1/projects/PROJECT_ID/locations/LOCATION/publishers/google/models/imagegeneration@006:predict"PowerShell
リクエスト本文を
request.jsonという名前のファイルに保存して、次のコマンドを実行します。$cred = gcloud auth print-access-token
$headers = @{ "Authorization" = "Bearer $cred" }
Invoke-WebRequest `
-Method POST `
-Headers $headers `
-ContentType: "application/json; charset=utf-8" `
-InFile request.json `
-Uri "https://LOCATION-aiplatform.googleapis.com/v1/projects/PROJECT_ID/locations/LOCATION/publishers/google/models/imagegeneration@006:predict" | Select-Object -Expand Content"sampleCount": 2を含むリクエストに対するものです。レスポンスは、生成された画像のバイトを base64 でエンコードした 2 つの予測オブジェクトを返します。{ "predictions": [ { "bytesBase64Encoded": "BASE64_IMG_BYTES", "mimeType": "image/png" }, { "mimeType": "image/png", "bytesBase64Encoded": "BASE64_IMG_BYTES" } ] }Python
Vertex AI SDK for Python のインストールまたは更新の方法については、Vertex AI SDK for Python をインストールするをご覧ください。詳細については、Python API リファレンス ドキュメントをご覧ください。
制限事項
以降のセクションでは、Imagen のオブジェクト削除機能の制限事項について説明します。
変更されたピクセル
マスクに含まれていないモデルによって生成されたピクセルは、入力と同一であるとは限りません。これは、モデルの解像度(1024 x 1024 など)で生成されています。生成された画像に、ごくわずかな変更が含まれている場合があります。
画像を完全に保持したい場合は、マスクを使用して、生成された画像を入力画像とブレンドすることをおすすめします。通常、入力画像の解像度が 2K 以上の場合は、生成された画像と入力画像をブレンドする必要があります。
削除の制限
マスクに隣接する小さなオブジェクトも削除されることがあります。ベスト プラクティスとして、マスクをできるだけ正確にすることをおすすめします。
屋外画像の空の領域で大きな領域を削除すると、不要なアーティファクトが発生する可能性があります。ベスト プラクティスとして、プロンプトを指定することをおすすめします。
次のステップ
Imagen や Vertex AI のその他の生成 AI プロダクトに関する次の記事を読む。
- Vertex AI で Imagen 3 を使い始めるためのデベロッパー ガイド
- クリエイターとともにクリエイターのために構築された、新しい生成メディアのモデルとツール
- Gemini の新機能: カスタム Gem と Imagen 3 による画像生成の改善
- Google DeepMind: Imagen 3 - 最も高い品質水準の Text-to-Image モデル
特に記載のない限り、このページのコンテンツはクリエイティブ・コモンズの表示 4.0 ライセンスにより使用許諾されます。コードサンプルは Apache 2.0 ライセンスにより使用許諾されます。詳しくは、Google Developers サイトのポリシーをご覧ください。Java は Oracle および関連会社の登録商標です。
最終更新日 2025-10-19 UTC。
-