이 페이지에서는 다음 프로세스를 안내합니다.
- 데이터 소스의 계산된 필드 만들기
- 데이터 소스의 계산된 필드 수정하기
- 차트별 계산된 필드 만들기
- 차트별 계산된 필드 수정하기
- 차트별 계산된 필드 재사용하기
- 계산된 필드 문제 해결하기
- 관련 리소스
데이터 소스의 계산된 필드 만들기
데이터 소스의 계산된 필드는 해당 데이터 소스를 사용하는 모든 보고서에서 사용할 수 있습니다. 계산된 필드를 만들려면 다음 단계를 따르세요.
- 데이터 소스를 수정합니다.
 필드 추가를 클릭합니다.
- 계산된 필드 추가를 선택합니다.
- 이 필드의 이름 값을 입력합니다.
- 이는 보고서에 표시되는 기본 이름입니다. 측정기준 및 측정항목 선택기에서 이름을 수정하여 개별 차트에 맞게 변경할 수 있습니다.
- 필드 이름은 고유해야 합니다.
- 예약된 키워드를 필드 이름으로 사용할 수 없습니다.
수식 값을 입력합니다.
- 측정기준, 측정항목 또는 함수를 선택하려면 해당 이름을 입력합니다.
- 이름이 유사한 필드가 여러 개 있거나 함수 이름의 일부가 중복된 필드가 있는 경우(예: Date 및 Date2) 이름의 일부를 입력한 다음 목록을 스크롤하여 원하는 필드를 선택합니다.
- 사용 가능한 필드 목록에서 필드를 클릭하여 수식 편집기에 추가할 수도 있습니다.
- 오른쪽 하단에서 저장 (또는 기존 필드를 수정하는 경우 업데이트)을 클릭합니다.
- 필요에 따라 유형, 집계, 다음으로 표시 옵션을 조정합니다.
또는 다음 단계에 따라 보고서의 데이터 소스에 계산된 필드를 만들 수 있습니다.
- 측정기준, 측정항목 또는 함수를 선택하려면 해당 이름을 입력합니다.
보고서를 작성하거나 수정합니다.
- 필드 추가를 클릭합니다.
계산된 필드 추가를 선택합니다.
이 필드의 이름 값을 입력합니다.
- 이는 보고서에 표시되는 기본 이름입니다. 측정기준 및 측정항목 선택기에서 이름을 수정하여 개별 차트에 맞게 변경할 수 있습니다.
- 필드 이름은 고유해야 합니다.
- 예약된 키워드를 필드 이름으로 사용할 수 없습니다.
수식 값을 입력합니다.
- 측정기준, 측정항목 또는 함수를 선택하려면 해당 이름을 입력합니다.
- 이름이 유사한 필드가 여러 개 있거나 함수 이름의 일부가 중복된 필드가 있는 경우(예: Date 및 Date2) 이름의 일부를 입력한 다음 목록을 스크롤하여 원하는 필드를 선택합니다.
- 사용 가능한 필드 목록에서 필드를 클릭하여 수식 편집기에 추가할 수도 있습니다.
- 오른쪽 하단에서 저장 (또는 기존 필드를 수정하는 경우 업데이트)을 클릭합니다.
- 필요에 따라 유형, 집계, 다음으로 표시 옵션을 조정합니다.
- 측정기준, 측정항목 또는 함수를 선택하려면 해당 이름을 입력합니다.
계산된 필드로 할 수 있는 작업 및 데이터 소스에서 만든 계산된 필드와 차트별 계산된 필드의 차이점에 대해 자세히 알아보세요.
데이터 소스의 계산된 필드 수정하기
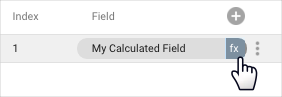
계산된 필드는 데이터 소스에 fx 기호로 나타납니다. 수식을 수정하려면 필드 이름 옆에 있는 fx를 클릭합니다. 이렇게 하면 수식 편집기가 열리고 필요에 따라 필드를 조정할 수 있습니다.
차트별 계산된 필드 만들기
차트별 계산된 필드는 사용자가 필드를 만드는 차트에만 존재합니다.
차트별 계산된 필드를 만들려면 다음 단계를 따르세요.
보고서를 작성하거나 수정합니다.
새 차트를 추가하거나 기존 차트를 선택합니다.
속성 패널의 설정 탭에서 만들 계산된 필드의 종류에 따라 + 측정기준 추가 또는 + 측정항목 추가를 클릭합니다.
+ 필드 추가를 클릭합니다.
필드 이름을 입력합니다.
수식을 입력합니다.
데이터 소스의 계산된 필드와 동일한 연산자 및 함수를 사용할 수 있습니다. 그러나 다른 차트별 계산된 필드는 참조할 수 없습니다. 혼합 데이터와 함께 차트별 계산된 필드를 사용할 수 있습니다.
적용을 클릭합니다.
필요에 따라 유형, 집계, 표시 형식, 다음으로 표시 옵션을 조정합니다.
차트별 계산된 필드 수정하기
차트별 계산된 필드는 차트의 속성 패널에 있는 설정 탭에 표시됩니다.
필드 이름 옆에 있는 필드 유형 위로 커서를 가져가면 fx 기호가 표시됩니다. 수식을 수정하려면 fx를 클릭하세요.그러면 수식 편집기가 표시되고 필요에 따라 필드를 조정할 수 있습니다.
차트별 계산된 필드 재사용하기
차트별 계산된 필드는 사용자가 필드를 만드는 차트에만 존재합니다. 차트별 계산된 필드를 직접 재사용하거나 다른 계산된 필드에서 참조할 수 없습니다.
그러나 차트별 계산된 필드가 포함된 차트는 복사할 수 있습니다. 사본에는 원본에 정의된 계산된 필드가 포함됩니다. 그런 다음 필요에 따라 새 차트에서 수정할 수 있습니다.
계산된 필드 문제 해결하기
계산된 필드 수식에 오류가 있으면 경고 메시지가 표시되고 필드를 저장할 수 없습니다. 다음은 수식이 거부되는 몇 가지 이유입니다.
| 오류 메시지 또는 이유 | 해결 방법 |
|---|---|
| 필드 이름이 잘못되었습니다. 올바른 필드 이름은 수식 편집기에서 자동으로 녹색 또는 파란색 칩으로 표시됩니다. |
필드 이름의 맞춤법과 특수문자를 확인합니다. |
| 함수 이름이 잘못되었습니다. 올바른 함수는 수식 편집기에서 자동으로 대문자 녹색 글자로 표시됩니다. |
함수 이름의 철자를 확인합니다 . |
| 따옴표가 누락되었습니다. 리터럴 문자열은 작은따옴표와 큰따옴표를 혼합하지 말고 쌍을 맞춰 사용해야 합니다. |
모든 문자열 리터럴에 따옴표가 제대로 사용되었는지 확인합니다. |
| 괄호가 일치하지 않습니다. 함수를 중첩할 때 닫는 괄호가 누락되었을 수 있습니다. |
닫는 괄호와 여는 괄호의 수가 동일하며 올바른 위치에 있는지 확인합니다. |
| 함수 인수 유형이 일치하지 않습니다. 함수에는 특정 유형의 인수를 사용해야 합니다. 인수의 형식이 일치하지 않으면 오류가 발생할 수 있습니다. 예를 들어 텍스트 측정기준에서 날짜 함수를 사용하려고 하면 함수 인수 유형이 일치하지 않게 됩니다. |
올바른 입력 값을 선택합니다. CAST() 를 사용하여 입력 값 유형을 변경할 수도 있습니다. |
| 측정항목 재집계는 지원되지 않습니다. 이미 집계된 데이터에는 집계 함수를 적용할 수 없습니다. 여기에는 Google 애널리틱스와 Google Ads에서 제공되는 대부분의 측정항목이 포함됩니다. 예를 들어 Sessions 는 이미 데이터 세트에서 합계로 집계되었으므로 SUM( Sessions ) 수식을 사용하면 오류가 발생합니다. |
이 같은 제한은 기본 데이터 세트에서 비롯된 것입니다. 가능한 경우 데이터가 표시되는 방식을 변경해야 합니다. |
| 표현식에는 측정항목 또는 측정기준 하나만 사용할 수 있으며 두 개를 동시에 사용할 수는 없습니다. 함수 인수에 측정기준과 측정항목을 혼합해서는 안 됩니다. |
데이터에 적절한 함수를 사용하고 있는지 확인합니다. 예를 들어 +를 사용하는 대신 CONCAT() 함수를 사용하여 텍스트 필드에 텍스트를 추가합니다. |
| 측정항목 표현식과 집계는 이 표현식에 허용되지 않습니다. 새로운 차트별 계산된 측정기준을 만들지만 입력한 수식의 결과는 측정항목을 만듭니다. |
새 필드를 측정항목으로 만들어 보세요. |