Antes de começar
Se ainda não o fez, configure um Google Cloud projeto e dois (2) recipientes do Cloud Storage.
Configure o seu projeto
- Sign in to your Google Cloud account. If you're new to Google Cloud, create an account to evaluate how our products perform in real-world scenarios. New customers also get $300 in free credits to run, test, and deploy workloads.
-
In the Google Cloud console, on the project selector page, select or create a Google Cloud project.
Roles required to select or create a project
- Select a project: Selecting a project doesn't require a specific IAM role—you can select any project that you've been granted a role on.
-
Create a project: To create a project, you need the Project Creator
(
roles/resourcemanager.projectCreator), which contains theresourcemanager.projects.createpermission. Learn how to grant roles.
-
Verify that billing is enabled for your Google Cloud project.
-
Enable the Dataproc, Compute Engine, Cloud Storage, and Cloud Run functions APIs.
Roles required to enable APIs
To enable APIs, you need the Service Usage Admin IAM role (
roles/serviceusage.serviceUsageAdmin), which contains theserviceusage.services.enablepermission. Learn how to grant roles. -
Install the Google Cloud CLI.
-
Se estiver a usar um fornecedor de identidade (IdP) externo, tem primeiro de iniciar sessão na CLI gcloud com a sua identidade federada.
-
Para inicializar a CLI gcloud, execute o seguinte comando:
gcloud init -
In the Google Cloud console, on the project selector page, select or create a Google Cloud project.
Roles required to select or create a project
- Select a project: Selecting a project doesn't require a specific IAM role—you can select any project that you've been granted a role on.
-
Create a project: To create a project, you need the Project Creator
(
roles/resourcemanager.projectCreator), which contains theresourcemanager.projects.createpermission. Learn how to grant roles.
-
Verify that billing is enabled for your Google Cloud project.
-
Enable the Dataproc, Compute Engine, Cloud Storage, and Cloud Run functions APIs.
Roles required to enable APIs
To enable APIs, you need the Service Usage Admin IAM role (
roles/serviceusage.serviceUsageAdmin), which contains theserviceusage.services.enablepermission. Learn how to grant roles. -
Install the Google Cloud CLI.
-
Se estiver a usar um fornecedor de identidade (IdP) externo, tem primeiro de iniciar sessão na CLI gcloud com a sua identidade federada.
-
Para inicializar a CLI gcloud, execute o seguinte comando:
gcloud init - In the Google Cloud console, go to the Cloud Storage Buckets page.
- Click Create.
- On the Create a bucket page, enter your bucket information. To go to the next
step, click Continue.
-
In the Get started section, do the following:
- Enter a globally unique name that meets the bucket naming requirements.
- To add a
bucket label,
expand the Labels section (),
click add_box
Add label, and specify a
keyand avaluefor your label.
-
In the Choose where to store your data section, do the following:
- Select a Location type.
- Choose a location where your bucket's data is permanently stored from the Location type drop-down menu.
- If you select the dual-region location type, you can also choose to enable turbo replication by using the relevant checkbox.
- To set up cross-bucket replication, select
Add cross-bucket replication via Storage Transfer Service and
follow these steps:
Set up cross-bucket replication
- In the Bucket menu, select a bucket.
In the Replication settings section, click Configure to configure settings for the replication job.
The Configure cross-bucket replication pane appears.
- To filter objects to replicate by object name prefix, enter a prefix that you want to include or exclude objects from, then click Add a prefix.
- To set a storage class for the replicated objects, select a storage class from the Storage class menu. If you skip this step, the replicated objects will use the destination bucket's storage class by default.
- Click Done.
-
In the Choose how to store your data section, do the following:
- Select a default storage class for the bucket or Autoclass for automatic storage class management of your bucket's data.
- To enable hierarchical namespace, in the Optimize storage for data-intensive workloads section, select Enable hierarchical namespace on this bucket.
- In the Choose how to control access to objects section, select whether or not your bucket enforces public access prevention, and select an access control method for your bucket's objects.
-
In the Choose how to protect object data section, do the
following:
- Select any of the options under Data protection that you
want to set for your bucket.
- To enable soft delete, click the Soft delete policy (For data recovery) checkbox, and specify the number of days you want to retain objects after deletion.
- To set Object Versioning, click the Object versioning (For version control) checkbox, and specify the maximum number of versions per object and the number of days after which the noncurrent versions expire.
- To enable the retention policy on objects and buckets, click the Retention (For compliance) checkbox, and then do the following:
- To enable Object Retention Lock, click the Enable object retention checkbox.
- To enable Bucket Lock, click the Set bucket retention policy checkbox, and choose a unit of time and a length of time for your retention period.
- To choose how your object data will be encrypted, expand the Data encryption section (), and select a Data encryption method.
- Select any of the options under Data protection that you
want to set for your bucket.
-
In the Get started section, do the following:
- Click Create.
- Crie o modelo de fluxo de trabalho.
  gcloud dataproc workflow-templates create wordcount-template \
      --region=us-central1
- Adicione a tarefa de contagem de palavras ao modelo de fluxo de trabalho.
-
Especifique o seu output-bucket-name antes de executar
o comando (a sua função vai fornecer o contentor de entrada).
Depois de inserir o nome do contentor de saída, o argumento do contentor de saída deve ser lido da seguinte forma:
gs://your-output-bucket/wordcount-output". -
O ID do passo "count" é obrigatório e identifica a tarefa Hadoop adicionada.
          gcloud dataproc workflow-templates add-job hadoop \
              --workflow-template=wordcount-template \
              --step-id=count \
              --jar=file:///usr/lib/hadoop-mapreduce/hadoop-mapreduce-examples.jar \
              --region=us-central1 \
              -- wordcount gs://input-bucket gs://output-bucket-name/wordcount-output
-
Especifique o seu output-bucket-name antes de executar
o comando (a sua função vai fornecer o contentor de entrada).
Depois de inserir o nome do contentor de saída, o argumento do contentor de saída deve ser lido da seguinte forma:
- Use um cluster
gerido,
de nó único
para executar o fluxo de trabalho. O Dataproc cria o cluster, executa o fluxo de trabalho no mesmo e, em seguida, elimina o cluster quando o fluxo de trabalho estiver concluído.
gcloud dataproc workflow-templates set-managed-cluster wordcount-template \ --cluster-name=wordcount \ --single-node \ --region=us-central1 - Clique no nome do
wordcount-templatena página Fluxos de trabalho do Dataproc na Google Cloud consola para abrir a página Detalhes do modelo de fluxo de trabalho. Confirme os atributos wordcount-template.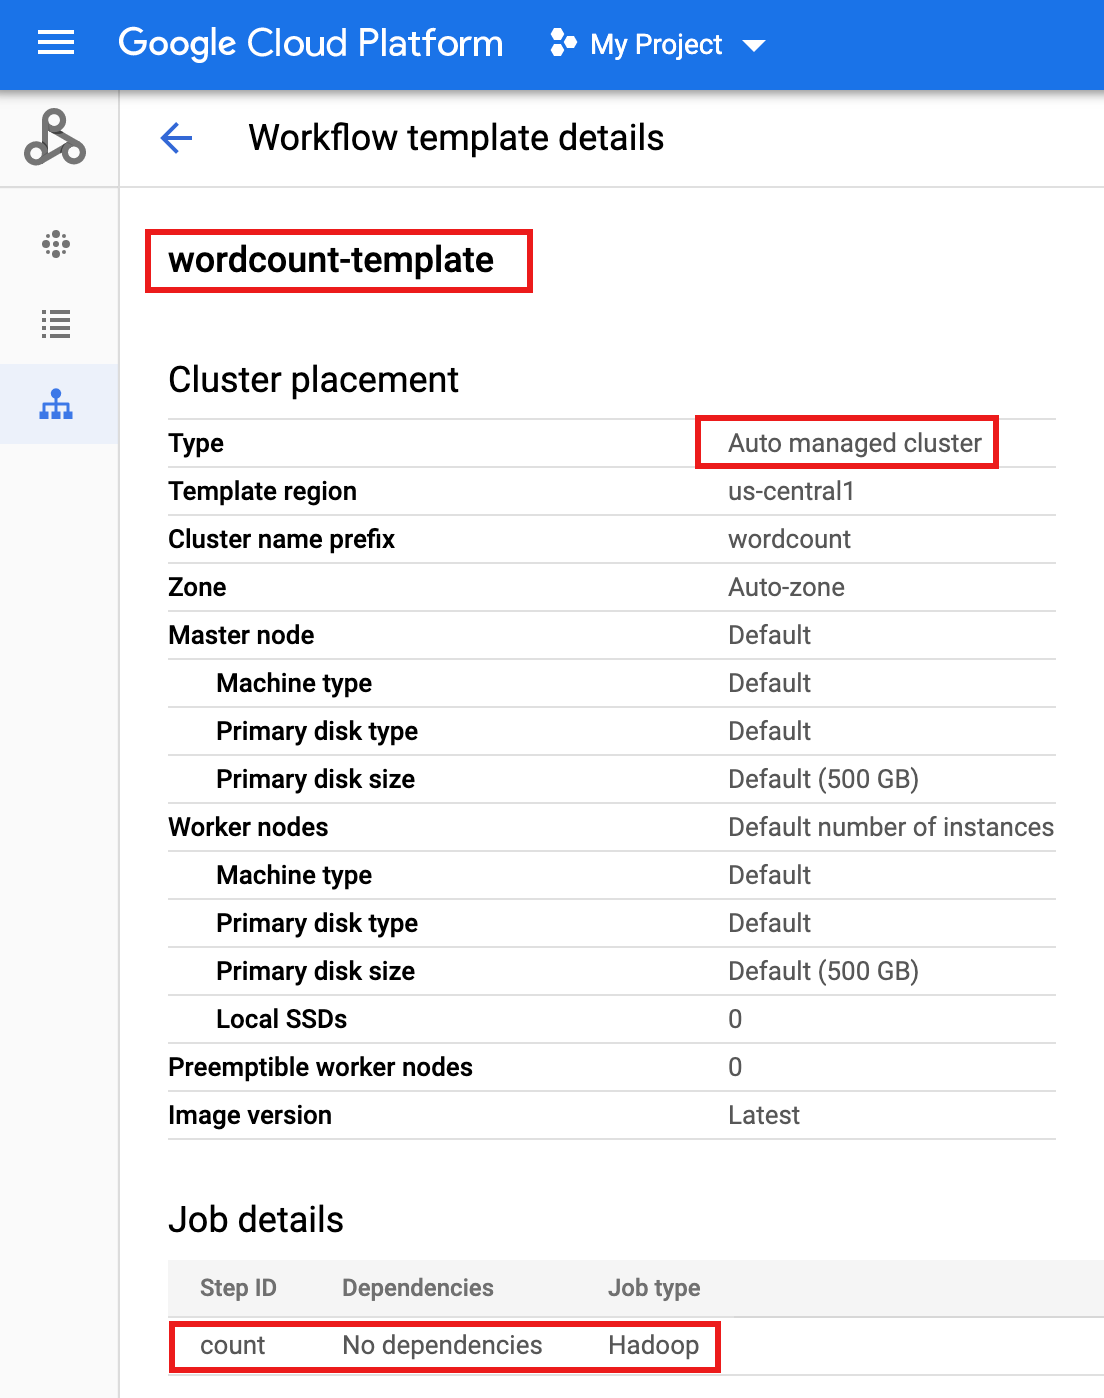
- Exporte o modelo de fluxo de trabalho para um ficheiro de
wordcount.yamltexto para parametrização.gcloud dataproc workflow-templates export wordcount-template \ --destination=wordcount.yaml \ --region=us-central1
- Usando um editor de texto, abra
wordcount.yamle, de seguida, adicione um blocoparametersao final do ficheiro YAML para que o Cloud Storage INPUT_BUCKET_URI possa ser transmitido comoargs[1]ao ficheiro binário wordcount quando o fluxo de trabalho é acionado.Abaixo, é apresentado um exemplo de um ficheiro YAML exportado. Pode adotar uma de duas abordagens para atualizar o modelo:
- Copie e, em seguida, cole todo o ficheiro para substituir o ficheiro exportado
wordcount.yamldepois de substituir your-output_bucket pelo nome do seu contentor de saída OU - Copie e, em seguida, cole apenas a secção
parametersno final do ficheirowordcount.yamlexportado.
jobs: - hadoopJob: args: - wordcount - gs://input-bucket - gs://your-output-bucket/wordcount-output mainJarFileUri: file:///usr/lib/hadoop-mapreduce/hadoop-mapreduce-examples.jar stepId: count placement: managedCluster: clusterName: wordcount config: softwareConfig: properties: dataproc:dataproc.allow.zero.workers: 'true' parameters: - name: INPUT_BUCKET_URI description: wordcount input bucket URI fields: - jobs['count'].hadoopJob.args[1] - Copie e, em seguida, cole todo o ficheiro para substituir o ficheiro exportado
- Importe o ficheiro de texto
wordcount.yamlcom parâmetros. Escreva "S"im quando lhe for pedido para substituir o modelo.gcloud dataproc workflow-templates import wordcount-template \ --source=wordcount.yaml \ --region=us-central1
Abra a página Funções do Cloud Run na Google Cloud consola e, de seguida, clique em CRIAR FUNÇÃO.
Na página Criar função, introduza ou selecione as seguintes informações:
- Nome: wordcount
- Memória atribuída: mantenha a seleção predefinida.
- Acionador:
- Cloud Storage
- Tipo de evento: finalizar/criar
- Contentor: selecione o seu contentor de entrada (consulte a secção Crie um contentor do Cloud Storage no seu projeto). Quando um ficheiro é adicionado a este contentor, a função aciona o fluxo de trabalho. O fluxo de trabalho executa a aplicação de contagem de palavras, que processa todos os ficheiros de texto no contentor.
Código-fonte:
- Editor inline
- Tempo de execução: Node.js 8
- separador
INDEX.JS: substitua o fragmento do código predefinido pelo seguinte código e, de seguida, edite a linhaconst projectIdpara fornecer -your-project-id- (sem "-" no início nem no fim).
const dataproc = require('@google-cloud/dataproc').v1; exports.startWorkflow = (data) => { const projectId = '-your-project-id-' const region = 'us-central1' const workflowTemplate = 'wordcount-template' const client = new dataproc.WorkflowTemplateServiceClient({ apiEndpoint: `${region}-dataproc.googleapis.com`, }); const file = data; console.log("Event: ", file); const inputBucketUri = `gs://${file.bucket}/${file.name}`; const request = { name: client.projectRegionWorkflowTemplatePath(projectId, region, workflowTemplate), parameters: {"INPUT_BUCKET_URI": inputBucketUri} }; client.instantiateWorkflowTemplate(request) .then(responses => { console.log("Launched Dataproc Workflow:", responses[1]); }) .catch(err => { console.error(err); }); };- separador
PACKAGE.JSON: substitua o fragmento do código predefinido pelo seguinte código.
{ "name": "dataproc-workflow", "version": "1.0.0", "dependencies":{ "@google-cloud/dataproc": ">=1.0.0"} }- Função a executar: inserir: "startWorkflow".
Clique em CRIAR.
Copie o ficheiro público
rose.txtpara o seu contentor para acionar a função. Insira your-input-bucket-name (o contentor usado para acionar a sua função) no comando.gcloud storage cp gs://pub/shakespeare/rose.txt gs://your-input-bucket-name
Aguarde 30 segundos e, de seguida, execute o seguinte comando para verificar se a função foi concluída com êxito.
gcloud functions logs read wordcount
...
Function execution took 1348 ms, finished with status: 'ok'
Para ver os registos de funções na página de lista Funções na consola Google Cloud , clique no nome da função
wordcounte, de seguida, clique em VER REGISTOS na página Detalhes da função.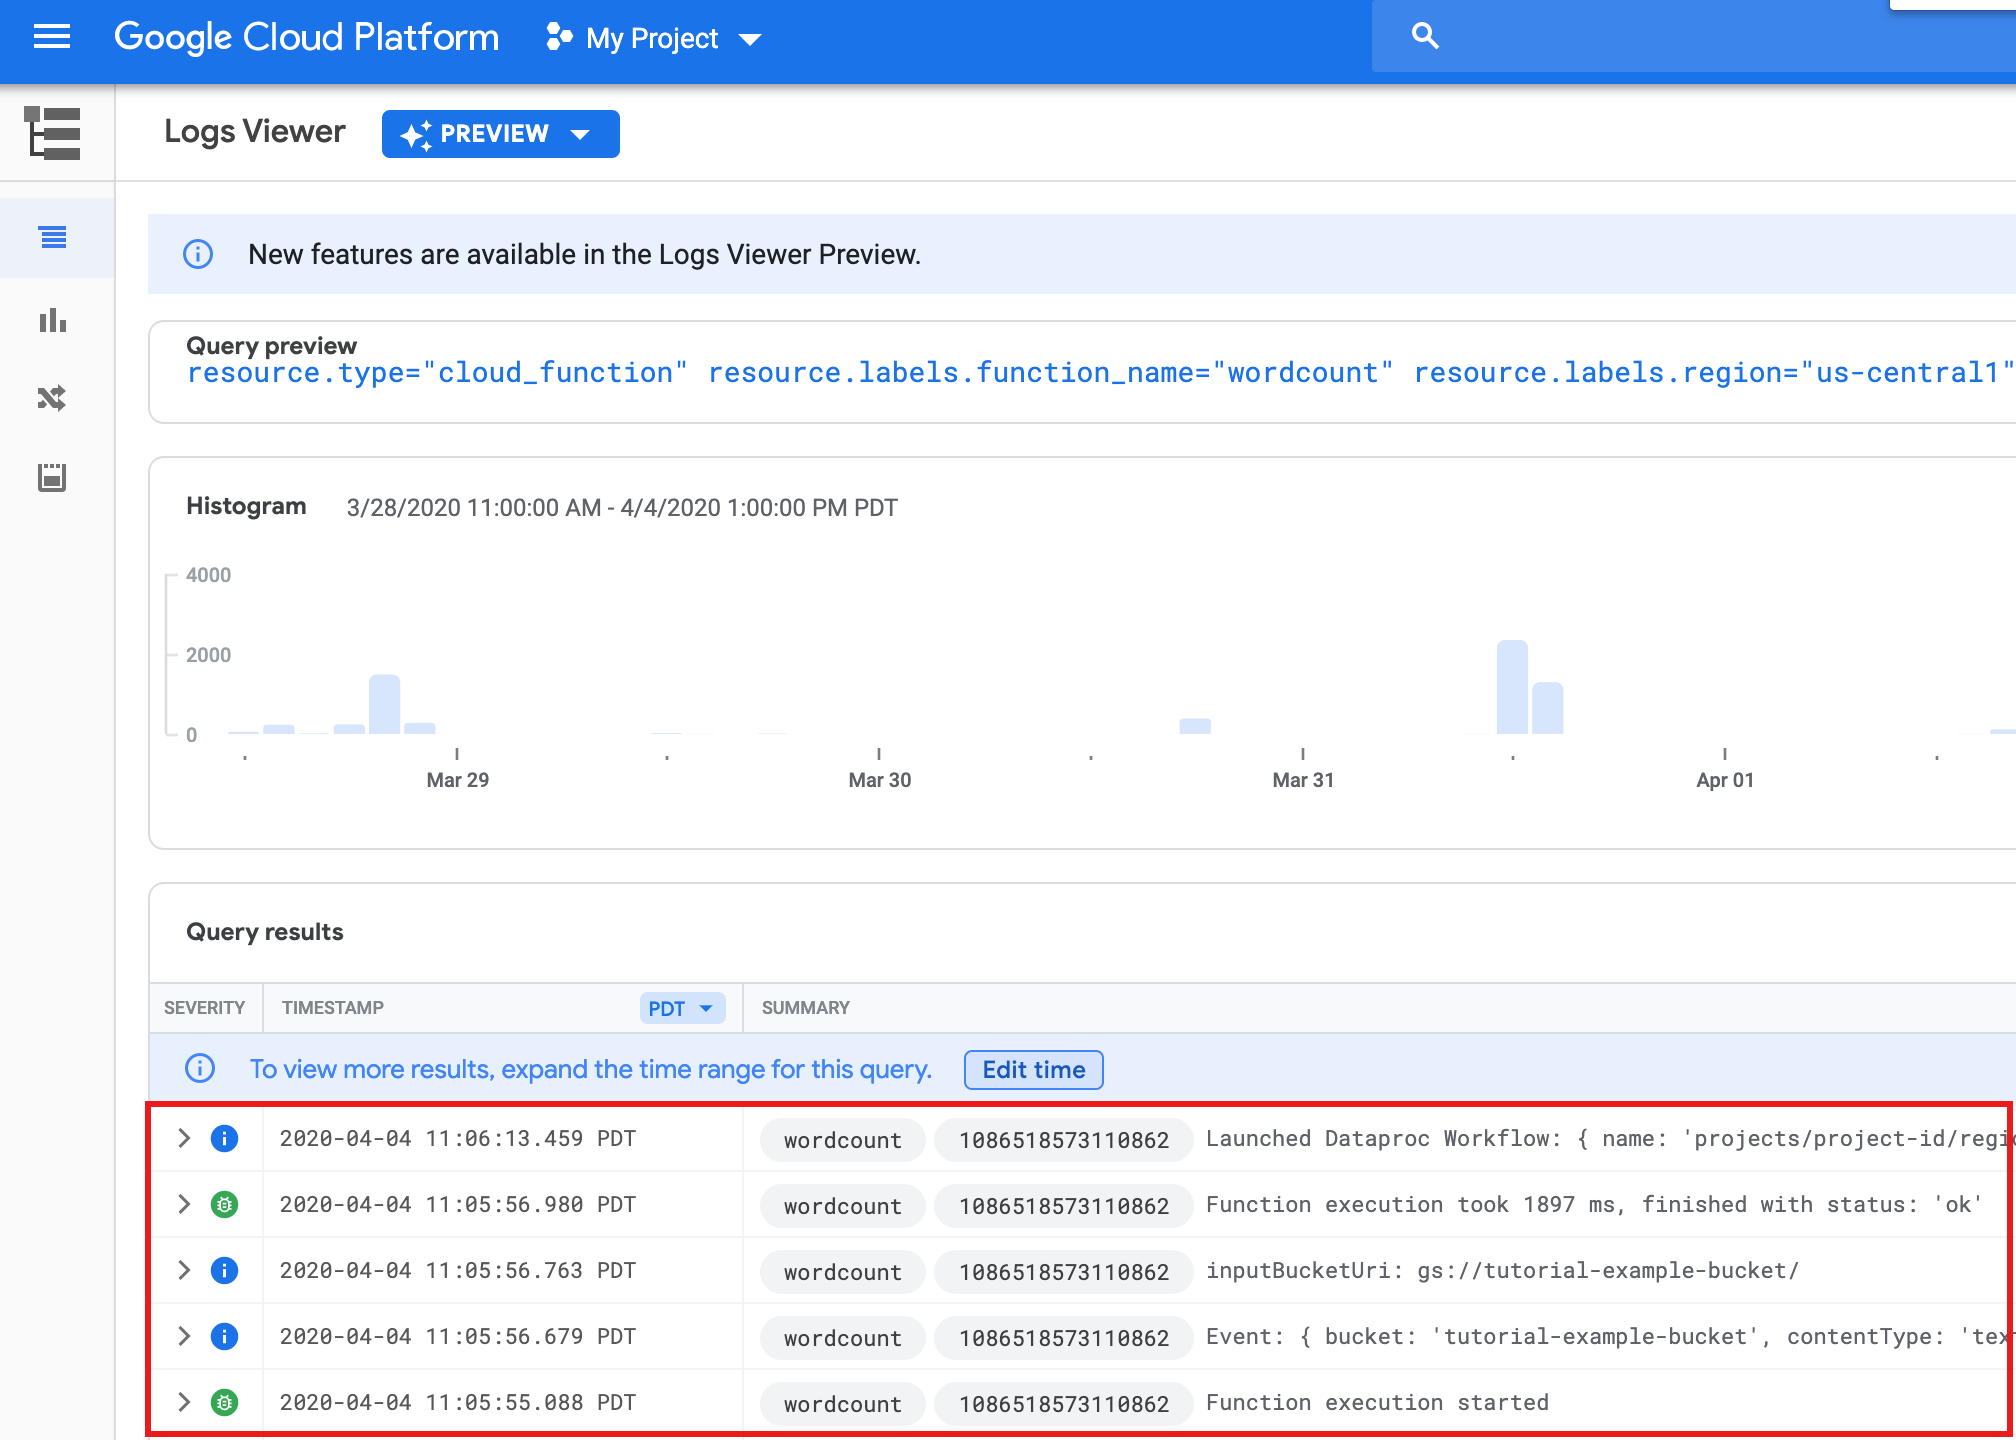
Pode ver a pasta
wordcount-outputno seu contentor de saída na página Navegador de armazenamento na Google Cloud consola.
Após a conclusão do fluxo de trabalho, os detalhes da tarefa persistem na Google Cloud consola. Clique na tarefa
count...apresentada na página Tarefas do Dataproc para ver os detalhes da tarefa de fluxo de trabalho.
- In the Google Cloud console, go to the Manage resources page.
- In the project list, select the project that you want to delete, and then click Delete.
- In the dialog, type the project ID, and then click Shut down to delete the project.
- In the Google Cloud console, go to the Cloud Storage Buckets page.
- Click the checkbox for the bucket that you want to delete.
- To delete the bucket, click Delete, and then follow the instructions.
- Consulte o artigo Vista geral dos modelos de fluxo de trabalho do Dataproc.
- Consulte soluções de agendamento de fluxos de trabalho.
Crie ou use dois contentores do Cloud Storage no seu projeto
Precisa de dois contentores do Cloud Storage no seu projeto: um para os ficheiros de entrada e outro para os de saída.
Crie um modelo de fluxo de trabalho
Para criar e definir um modelo de fluxo de trabalho, copie e execute os seguintes comandos numa janela de terminal local ou no Cloud Shell.
Parametrize o modelo de fluxo de trabalho
Parametrize a variável do bucket de entrada para passar para o modelo de fluxo de trabalho.
Crie uma função do Google Cloud
Teste a sua função
Limpar
O fluxo de trabalho neste tutorial elimina o respetivo cluster gerido quando o fluxo de trabalho é concluído. Para evitar custos recorrentes, pode eliminar outros recursos associados a este tutorial.
Elimine um projeto
Elimine contentores do Cloud Storage
Elimine o modelo de fluxo de trabalho
gcloud dataproc workflow-templates delete wordcount-template \
    --region=us-central1
Elimine a sua função do Google Cloud
Abra a página Funções do Cloud Run na
Google Cloud consola, selecione a caixa à esquerda da função wordcount
e, de seguida, clique em Eliminar.