Avviare pipeline Dataflow con Cloud Composer

Cloud Composer 1 | Cloud Composer 2 | Cloud Composer 3

In questa pagina viene descritto come utilizzare DataflowTemplateOperator per l'avvio Pipeline Dataflow da con Cloud Composer. Pipeline da testo a BigQuery di Cloud Storage è una pipeline batch che consente di caricare file di testo Cloud Storage, trasformali utilizzando una funzione JavaScript definita dall'utente (UDF) che fornisci e invia i risultati a in BigQuery.

verranno caricati una funzione definita dall'utente, un file di input e uno schema JSON
  in un bucket Cloud Storage. Un DAG che fa riferimento a questi file avvia una pipeline batch Dataflow, che applicherà la funzione definita dall'utente e il file di schema JSON al file di input. In seguito, questi contenuti verranno caricati in una tabella BigQuery

Panoramica

  • Prima di avviare il flusso di lavoro, creerai le seguenti entità:

    • Una tabella BigQuery vuota da un set di dati vuoto che conterrà le seguenti colonne di informazioni: location, average_temperature,month e, facoltativamente, inches_of_rain, is_current e latest_measurement.

    • Un file JSON che normalizzerà i dati di .txt nel formato corretto per il parametro . L'oggetto JSON avrà un array di BigQuery Schema, in cui ciascun oggetto conterrà un nome di colonna, un tipo di input e se non è un campo obbligatorio.

    • Un file .txt di input che conterrà i dati che verranno caricati collettivamente alla tabella BigQuery.

    • Una funzione definita dall'utente scritta in JavaScript che trasformerà ciascuna riga del file .txt nelle variabili pertinenti per la tabella.

    • Un file DAG Airflow che punterà alla posizione di questi .

  • Successivamente, caricherai il file .txt, il file delle funzioni definite dall'utente .js e lo schema .json in un bucket Cloud Storage. Caricherai anche il DAG del tuo ambiente Cloud Composer.

  • Dopo aver caricato il DAG, Airflow eseguirà un'attività da quest'ultimo. Questa attività avviare una pipeline Dataflow che applicherà funzione definita dall'utente al file .txt e formattarla in base alla Schema JSON.

  • Infine, i dati vengono caricati nella tabella BigQuery che hai creato in precedenza.

Prima di iniziare

  • Questa guida richiede familiarità con JavaScript per scrivere la funzione definita dall'utente.
  • Questa guida presuppone che tu abbia già un Cloud Composer completamente gestito di Google Cloud. Consulta Creare un ambiente per crearne uno. Puoi utilizzare qualsiasi versione di Cloud Composer con questa guida.
  • Abilita le API Cloud Composer, Dataflow, Cloud Storage, BigQuery.

    Abilita le API

Crea una tabella BigQuery vuota con una definizione di schema

Creare una tabella BigQuery con una definizione di schema. Tu utilizzerà questa definizione di schema più avanti in questa guida. Questo La tabella BigQuery conterrà i risultati del caricamento in batch.

Per creare una tabella vuota con una definizione di schema:

Console

  1. Nella console Google Cloud, vai a BigQuery pagina:

    Vai a BigQuery

  2. Nel pannello di navigazione, nella sezione Risorse, espandi le progetto.

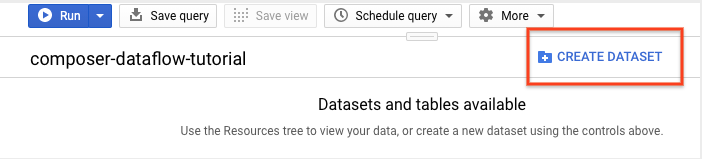
  3. Nel riquadro dei dettagli, fai clic su Crea set di dati.

    fai clic sul pulsante "Create a dataset" (Crea un set di dati)

  4. Nella pagina Crea set di dati, nella sezione ID set di dati, assegna un nome Set di dati average_weather. Lascia invariati i valori predefiniti di tutti gli altri campi. stato.

    inserisci l'ID del set di dati con il nome average_weather

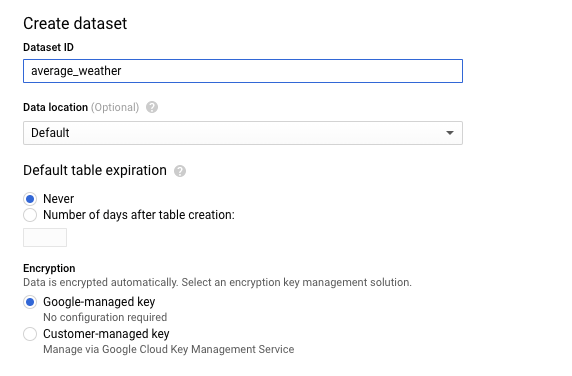
  5. Fai clic su Crea set di dati.

  6. Torna al pannello di navigazione, nella sezione Risorse ed espandi del progetto. Quindi, fai clic sul set di dati average_weather.

  7. Nel riquadro dei dettagli, fai clic su Crea tabella.

    fai clic su Crea tabella

  8. Nella pagina Crea tabella, nella sezione Origine, seleziona Tabella vuota.

  9. Nella sezione Destinazione della pagina Crea tabella:

    • In Nome set di dati, scegli il set di dati average_weather.

      scegli l'opzione Dataset per il set di dati average_weather

    • Nel campo Nome tabella, inserisci il nome average_weather.

    • Verifica che l'opzione Tipo di tabella sia impostata su Tabella nativa.

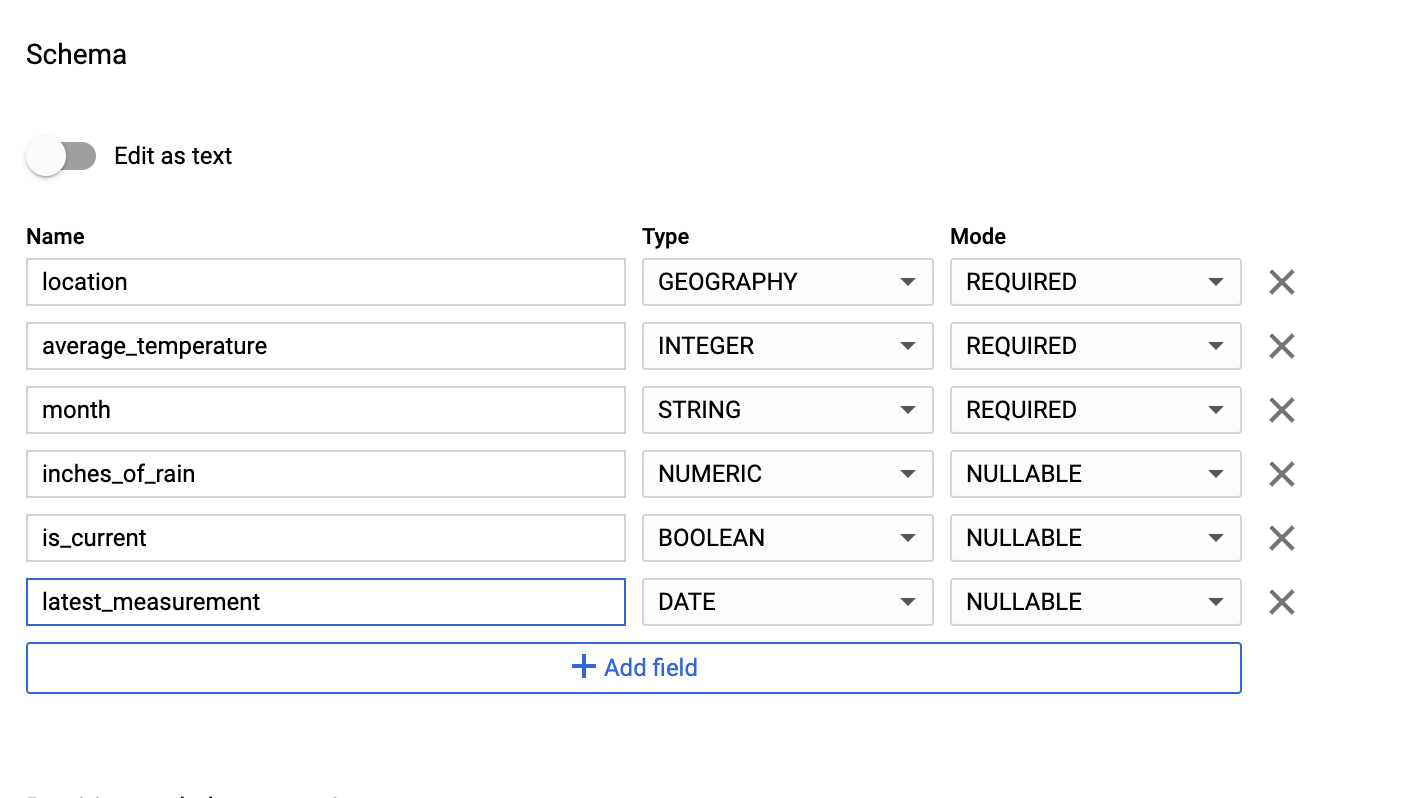
  10. Nella sezione Schema, inserisci lo schema. definizione di Kubernetes. Puoi utilizzare uno dei seguenti approcci:

    • Inserisci manualmente le informazioni sullo schema attivando Modifica come testo e inserendo lo schema della tabella come array JSON. Digita quanto segue campi:

      [
          {
              "name": "location",
              "type": "GEOGRAPHY",
              "mode": "REQUIRED"
          },
          {
              "name": "average_temperature",
              "type": "INTEGER",
              "mode": "REQUIRED"
          },
          {
              "name": "month",
              "type": "STRING",
              "mode": "REQUIRED"
          },
          {
              "name": "inches_of_rain",
              "type": "NUMERIC"
          },
          {
              "name": "is_current",
              "type": "BOOLEAN"
          },
          {
              "name": "latest_measurement",
              "type": "DATE"
          }
      ]
      
    • Utilizza Aggiungi campo per inserire manualmente lo schema:

      fai clic su Aggiungi campo per inserire i campi

  11. In Impostazioni di partizionamento e clustering, lascia il valore predefinito valore, No partitioning.

  12. Nella sezione Opzioni avanzate, per Crittografia lascia il valore predefinito, Google-managed key.

  13. Fai clic su Crea tabella.

bq

Utilizza il comando bq mk per creare un set di dati vuoto e una tabella in del set di dati.

Esegui questo comando per creare un set di dati delle condizioni meteorologiche globali medie:

bq --location=LOCATION mk \
    --dataset PROJECT_ID:average_weather

Sostituisci quanto segue:

  • LOCATION: la regione in cui si trova l'ambiente.
  • PROJECT_ID: l'ID del progetto.

Esegui questo comando per creare una tabella vuota in questo set di dati con la definizione dello schema:

bq mk --table \
PROJECT_ID:average_weather.average_weather \
location:GEOGRAPHY,average_temperature:INTEGER,month:STRING,inches_of_rain:NUMERIC,is_current:BOOLEAN,latest_measurement:DATE

Dopo aver creato la tabella, puoi aggiorna la scadenza, la descrizione e le etichette della tabella. Puoi anche modificare la definizione dello schema.

Python

Salva questo codice come dataflowtemplateoperator_create_dataset_and_table_helper.py e aggiornare le variabili in modo che riflettano il progetto e la località, eseguilo con questo comando:

python dataflowtemplateoperator_create_dataset_and_table_helper.py

Python

Per eseguire l'autenticazione su Cloud Composer, configura le credenziali predefinite dell'applicazione. Per ulteriori informazioni, vedi Configura l'autenticazione per un ambiente di sviluppo locale.


# Make sure to follow the quickstart setup instructions beforehand.
# See instructions here:
# https://cloud.google.com/bigquery/docs/quickstarts/quickstart-client-libraries

# Before running the sample, be sure to install the bigquery library
# in your local environment by running pip install google.cloud.bigquery

from google.cloud import bigquery

# TODO(developer): Replace with your values
project = "your-project"  # Your GCP Project
location = "US"  # the location where you want your BigQuery data to reside. For more info on possible locations see https://cloud.google.com/bigquery/docs/locations
dataset_name = "average_weather"


def create_dataset_and_table(project, location, dataset_name):
    # Construct a BigQuery client object.
    client = bigquery.Client(project)

    dataset_id = f"{project}.{dataset_name}"

    # Construct a full Dataset object to send to the API.
    dataset = bigquery.Dataset(dataset_id)

    # Set the location to your desired location for the dataset.
    # For more information, see this link:
    # https://cloud.google.com/bigquery/docs/locations
    dataset.location = location

    # Send the dataset to the API for creation.
    # Raises google.api_core.exceptions.Conflict if the Dataset already
    # exists within the project.
    dataset = client.create_dataset(dataset)  # Make an API request.

    print(f"Created dataset {client.project}.{dataset.dataset_id}")

    # Create a table from this dataset.

    table_id = f"{client.project}.{dataset_name}.average_weather"

    schema = [
        bigquery.SchemaField("location", "GEOGRAPHY", mode="REQUIRED"),
        bigquery.SchemaField("average_temperature", "INTEGER", mode="REQUIRED"),
        bigquery.SchemaField("month", "STRING", mode="REQUIRED"),
        bigquery.SchemaField("inches_of_rain", "NUMERIC", mode="NULLABLE"),
        bigquery.SchemaField("is_current", "BOOLEAN", mode="NULLABLE"),
        bigquery.SchemaField("latest_measurement", "DATE", mode="NULLABLE"),
    ]

    table = bigquery.Table(table_id, schema=schema)
    table = client.create_table(table)  # Make an API request.
    print(f"Created table {table.project}.{table.dataset_id}.{table.table_id}")

Crea un bucket Cloud Storage

Crea un bucket per contenere tutti i file necessari per il flusso di lavoro. Il DAG che più avanti nella guida farà riferimento ai file che caricherai in questa Cloud Storage. Per creare un nuovo bucket di archiviazione:

Console

  1. Apri Cloud Storage nella console Google Cloud.

    Vai a Cloud Storage

  2. Fai clic su Crea bucket per aprire il modulo di creazione del bucket.

    1. Inserisci le informazioni sul bucket e fai clic su Continua per completare ogni passaggio:

      • Specifica un nome globalmente univoco per il tuo bucket. Questa guida utilizza bucketName, ad esempio.

      • Seleziona Regione come tipo di località. Quindi, seleziona un'opzione Località in cui verranno archiviati i dati del bucket.

      • Seleziona Standard come classe di archiviazione predefinita per i tuoi dati.

      • Seleziona il controllo dell'accesso Uniforme per accedere agli oggetti.

    2. Fai clic su Fine.

gsutil

Usa il comando gsutil mb:

gsutil mb gs://bucketName/

Sostituisci quanto segue:

  • bucketName: il nome del bucket che hai creato in precedenza in questo guida.

Esempi di codice

C#

Per eseguire l'autenticazione su Cloud Composer, configura le credenziali predefinite dell'applicazione. Per ulteriori informazioni, vedi Configura l'autenticazione per un ambiente di sviluppo locale.


using Google.Apis.Storage.v1.Data;
using Google.Cloud.Storage.V1;
using System;

public class CreateBucketSample
{
    public Bucket CreateBucket(
        string projectId = "your-project-id",
        string bucketName = "your-unique-bucket-name")
    {
        var storage = StorageClient.Create();
        var bucket = storage.CreateBucket(projectId, bucketName);
        Console.WriteLine($"Created {bucketName}.");
        return bucket;
    }
}

Go

Per eseguire l'autenticazione su Cloud Composer, configura le credenziali predefinite dell'applicazione. Per ulteriori informazioni, vedi Configura l'autenticazione per un ambiente di sviluppo locale.

import (
	"context"
	"fmt"
	"io"
	"time"

	"cloud.google.com/go/storage"
)

// createBucket creates a new bucket in the project.
func createBucket(w io.Writer, projectID, bucketName string) error {
	// projectID := "my-project-id"
	// bucketName := "bucket-name"
	ctx := context.Background()
	client, err := storage.NewClient(ctx)
	if err != nil {
		return fmt.Errorf("storage.NewClient: %w", err)
	}
	defer client.Close()

	ctx, cancel := context.WithTimeout(ctx, time.Second*30)
	defer cancel()

	bucket := client.Bucket(bucketName)
	if err := bucket.Create(ctx, projectID, nil); err != nil {
		return fmt.Errorf("Bucket(%q).Create: %w", bucketName, err)
	}
	fmt.Fprintf(w, "Bucket %v created\n", bucketName)
	return nil
}

Java

Per eseguire l'autenticazione su Cloud Composer, configura le credenziali predefinite dell'applicazione. Per ulteriori informazioni, vedi Configura l'autenticazione per un ambiente di sviluppo locale.

import com.google.cloud.storage.Bucket;
import com.google.cloud.storage.BucketInfo;
import com.google.cloud.storage.Storage;
import com.google.cloud.storage.StorageOptions;

public class CreateBucket {
  public static void createBucket(String projectId, String bucketName) {
    // The ID of your GCP project
    // String projectId = "your-project-id";

    // The ID to give your GCS bucket
    // String bucketName = "your-unique-bucket-name";

    Storage storage = StorageOptions.newBuilder().setProjectId(projectId).build().getService();

    Bucket bucket = storage.create(BucketInfo.newBuilder(bucketName).build());

    System.out.println("Created bucket " + bucket.getName());
  }
}

Python

Per eseguire l'autenticazione su Cloud Composer, configura le credenziali predefinite dell'applicazione. Per ulteriori informazioni, vedi Configura l'autenticazione per un ambiente di sviluppo locale.

from google.cloud import storage


def create_bucket(bucket_name):
    """Creates a new bucket."""
    # bucket_name = "your-new-bucket-name"

    storage_client = storage.Client()

    bucket = storage_client.create_bucket(bucket_name)

    print(f"Bucket {bucket.name} created")

Ruby

Per eseguire l'autenticazione su Cloud Composer, configura le credenziali predefinite dell'applicazione. Per ulteriori informazioni, vedi Configura l'autenticazione per un ambiente di sviluppo locale.

def create_bucket bucket_name:
  # The ID to give your GCS bucket
  # bucket_name = "your-unique-bucket-name"

  require "google/cloud/storage"

  storage = Google::Cloud::Storage.new
  bucket  = storage.create_bucket bucket_name

  puts "Created bucket: #{bucket.name}"
end

Crea uno schema BigQuery in formato JSON per la tabella di output

Crea un file di schema BigQuery in formato JSON corrispondente alla che hai creato in precedenza. Tieni presente che i nomi, i tipi e le modalità dei campi devono corrispondere a quelli definiti in precedenza nella tabella BigQuery . Questo file normalizzerà i dati del file .txt in un formato compatibili con lo schema BigQuery. Assegna un nome a questo file jsonSchema.json.

{
    "BigQuery Schema": [
    {
        "name": "location",
        "type": "GEOGRAPHY",
        "mode": "REQUIRED"
    },
    {
        "name": "average_temperature",
        "type": "INTEGER",
        "mode": "REQUIRED"
    },
    {
        "name": "month",
        "type": "STRING",
        "mode": "REQUIRED"
    },
    {
        "name": "inches_of_rain",
        "type": "NUMERIC"
    },
    {
        "name": "is_current",
        "type": "BOOLEAN"
    },
    {
        "name": "latest_measurement",
        "type": "DATE"
    }]
}

Crea un file JavaScript per formattare i dati

In questo file, definirai la funzione definita dall'utente (UDF) che fornisce la logica per trasformare le righe di testo nel file di input. Tieni presente che prende ciascuna riga di testo nel file di input come argomento separato, la funzione verrà eseguita una volta per ogni riga del file di input. Assegna un nome a questo file transformCSVtoJSON.js.


function transformCSVtoJSON(line) {
  var values = line.split(',');
  var properties = [
    'location',
    'average_temperature',
    'month',
    'inches_of_rain',
    'is_current',
    'latest_measurement',
  ];
  var weatherInCity = {};

  for (var count = 0; count < values.length; count++) {
    if (values[count] !== 'null') {
      weatherInCity[properties[count]] = values[count];
    }
  }

  return JSON.stringify(weatherInCity);
}

Crea il file di input

Questo file conterrà le informazioni che vuoi caricare sul tuo Tabella BigQuery. Copia questo file localmente e assegnagli un nome inputFile.txt.

POINT(40.7128 74.006),45,'July',null,true,2020-02-16
POINT(41.8781 87.6298),23,'October',13,false,2015-02-13
POINT(48.8566 2.3522),80,'December',null,true,null
POINT(6.5244 3.3792),15,'March',14,true,null

Carica i file nel bucket

Carica i file seguenti nel bucket Cloud Storage che hai creato precedenti:

  • Schema BigQuery in formato JSON (.json)
  • Funzione JavaScript definita dall'utente (transformCSVtoJSON.js)
  • Il file di input del testo da elaborare (.txt)

Console

  1. Nella console Google Cloud, vai alla pagina Bucket di Cloud Storage.

    Vai a Bucket

  2. Nell'elenco dei bucket, fai clic sul tuo bucket.

  3. Nella scheda Oggetti del bucket, esegui una delle seguenti operazioni:

    • Trascina i file desiderati dal desktop o da Gestione file. al riquadro principale della console Google Cloud.

    • Fai clic sul pulsante Carica file e seleziona i file che vuoi carica nella finestra di dialogo visualizzata e fai clic su Apri.

gsutil

Esegui il comando gsutil cp:

gsutil cp OBJECT_LOCATION gs://bucketName

Sostituisci quanto segue:

  • bucketName: il nome del bucket che hai creato in precedenza in questa guida.
  • OBJECT_LOCATION: il percorso locale dell'oggetto. Ad esempio: Desktop/transformCSVtoJSON.js.

Esempi di codice

Python

Per eseguire l'autenticazione su Cloud Composer, configura le credenziali predefinite dell'applicazione. Per ulteriori informazioni, vedi Configura l'autenticazione per un ambiente di sviluppo locale.

from google.cloud import storage


def upload_blob(bucket_name, source_file_name, destination_blob_name):
    """Uploads a file to the bucket."""
    # The ID of your GCS bucket
    # bucket_name = "your-bucket-name"
    # The path to your file to upload
    # source_file_name = "local/path/to/file"
    # The ID of your GCS object
    # destination_blob_name = "storage-object-name"

    storage_client = storage.Client()
    bucket = storage_client.bucket(bucket_name)
    blob = bucket.blob(destination_blob_name)

    # Optional: set a generation-match precondition to avoid potential race conditions
    # and data corruptions. The request to upload is aborted if the object's
    # generation number does not match your precondition. For a destination
    # object that does not yet exist, set the if_generation_match precondition to 0.
    # If the destination object already exists in your bucket, set instead a
    # generation-match precondition using its generation number.
    generation_match_precondition = 0

    blob.upload_from_filename(source_file_name, if_generation_match=generation_match_precondition)

    print(
        f"File {source_file_name} uploaded to {destination_blob_name}."
    )

Ruby

Per eseguire l'autenticazione su Cloud Composer, configura le credenziali predefinite dell'applicazione. Per ulteriori informazioni, vedi Configura l'autenticazione per un ambiente di sviluppo locale.

def upload_file bucket_name:, local_file_path:, file_name: nil
  # The ID of your GCS bucket
  # bucket_name = "your-unique-bucket-name"

  # The path to your file to upload
  # local_file_path = "/local/path/to/file.txt"

  # The ID of your GCS object
  # file_name = "your-file-name"

  require "google/cloud/storage"

  storage = Google::Cloud::Storage.new
  bucket  = storage.bucket bucket_name, skip_lookup: true

  file = bucket.create_file local_file_path, file_name

  puts "Uploaded #{local_file_path} as #{file.name} in bucket #{bucket_name}"
end

Configura DataflowTemplateOperator

Prima di eseguire il DAG, imposta le seguenti variabili Airflow.

Variabile Airflow Valore
project_id L'ID del progetto
gce_zone Zona Compute Engine in cui si trova il cluster Dataflow devono essere creati
bucket_path La località del bucket Cloud Storage che hai creato precedenti

Ora farai riferimento ai file creati in precedenza per creare un DAG che avvia dal flusso di lavoro Dataflow. Copia questo DAG e salvalo localmente come composer-dataflow-dag.py.

Flusso d'aria 2


"""Example Airflow DAG that creates a Cloud Dataflow workflow which takes a
text file and adds the rows to a BigQuery table.

This DAG relies on four Airflow variables
https://airflow.apache.org/docs/apache-airflow/stable/concepts/variables.html
* project_id - Google Cloud Project ID to use for the Cloud Dataflow cluster.
* gce_zone - Google Compute Engine zone where Cloud Dataflow cluster should be
  created.
For more info on zones where Dataflow is available see:
https://cloud.google.com/dataflow/docs/resources/locations
* bucket_path - Google Cloud Storage bucket where you've stored the User Defined
Function (.js), the input file (.txt), and the JSON schema (.json).
"""

import datetime

from airflow import models
from airflow.providers.google.cloud.operators.dataflow import (
    DataflowTemplatedJobStartOperator,
)
from airflow.utils.dates import days_ago

bucket_path = "{{var.value.bucket_path}}"
project_id = "{{var.value.project_id}}"
gce_zone = "{{var.value.gce_zone}}"


default_args = {
    # Tell airflow to start one day ago, so that it runs as soon as you upload it
    "start_date": days_ago(1),
    "dataflow_default_options": {
        "project": project_id,
        # Set to your zone
        "zone": gce_zone,
        # This is a subfolder for storing temporary files, like the staged pipeline job.
        "tempLocation": bucket_path + "/tmp/",
    },
}

# Define a DAG (directed acyclic graph) of tasks.
# Any task you create within the context manager is automatically added to the
# DAG object.
with models.DAG(
    # The id you will see in the DAG airflow page
    "composer_dataflow_dag",
    default_args=default_args,
    # The interval with which to schedule the DAG
    schedule_interval=datetime.timedelta(days=1),  # Override to match your needs
) as dag:
    start_template_job = DataflowTemplatedJobStartOperator(
        # The task id of your job
        task_id="dataflow_operator_transform_csv_to_bq",
        # The name of the template that you're using.
        # Below is a list of all the templates you can use.
        # For versions in non-production environments, use the subfolder 'latest'
        # https://cloud.google.com/dataflow/docs/guides/templates/provided-batch#gcstexttobigquery
        template="gs://dataflow-templates/latest/GCS_Text_to_BigQuery",
        # Use the link above to specify the correct parameters for your template.
        parameters={
            "javascriptTextTransformFunctionName": "transformCSVtoJSON",
            "JSONPath": bucket_path + "/jsonSchema.json",
            "javascriptTextTransformGcsPath": bucket_path + "/transformCSVtoJSON.js",
            "inputFilePattern": bucket_path + "/inputFile.txt",
            "outputTable": project_id + ":average_weather.average_weather",
            "bigQueryLoadingTemporaryDirectory": bucket_path + "/tmp/",
        },
    )

Flusso d'aria 1


"""Example Airflow DAG that creates a Cloud Dataflow workflow which takes a
text file and adds the rows to a BigQuery table.

This DAG relies on four Airflow variables
https://airflow.apache.org/docs/apache-airflow/stable/concepts/variables.html
* project_id - Google Cloud Project ID to use for the Cloud Dataflow cluster.
* gce_zone - Google Compute Engine zone where Cloud Dataflow cluster should be
  created.
  created.
Learn more about the difference between the two here:
https://cloud.google.com/compute/docs/regions-zones
* bucket_path - Google Cloud Storage bucket where you've stored the User Defined
Function (.js), the input file (.txt), and the JSON schema (.json).
"""

import datetime

from airflow import models
from airflow.contrib.operators.dataflow_operator import DataflowTemplateOperator
from airflow.utils.dates import days_ago

bucket_path = "{{var.value.bucket_path}}"
project_id = "{{var.value.project_id}}"
gce_zone = "{{var.value.gce_zone}}"


default_args = {
    # Tell airflow to start one day ago, so that it runs as soon as you upload it
    "start_date": days_ago(1),
    "dataflow_default_options": {
        "project": project_id,
        # Set to your zone
        "zone": gce_zone,
        # This is a subfolder for storing temporary files, like the staged pipeline job.
        "tempLocation": bucket_path + "/tmp/",
    },
}

# Define a DAG (directed acyclic graph) of tasks.
# Any task you create within the context manager is automatically added to the
# DAG object.
with models.DAG(
    # The id you will see in the DAG airflow page
    "composer_dataflow_dag",
    default_args=default_args,
    # The interval with which to schedule the DAG
    schedule_interval=datetime.timedelta(days=1),  # Override to match your needs
) as dag:
    start_template_job = DataflowTemplateOperator(
        # The task id of your job
        task_id="dataflow_operator_transform_csv_to_bq",
        # The name of the template that you're using.
        # Below is a list of all the templates you can use.
        # For versions in non-production environments, use the subfolder 'latest'
        # https://cloud.google.com/dataflow/docs/guides/templates/provided-batch#gcstexttobigquery
        template="gs://dataflow-templates/latest/GCS_Text_to_BigQuery",
        # Use the link above to specify the correct parameters for your template.
        parameters={
            "javascriptTextTransformFunctionName": "transformCSVtoJSON",
            "JSONPath": bucket_path + "/jsonSchema.json",
            "javascriptTextTransformGcsPath": bucket_path + "/transformCSVtoJSON.js",
            "inputFilePattern": bucket_path + "/inputFile.txt",
            "outputTable": project_id + ":average_weather.average_weather",
            "bigQueryLoadingTemporaryDirectory": bucket_path + "/tmp/",
        },
    )

Carica il DAG in Cloud Storage

Carica il DAG nella cartella /dags della cartella di sincronizzare la directory di una VM con un bucket. Una volta completato il caricamento, puoi visualizzarlo facendo clic sul link Cartella dei DAG in Cloud Composer Pagina Ambienti.

La cartella dei DAG nel tuo ambiente contiene il tuo DAG

Visualizzare lo stato dell'attività

  1. Vai all'interfaccia web di Airflow.
  2. Nella pagina dei DAG, fai clic sul nome del DAG (ad esempio composerDataflowDAG).
  3. Nella pagina dei dettagli dei DAG, fai clic su Vista grafico.
  4. Verifica lo stato:

    • Failed: intorno all'attività è presente una casella rossa. Puoi anche tenere il puntatore sopra l'attività e cercare State: Non riuscita.

    • Success: intorno all'attività è presente un riquadro verde. Puoi anche tenere il puntatore sopra l'attività per verificare Stato: operazione completata.

Dopo alcuni minuti, puoi controllare i risultati in Dataflow in BigQuery.

Visualizza il job in Dataflow

  1. Nella console Google Cloud, vai alla pagina Dataflow.

    Vai a Dataflow

  2. Il tuo job è denominato dataflow_operator_transform_csv_to_bq con un ID univoco alla fine del nome con un trattino, in questo modo:

    il job Dataflow ha un ID univoco

  3. Fai clic sul nome per visualizzare dettagli offerta di lavoro.

    vedi tutti i dettagli del job

Visualizzare i risultati in BigQuery

  1. Nella console Google Cloud, vai alla pagina BigQuery.

    Vai a BigQuery

  2. Puoi inviare query utilizzando SQL standard. Usa la seguente query per visualizza le righe aggiunte alla tabella:

    SELECT * FROM projectId.average_weather.average_weather