Cloud Composer 3 | Cloud Composer 2 | Cloud Composer 1
This guide explains how to create a CI/CD pipeline to test, synchronize, and deploy DAGs to your Cloud Composer environment from your GitHub repository.
If you want to only synchronize data from other services, see Transfer data from other services.
CI/CD pipeline overview
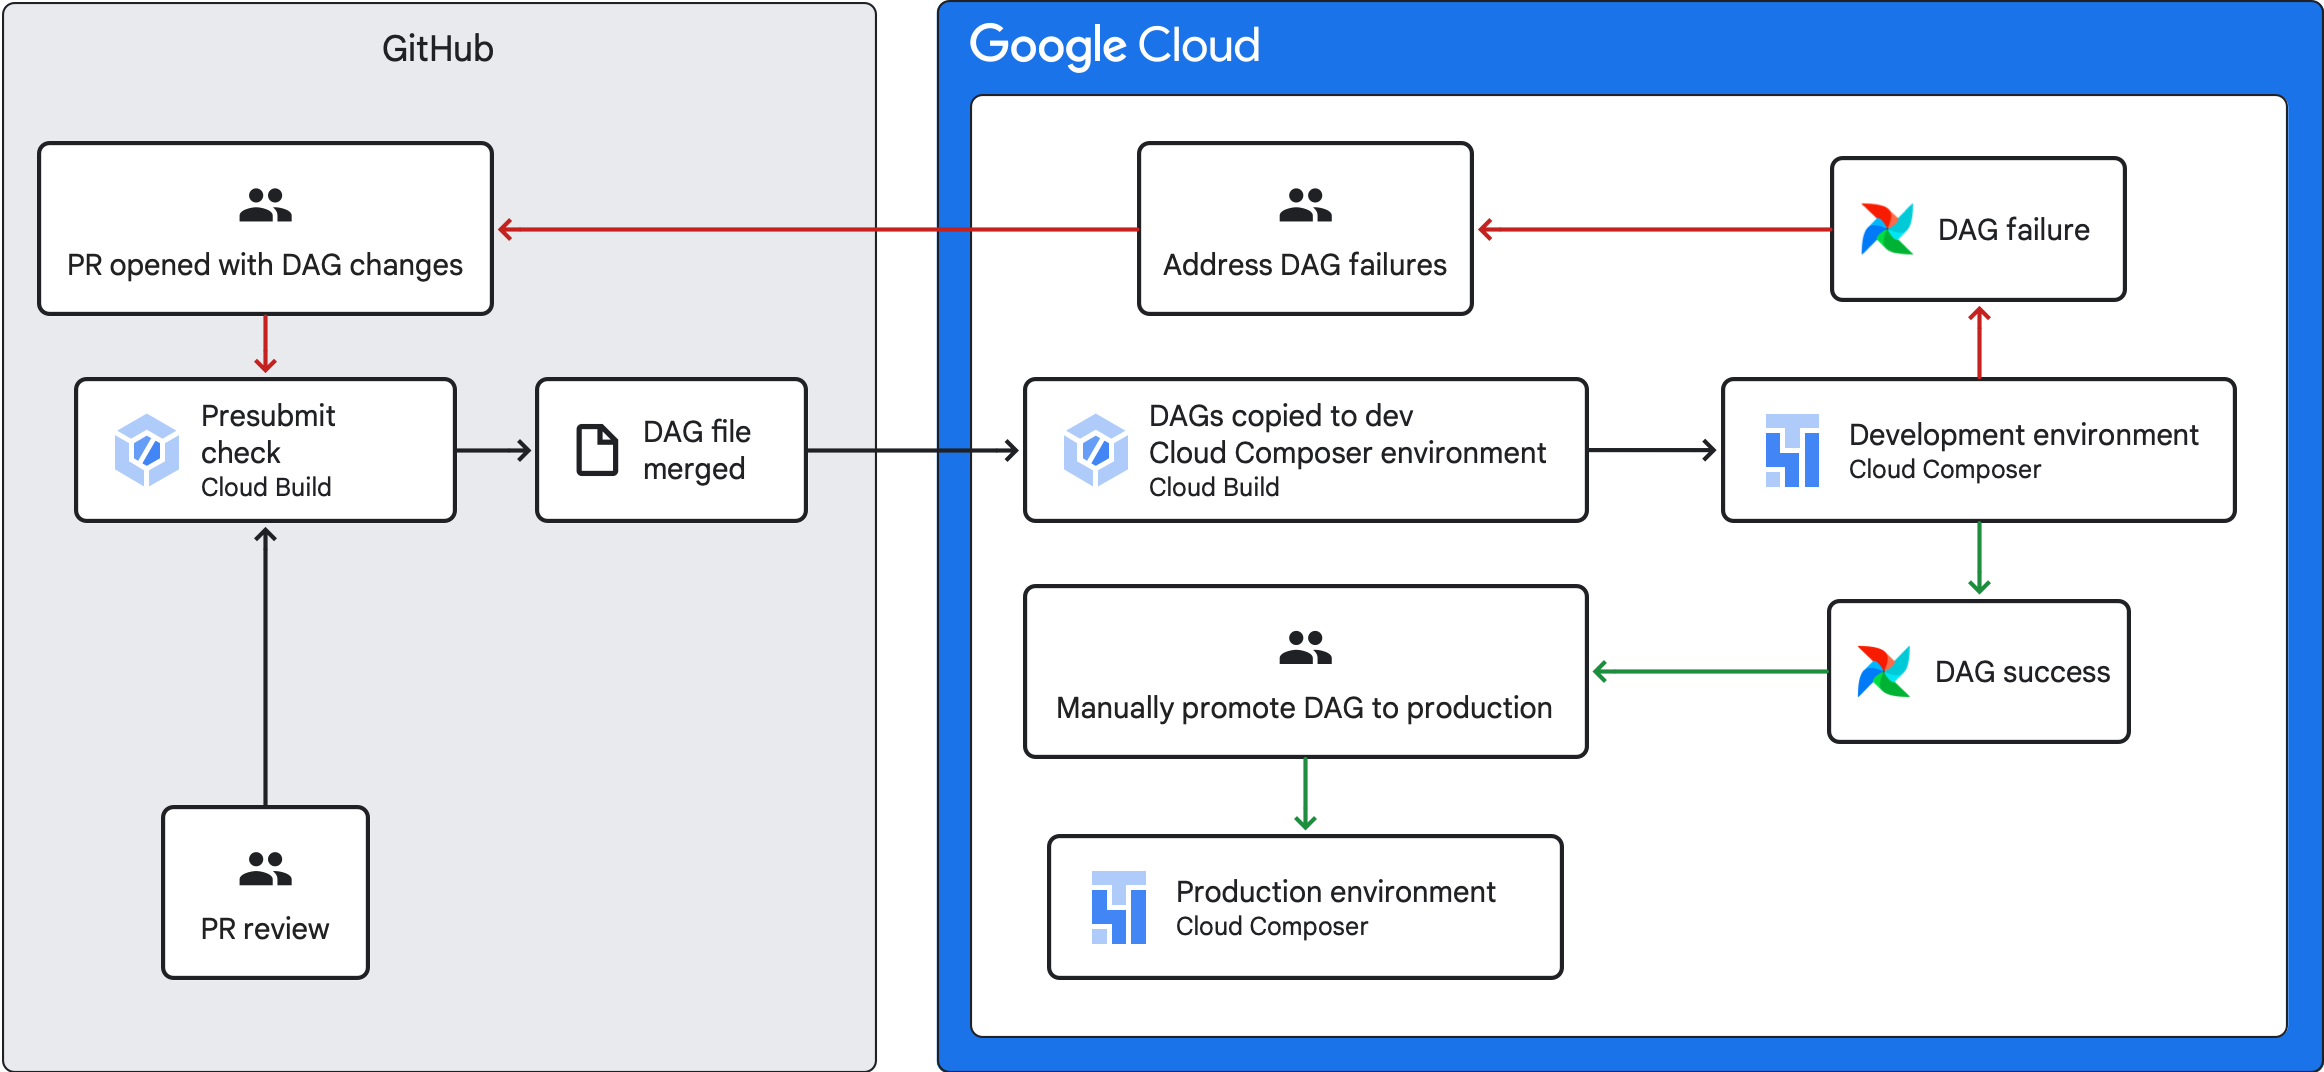
The CI/CD pipeline that to test, synchronize, and deploys DAGs has the following steps:
You make a change to a DAG and push that change to a development branch in your repository.
You open a pull request against the main branch of your repository.
Cloud Build runs unit tests to check that your DAG is valid.
Your pull request is approved and merged to the main branch of your repository.
Cloud Build synchronizes your development Cloud Composer environment with these new changes.
You verify that the DAG works as expected in your development environment.
If your DAG works as expected, you upload the DAG to your production Cloud Composer environment.
Objectives
- Run an automated presubmit check using Cloud Build. This check runs unit tests for a DAG.
- Synchronize DAGs in your development Cloud Composer environment with DAGs in your GitHub repository.
Before you begin
This guide assumes that you are working with two identical Cloud Composer environments: a development environment and a production environment.
For the purposes of this guide, you are configuring a CI/CD pipeline only for the development environment. Make sure that the environment you use isn't a production environment.
This guide assumes that you have your DAGs and their tests stored in a GitHub repository.
The example CI/CD pipeline demonstrates the contents of an example repository. DAGs and tests are stored in the
dags/directory, with requirements files, the constraints file, and Cloud Build configuration files stored at the top level. The DAG synchronization utility and its requirements are located in theutilsdirectory.
Create a presubmit check job and unit tests
The first Cloud Build job runs a presubmit check, which executes unit tests for your DAGs.
Add unit tests
If you haven't already, author unit tests for your
DAGs. Save these tests alongside the DAGs in your repository, each with the
_test suffix. For example, the test file for the DAG in example_dag.py is
example_dag_test.py. These are the tests that run as a presubmit check in
your repository.
Create Cloud Build YAML configuration for the presubmit check
In your repository, create a YAML file named test-dags.cloudbuild.yaml that
configures your Cloud Build job for presubmit checks. In it, there are
three steps:
- Install the dependencies needed by your DAGs.
- Install the dependencies needed by your unit tests.
- Execute the DAG tests.
Create the Cloud Build trigger for the presubmit check
Follow the Building repositories from GitHub guide to create a GitHub app based trigger with the following configurations:
Name:
test-dagsEvent: Pull Request
Source - Repository: choose your repository
Source - Base branch:
^main$(changemainto the name of your repository's base branch, if required)Source - Comment Control: not required
Build Configuration - Cloud build configuration file:
/test-dags.cloudbuild.yaml(the path to your build file)
Create a DAG sync job and add DAGs utility script
Next, configure a Cloud Build job that runs a DAGs utility script. The utility script in this job synchronizes your DAGs with your Cloud Composer environment after they are merged to the main branch in your repository.
Add the DAGs utility script
Add the DAG utility script to your repository. This utility script copies all DAG files in the dags/ directory of your
repository to a temporary directory, ignoring all non-DAG Python files. The
script then uses the Cloud Storage client library to upload all files
from that temporary directory to the dags/ directory in your
Cloud Composer environment's bucket.
Create Cloud Build YAML configuration for synchronizing DAGs
In your repository, create a YAML file named
add-dags-to-composer.cloudbuild.yaml that configures your Cloud Build
job for synchronizing DAGs. In it, there are two steps:
Install the dependencies needed by the DAGs utility script.
Run the utility script to synchronize the DAGs in your repository with your Cloud Composer environment.
Create the Cloud Build trigger
Follow the Building repositories from GitHub guide to create a GitHub app based trigger with the following configurations:
Name:
add-dags-to-composerEvent: Push to a branch
Source - Repository: choose your repository
Source - Base branch:
^main$(changemainto the name of your repository's base branch, if required)Source - Included files filter (glob):
dags/**Build Configuration - Cloud build configuration file:
/add-dags-to-composer.cloudbuild.yaml(the path to your build file)
In the Advanced configuration, add two substitution variables:
_DAGS_DIRECTORY- the directory where dags are located in your repository. If you are using the example repository from this guide, it isdags/._DAGS_BUCKET- the Cloud Storage bucket that contains thedags/directory in your development Cloud Composer environment. Omit thegs://prefix. For example:us-central1-example-env-1234ab56-bucket.
Test your CI/CD pipeline
In this section, follow a DAG development flow that utilizes your newly created Cloud Build triggers.
Run a presubmit job
Create a pull request to your main branch to test your build. Locate your presubmit check on the page. Click Details and choose View more details on Google Cloud Build to see your build logs in the Google Cloud console.
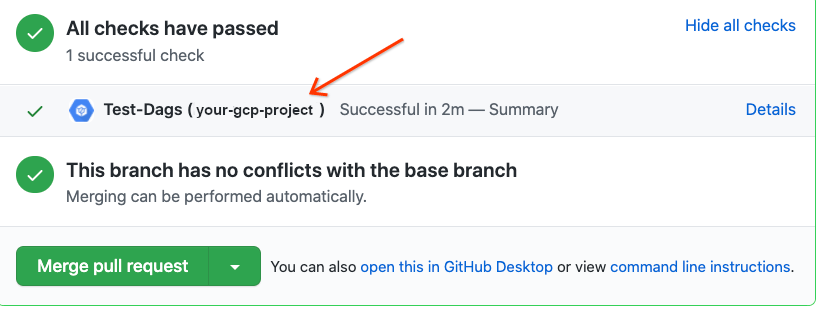
If your presubmit check failed, see Addressing build failures.
Validate that your DAG works in your development environment
After your pull request is approved, merge it to your main branch. Use the
Google Cloud console to
view your build results. If you have many
Cloud Build triggers, you can filter your builds on the trigger name
add-dags-to-composer.
After the Cloud Build sync job succeeds, the synchronized DAG appears in your development Cloud Composer environment. There, you can validate that the DAG functions as expected.
Add the DAG to your production environment
After the DAG performs as expected, manually add it to your production
environment. To do so, upload the DAG file
to the dags/ directory in your production Cloud Composer
environment's bucket.
If your DAG sync job failed or if your DAG is not behaving as expected in your development Cloud Composer environment, see Addressing build failures.
Addressing build failures
This section explains how to address common build failure scenarios.
What if my presubmit check failed?
From your pull request, click Details and choose View more details on Google Cloud Build to see your build logs in the Google Cloud console. Use these logs to help you debug the problem with your DAG. Once you have resolved the issues, commit the fix and push to your branch. The presubmit check runs again, and you can continue to iterate using the logs as a debugging tool.
What if my DAG sync job failed?
Use the Google Cloud console to
view your build results. If you have many
Cloud Build triggers, you can filter your builds on the trigger name
add-dags-to-composer. Examine the logs of the build job and resolve the
errors. If you need additional help resolving the errors, utilize
support channels.
What if my DAG does not work properly in my Cloud Composer environment?
If your DAG does not function as expected in your development Cloud Composer environment, do not manually promote the DAG to your production Cloud Composer environment. Instead, do one of the following:
- Revert the pull request with the changes that broke your DAG to restore it to the state immediately prior to your changes (this also reverts all other files in that pull request).
- Create a new pull request to manually revert changes to the broken DAG.
- Create a new pull request the fix the errors in your DAG.
Following any of these steps triggers a new presubmit check and upon merge, the DAG sync job.