Explorer la mise en page de l'éditeur d'intégration
L'éditeur d'intégrations est une interface par glisser-déposer qui vous permet de concevoir et de développer l'intégralité de votre flux d'intégration avec peu ou pas de code. Vous pouvez créer, modifier et exécuter toutes vos intégrations dans l'éditeur d'intégration. Vous pouvez considérer l'éditeur d'intégrations comme un espace de travail unifié pour gérer votre intégration.
Application Integration fournit des déclencheurs et des tâches prêts à l'emploi pour vous aider à développer rapidement votre intégration. Chaque élément de tâche ou de déclencheur est connecté à l'aide d'une limite avec sa duplication et jointure respectives.
Les arêtes indiquent également le flux de contrôle d'une tâche/déclencheur à une autre. Pour en savoir plus sur la spécification des conditions pour les arêtes et les tâches, consultez la section Conditions de périphérie.
Ouvrir l'éditeur d'intégration
Pour ouvrir votre intégration dans l'éditeur d'intégration, procédez comme suit :
Dans la console Google Cloud, accédez à la page Application Integration.
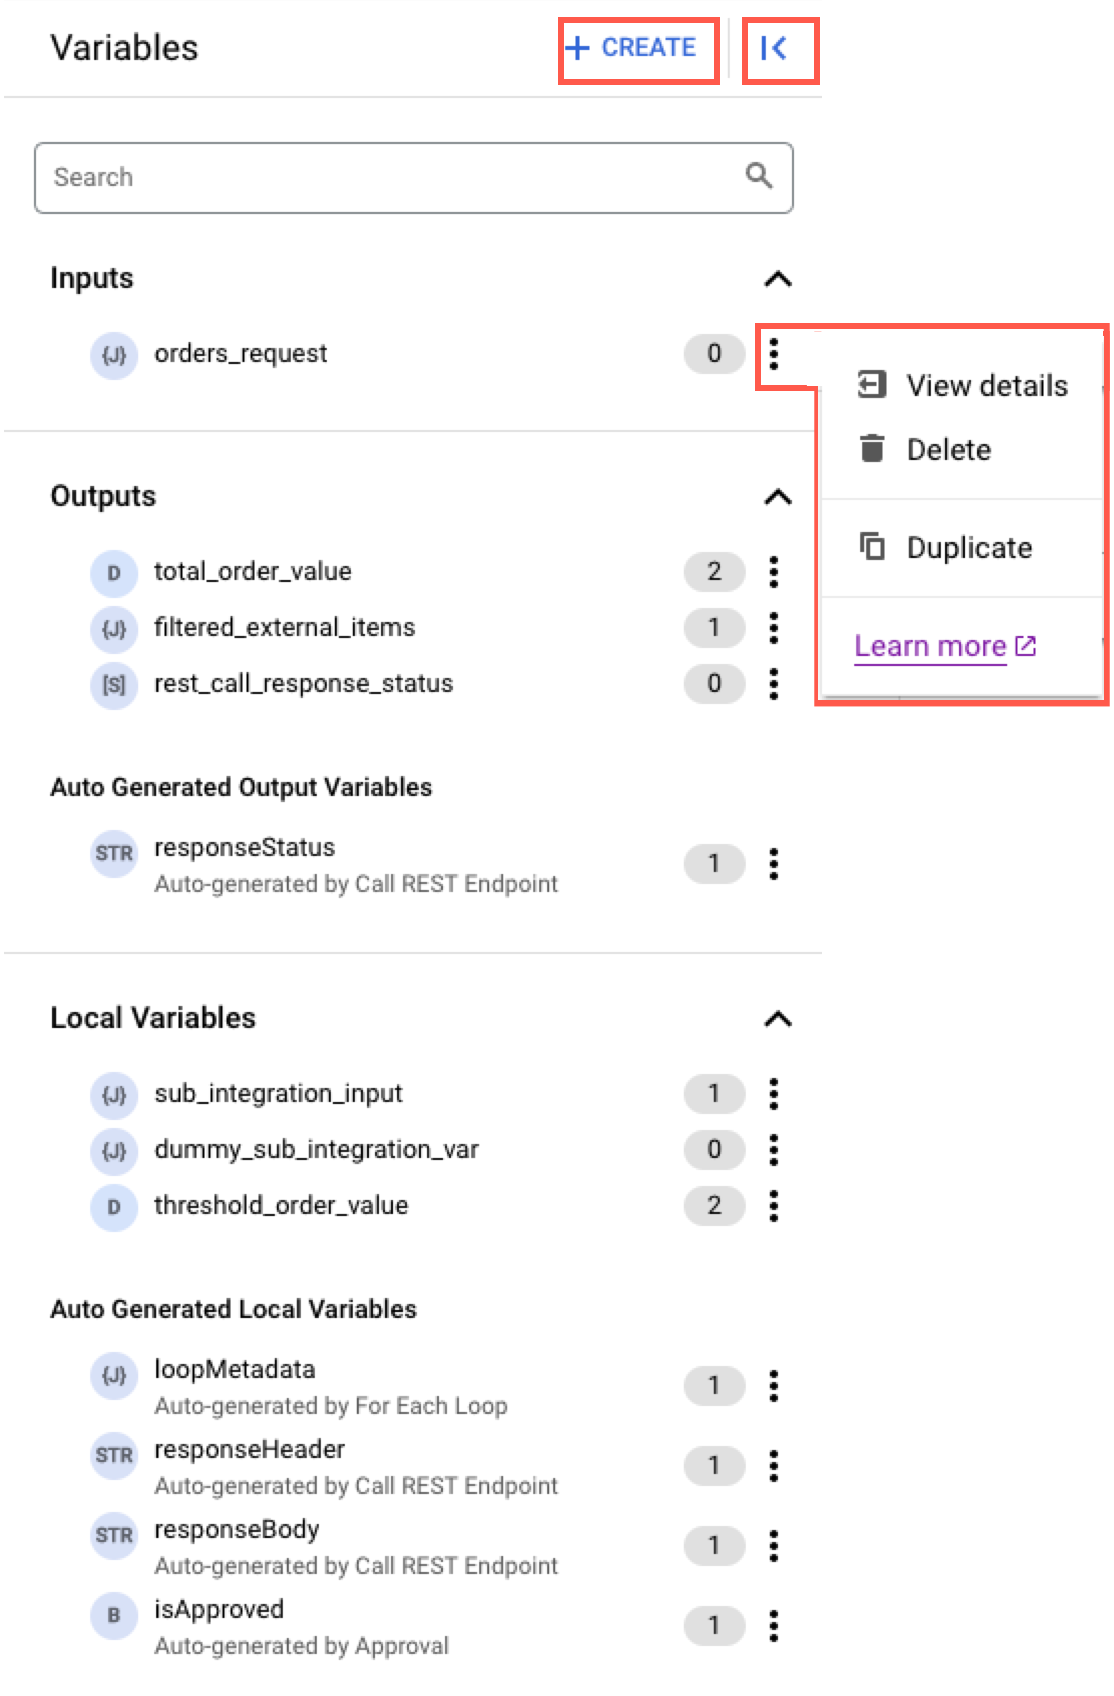
Le volet Variables répertorie toutes les variables d'intégration et les variables de tâche disponibles dans l'intégration. Il indique également le nombre total de références de variables dans l'intégration.
Pour effectuer des actions telles que supprimer ou dupliquer une variable, cliquez sur
more_vert
(menu d'actions) à côté de la variable concernée.
Pour en savoir plus sur les variables, consultez Variables.
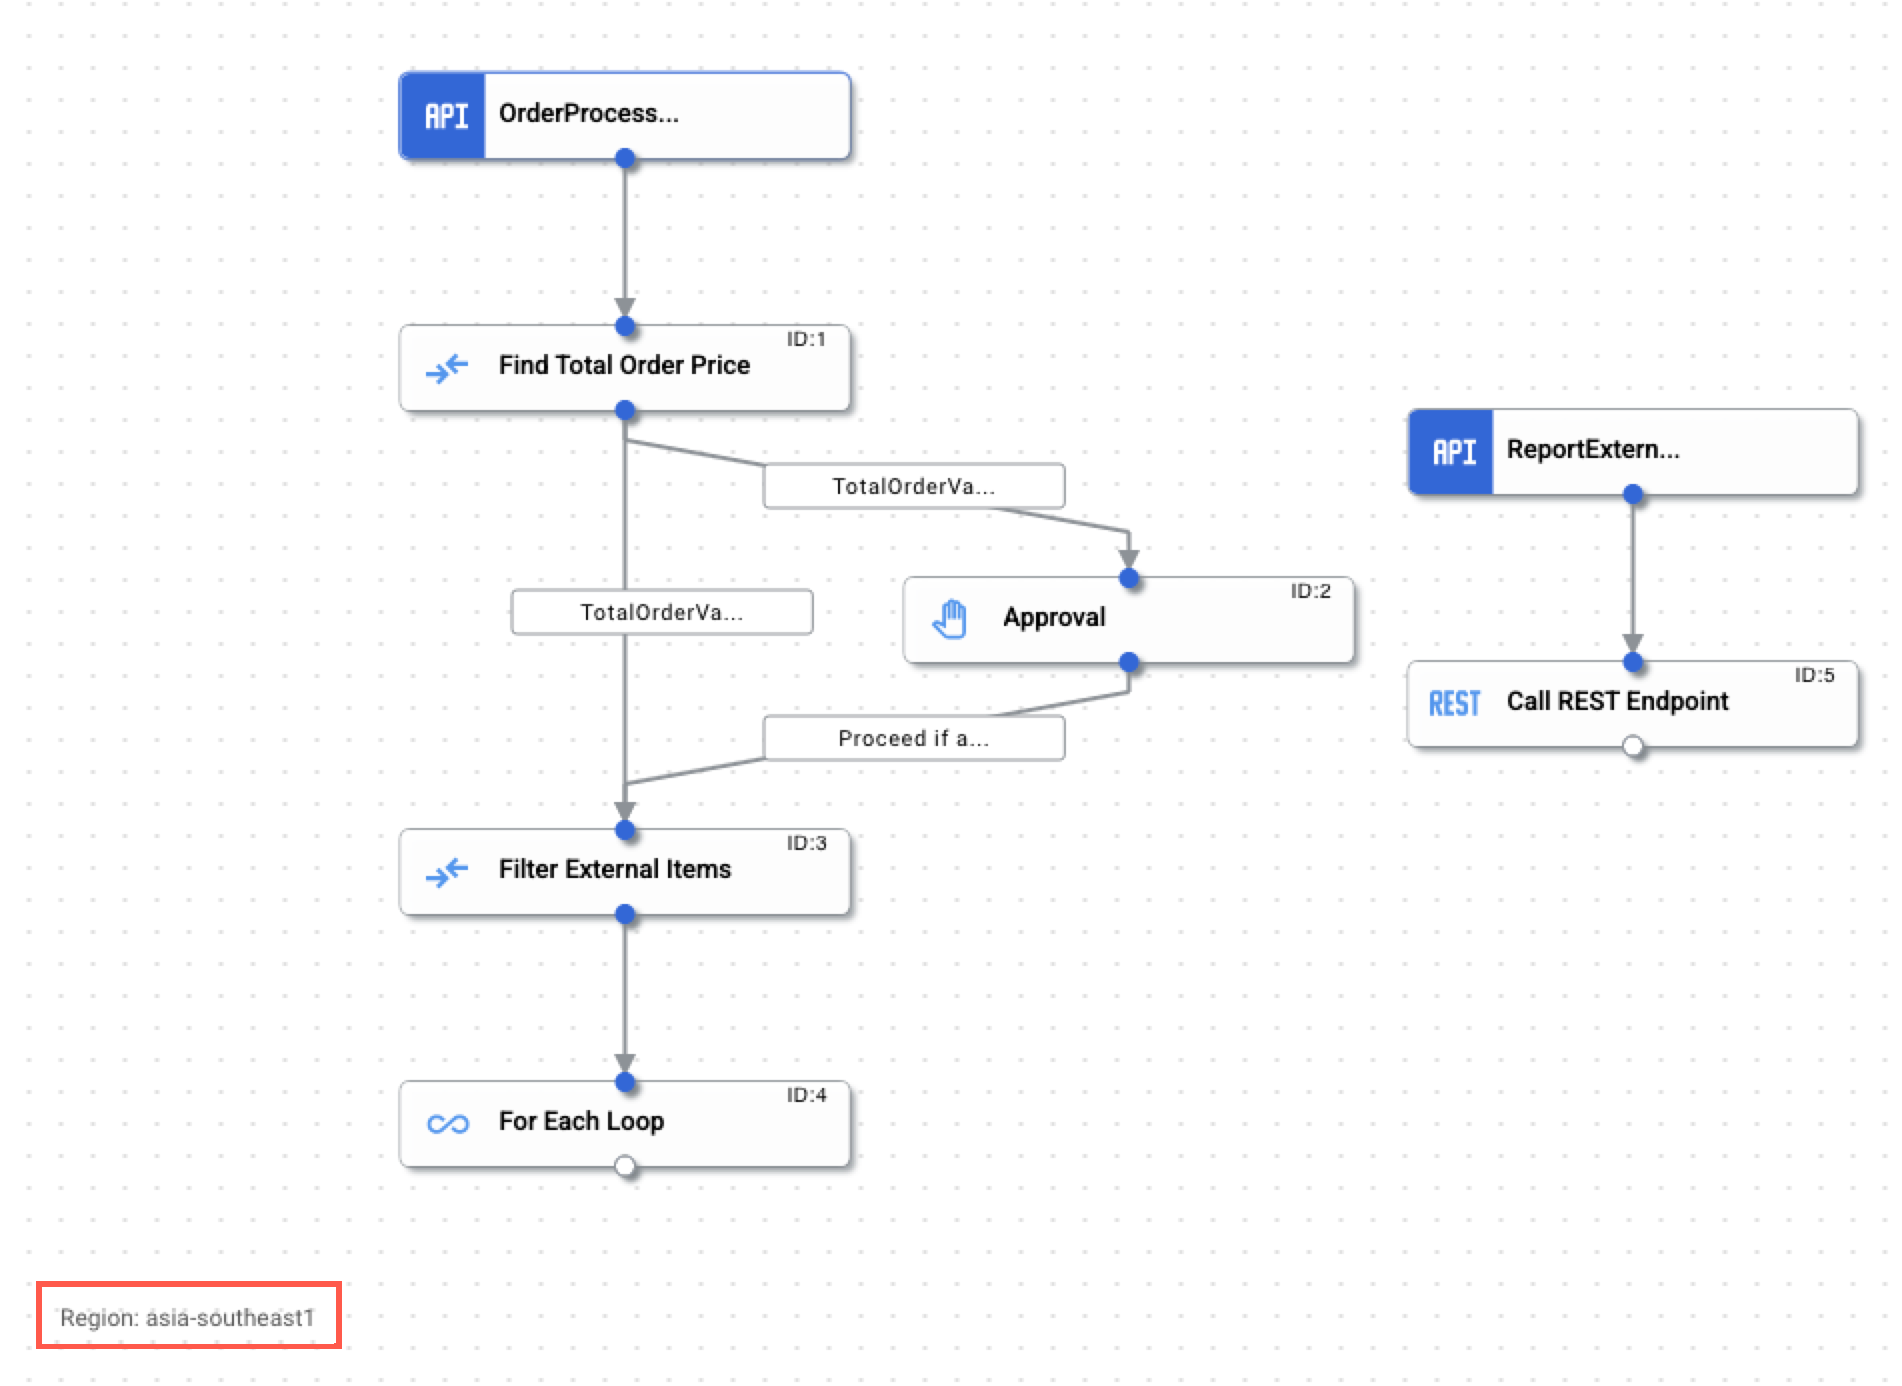
Canevas du concepteur
Le canevas du concepteur est l'arrière-plan sur lequel vous pouvez concevoir et développer votre flux d'intégration.
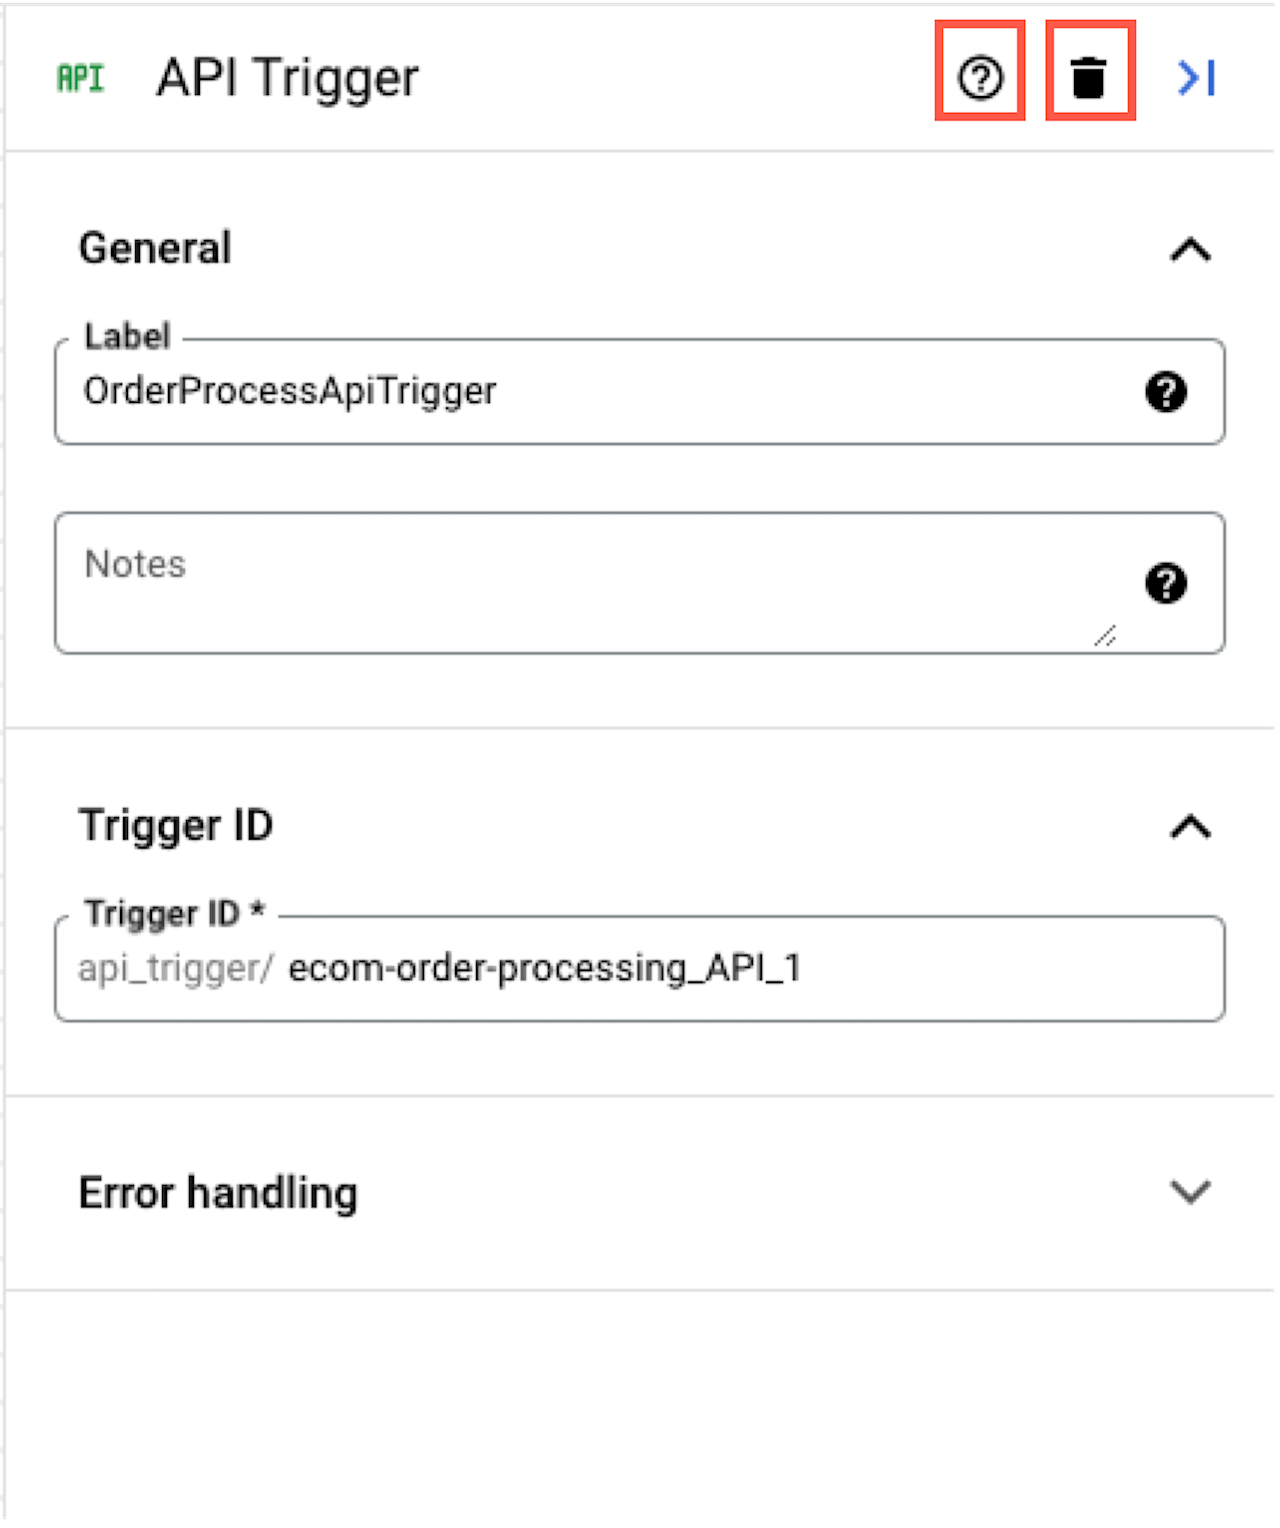
Volet de configuration
Le volet de configuration affiche les paramètres de configuration de chacun des déclencheurs et des tâches ajoutés dans le canevas du concepteur.
Pour savoir comment configurer un déclencheur ou une tâche, consultez Déclencheurs et tâches.
Sauf indication contraire, le contenu de cette page est régi par une licence Creative Commons Attribution 4.0, et les échantillons de code sont régis par une licence Apache 2.0. Pour en savoir plus, consultez les Règles du site Google Developers. Java est une marque déposée d'Oracle et/ou de ses sociétés affiliées.
Dernière mise à jour le 2025/09/03 (UTC).
[[["Facile à comprendre","easyToUnderstand","thumb-up"],["J'ai pu résoudre mon problème","solvedMyProblem","thumb-up"],["Autre","otherUp","thumb-up"]],[["Difficile à comprendre","hardToUnderstand","thumb-down"],["Informations ou exemple de code incorrects","incorrectInformationOrSampleCode","thumb-down"],["Il n'y a pas l'information/les exemples dont j'ai besoin","missingTheInformationSamplesINeed","thumb-down"],["Problème de traduction","translationIssue","thumb-down"],["Autre","otherDown","thumb-down"]],["Dernière mise à jour le 2025/09/03 (UTC)."],[[["\u003cp\u003eThe Integration editor is a drag-and-drop interface for designing, developing, modifying, and running integrations with minimal coding.\u003c/p\u003e\n"],["\u003cp\u003eApplication Integration offers built-in triggers and tasks that can be connected via edges to rapidly create integrations, and edges indicate the flow of control between elements.\u003c/p\u003e\n"],["\u003cp\u003eThe Integration editor is accessible from the Application Integration page in the Google Cloud console, either by selecting an existing integration or creating a new one.\u003c/p\u003e\n"],["\u003cp\u003eThe Integration editor's layout includes a toolbar, navigation bar, variables pane, designer canvas, and configuration pane, each serving distinct purposes in the integration design process.\u003c/p\u003e\n"],["\u003cp\u003eThe editor allows you to view connectors, execution logs and monitoring dashboard and also perform actions like cloning, downloading and uploading, and deleting integrations.\u003c/p\u003e\n"]]],[],null,["# Explore the Integration editor layout\n\nSee the [supported connectors](/integration-connectors/docs/connector-reference-overview) for Application Integration.\n\nExplore the Integration editor layout\n=====================================\n\nThe *Integration editor* is a drag-and-drop interface that lets you design and develop your entire integration flow\nwith little or no code. You can create, modify, and run all your integrations in the *Integration editor* . Overall, you can think of the *Integration editor* as a unified workspace for managing your integration.\n\n\nApplication Integration provides out-of-the-box\n[triggers](/application-integration/docs/trigger-overview) and\n[tasks](/application-integration/docs/task-overview) to further assist you in rapid\ndevelopment of your integration. Every task or trigger element is connected using an\n[edge](/application-integration/docs/edge-overview) along with its respective\n[fork and join](/application-integration/docs/forks-joins).\nEdges also indicate the flow of control from one task/trigger to another. For information on specifying conditions for edges and tasks, see\n[Edge conditions](/application-integration/docs/edge-overview#edge_condition).\n\nOpen integration editor\n-----------------------\n\n\nTo open your integration in the *Integration editor*, do the following:\n\n1. In the Google Cloud console, go to the **Application Integration** page.\n\n [Go to Application Integration](https://console.cloud.google.com/integrations)\n2. Click **Integrations** from the left navigation menu to open the **Integrations** page.\n3. Select an existing integration or create a new integration by clicking **Create integration** .\n\n\n If you are creating a new integration:\n 1. Enter a name and description in the **Create Integration** dialog.\n 2. Select a region for the integration. **Note:** The **Regions** dropdown only lists the regions provisioned in your Google Cloud project. To provision a new region, Click **Enable Region** . See [Enable new region](/application-integration/docs/enable-new-region) for more information.\n 3. Click **Create** . The newly created integration opens in the *integration editor*.\n\n\nExplore integration editor layout\n---------------------------------\n\nThe following figure shows a sample layout of the *Integration editor*.\n\n\nThe following table describes the different sections that comprise the integration editor:\n\nWhat's next\n-----------\n\n- Start a [quickstart](/application-integration/docs/quickstarts).\n- Learn about the [canvas view](/application-integration/docs/canvas-view).\n- Get a deeper understanding of the fundamental Application Integration [concepts](/application-integration/docs/concepts).\n- Learn how to add and configure the available [triggers and tasks](/application-integration/docs/all-triggers-tasks)."]]