Vous pouvez modifier une intégration en configurant des tâches, des déclencheurs ou des connexions périphériques. Vous pouvez également modifier les détails de l'intégration, par exemple en modifiant le paramètre de masquage des variables dans les journaux, Cloud Logging et la journalisation locale, et en mettant à jour le compte de service et la description de votre intégration.
Verrous de modification d'intégration
Les intégrations sont des entités de temps de conception souvent développées en collaboration avec plusieurs auteurs.
Bien qu'une intégration ne puisse être modifiée que par un seul auteur à la fois, les équipes peuvent collaborer sur une intégration et suivre les changements d'état via leurs versions.
Vous ne pouvez modifier qu'une version DRAFT de l'intégration et n'exécuter que la version ACTIVE de l'intégration. Pour en savoir plus sur les différentes versions d'intégration, consultez la section Versions d'intégration.
Lorsque vous ouvrez une intégration, un message semblable au suivant peut s'afficher dans l'éditeur d'intégration:
Si vous ouvrez une intégration en cours de modification par un autre utilisateur, le message suivant s'affiche dans l'éditeur d'intégration, car un seul utilisateur peut modifier l'intégration à un moment donné:
test-user@gmail.com is currently editing the integration. Edit features are temporarily disabled.
Pour modifier l'intégration, cliquez sur Prendre en charge. Une nouvelle version à l'état DRAFT est créée dans l'intégration pour vous, et la fonctionnalité de modification est désactivée pour les autres utilisateurs. La figure suivante montre le verrouillage de modification dans l'éditeur d'intégration.
Si vous ouvrez une intégration publiée, la version d'intégration est à l'état ACTIVE. Pour modifier l'intégration, cliquez sur Activer la modification. Une nouvelle version est créée avec l'état DRAFT.
This version is currently active. Editing features are disabled.
Pour modifier l'intégration, cliquez sur Activer la modification. Une nouvelle version à l'état DRAFT est créée dans l'intégration pour vous.
La figure suivante montre le verrouillage de modification dans l'éditeur d'intégration.
Modifier une intégration
Pour afficher et modifier un flux d'intégration, procédez comme suit:
Dans la console Google Cloud , accédez à la page Application Integration (Intégration d'applications).
Dans le menu de navigation, cliquez sur Intégrations.
La page Intégrations s'affiche et liste toutes les intégrations disponibles dans le projet Google Cloud .
Cliquez sur l'intégration que vous souhaitez modifier. L'intégration s'ouvre dans l'éditeur d'intégration.
Si l'intégration n'est pas à l'état DRAFT, elle est verrouillée et ne peut pas être modifiée. Pour en savoir plus sur les verrous de modification, consultez la section Verrous de modification des intégrations.
Supprimer des intégrations
Pour supprimer la publication d'une intégration, procédez comme suit :
Dans la console Google Cloud, accédez à la page Application Integration.
Cliquez sur Intégrations dans le menu de navigation de gauche pour ouvrir la page Intégrations.
Effectuez l'une des opérations suivantes dans la liste Intégrations :
Pour l'intégration existante que vous souhaitez supprimer, cliquez sur more_vertActions.
Dans le menu déroulant, sélectionnez Supprimer.
Une boîte de dialogue de confirmation s'affiche.
Ou
Cliquez sur l'intégration existante que vous souhaitez supprimer.
Cela entraîne son ouverture dans l'éditeur d'intégrations.
Dans la barre d'outils du concepteur, cliquez sur
more_vert
(menu d'actions), puis sélectionnez Clonerer l'intégration > Supprimer toutes les versions.
Une boîte de dialogue de confirmation s'affiche.
Cliquez sur Supprimer pour supprimer définitivement le sujet.
Gérer les détails de l'intégration
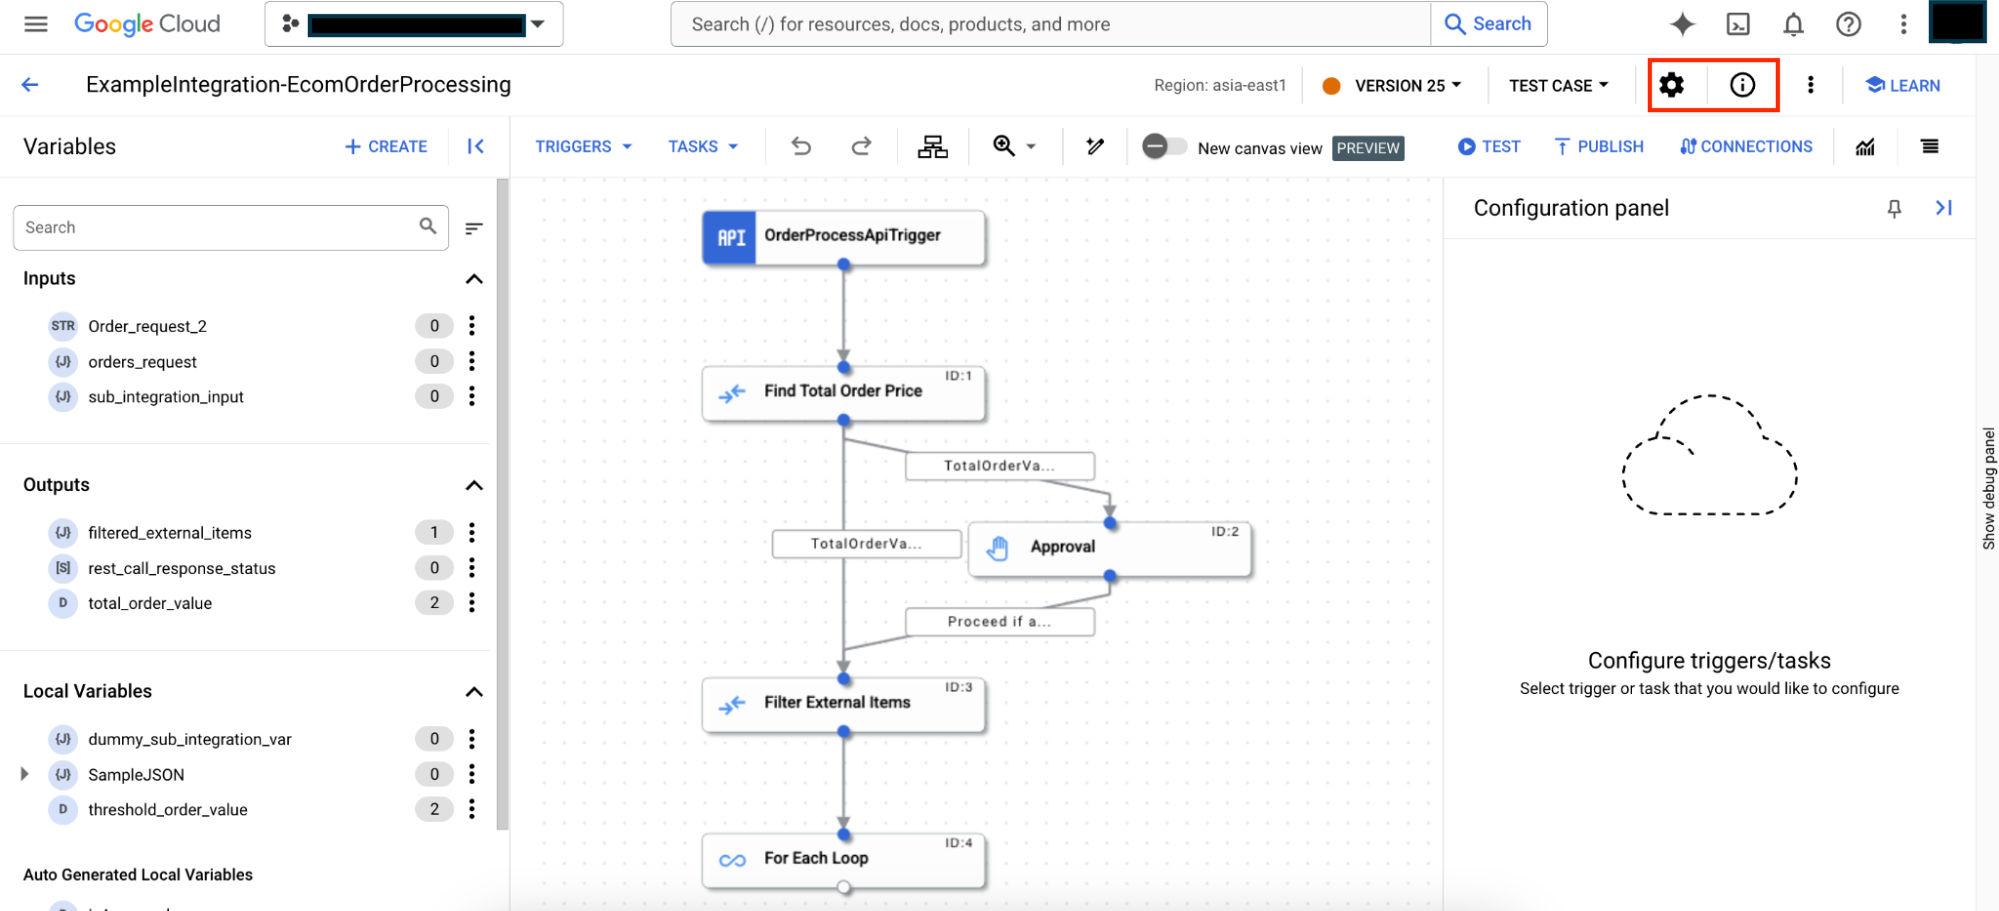
Vous pouvez consulter le récapitulatif de l'intégration et modifier ses paramètres. L'image suivante montre les icônes settings Paramètres d'intégration et info Informations d'intégration dans la barre d'outils de l'éditeur Application Integration:
Afficher les détails de l'intégration
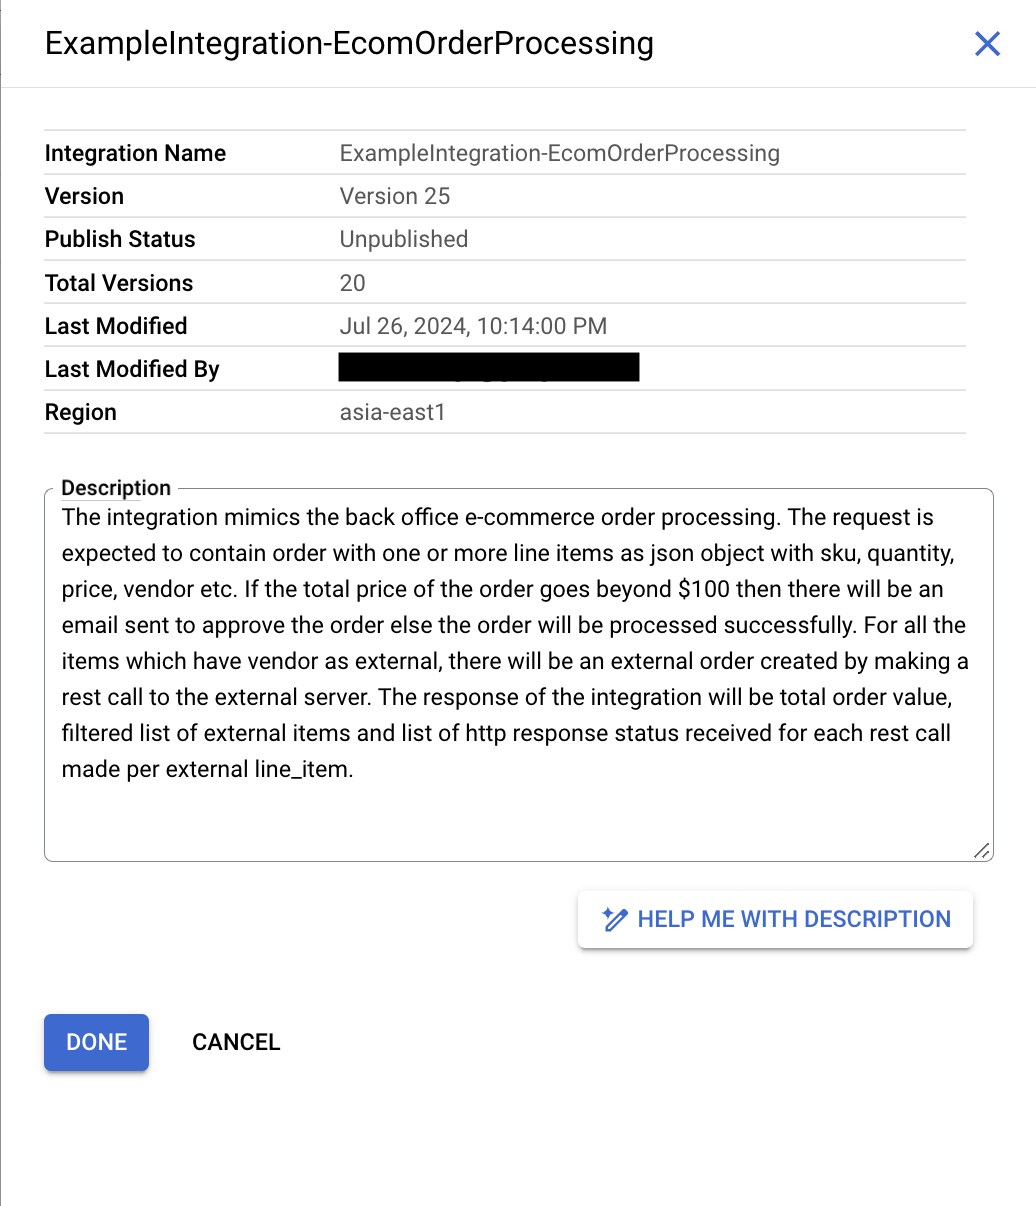
Pour afficher les détails d'une intégration, ouvrez-la dans l'éditeur d'intégration, puis cliquez sur info (Informations sur l'intégration) dans la barre d'outils du concepteur. L'image suivante présente les détails de l'intégration:
Le résumé de l'intégration comprend les informations suivantes:
Nom de l'intégration:nom de l'intégration.
Version:version actuelle de l'intégration, avec le nom de la version (le cas échéant). Pour en savoir plus sur la gestion des versions, consultez la section Versions.
État de la publication:état de la publication de la version actuelle de l'intégration (Publié ou Non publié).
Nombre total de versions:nombre total de versions d'intégration créées pour l'intégration.
Dernière modification:date et heure de la dernière modification de la version d'intégration actuelle.
Dernière modification par : nom de l'utilisateur qui a modifié la version de l'intégration pour la dernière fois.
Région:région dans laquelle l'intégration a été créée.
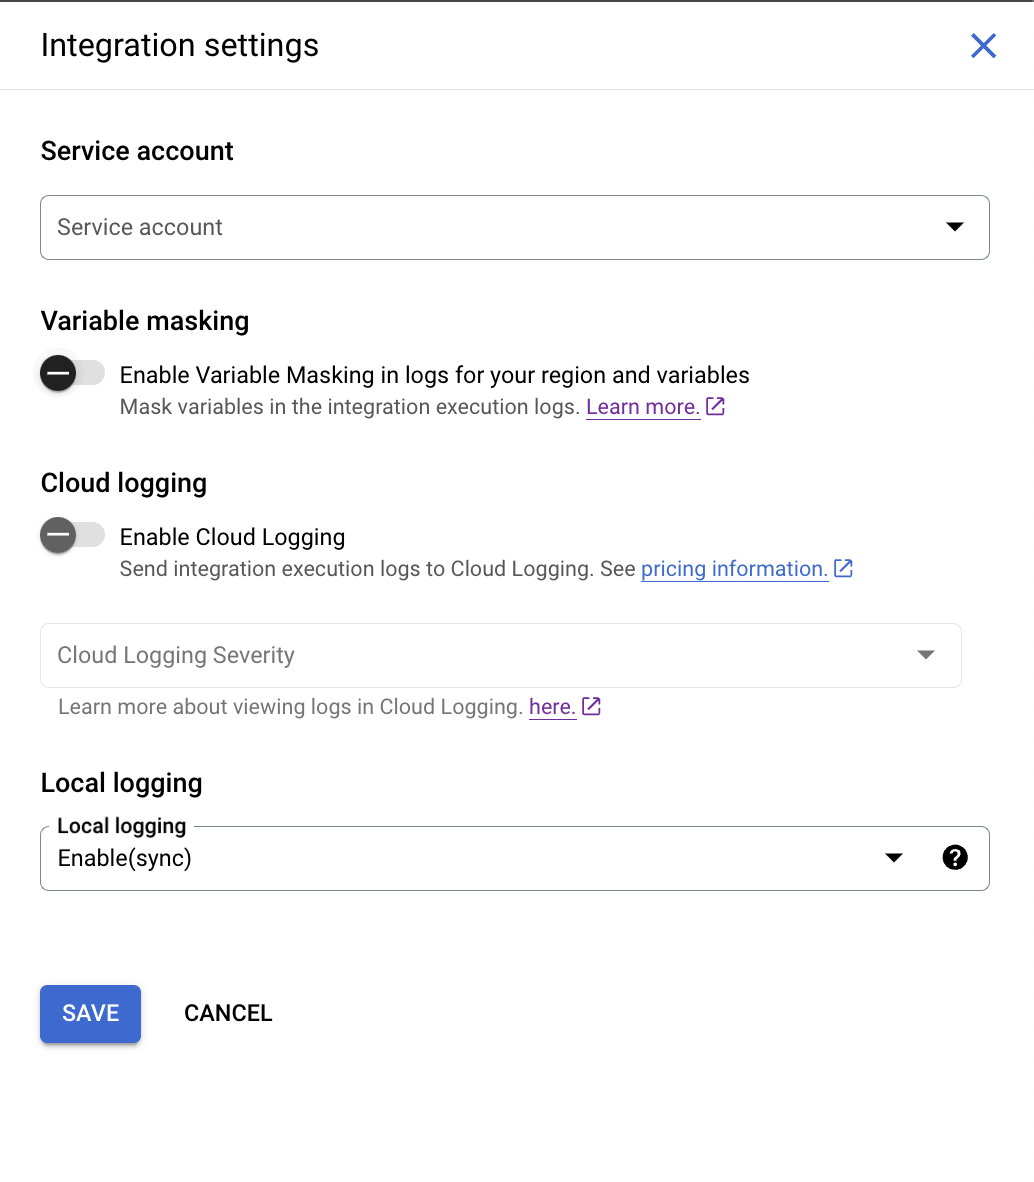
Pour modifier les détails d'une intégration, ouvrez-la dans l'éditeur d'intégration, puis cliquez sur settings (Paramètres d'intégration) dans la barre d'outils du concepteur. L'image suivante montre le volet Paramètres d'intégration:
Le résumé de l'intégration comprend les informations suivantes:
Compte de service:compte de service associé à l'intégration.
Activer le masquage des variables dans les journaux (bêta) : paramètre permettant d'activer le masquage des variables dans les journaux d'exécution de l'intégration. Si vous activez le masquage pour votre intégration, assurez-vous également de l'avoir activé au niveau de la région et de la variable.
Journalisation locale:paramètre permettant d'activer ou de désactiver l'enregistrement des données ou des métadonnées de l'intégration lors de son exécution. Par défaut, la journalisation locale est définie sur Enable(async) (Activer (async)). Dans ce mode, l'intégration prend relativement moins de temps à s'exécuter par rapport au mode Enable(sync) (Activer (synchronisation)), car l'Application Integration écrit les données de journalisation de manière asynchrone pendant l'exécution de l'intégration. Toutefois, ce mode ne garantit pas la génération de journaux pour toutes les exécutions. Dans de rares cas (par exemple, en cas de défaillance d'un serveur physique), il est possible que des journaux ne soient pas générés pour l'exécution d'une intégration. Pour en savoir plus, consultez la section Journalisation locale.
Sauf indication contraire, le contenu de cette page est régi par une licence Creative Commons Attribution 4.0, et les échantillons de code sont régis par une licence Apache 2.0. Pour en savoir plus, consultez les Règles du site Google Developers. Java est une marque déposée d'Oracle et/ou de ses sociétés affiliées.
Dernière mise à jour le 2025/09/03 (UTC).
[[["Facile à comprendre","easyToUnderstand","thumb-up"],["J'ai pu résoudre mon problème","solvedMyProblem","thumb-up"],["Autre","otherUp","thumb-up"]],[["Difficile à comprendre","hardToUnderstand","thumb-down"],["Informations ou exemple de code incorrects","incorrectInformationOrSampleCode","thumb-down"],["Il n'y a pas l'information/les exemples dont j'ai besoin","missingTheInformationSamplesINeed","thumb-down"],["Problème de traduction","translationIssue","thumb-down"],["Autre","otherDown","thumb-down"]],["Dernière mise à jour le 2025/09/03 (UTC)."],[[["\u003cp\u003eIntegrations can be modified by configuring tasks, triggers, or edge connections, and by updating details such as logging settings, service accounts, and descriptions.\u003c/p\u003e\n"],["\u003cp\u003eOnly one user can edit an integration at a time, with edits limited to \u003ccode\u003eDRAFT\u003c/code\u003e versions, while \u003ccode\u003eACTIVE\u003c/code\u003e versions are for execution, and a 15 minute lock is in place when a user makes a change.\u003c/p\u003e\n"],["\u003cp\u003eDeleting an integration is permanent and removes all versions, variables, triggers, tasks, and data mappings associated with it.\u003c/p\u003e\n"],["\u003cp\u003eIntegration details, such as name, version, publish status, last modified information, region, and description, can be viewed within the integration editor.\u003c/p\u003e\n"],["\u003cp\u003eSettings for service accounts, variable masking, Cloud Logging, and local logging can be modified within the integration's settings.\u003c/p\u003e\n"]]],[],null,["# Manage integrations\n\nSee the [supported connectors](/integration-connectors/docs/connector-reference-overview) for Application Integration.\n\nManage integrations\n===================\n\nYou can modify an integration by configuring tasks, triggers, or edge connections. You can also update the integration details, such as modifying the setting for masking variables in logs, Cloud Logging, local logging, and updating the service account and the description of your integration.\n\nIntegration edit locks\n----------------------\n\nIntegrations are design time entities that are often developed in collaboration with multiple authors.\nAlthough an integration can only be actively edited by one author at a time,\nteams can collaborate on an integration and track changes in state through its *versions*.\n\nYou can edit only a `DRAFT` version of the integration, and execute only the `ACTIVE` version of the integration. For information about different integration versions, see [Integration versions](/application-integration/docs/integration-versions).\n\nWhen you open an integration, you might find a message similar to the following in the integration editor:\n\n- If you open the integration that is being edited by another user, the following message appears in the integration editor because only one user can update the integration at a given time: \n\n ```\n test-user@gmail.com is currently editing the integration. Edit features are temporarily disabled.\n ```\n | **Note:** The integration is locked for editing by others for 15 minutes from the last update. Locks are released after 15 minutes from the last update.\n\n To edit the integration, click **Take Over** . A new version in the `DRAFT` state is created in the integration for you and the editing capability is disabled for the other users. The following figure shows the edit lock in the integration editor.\n\n\n- If you open a published integration, then the integration version is in the `ACTIVE` state. To edit the integration, click **Enable Editing** . A new version is created with the `DRAFT` state.\n\n ```\n This version is currently active. Editing features are disabled.\n ```\n\n To edit the integration, click **Enable Editing** . A new version in the `DRAFT` state is created in the integration for you.\n The following figure shows the edit lock in the integration editor.\n\n\nEdit an integration\n-------------------\n\nTo view and edit an integration flow, follow these steps:\n\n1. In the Google Cloud console, go to the **Application Integration** page.\n\n [Go to Application Integration](https://console.cloud.google.com/integrations)\n2. In the navigation menu, click **Integrations** .\n\n\n The **Integrations** page appears, listing all the integrations available in the Google Cloud project.\n3. Click the integration that you want to edit. This opens the integration in the integration editor.If the integration is not in `DRAFT` state, then the integration is locked for editing. For information about edit locks, see [Integration edit locks](#edit-locks).\n\nDelete integrations\n-------------------\n\n| **Warning:** When you delete an integration, you permanently delete all the versions of that integration, including all the integration variables, configured triggers, tasks, and data mappings. Deleting an integration cannot be undone.\n\nTo delete an integration, perform the following steps:\n\n1. In the Google Cloud console, go to the **Application Integration** page.\n\n [Go to Application Integration](https://console.cloud.google.com/integrations)\n2. Click **Integrations** from the left navigation menu to open the **Integrations** page.\n3. Do any one of the following steps in the **Integrations List** page:\n 1. For the existing integration that you want to delete, click more_vert **Actions**.\n 2. Select **Delete** in the drop-down menu.\n\n A confirmation dialog appears.\n\n Or\n \u003c!-- --\u003e\n\n 1. Click the existing integration that you want to delete. This opens the integration in the *integration editor*.\n\n 2. In the designer toolbar, click more_vert (Actions menu) and select **Clone integration \\\u003e Delete all versions** .\n\n A confirmation dialog appears.\n 3. Click **Delete** to permanently delete the integration.\n\nManage integration details\n--------------------------\n\nYou can view the integration summary and update settings for your integration. The following image shows the **settings Integration settings** and **info Integration information** icons on the Application Integration editor toolbar:\n\n\n### View integration details\n\nTo view the details of an integration, open the integration in the integration editor and click info (**Integration information**) in the designer toolbar. The following image shows the integration details:\n\n\nThe integration summary includes the following information:\n\n- **Integration name:** The name of the integration.\n- **Version:** The current version of the integration along with the version name (if any). For information about versioning, see [Versions](/application-integration/docs/integration-versions).\n- **Publish status:** The publish status of the current version of the integration; **Published** or **Unpublished**.\n- **Total versions:** The count of the total number of integration versions created for the integration.\n- **Last modified:** The date and time when the current integration version was last edited or modified.\n- **Last modified by** The name of the user who last edited or modified the integration version.\n- **Region:** The regional location where the integration was created.\n- **Description:** The integration description. To generate integration description using Gemini, see [Build integrations with Gemini Code Assist](/application-integration/docs/build-integrations-gemini).\n\n### Edit integration details\n\nTo edit the details of an integration, open the integration in the integration editor and click settings (**Integration settings** ) in the designer toolbar. The following image shows the **Integration Settings** pane:\n\n\nThe integration summary includes the following information:\n\n- **Service account:** The service account attached to the integration.\n- **Enable Variable Masking in logs ([preview](/products#product-launch-stages)):** The setting to enable masking of variables in the integration execution logs. If you enable masking for your integration, ensure that you have also enabled masking at the [region](/application-integration/docs/enable-new-region#edit-region) and the [variable](/application-integration/docs/variables) levels.\n\n For information about masking, see [Mask sensitive data in logs](/application-integration/docs/mask-sensitive-data-logs).\n- **Enable Cloud Logging:** The setting to enable or disable Cloud Logging. For more information, see [View logs in Cloud Logging](/application-integration/docs/cloud-logging).\n- **Local logging:** The setting to enable or disable saving integration's data or metadata during its execution. By default, local logging is set to **Enable(async)** . In this mode, the integration takes a relatively lesser time to execute when compared to the **Enable(sync)** mode, because Application Integration writes the log data asynchronously during the integration execution. However, this mode doesn't guarantee the generation of logs for all the executions. In rare cases--such as a physical server failure--it's possible that logs aren't generated for an integration execution. For more information, see [Local logging](/application-integration/docs/local-logging).\n\n| **Note:** Except for the **Service account** and **Description** fields, you can't edit or change any of the other integration information.\n\nWhat's next\n-----------\n\n- Learn how to [test and publish integrations](/application-integration/docs/test-publish-integrations).\n- Learn how to [create an integration](/application-integration/docs/create-integrations#create-a-new-integration).\n- Learn how to [clone integrations](/application-integration/docs/clone-integrations).\n- Learn about [logs in Application Integration](/application-integration/docs/introduction-logs)."]]