See the supported connectors for Application Integration.
ServiceNow trigger
The ServiceNow trigger is a Connector Event trigger that lets you invoke an integration based on the custom ServiceNow events that you've defined in your ServiceNow instance business rule.
Before you begin
If you plan to create or configure a new connection for the ServiceNow trigger, make sure that you have the following IAM role on the project:
- Connector Admin (
roles/connectors.admin)
For information about granting roles, see Manage access.
Grant the following IAM roles to the service account that you want to use for the ServiceNow trigger:
- Application Integration Invoker (
roles/integrations.integrationInvoker)
For information about granting roles to a service account, see Manage access to service accounts.
Add the ServiceNow trigger
To add a ServiceNow trigger to your integration, perform the following steps:
- In the Google Cloud console, go to the Application Integration page.
- In the navigation menu, click Integrations
The Integrations List page appears listing all the integrations available in the Google Cloud project.
- Select an existing integration or click Create integration to create a new one.
If you are creating a new integration:
- Enter a name and description in the Create Integration pane.
- Select a region for the integration.
- Select a service account for the integration. You can change or update the service account details of an integration any time from the Integration summary pane in the integration toolbar.
- Click Create.
The newly created integration opens in the integration editor.
- In the integration editor navigation bar, click Triggers to view the list of available triggers.
- Click and place the ServiceNow trigger element in the integration editor.
To configure the ServiceNow trigger, you can either use an existing ServiceNow connection available in Integration Connectors, or create a new ServiceNow connection using the inline connection creation option.
Configure ServiceNow trigger using an existing connection
You can configure the ServiceNow trigger using an existing ServiceNow connection in Integration Connectors. Note that the ServiceNow trigger is an Connector Event trigger, therefore you can only use a ServiceNow connection with event subscription enabled to configure the trigger.
For information about how to configure a ServiceNow trigger using a new ServiceNow connection, See Configure ServiceNow trigger using a new connection
To configure a ServiceNow trigger using an existing ServiceNow connection, perform the following steps:
- Click the ServiceNow trigger element in the integration editor to open the trigger configuration pane.
- Click Configure trigger.
- Provide the following configuration details in the Connector Event Trigger Editor page:
- Region: Select the region of your ServiceNow connection.
- Connection: Select the ServiceNow connection that you want to use.
Application Integration only displays those ServiceNow connections that are active and have an event subscription enabled.
- Event subscription type: Enter the type of event that you want to use to trigger the integration. These event types must be defined in your ServiceNow instance business rule.
- Service Account: Select a service account with the required IAM roles for the ServiceNow trigger.
- Click Done to complete the trigger configuration and close the page.
Configure ServiceNow trigger using a new connection
To configure the ServiceNow trigger using a new ServiceNow connection, perform the following steps:
- Click the ServiceNow trigger element in the integration editor to open the trigger configuration pane.
- Click Configure trigger.
- Skip the Region field.
- Click Connection and select the Create Connection option from the drop-down menu.
- Complete the following steps in the Create Connection pane:
- In the Location step, choose the location for the new ServiceNow connection:
- Region: Select a region from the drop-down list.
- Click Next.
- In the Connection Details step, provide details about the new ServiceNow connection:
- Connector version: Choose an available version of the ServiceNow connector from the drop-down list.
- Connection Name: Enter a name for the ServiceNow connection.
- (Optional) Description: Enter a description for the connection.
- (Optional) Enable Cloud Logging: Select this checkbox to store all log data of the connection.
- Service Account: Select a service account with the required IAM roles for the ServiceNow connection.
- Enable event subscription: Select to create and enable a new event subscription for the ServiceNow connection. You can either only enable event subscriptions or also include connection entities, operations, and actions.
- Include system tables: Select to report or include system tables in the connection.
- (Optional) Filter tables: Enter the list of system tables (beginning with "
sys_", comma separated), that you want to include. - (Optional) Expand Advanced settings to configure the connection node settings.
For more information about the connection node settings for ServiceNow, see the ServiceNow connection documentation.
- (Optional) Click + Add label to add a label to the connection in the form of a key-value pair.
- Click Next.
-
In the Destinations step, provide the ServiceNow instance details:
- Destination Type: Select Host address.
- Host: Enter the hostname or IP address of your ServiceNow instance.
- Click Next.
-
In the Authentication step, provide the authentication details for the ServiceNow instance:
- Username: Enter the username to access the provided destination address.
- Password: Select the Secret Manager secret containing the password associated with the ServiceNow username.
- Secret version: Select a secret version.
To know more about how to configure authentication, see Configure authentication.
- Click Next.
- In the Location step, choose the location for the new ServiceNow connection:
-
In the Event subscription details step, provide the authentication details that will be used to validate the ServiceNow token payload:
- Authentication Token: (Optional) Select the Secret Manager secret of your authentication token, and the corresponding secret version from the Secret Version drop-down.
- HMAC Algorithm: (Optional) Select the HMAC algorithm for encrypting the response payload.
- HMAC Secret Key: If you have selected a HMAC Algorithm, select the Secret Manager secret of the HMAC key, and the corresponding secret version from the Secret Version drop-down.
- Click Next.
- Review: Review the provided ServiceNow connection details.
- Click Create to complete creating a new ServiceNow connection.
Create a business rule
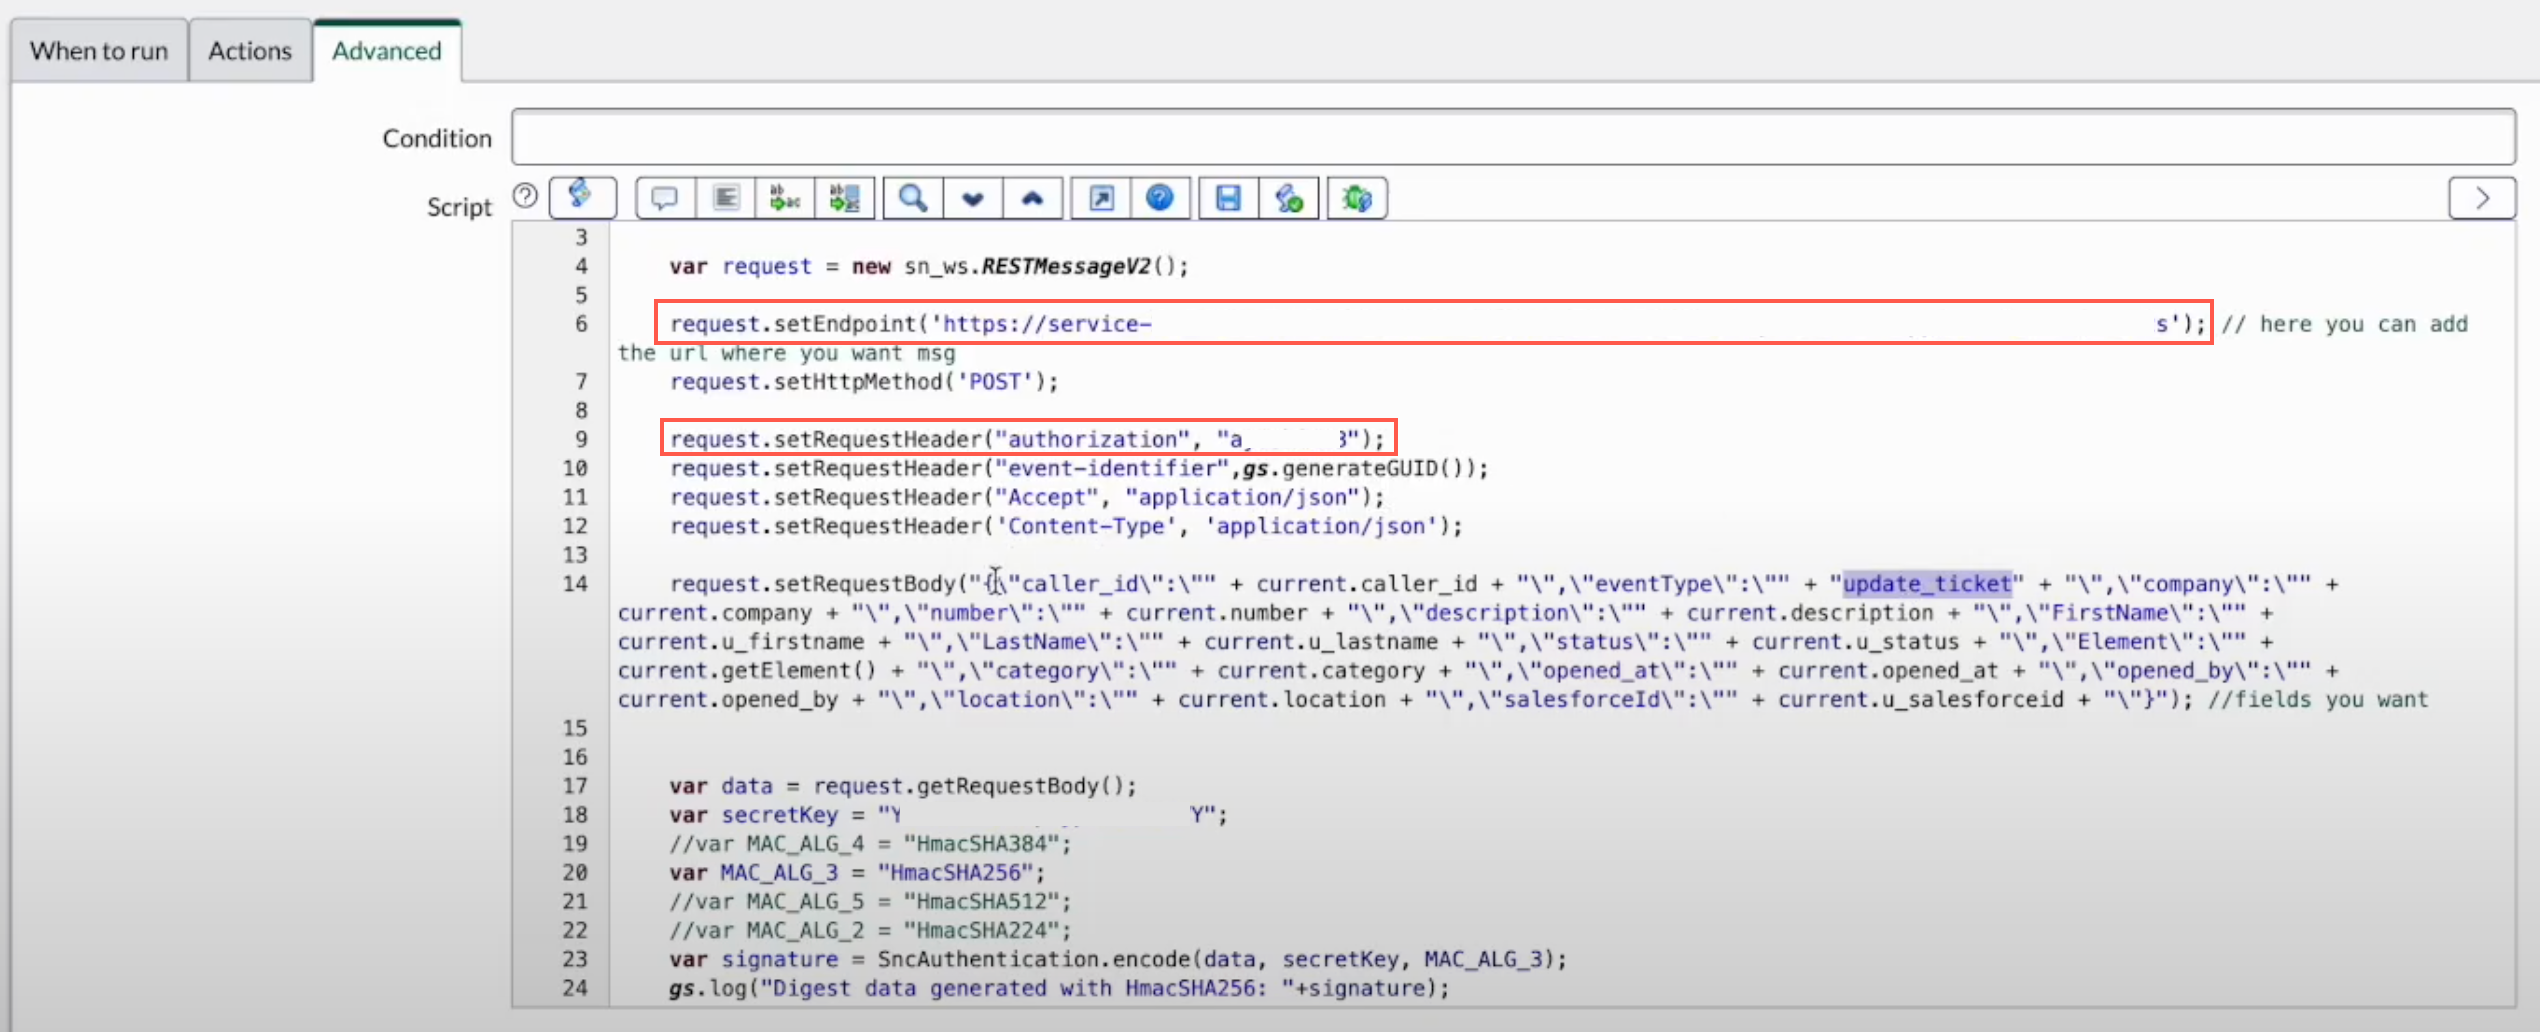
A ServiceNow business rule is a server-side logic that executes when a database record is queried, updated, inserted, or deleted in your ServiceNow instance. Application Integration uses these business rules to identify and listen to events that trigger an integration.
For information on how to create a business rule, see ServiceNow documentation.
The following image shows a sample ServiceNow business rule with the update_ticket event type:
Trigger output
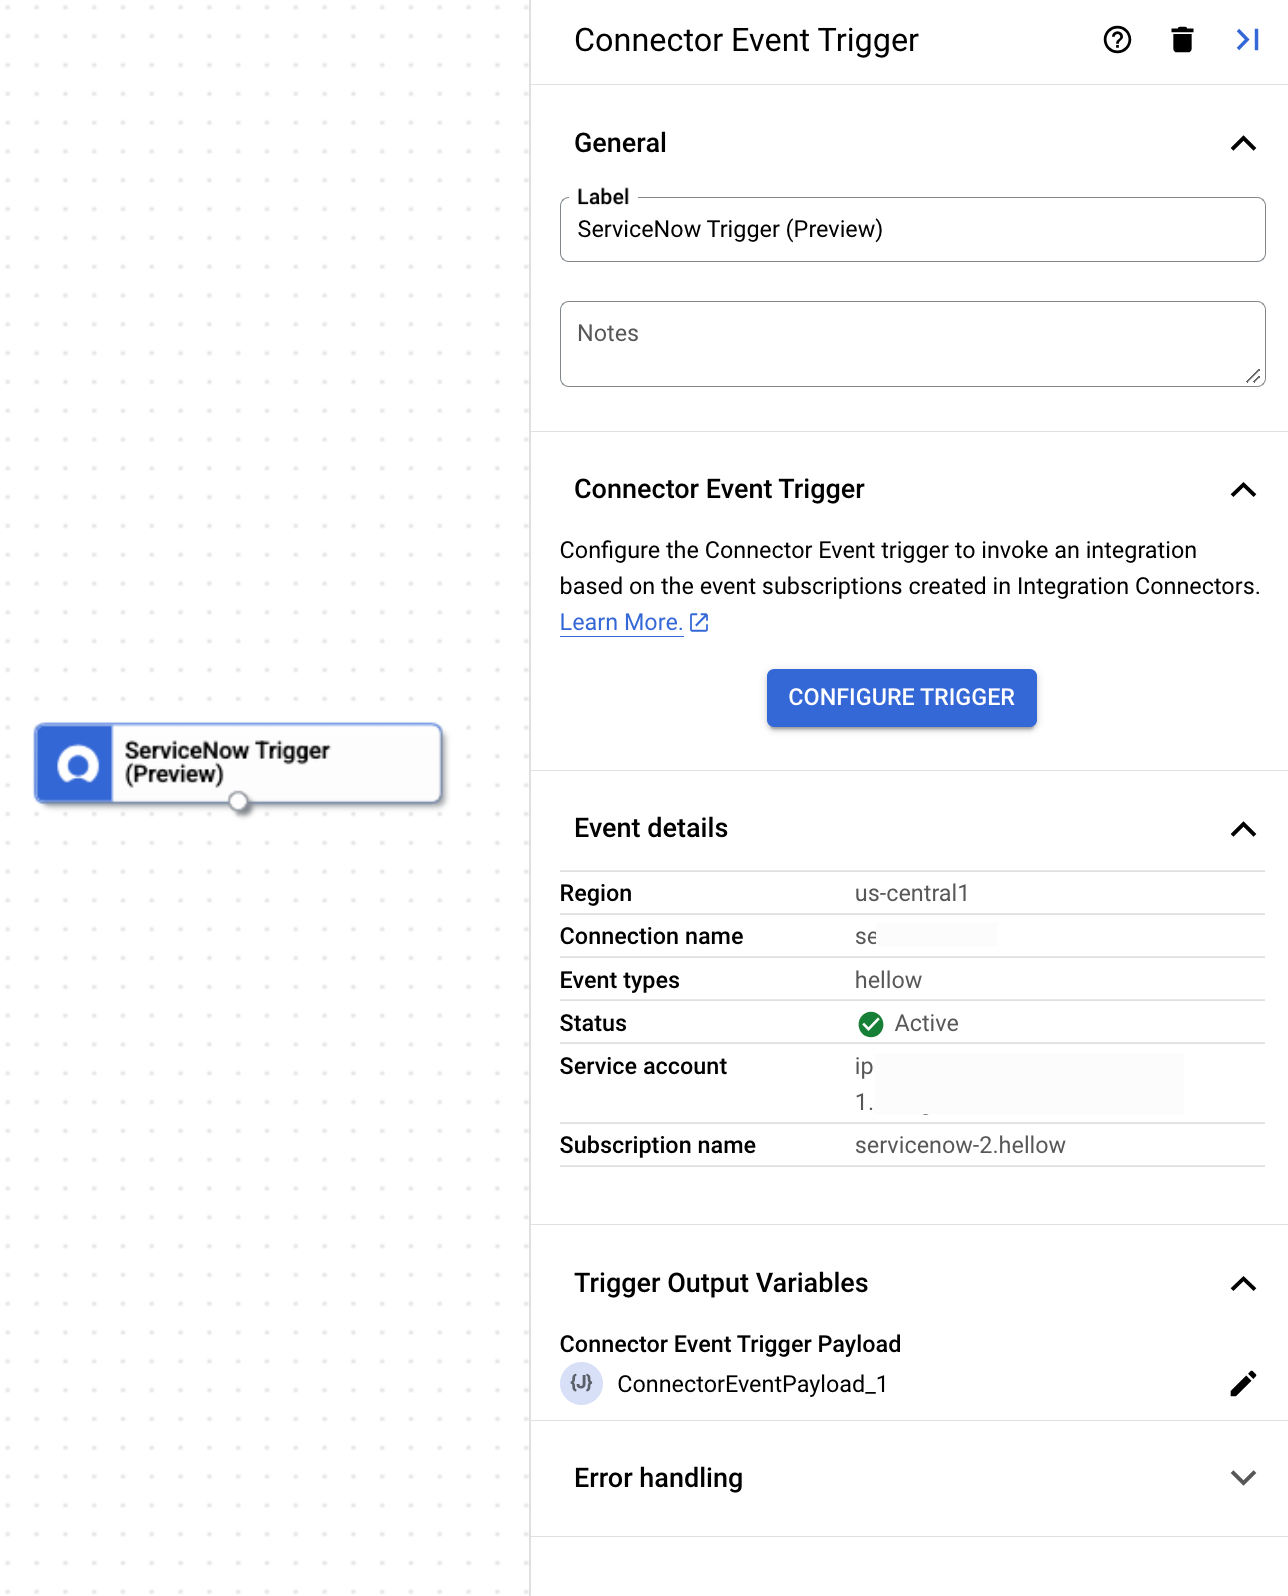
The ServiceNow trigger takes a couple of minutes to complete the event subscription configuration. You can view the status of your event subscription in the trigger configuration pane under Event Subscription details.
The ServiceNow trigger indicates the status of an event subscription using the following states:
Creating: Indicates that the trigger is subscribing to the event subscription.Active: Indicates that the trigger is successfully subscribed to an event subscription.Error: Indicates that the there is an issue with the configured event subscription.
In addition to the event subscription status, the Event Subscription details section also displays other details such as connection region, connection name, event subscription name, and more.
The following image shows a sample layout of the ServiceNow trigger configuration pane:
Trigger output variable
For each event, the ServiceNow trigger generates a ConnectorEventPayload output variable which you can use in your downstream tasks. The output variable is in JSON format containing the output ServiceNow payload schema.
View event subscriptions
To view and manage all the event subscriptions associated with a connection in Integration Connectors, do the following:
- Go to Integration Connectors > Connections page.
- Click the connection for which you want to view the subscriptions.
- Click the Event subscriptions tab.
This displays all the event subscriptions for the connection.
Edit ServiceNow trigger
You can edit a ServiceNow trigger to change or update the connection configuration and event subscription details.
To edit a ServiceNow trigger, perform the following steps:
- Click the ServiceNow trigger element in the integration editor to open the trigger configuration pane.
- Click Configure ServiceNow trigger.
- Do the following in the Connector Event Trigger Editor page:
- To retain the previously configured event subscription, click Retain, else click Delete.
- Update the connection configuration and event subscription details as desired.
- Click Done.
You can view the updated connection and event subscription details in the trigger configuration pane under Event Subscription details.
Quotas and limits
For information about quotas and limits, see Quotas and limits.
What's next
- Learn about all tasks and triggers.
- Learn how to test and publish an integration.
- Learn about error handling.
- Learn about integration execution logs.