Overview
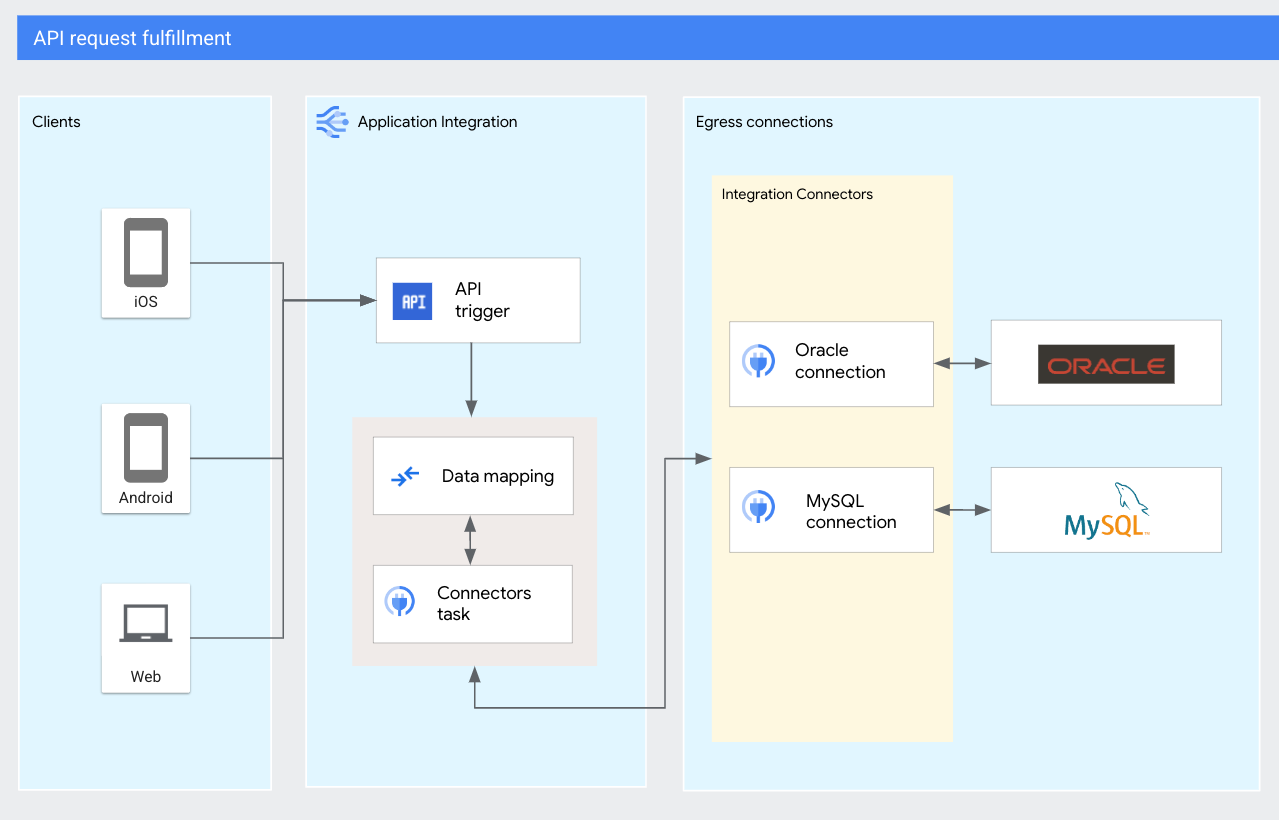
In this tutorial, you'll create an integration with an API trigger that receives API requests for retrieving customer information. Depending on the API request location, the integration retrieves the customer details from either a MySQL database or an Oracle database.
Objectives
This tutorial shows you how to complete the following tasks in your integration:
- Add an API trigger.
- Add and configure Connectors tasks for MySQL and Oracle connections.
- Add and configure data mapping tasks to extract and map API payload.
Costs
In this tutorial, you use the following billable components of Google Cloud:
The instructions in this tutorial are designed to keep your resource usage within the limits of Google Cloud's Always Free tier.
When you finish the tasks that are described in this document, you can avoid continued billing by deleting the resources that you created. For more information, see Clean up.
Before you begin
- Sign in to your Google Cloud account. If you're new to Google Cloud, create an account to evaluate how our products perform in real-world scenarios. New customers also get $300 in free credits to run, test, and deploy workloads.
-
In the Google Cloud console, on the project selector page, select or create a Google Cloud project.
Roles required to select or create a project
- Select a project: Selecting a project doesn't require a specific IAM role—you can select any project that you've been granted a role on.
-
Create a project: To create a project, you need the Project Creator
(
roles/resourcemanager.projectCreator), which contains theresourcemanager.projects.createpermission. Learn how to grant roles.
-
Verify that billing is enabled for your Google Cloud project.
-
Create a service account:
-
Ensure that you have the Create Service Accounts IAM role
(
roles/iam.serviceAccountCreator). Learn how to grant roles. -
In the Google Cloud console, go to the Create service account page.
Go to Create service account - Select your project.
-
In the Service account name field, enter a name. The Google Cloud console fills in the Service account ID field based on this name.
In the Service account description field, enter a description. For example,
Service account for quickstart. - Click Create and continue.
-
Grant the following roles to the service account: Secret Manager Viewer (
roles/secretmanager.viewer), Secret Manager Secret Accessor (roles/secretmanager).To grant a role, find the Select a role list, then select the role.
To grant additional roles, click Add another role and add each additional role.
- Click Continue.
-
Click Done to finish creating the service account.
-
Ensure that you have the Create Service Accounts IAM role
(
-
In the Google Cloud console, on the project selector page, select or create a Google Cloud project.
Roles required to select or create a project
- Select a project: Selecting a project doesn't require a specific IAM role—you can select any project that you've been granted a role on.
-
Create a project: To create a project, you need the Project Creator
(
roles/resourcemanager.projectCreator), which contains theresourcemanager.projects.createpermission. Learn how to grant roles.
-
Verify that billing is enabled for your Google Cloud project.
-
Create a service account:
-
Ensure that you have the Create Service Accounts IAM role
(
roles/iam.serviceAccountCreator). Learn how to grant roles. -
In the Google Cloud console, go to the Create service account page.
Go to Create service account - Select your project.
-
In the Service account name field, enter a name. The Google Cloud console fills in the Service account ID field based on this name.
In the Service account description field, enter a description. For example,
Service account for quickstart. - Click Create and continue.
-
Grant the following roles to the service account: Secret Manager Viewer (
roles/secretmanager.viewer), Secret Manager Secret Accessor (roles/secretmanager).To grant a role, find the Select a role list, then select the role.
To grant additional roles, click Add another role and add each additional role.
- Click Continue.
-
Click Done to finish creating the service account.
-
Ensure that you have the Create Service Accounts IAM role
(
Prepare your environment
Set up a MySQL database
Connect to your MySQL server and create a database and a table to use in this tutorial. This tutorial uses a database that contains a table named Customers with the following rows:
  +-------------+---------------+--------------------+------------------+
  | customer_id | customer_name | customer_emailID   | customer_city    |
  +-------------+---------------+--------------------+------------------+
  |           1 | Alex          | test-01@test.com   | New York         |
  |           2 | Dana          | test-02@test.com   | Seattle          |
  +-------------+---------------+--------------------+------------------+
For information about creating and using a MySQL database, see the MySQL documentation.
Set up an Oracle database
Connect to your Oracle database and create a table to use in this tutorial. This tutorial uses a database that contains a SQL table named Customers with the following rows:
  +-------------+---------------+--------------------+------------------+
  | customer_id | customer_name | customer_emailID   | customer_city    |
  +-------------+---------------+--------------------+------------------+
  |           1 | Amal          | test-01@test.com   | Delhi            |
  |           2 | Hao           | test-02@test.com   | Beijing          |
  +-------------+---------------+--------------------+------------------+
For information about creating and using a Oracle database, see the Oracle documentation.
Configure connections
For this tutorial, you must configure the following connections in Integration Connectors:
- MySQL connection
- Configure a MySQL connection in Integration Connectors to get the
Customertables entities. For information on configuring a MySQL connector, see MySQL connector. - Oracle DB connection
- Configure a Oracle DB connection in Integration Connectors to get the
Customertables entities. For information on configuring a MySQL connector, see Oracle DB connector.
Create integration
To create a new integration, perform the following steps:
- In the Google Cloud console, go to the Application Integration page.
- Click Integrations from the left navigation menu to open the Integrations page.
- Click Create integration and provide the following details in the Create Integration page:
- Integration name: Enter
api_fulfilment. - Description: Enter
Demo integration created for tutorial. - Region: Select
us-central1from the list of supported regions. - Click Create to open the integration editor.
- Integration name: Enter
Set up integration trigger
Once you have successfully created your integration, you can add and configure an integration trigger that invokes the integration for an identified event.
For this tutorial, an API trigger is used to invoke the integration for every new API request. To add and configure an API trigger in your api_fulfilment integration, do the following:
- In the integration editor, click Triggers to display a list of available triggers.
- Click and place the API trigger element in the integration editor.
Application Integration automatically populates the trigger Label, trigger name, and trigger ID. Trigger ID is a machine-generated ID in the format
api_trigger/TRIGGER_NAME, and is used in the API request.
No further configuration is required for this trigger.
Create integration variables
Integration variables are similar to variables used in a programming language. Data in the variables can be read and written throughout the execution of the integration. To create the required variables for this tutorial, do the following:
- Click (Toggle panel) in the designer navigation bar to bring up the Variables pane.
- Click + Create and create the following integration variables:
Variable name Data type Variable type locationSTRINGInput to integration customer_idSTRINGInput to Integration customer_recordJSONOutput from Integration
Retrieve customer data from MySQL database
If the ingress API request is from the US location, then do the following to retrieve customer data from the MySQL database.
Connect to the MySQL database
Perform the following steps to add and configure a Connectors task to retrieve the customers details from the MySQL Customers table:
- In the integration editor, click Tasks to display a list of available tasks.
- Click and place the Connectors element in the integration editor.
- Select the Connectors task element on the designer to view the Connectors task configuration pane.
- Click and rename the Connectors label to
Fetch MySQL Data. - Click Configure connector.
- Do the following in the Connectors Task Editor page:
- Under Select connection, choose the
us-central1region. - Select your Salesforce connection from the list of available connections.
- Click Next.
- Under Type, choose Entities.
- Under Set entities/actions, select Customers from the list of available entities and then select Get as the Operation.
- Click Done to complete the connection configuration and close the pane.
- Under Select connection, choose the
Map customer ID to MySQL connector
A Data Mapping task is used to map the customer ID to the MySQL connector. To add and configure the data mapping in your integration, do the following:
- In the integration editor, click Tasks to display a list of available tasks.
- Click and place the Data Mapping element in the integration editor.
- Select the Data Mapping element on the designer to view the task configuration pane.
- Click and rename the Data Mapping task to
Map to MySQL. - Click Open Data Mapping Editor.
The Data Mapping Editor lets you map input variables to the desired output variables, using the available transformation functions. The output is then available as a variable to any other integration task or trigger. For more details on mapping variables, see Add a mapping.
- Map the trigger —
customer_id—integration variable to the auto-generated connector—entityId(Fetch MySQL Data)—input variable.Once your mapping is complete, close the pane. Any changes will be autosaved.
- Add an edge connection from the Map to MySQL task to the Fetch MySQL Data connector.
Retrieve MySQL customer details
To retrieve the customer details from the MySQL connector, do the following:
- In the integration editor, click Tasks to display a list of available tasks.
- Click and place the Data Mapping element in the integration editor.
- Click the Data Mapping element on the designer to view the task configuration pane.
- Click and rename the Data Mapping task to
Get MySQL data. - Click Open Data Mapping Editor.
- Map the MySQL—
connectorOutputPayload (Fetch MySQL Data)—output variable to thecustomer_recordintegration variable.Once your mapping is complete, close the pane. Any changes will be autosaved.
- Add an edge connection from the Fetch MySQL Data connector to the Get MySQL data task.
Retrieve customer data from Oracle database
If the ingress API request is from the APAC location, then do the following to retrieve customer data from the Oracle database.
Connect to the Oracle database
Perform the following steps to add and configure a Connectors task to retrieve the customers details from the Oracle Customers table:
- In the integration editor, click Tasks to display a list of available tasks.
- Click and place the Connectors element in the integration editor.
- Select the Connectors task element on the designer to view the Connectors task configuration pane.
- Click and rename the Connectors label to
Fetch Oracle Data. - Click Configure connector.
- Do the following in the Connectors Task Editor page:
- Under Select connection, choose the
us-central1region. - Select your Salesforce connection from the list of available connections.
- Click Next.
- Under Type, choose Entities.
- Under Set entities/actions, select Customers from the list of available entities and then select Get as the Operation.
- Click Done to complete the connection configuration and close the pane.
- Under Select connection, choose the
Map customer ID to Oracle connector
To add and configure the data mapping in your integration, do the following:
- In the integration editor, click Tasks to display a list of available tasks.
- Click and place the Data Mapping element in the integration editor.
- Select the Data Mapping element on the designer to view the task configuration pane.
- Click and rename the Data Mapping task to
Map to Oracle. - Click Open Data Mapping Editor.
- Map the trigger —
customer_id—integration variable to the auto-generated connector—entityId(Fetch Oracle Data)—input variable.Once your mapping is complete, close the pane. Any changes will be autosaved.
- Add an edge connection from the Map to Oracle task to the Fetch Oracle Data connector.
Retrieve Oracle customer details
To retrieve the customer details from the Oracle connector, do the following:
- In the integration editor, click Tasks to display a list of available tasks.
- Click and place the Data Mapping element in the integration editor.
- Click the Data Mapping element on the designer to view the task configuration pane.
- Click and rename the Data Mapping task to
Get Oracle data. - Click Open Data Mapping Editor.
- Map the Oracle—
connectorOutputPayload (Fetch Oracle Data)—output variable to thecustomer_recordintegration variable.Once your mapping is complete, close the pane. Any changes will be autosaved.
- Add an edge connection from the Fetch Oracle Data connector to the Get Oracle data task.
Add edge condition
An edge condition lets you specify the conditions that must be met for control of an integration to pass to the task connected by the edge. Now that you have added and configured and the required tasks, you can add an edge condition to define the flow of the integration.
The following edge condition controls the flow of the integration based on the location integration variable:
- Add an edge connection from the API trigger to the Map to MySQL task with the following edge condition:
$location$ = "US"
- Add another edge connection from the API trigger to the Map to Oracle task with the following edge condition:
$location$ = "APAC"
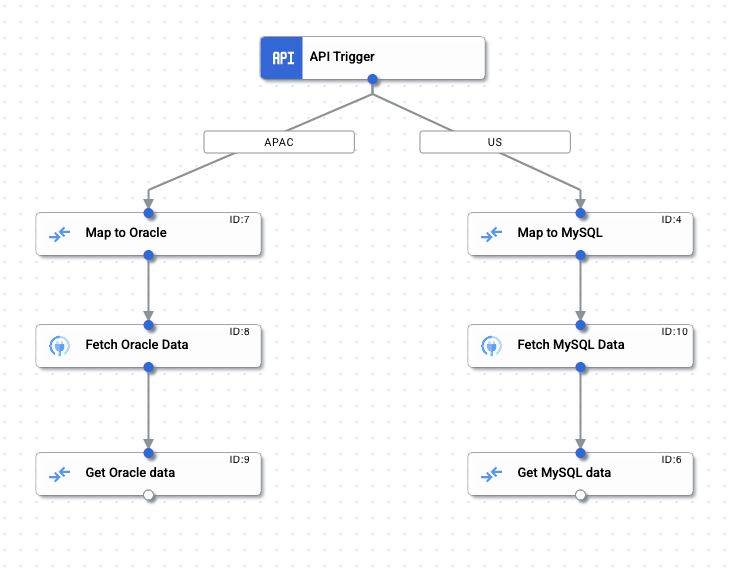
Sample integration flow
The following figure shows a sample layout of the integration created using this tutorial.
Publish integration
To publish the integration click Publish in the integration editor toolbar.
Upon successfully publishing your integration, you can view and inspect the execution logs of the published integration. To view logs, click ![]() View execution logs for this integration. The Execution Logs page appears.
View execution logs for this integration. The Execution Logs page appears.
Test the integration
Test the integration from the integration editor
To test the integration from the integration editor, perform the following steps:
- Click Test in the integration editor toolbar.
The Test Integration pane appears.
- You are prompted to enter the test values for the integration input variables. For the purpose of this test, do the following:.
- customer_id: Enter
1. - location: Enter
APAC.
- customer_id: Enter
- Click Test Integration.
The integration executes successfully and the following customer value is displayed:
{
  "CUSTOMER_ID": 1,
  "CUSTOMER_NAME": "Amal"
  "CUSTOMER_EMAILID": "test-01@test.com "
  "CUSTOMER_CITY": "Delhi"
}
For more information about testing, see Test and publish integrations.
Test using a REST API call
Now that the integration is published and running, you can invoke it using the following POST REST call:
URL:https://integrations.googleapis.com/v1/projects/project-name/locations/-/integrations/api_fulfilment:execute
{"trigger_id":"api_trigger/api_fulfilment_API_1"}Example: Make an API request with custom inputs
curl -v -X POST -H "Content-Type: application/json" 'https://integrations.googleapis.com/v1/projects/connectors-ip-test/locations/us-central1/integrations/api-fulfillment-integration:execute' -H "Authorization: Bearer $(gcloud auth AUTH_PROFILE)" -d '{ "triggerId": "api_trigger/api-fulfillment-integration_API_1", "inputParameters": { "customer_id": {"string_value": 1}, "location" : {"string_value" : "US"}} }'
The API returns the integration execution response containing all following JSON:
  {
    "CUSTOMER_ID": 2,
    "CUSTOMER_NAME": "Dana"
    "CUSTOMER_EMAILID": "test-02@test.com "
    "CUSTOMER_CITY": "Seattle"
  }
Clean up
To avoid incurring charges to your Google Cloud account for the resources used in this tutorial, unpublish the integration and delete the connections created in Integration Connectors.
- To unpublish this integration, click Unpublish in the integration editor toolbar. See Delete integrations for more information.
- For information about how to delete a connection, see Manage connectors.