Gemini Enterprise Agent Platform
Innovate, build, and deploy enterprise ready agents
Gemini Enterprise Agent Platform is Google Cloud's comprehensive platform for developers to build, scale, govern and optimize agents. It's a single destination for technical teams to build agents that can transform enterprise applications and workflows into powerful agentic systems.
New customers get up to $300 in free credits to try Agent Platform and other Google Cloud products.

Features
Build, scale, govern and optimize enterprise grade AI agents
Agent Platform is our open and comprehensive platform that empowers businesses to rapidly build, scale, govern and optimize enterprise-grade agents grounded in your enterprise data. It provides the full-stack foundation and extensive developer choice you need to transform your applications and workflows into powerful agentic systems at global scale.
Agent-powered development and workflows
Now available through Agent Platform, Google Antigravity provides a centralized app to steer, customize, and orchestrate agents. You can deploy multiple agents to simultaneously execute entire workflows like product launches—automating the code generation for your website, on-brand asset creation, and customer email production. Download Antigravity and log in to the desktop application or Antigravity CLI using your standard Google Cloud credentials.
200+ Google and third-party AI models and tools
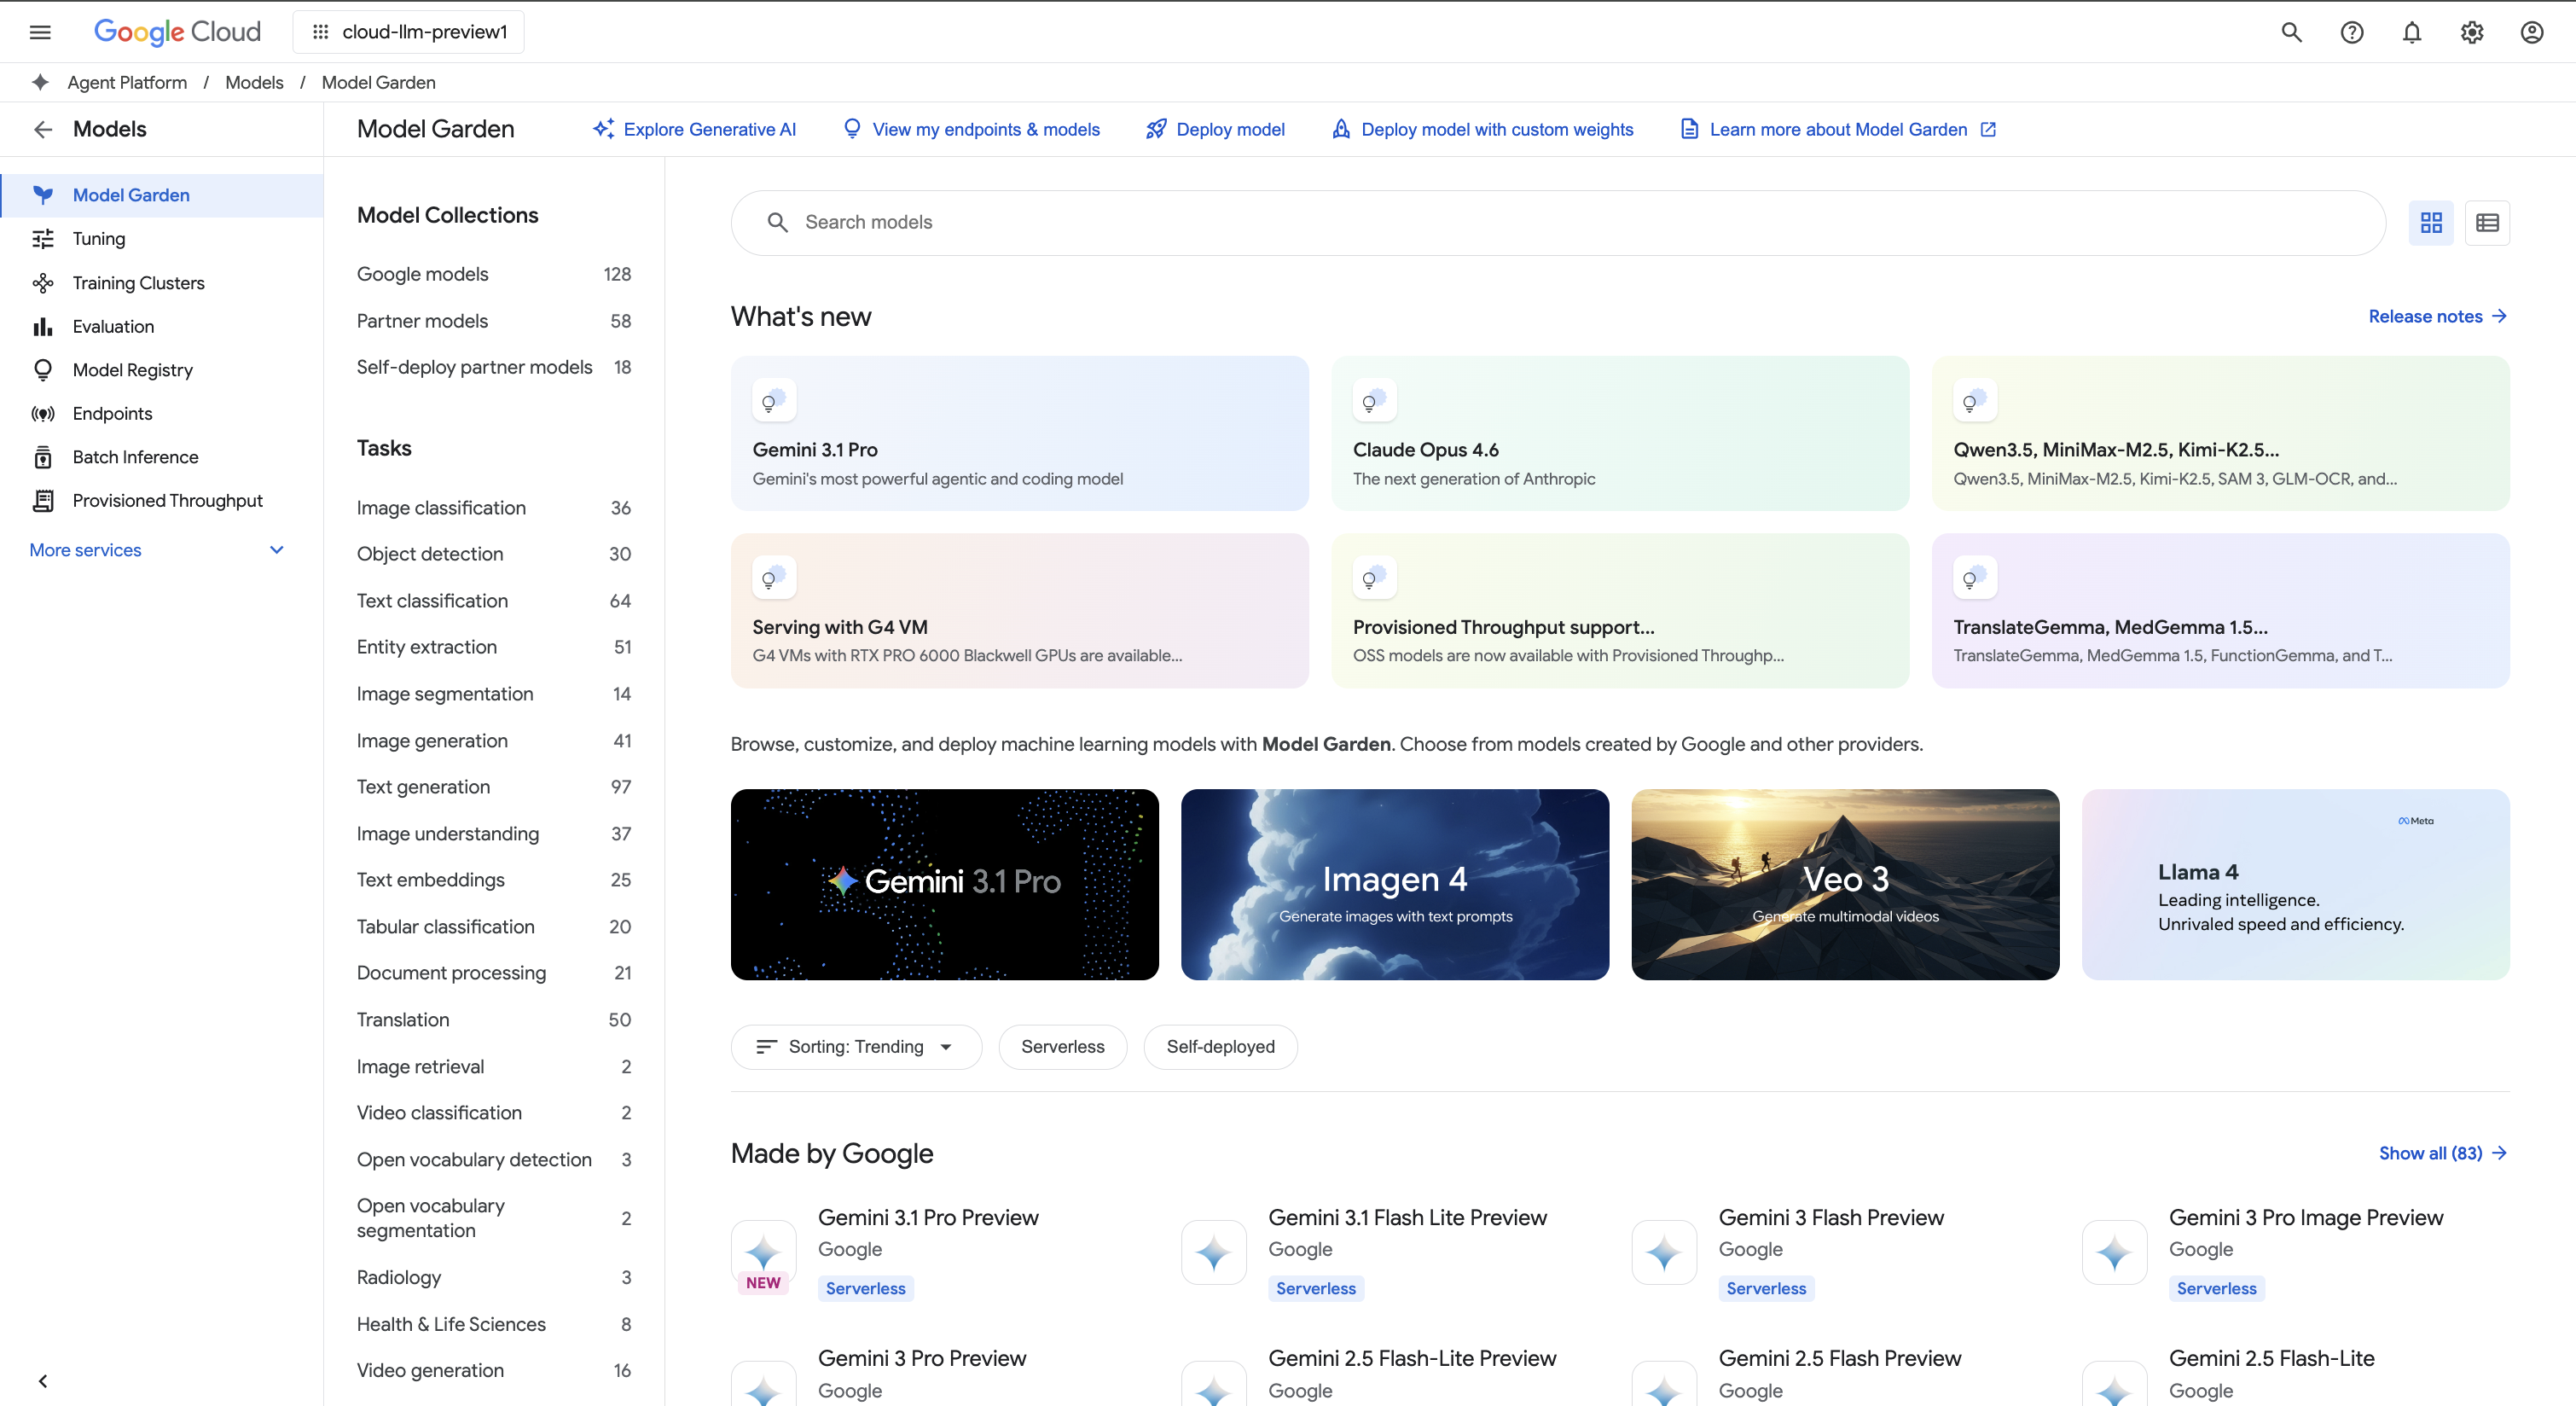
Choose from Google’s latest multimodal models like Gemini 3.5, third-party models like Anthropic's Claude Model Family, and open models like Gemma in Model Garden. You can also customize models to your use case with a variety of tuning options.
Our Model Evaluation service provides enterprise-grade tools for objective, data-driven assessment of generative AI models.
Open and integrated AI platform
Data scientists can move faster with Agent Platform tools for training, tuning, and deploying ML models.
Agent platform notebooks, including your choice of Colab Enterprise or Workbench, are natively integrated with BigQuery providing a single surface across all data and AI workloads.
Agent platform Training and Prediction help you reduce training time and deploy models to production easily with your choice of open source frameworks and optimized AI infrastructure.
MLOps for predictive and generative AI
Agent Platform provides purpose-built MLOps tools for data scientists and ML engineers to automate, standardize, and manage ML projects.
Modular tools help you collaborate across teams and improve models throughout the entire development lifecycle—identify the best model for a use case with Model Evaluation, orchestrate workflows with Pipelines, manage any model with Model Registry serve, share, and reuse ML features with Feature Store, and monitor models for input skew and drift.
How It Works
Agent Platform provides several options for agent building, model training and deployment:
- Agent Platform enables you to build, scale, govern and optimize enterprise ready agents in one unified platform
- Agent Studio gives you access to large generative AI models, including Gemini 3, so you can evaluate, tune, and deploy them for use in your AI-powered applications
- Model Garden lets you discover, test, customize, and deploy in Agent Platform and select open-source (OSS) models and assets
- Custom training gives you complete control over the training process, including using your preferred ML framework, writing your own training code, and choosing hyperparameter tuning options
Build and deploy AI agents
Unlock advanced AI capabilities with Agent Platform
Unlock advanced AI capabilities with Agent Platform
Build production-ready generative AI agents and applications on a platform that scales with you. Our Agent Platform provides a secure environment for developing and deploying AI models and applications.
For developers, Agent Platform remains our advanced platform where you can build, customize, and fine-tune sophisticated agents using frameworks like the Agent Development Kit (ADK).
Get started with this codelab and build your first AI application today
Tutorials, quickstarts, & labs
Unlock advanced AI capabilities with Agent Platform
Unlock advanced AI capabilities with Agent Platform
Build production-ready generative AI agents and applications on a platform that scales with you. Our Agent Platform provides a secure environment for developing and deploying AI models and applications.
For developers, Agent Platform remains our advanced platform where you can build, customize, and fine-tune sophisticated agents using frameworks like the Agent Development Kit (ADK).
Get started with this codelab and build your first AI application today
Build with Gemini models
Start building with Agent Studio
Start building with Agent Studio
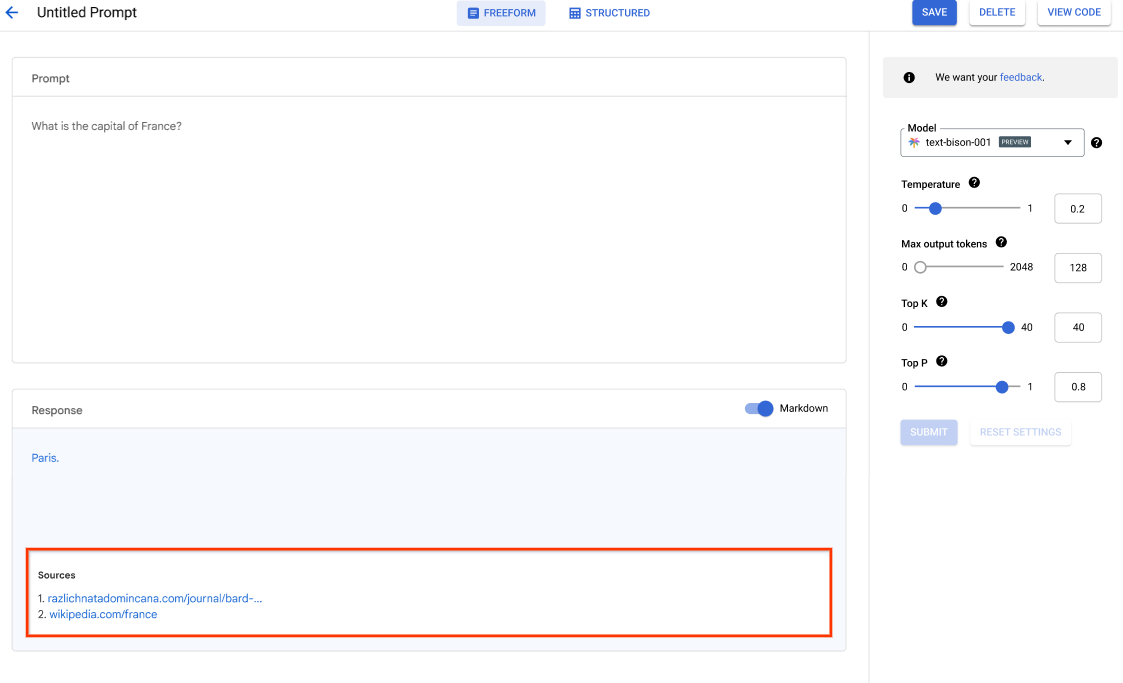
Use Agent Studio to design, test, and manage prompts for Gemini models using natural language, code, images, or video. Try sample prompts for extracting text from images, image mock up to HTML, and even generate answers about uploaded images or videos.
You can also start testing Gemini on Agent Platform with an API key.
Access Gemini models via the Gemini API in Agent Platform
- Python
- JavaScript
- Java
- Go
- Curl
Tutorials, quickstarts, & labs
Start building with Agent Studio
Start building with Agent Studio
Use Agent Studio to design, test, and manage prompts for Gemini models using natural language, code, images, or video. Try sample prompts for extracting text from images, image mock up to HTML, and even generate answers about uploaded images or videos.
You can also start testing Gemini on Agent Platform with an API key.
Code sample
Access Gemini models via the Gemini API in Agent Platform
- Python
- JavaScript
- Java
- Go
- Curl
Extract, summarize, and classify data
Use gen AI for summarization, classification, and extraction
Use gen AI for summarization, classification, and extraction
Learn how to create text prompts for handling any number of tasks with Agent Platform's generative AI support. Some of the most common tasks are classification, summarization, and extraction. Gemini on Agent Platform lets you design prompts with flexibility in terms of their structure and format.

Tutorials, quickstarts, & labs
Use gen AI for summarization, classification, and extraction
Use gen AI for summarization, classification, and extraction
Learn how to create text prompts for handling any number of tasks with Agent Platform's generative AI support. Some of the most common tasks are classification, summarization, and extraction. Gemini on Agent Platform lets you design prompts with flexibility in terms of their structure and format.
Deploy a model for production use
Deploy for batch or online predictions
Deploy for batch or online predictions
When you're ready to use your model to solve a real-world problem, register your model to Model Registry and use the Agent Platform prediction service for batch and online predictions.
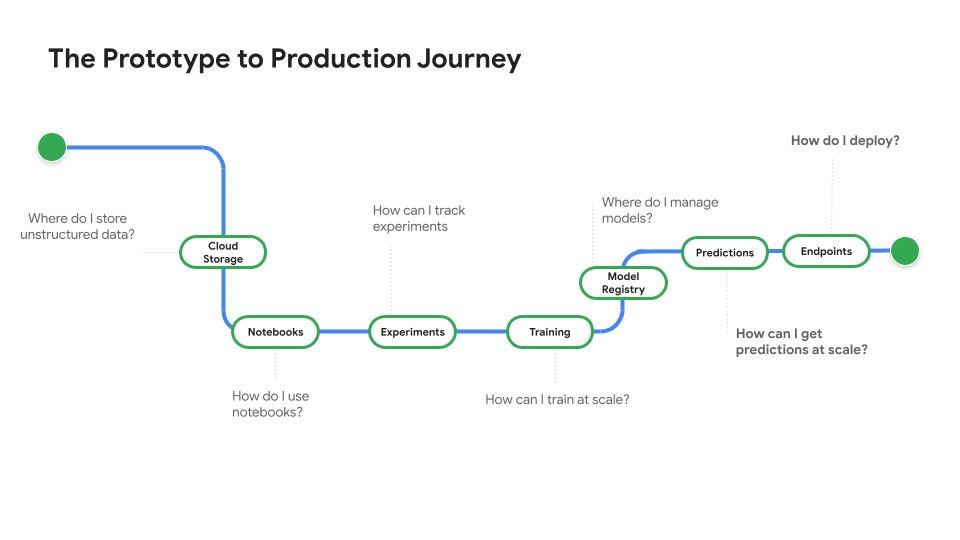
Watch Prototype to Production, a video series that takes you from notebook code to a deployed model.
Tutorials, quickstarts, & labs
Deploy for batch or online predictions
Deploy for batch or online predictions
When you're ready to use your model to solve a real-world problem, register your model to Model Registry and use the Agent Platform prediction service for batch and online predictions.
Watch Prototype to Production, a video series that takes you from notebook code to a deployed model.
Train custom Models
Custom Model training overview and documentation
Custom Model training overview and documentation
Get an overview of the custom training workflow in Agent Platform, the benefits of custom training, and the various training options that are available. This page also details every step involved in the ML training workflow from preparing data to predictions.
Get a video walkthrough of the steps required to train custom models on Agent Platform.
Tutorials, quickstarts, & labs
Custom Model training overview and documentation
Custom Model training overview and documentation
Get an overview of the custom training workflow in Agent Platform, the benefits of custom training, and the various training options that are available. This page also details every step involved in the ML training workflow from preparing data to predictions.
Get a video walkthrough of the steps required to train custom models on Agent Platform.
Pricing
| How Agent Platform pricing works | Pay for Agent Platform tools, storage, compute and Cloud resources used. New customers get $300 free credits to try Agent Platform and Google Cloud products. | |
|---|---|---|
| Tools and usage | Description | Price |
Generative AI | Imagen model for image generation Based on image input, character input, or custom training pricing. | Starting at $0.0001 |
Text, chat, and code generation Based on every 1,000 characters of input (prompt) and every 1,000 characters of output (response). | Starting at $0.0001 per 1,000 characters | |
Custom-trained models | Custom model training Based on machine type used per hour, region, and any accelerators used. Get an estimate using sales or our pricing calculator. | Contact sales |
Agent Platform notebooks | Compute and storage resources Based on the same rates as Compute Engine and Cloud Storage. | Refer to products |
Management fees In addition to the above resource usage, management fees apply based on region, instances, notebooks, and managed notebooks used. View details. | Refer to details | |
Agent Platform Pipelines | Execution and additional fees Based on execution charge, resources used, and any additional service fees. | Starting at $0.03 per pipeline run |
Agent Platform Vector Search | Serving and building costs Based on the size of your data, the amount of queries per second (QPS) you want to run, and the number of nodes you use. View example. | Refer to example |
View pricing details for all Agent Platform features and services.
How Agent Platform pricing works
Pay for Agent Platform tools, storage, compute and Cloud resources used. New customers get $300 free credits to try Agent Platform and Google Cloud products.
Generative AI
Imagen model for image generation
Based on image input, character input, or custom training pricing.
Starting at
$0.0001
Text, chat, and code generation
Based on every 1,000 characters of input (prompt) and every 1,000 characters of output (response).
Starting at
$0.0001
per 1,000 characters
Custom-trained models
Custom model training
Based on machine type used per hour, region, and any accelerators used. Get an estimate using sales or our pricing calculator.
Contact sales
Agent Platform notebooks
Compute and storage resources
Based on the same rates as Compute Engine and Cloud Storage.
Refer to products
Management fees
In addition to the above resource usage, management fees apply based on region, instances, notebooks, and managed notebooks used. View details.
Refer to details
Agent Platform Pipelines
Execution and additional fees
Based on execution charge, resources used, and any additional service fees.
Starting at
$0.03
per pipeline run
Agent Platform Vector Search
Serving and building costs
Based on the size of your data, the amount of queries per second (QPS) you want to run, and the number of nodes you use. View example.
Refer to example
View pricing details for all Agent Platform features and services.
Start your proof of concept
Business Case
Unlock the full potential of gen AI

"The accuracy of Google Cloud's generative AI solution and practicality of the Agent Platform gives us the confidence we needed to implement this cutting-edge technology into the heart of our business and achieve our long-term goal of a zero-minute response time."
Abdol Moabery, CEO of GA Telesis
Analyst reports
Google named a Leader in the 2025 IDC MarketScape for Worldwide GenAI Life-Cycle Foundation Model Software. Download the report
Google Named a Leader in the Gartner Magic Quadrant™ for AI Application Development Platforms, Q4 2025. Read the report
Google named a leader in the Forrester Wave™: AI/ML Platforms, Q3 2024. Read the report