Mantenha tudo organizado com as coleções
Salve e categorize o conteúdo com base nas suas preferências.
Como conectar VMs de cargas de trabalho ao Google Cloud NetApp Volumes
O Google Cloud NetApp Volumes acelera a implantação de
aplicativos baseados em nuvem por meio do provisionamento rápido de serviços de arquivos compartilhados e
recursos de gerenciamento de armazenamento. Ao conectar o NetApp Volumes ao
VMware Engine, é possível montar volumes do NetApp Volumes
no SO convidado das suas máquinas virtuais (VMs) de carga de trabalho.
Confira alguns casos de uso comuns para o uso de volumes NetApp com o
VMware Engine:
Infraestrutura de área de trabalho virtual (VDI, na sigla em inglês)
Como criar diretórios iniciais da VM
Como configurar serviços de arquivos
Armazenamento de arquivos compartilhados para aplicativos e bancos de dados
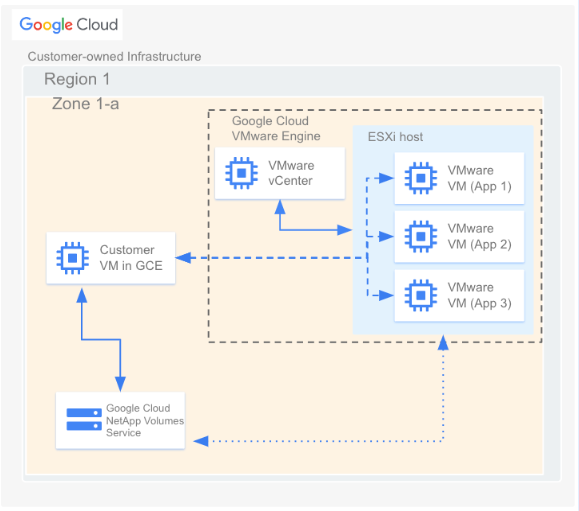
Além disso, as VMs no Compute Engine e no Google Cloud VMware Engine podem montar
os mesmos volumes. Confira um diagrama que mostra o Google Cloud NetApp Volumes sendo
usado com o VMware Engine e o Compute Engine:
Antes de começar
As etapas neste documento presumem que você fez o seguinte:
Criou um pool de armazenamento com o local escolhido,
o nível de serviço, a capacidade, a criptografia de dados e a política do AD.
Criou um volume em um pool de armazenamento preexistente com os
parâmetros selecionados (como capacidade alocada e tipo de protocolo) em uma determinada
região. É possível usar os volumes NFSv3, NFSv4 ou SMB na conexão
descrita neste documento.
Ao criar uma conexão de peering entre o VMware Engine e
o NetApp Volumes, você precisa de alguns detalhes sobre a rede VPC
usada pelo NetApp Volumes. Para conferir esses detalhes, faça o seguinte:
No Google Cloud console, acesse a página peering da Rede VPC.
Clique em Selecionar um projeto e selecione a organização, a pasta ou o projeto que
contém a conexão de peering.
Selecione a conexão de peering criada nos Volumes NetApp para
seu projeto.
A conexão é chamada de sn-netapp-prod.
Você poderá encontrar várias conexões de peering com o mesmo nome se tiver
mais de uma rede VPC com peering. A pessoa que configurou as
conexões de peering de rede VPC pode ajudar a determinar qual conexão
usar para o VMware Engine.
Copie os campos Rede VPC com peering e ID do projeto com peering, que
começam com netapp e terminem com -tp, respectivamente.
Criar uma conexão de peering
Se o projeto do VMware Engine e as nuvens privadas foram criados após
12 de novembro de 2023, faça o seguinte. Para mais informações sobre como criar peerings
de VPC para esses ambientes, consulte Peering de uma rede VPC.
No Google Cloud console, acesse a página peering da Rede VPC.
Clique em Selecionar um projeto e selecione a organização, a pasta ou o projeto em que você quer criar a conexão de peering.
Clique em Criar.
No campo Nome, forneça um nome para o peering de rede. Por exemplo, peering-2-netapp-volumes.
Na seção Rede do VMware Engine, mantenha selecionada a opção padrão "No projeto
atual". Especifique a rede do VMware Engine que você quer
fazer peering, por exemplo, ven1.
Em Peering, selecione Google Cloud NetApp Volumes.
No campo ID do projeto do locatário de serviço, insira o ID do projeto com peering do
projeto Google Cloud que contém seu volume.
No campo Nome da VPC do locatário de serviço, insira o nome da rede VPC
com peering em que o volume está.
Na seção Troca de rotas, mantenha as configurações padrão.
Clique em Criar.
Montar um volume
Quando o status de peering for listado como Ativo, será possível montar o volume do NetApp Volumes.
Execute o processo de montagem no SO convidado da sua VM do VMware.
Para montar um volume NFS, faça o seguinte:
No Google Cloud console, acesse NetApp Volumes >
Volumes.
Clique em Selecionar um projeto e selecione a organização, a pasta ou o projeto que
contém o volume.
Clique no volume NFS em que você quer ativar as exportações do NFS.
Role para a direita, clique em Maismore_vert e em
Instruções de montagem.
Siga as instruções na janela Instruções de ativação do NFS
que aparece. As instruções de montagem podem ser um pouco diferentes, dependendo de
qual protocolo NFS você configurou para o volume.
Para montar um volume SMB, faça o seguinte:
No Google Cloud console, acesse NetApp Volumes >
Volumes.
[[["Fácil de entender","easyToUnderstand","thumb-up"],["Meu problema foi resolvido","solvedMyProblem","thumb-up"],["Outro","otherUp","thumb-up"]],[["Difícil de entender","hardToUnderstand","thumb-down"],["Informações incorretas ou exemplo de código","incorrectInformationOrSampleCode","thumb-down"],["Não contém as informações/amostras de que eu preciso","missingTheInformationSamplesINeed","thumb-down"],["Problema na tradução","translationIssue","thumb-down"],["Outro","otherDown","thumb-down"]],["Última atualização 2025-09-04 UTC."],[],[],null,["# Connecting workload VMs to Google Cloud NetApp Volumes\n======================================================\n\n[Google Cloud NetApp Volumes](/architecture/partners/netapp-cloud-volumes) speeds up the deployment of\ncloud-based applications through rapid provisioning of shared file services and\nstorage management features. Connecting NetApp Volumes to\nVMware Engine lets you mount NetApp Volumes volumes\nfrom within the guest OS of your workload virtual machines (VMs).\n\nHere are some common use cases for using NetApp Volumes with\nVMware Engine:\n\n- Virtual desktop infrastructure (VDI)\n- Creating VM home directories\n- Setting up file services\n- Shared file storage for applications and databases\n\nAdditionally, VMs in Compute Engine and Google Cloud VMware Engine can both mount\nthe same volumes. Here's a diagram that shows Google Cloud NetApp Volumes being\nused with VMware Engine and Compute Engine:\n\nBefore you begin\n----------------\n\nThe steps in this document assume that you have done the following:\n\n- [Created a Storage Pool](/netapp/volumes/docs/configure-and-use/storage-pools/create-storage-pool) with the chosen location, service level, capacity, data encryption, and AD policy.\n- [Created a Volume](/netapp/volumes/docs/configure-and-use/volumes/create-volume) in a pre-existing storage pool with the selected parameters (like allocated capacity and protocol type) in a given region. You can use NFSv3, NFSv4, or SMB volumes for the connection described in this document.\n- [Created a private cloud](/vmware-engine/docs/private-clouds/howto-create-private-cloud) in the same region as your volume.\n\nGet VPC network details\n-----------------------\n\nWhen creating a peering connection between VMware Engine and\nNetApp Volumes, you need some details about the VPC network\nused by NetApp Volumes. To get these details, do the following:\n\n1. In the Google Cloud console, go to the **VPC Network peerings** page.\n\n [Go to VPC Network peerings](https://console.cloud.google.com/vmwareengine/network-peerings)\n2. Click **Select a project** and then select the organization, folder, or project that\n contains the peering connection.\n\n3. Select the peering connection created in NetApp Volumes for\n your project.\n The connection is named `sn-netapp-prod`.\n\n You might see multiple peering connections with the same name if you\n have more than one peered VPC network. The person who set up the\n VPC Network Peering connections can help you determine which connection\n to use for VMware Engine.\n4. Copy the **Peered VPC network** and **Peered project ID** fields, which\n begin with *netapp* and end with *-tp*, respectively.\n\nCreate a peering connection\n---------------------------\n\nIf your VMware Engine project and private clouds were created after\nNov 12, 2023, do the following. For more information on how to create VPC\npeerings for such environments, see [Peer a VPC network](/vmware-engine/docs/networking/peer-vpc-network).\n\n1. In the Google Cloud console, go to the **VPC Network peerings** page.\n\n [Go to VPC Network peerings](https://console.cloud.google.com/vmwareengine/network-peerings)\n2. Click **Select a project** and then select the organization, folder, or project where\n you want to create the peering connection.\n\n3. Click **Create**.\n\n4. In the **Name** field, provide a name for your networking peering. For\n example, `peering-2-netapp-volumes`.\n\n5. In the **VMware Engine network** section, keep the default **\"In current\n project\"** selected. Specify the VMware Engine network you want to\n peer, for example `ven1`.\n\n6. For **Peering** , select **Google Cloud NetApp Volumes**.\n\n7. In the **Service tenant project ID** field, enter the *peered project ID* of\n the Google Cloud project containing your volume.\n\n8. In the **Service tenant VPC name** field, enter the name of the *peered VPC\n network* your volume is in.\n\n9. In the **Route exchange** section, keep the default settings.\n\n10. Click **Create**.\n\nMount a volume\n--------------\n\nOnce the peering status is listed as *Active*, you can mount your NetApp Volumes\nvolume.\nPerform the mounting process from within the guest OS of your VMware VM.\n\nTo mount an NFS volume, do the following:\n\n1. In the Google Cloud console, go to **NetApp Volumes \\\u003e\n Volumes**.\n\n [Go to the Volumes page](https://console.cloud.google.com/netapp/cloud-volumes/volumes)\n2. Click **Select a project** and then select the organization, folder, or project that\n contains the volume.\n\n3. Click the NFS volume for which you want to mount NFS exports.\n\n4. Go to the right, click **More**\n *more_vert* , and then click\n **Mount Instructions**.\n\n5. Follow the instructions in the **Mount Instructions for NFS** window that\n appears. The mounting instructions might be slightly different depending on\n which NFS protocol you have configured for the volume.\n\nTo mount an SMB volume, do the following:\n\n1. In the Google Cloud console, go to **NetApp Volumes \\\u003e\n Volumes**.\n\n [Go to the Volumes page](https://console.cloud.google.com/netapp/cloud-volumes/volumes)\n2. Click **Select a project** and then select the organization, folder, or project that\n contains the volume.\n\n3. Click the SMB volume for which you want to map an SMB share.\n\n4. Go to the right, click **More**\n *more_vert* , and then click\n **Mount Instructions**.\n\n5. Follow the instructions in the **Mount Instructions for SMB** window that\n appears.\n\nAfter you mount your volume, you can manage the volume using the standard\ninterfaces described by [Edit a volume](/netapp/volumes/docs/configure-and-use/volumes/edit-volume)."]]