Dokumen ini menguraikan langkah-langkah untuk menginstrumentasi Agen ReAct LangGraph dengan OpenTelemetry, sehingga memungkinkan pengumpulan telemetri dari agen. Perintah pengguna serta respons dan pilihan agen disertakan dalam telemetri sebagai atribut yang dilampirkan ke rentang. Respons agen juga disertakan dalam entri log yang dikorelasikan dengan rentang yang berisi peristiwa AI generatif. Petunjuk dalam dokumen ini berlaku saat agen menggunakan ChatVertexAI Langchain untuk memanggil model Gemini.
Melengkapi aplikasi AI generatif Anda untuk mengumpulkan telemetri
Untuk menginstrumentasi aplikasi AI generatif Anda guna mengumpulkan data log, metrik, dan aktivitas, lakukan hal berikut:
- Instal paket OpenTelemetry
- Mengonfigurasi OpenTelemetry untuk mengumpulkan dan mengirim telemetri
- Melacak pemanggilan agen AI generatif
Menginstal paket OpenTelemetry
Tambahkan paket instrumentasi dan pengekspor OpenTelemetry berikut:
pip install 'opentelemetry-instrumentation-vertexai>=2.0b0' \
  'opentelemetry-instrumentation-sqlite3' \
  'opentelemetry-exporter-gcp-logging' \
  'opentelemetry-exporter-gcp-monitoring' \
  'opentelemetry-exporter-otlp-proto-grpc'
Data log dan metrik dikirim ke project Google Cloud Anda menggunakan Cloud Logging API atau Cloud Monitoring API. Library
opentelemetry-exporter-gcp-logging dan
opentelemetry-exporter-gcp-monitoring memanggil
endpoint di API tersebut.
Data trace dikirim ke Google Cloud menggunakan
Telemetry (OTLP) API, yang mengimplementasikan
OpenTelemetry OTLP Protocol.
Library opentelemetry-exporter-otlp-proto-grpc
memanggil endpoint Telemetry (OTLP) API.
Data rekaman aktivitas Anda disimpan dalam format yang umumnya konsisten dengan file proto yang ditentukan oleh Protokol OTLP OpenTelemetry. Namun, kolom dapat dikonversi dari jenis data khusus OpenTelemetry ke jenis data JSON sebelum penyimpanan. Untuk mempelajari format penyimpanan lebih lanjut, lihat Schema untuk data rekaman aktivitas.
Mengonfigurasi OpenTelemetry untuk mengumpulkan dan mengirim telemetri
Dalam kode inisialisasi agen LangGraph, konfigurasi OpenTelemetry untuk mengambil dan mengirim telemetri ke project Google Cloud Anda:
Untuk melihat contoh lengkap, klik more_vert Lainnya, lalu pilih Lihat di GitHub.
Melacak pemanggilan agen AI generatif
Untuk melacak eksekusi pemanggilan agen LangGraph, buat rentang kustom di sekitar pemanggilan agen:
Untuk melihat contoh lengkap, klik more_vert Lainnya, lalu pilih Lihat di GitHub.
Anda mungkin ingin menyertakan kode sebelumnya di tempat-tempat penting dalam kode aplikasi Anda.
Untuk mempelajari lebih lanjut cara menambahkan rentang dan metrik kustom, lihat Menambahkan rekaman aktivitas dan metrik kustom ke aplikasi Anda.
Menjalankan contoh
Contoh ini adalah agen LangGraph yang dilengkapi dengan OpenTelemetry untuk mengirimkan trace dan log dengan perintah dan respons AI generatif, serta metrik ke project Google Cloud Anda.
Persona agen LangGraph
Agen LangGraph ditentukan sebagai pakar SQL yang memiliki akses penuh ke database SQLite sementara. Agen diimplementasikan dengan Agen ReAct bawaan LangGraph dan mengakses database, yang awalnya kosong, menggunakan SQLDatabaseToolkit.
Sebelum memulai
- Sign in to your Google Cloud account. If you're new to Google Cloud, create an account to evaluate how our products perform in real-world scenarios. New customers also get $300 in free credits to run, test, and deploy workloads.
-
Install the Google Cloud CLI.
-
Jika Anda menggunakan penyedia identitas (IdP) eksternal, Anda harus login ke gcloud CLI dengan identitas gabungan Anda terlebih dahulu.
-
Untuk melakukan inisialisasi gcloud CLI, jalankan perintah berikut:
gcloud init -
Create or select a Google Cloud project.
Roles required to select or create a project
- Select a project: Selecting a project doesn't require a specific IAM role—you can select any project that you've been granted a role on.
-
Create a project: To create a project, you need the Project Creator
(
roles/resourcemanager.projectCreator), which contains theresourcemanager.projects.createpermission. Learn how to grant roles.
-
Create a Google Cloud project:
gcloud projects create PROJECT_ID
Replace
PROJECT_IDwith a name for the Google Cloud project you are creating. -
Select the Google Cloud project that you created:
gcloud config set project PROJECT_ID
Replace
PROJECT_IDwith your Google Cloud project name.
-
Verify that billing is enabled for your Google Cloud project.
-
Enable the Vertex AI, Telemetry, Cloud Logging, Cloud Monitoring, and Cloud Trace APIs:
Roles required to enable APIs
To enable APIs, you need the Service Usage Admin IAM role (
roles/serviceusage.serviceUsageAdmin), which contains theserviceusage.services.enablepermission. Learn how to grant roles.gcloud services enable aiplatform.googleapis.com
telemetry.googleapis.com logging.googleapis.com monitoring.googleapis.com cloudtrace.googleapis.com -
Install the Google Cloud CLI.
-
Jika Anda menggunakan penyedia identitas (IdP) eksternal, Anda harus login ke gcloud CLI dengan identitas gabungan Anda terlebih dahulu.
-
Untuk melakukan inisialisasi gcloud CLI, jalankan perintah berikut:
gcloud init -
Create or select a Google Cloud project.
Roles required to select or create a project
- Select a project: Selecting a project doesn't require a specific IAM role—you can select any project that you've been granted a role on.
-
Create a project: To create a project, you need the Project Creator
(
roles/resourcemanager.projectCreator), which contains theresourcemanager.projects.createpermission. Learn how to grant roles.
-
Create a Google Cloud project:
gcloud projects create PROJECT_ID
Replace
PROJECT_IDwith a name for the Google Cloud project you are creating. -
Select the Google Cloud project that you created:
gcloud config set project PROJECT_ID
Replace
PROJECT_IDwith your Google Cloud project name.
-
Verify that billing is enabled for your Google Cloud project.
-
Enable the Vertex AI, Telemetry, Cloud Logging, Cloud Monitoring, and Cloud Trace APIs:
Roles required to enable APIs
To enable APIs, you need the Service Usage Admin IAM role (
roles/serviceusage.serviceUsageAdmin), which contains theserviceusage.services.enablepermission. Learn how to grant roles.gcloud services enable aiplatform.googleapis.com
telemetry.googleapis.com logging.googleapis.com monitoring.googleapis.com cloudtrace.googleapis.com Jika Anda menjalankan sampel di Cloud Shell, di Google Cloud resource, atau di lingkungan pengembangan lokal, izin yang tercantum di bagian ini sudah cukup. Untuk aplikasi produksi, biasanya akun layanan menyediakan kredensial untuk menulis data log, metrik, dan trace.
Untuk mendapatkan izin yang Anda perlukan agar aplikasi contoh dapat menulis data log, metrik, dan aktivitas, minta administrator Anda untuk memberi Anda peran IAM berikut di project Anda:
-
Cloud Telemetry Traces Writer (
roles/telemetry.tracesWriter) -
Logs Writer (
roles/logging.logWriter) -
Monitoring Metric Writer (
roles/monitoring.metricWriter) -
Pengguna Vertex AI (
roles/aiplatform.user)
-
Cloud Telemetry Traces Writer (
Di Cloud Shell, jalankan perintah berikut:
git clone https://github.com/GoogleCloudPlatform/opentelemetry-operations-python.gitBuka direktori contoh:
cd opentelemetry-operations-python/samples/langgraph-sql-agentKonfigurasi variabel lingkungan:
# Capture GenAI prompts and responses
export OTEL_INSTRUMENTATION_GENAI_CAPTURE_MESSAGE_CONTENT=true
# Capture application logs automatically
export OTEL_PYTHON_LOGGING_AUTO_INSTRUMENTATION_ENABLED=true
Buat lingkungan virtual dan jalankan contoh:
python -m venv venv/
source venv/bin/activate
pip install -r requirements.txt
python main.py
Aplikasi akan menampilkan pesan yang mirip dengan berikut ini:
Starting agent using ephemeral SQLite DB.Untuk membuat database, masukkan nilai pada perintah Talk to the SQL agent >>, lalu tekan Enter.
Tindakan yang dilakukan oleh agen kemudian ditampilkan di Cloud Shell Anda.
Berikut ini menggambarkan contoh interaksi antara pengguna dan aplikasi:
Talk to the SQL agent >> Create a new table to hold weather data.
👤 User: Create a new table to hold weather data.
🤖 Agent: I need to know what columns the table should have. What information about the weather do you want to store? For example, I could include columns for date, location, temperature, humidity, and precipitation.

Talk to the SQL agent >> Create a new table to hold weather data. Include date, location, temperature, humidity, and precipitation.
👤 User: Create a new table to hold weather data. Include date, location, temperature, humidity, and precipitation.
🤖 Agent

CREATE TABLE weather (
  date DATE,
  location VARCHAR(255),
  temperature REAL,
  humidity REAL,
  precipitation REAL
);
Untuk keluar, masukkan
Ctrl-C.-
Logs Viewer (
roles/logging.viewer) -
Monitoring Viewer (
roles/monitoring.viewer) -
Cloud Trace User (
roles/cloudtrace.user) -
Di konsol Google Cloud , buka halaman Trace explorer:
Anda juga dapat menemukan halaman ini dengan menggunakan kotak penelusuran.
Di toolbar, pilih Tambahkan filter, pilih Nama rentang, lalu pilih
invoke agent.Bagian Jalankan sampel menyertakan contoh eksekusi saat dua perintah dikirim ke aplikasi. Berikut ini menggambarkan halaman Trace Explorer setelah memfilter data:
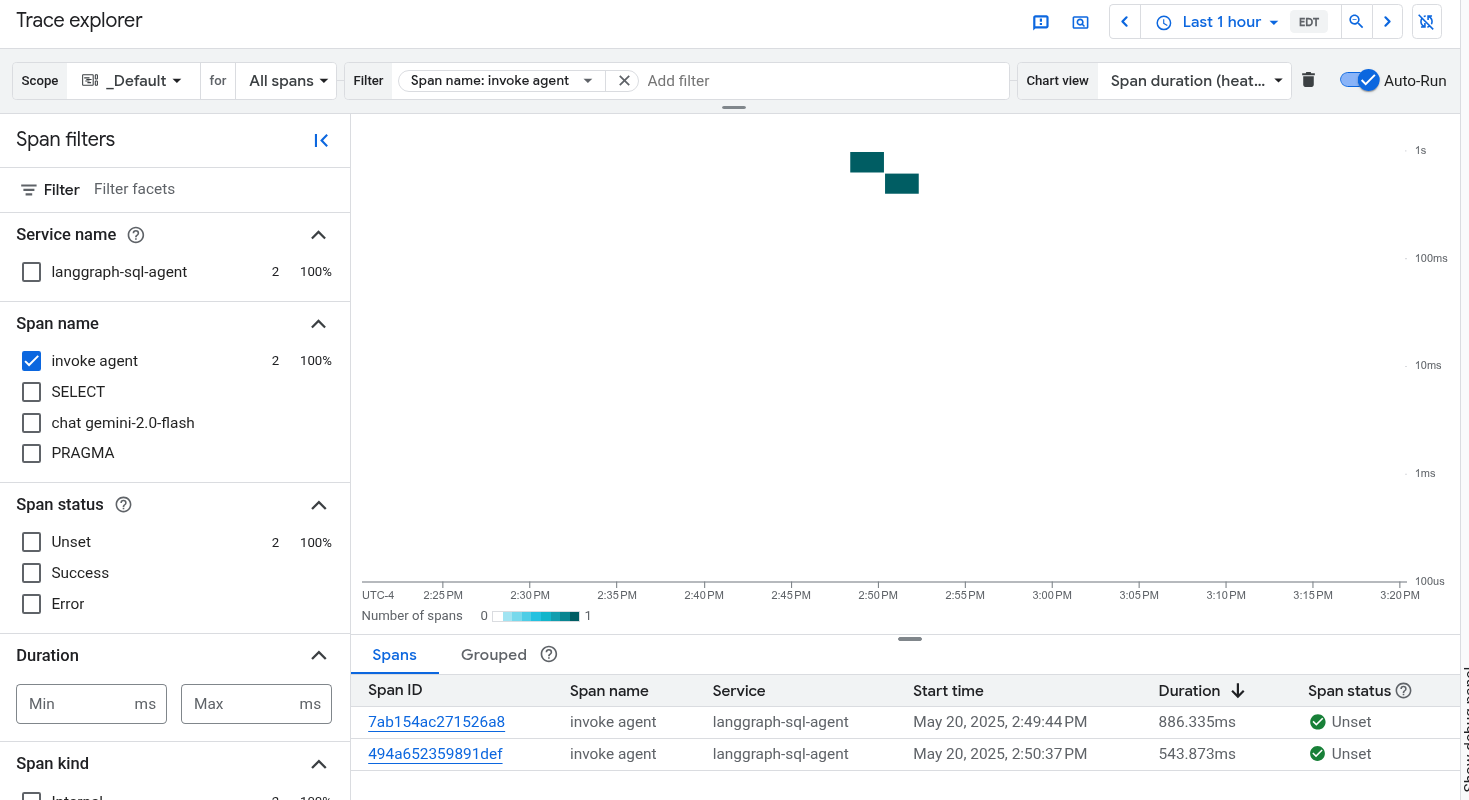
Jika Anda belum pernah menggunakan Cloud Trace, Google Cloud Observability perlu membuat database untuk menyimpan data rekaman aktivitas Anda. Pembuatan database dapat memerlukan waktu beberapa menit dan selama periode tersebut, tidak ada data rekaman aktivitas yang tersedia untuk dilihat.
Untuk menjelajahi data rentang dan log, di tabel Rentang, pilih rentang.
Halaman Detail akan terbuka. Halaman ini menampilkan rekaman aktivitas terkait dan rentang waktunya. Tabel di halaman menampilkan informasi mendetail untuk rentang yang Anda pilih. Informasi ini mencakup hal berikut:
Tab GenAI menampilkan peristiwa untuk agen AI generatif. Untuk mempelajari peristiwa ini lebih lanjut, lihat artikel Melihat peristiwa AI generatif.
Screenshot berikut mengilustrasikan rekaman aktivitas, dengan satu rentang memiliki nama
invoke_agent. Rentang tersebut memanggil Gemini. Rentang Gemini mencakup peristiwa AI generatif:
Tab Log & Peristiwa mencantumkan entri log dan peristiwa yang terkait dengan rentang. Jika Anda ingin melihat data log di Logs Explorer, pilih Lihat log di toolbar tab ini.
Data log mencakup respons agen LangGraph. Misalnya, untuk contoh run, payload JSON mencakup konten berikut:
{
  logName: "projects/my-project/logs/otel_python_inprocess_log_name_temp"
  jsonPayload: {
    finish_reason: "stop"
    message: {
      role: "model"
      content: [
        0: {
          text: "I need to know what columns the table should have. What information about the weather do you want to store? For example, I could include columns for date, location, temperature, humidity, and precipitation."
        }
      ]
    }
  index: 0
  }
...
}
Jalankan contoh
Untuk menjalankan contoh, lakukan hal berikut:
Tindakan yang dilakukan oleh agen AI generatif tidak deterministik, sehingga Anda mungkin melihat respons yang berbeda untuk perintah yang sama.
Melihat rekaman aktivitas, metrik, dan log
Bagian ini menjelaskan cara melihat peristiwa AI generatif.
Sebelum memulai
Untuk mendapatkan izin yang Anda perlukan guna melihat data log, metrik, dan rekaman aktivitas, minta administrator Anda untuk memberi Anda peran IAM berikut di project Anda:
Untuk mengetahui informasi selengkapnya tentang cara memberikan peran, baca artikel Mengelola akses ke project, folder, dan organisasi.
Anda mungkin juga bisa mendapatkan izin yang diperlukan melalui peran khusus atau peran bawaan lainnya.
Melihat telemetri
Untuk melihat peristiwa AI generatif, gunakan halaman Trace Explorer:
Contoh diinstrumentasikan untuk mengirim data metrik ke project Google Cloud Anda, tetapi tidak menghasilkan metrik apa pun.