This page introduces some of the facet features and how to use them.
Definitions related to facets
This section provides some basic definitions and explanations for some terms related to facets:
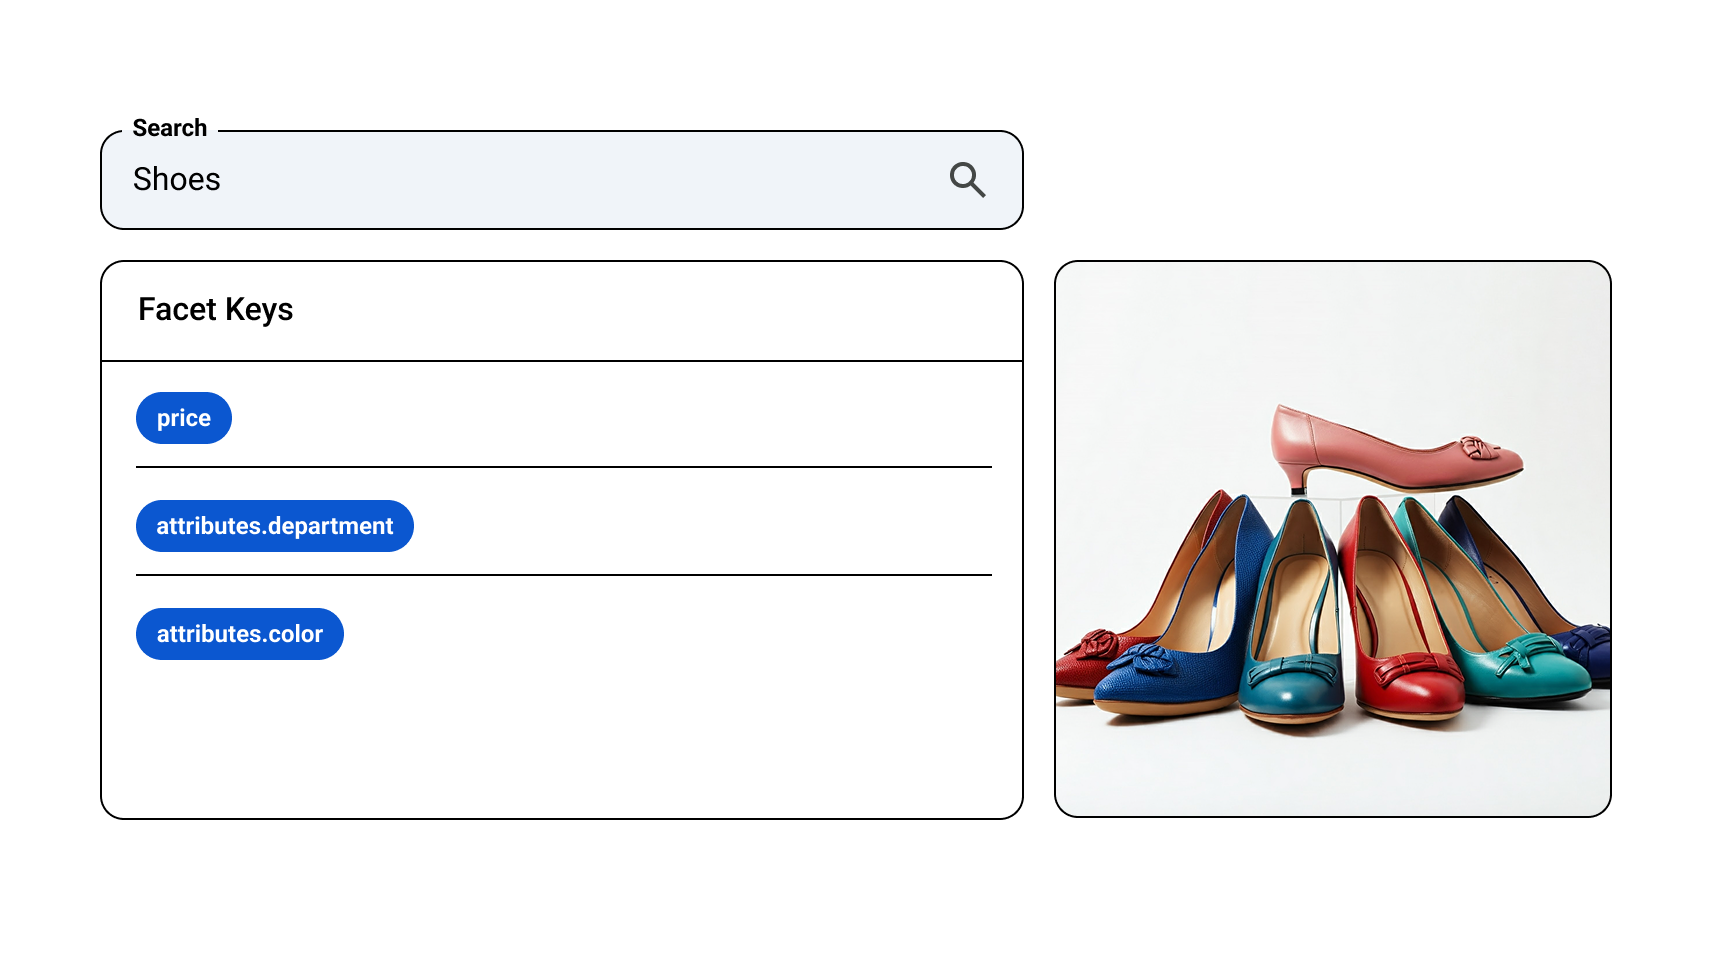
Facets: The facet specifications to perform faceted search. They help users find what they want by filtering the results. For example, if a user searches for
shoes, some facets that could be returned are:price,attributes.department,attributes.colors, andattributes.size.System attributes: Predefined system attributes are existing product fields that provide more information about the product. These include a few predefined product attributes like
brand,availability,color, andsize.Custom attributes: Custom attributes are extra attributes that you define using the Product.attributes field. For example, this could include
style,colorordepartment.Facet key: This is the name of a facet. For example, it could be
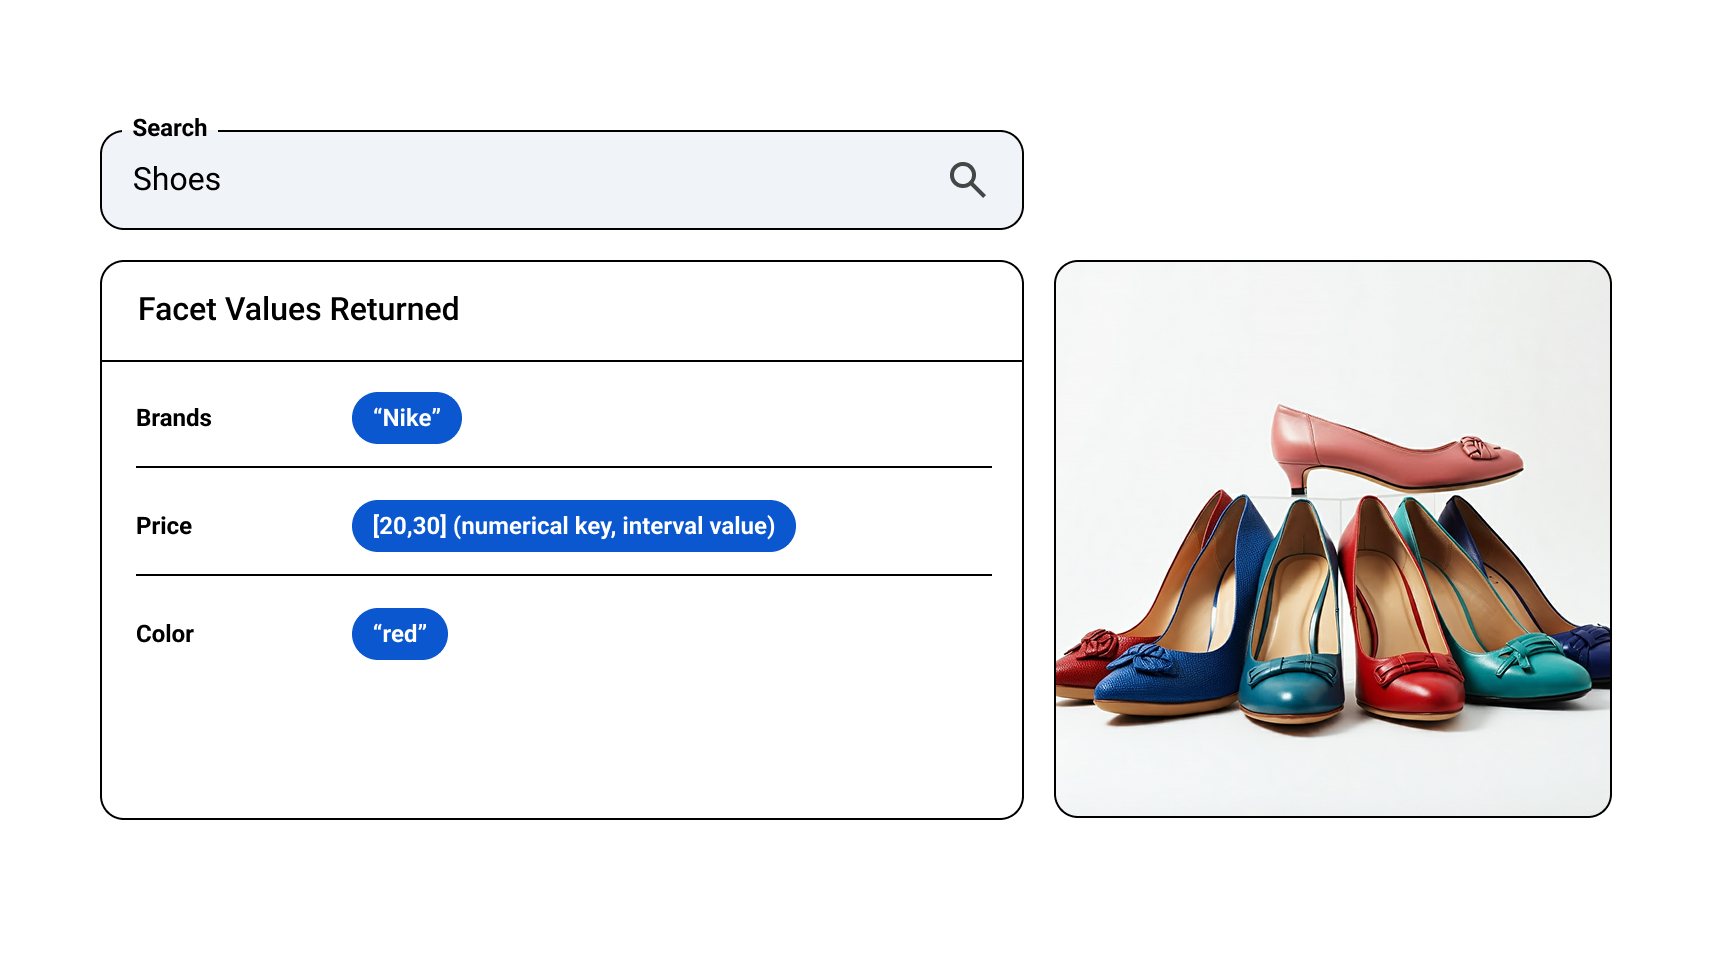
attributes.departmentorsizes. The facet keys correspond to the attribute names. For example, the (product) system attribute namesizescorresponds to the facet keysizes. Similarly, the (product) custom attribute namedepartmentcorresponds to the facet keyattributes.department(for custom attributes, the prefixattributes.is added to the custom attribute name to obtain the facet key). The terms attribute name, facet key, and facet name are interchangeable.Facet value: For textual keys, this is one of the textual values of a facet. By example, the textual facet key
brandscould have such textual values asAsicsandNike. For numerical keys, a facet value is an interval. By example, the numerical facet key price could have an interval of the form [20, 30).Type of an attribute or facet: They can be either textual or numerical.
Pinned facets: This is a facet that you pass in the request using the
FacetSpecwith the option enableDynamicPosition=false. The facets should appear in their original order before all the dynamic facets in the response.Dynamic facets: These are facets that search ranks on its side. They are either passed in the request with the option
enableDynamicPosition=trueor fetched according to the search models. They are then ranked by the same trained models with the most relevant ones at the top.Facetable, dynamic faceting, or tilable: When an attribute is enabled for dynamic faceting, search can automatically use this attribute as a dynamic facet based on past user behavior such as facet clicks and views. To enable dynamic faceting for an attribute, you must also enable indexing for that attribute.
Filter: The filter syntax consists of an expression language for constructing a predicate from one or more fields of the products being filtered. For example, if a user engages the facet values
Asicsof the facet keyattributes.brands, then part of the filter could be(attributes.brands:ANY(\"Asics",\"Nike\")). Filter expression is case-sensitive. See more details about the filter in this user guide.
About dynamic facets and tiles
When dynamic faceting is enabled for a
serving config, search
can automatically use attributes as dynamic facets and tiles in search results for this
configuration, based on past user behavior such as facet clicks and views.
Dynamic facets are either passed in the request with the option
enableDynamicPosition=true
or fetched according to the search models. They are then ranked
by the same models with the most relevant ones at the top.
By default, most facet keys are facetable. Dynamic faceting settings in the API
can be overwritten for some specific facet keys of your choice by site-wide
attribute controls in the Search for commerce console. In other words, if
you want some facet keys to be non-facetable, you need to disable dynamic
faceting for each of these keys in the Attribute
controls tab. For more information, see Managing site-wide attribute
controls.
Note that dynamic facets and tiles can be created based just on accurate product catalog data. However, for the feature to work optimally for your site, the facet models need to learn from activity on your site. For this, you need to set query, category, and filter fields in your search event uploads accurately.
If none of your serving configs has dynamic facets and tiles enabled and you just enabled dynamic facets and tiles in a serving config, expect to wait three to four days before they work.
Facet controls
This section provides instructions for creating different types of facet controls, many of which govern tile behavior also:
- Ignore facet and tile values controls
- Replace facets and tile values controls
- Merge facets controls
- Set numerical intervals controls
- Remove facets and tile controls
- Force return facets controls
- Rerank dynamic facets controls
Vertex AI Search for commerce performs case-sensitive matching for all these facet controls unless stated otherwise.
To control specific facet values and tile behavior, navigate to the Facet controls tab in the Search for commerce console.
Click Create control to modify facets returned from search. A Create control pane opens. Click the Control type field to open a drop-down menu, from which you can select the control type. Each one opens a dialog with options for controlling your facets. All facet control types require at least the attribute information, but each form requires slightly different information.

Create an ignore facet and tile values control
Create an ignore facet and tile values control when you want to remove some unwanted facet and tile values for some specific facet and tile keys.
This control is useful to erase unwanted facet and tile values like NA and
Not_applicable. But, it can also be used to erase seasonal trends like
Easter if you are in October.
To create a control that ignores facet and tile values:
Go to the Controls page in the Search for commerce console.
On the Facet controls tab, click add_boxCreate control.
The Create control pane opens.
Select Ignore facet and tile values.
Specify the attribute name.
For example,
brandsfor a system attribute. For a custom attribute, the name starts withattributes.—for example,attributes.departmentandattributes.colors.Optional: Specify Start Time and/or End Time.
Specify one or more attribute values as Ignore values.
For example,
NA,Not_applicableandEaster.Click Submit.
Create a replace facet and tile values control
Create a replace facet and tile values control when you want to consolidate a number of similar facet and tile values into one single term.
Replacing facet and tile values is sometimes referred to as merging facet and tile values.
To avoid conflicts and useless mappings, if an attribute value facet_value_1
is replaced by another attribute value facet_value_2, then the latter can't be
replaced by another attribute value. For example, if you replace ruby with
dark red, you can't subsequently replace dark red with red.
For each attribute name, an attribute value shouldn't appear more than once in the Replace values field.
To create a control that replaces facet and values:
Go to the Controls page in the Search for commerce console.
On the Facet controls tab, click add_boxCreate control.
The Create control pane opens.
Select Replace facet and tile values.
Specify the attribute name.
This feature works only for custom attributes, which start with the prefix with
attributes—for example,attributes.departmentandattributes.colors.Specify one or more attribute values as Replace values - for example,
RED,Red,dark red,bright red,ruby, andcrimson.An attribute value can only appear once in the Replace values field.
Specify a single attribute value as Replacement term - for example,
red.Click Submit.
Although the replaced values might disappear quickly, the replacement terms can take up to four days to appear.
When the replace facet values control takes effect, if the facet key (in this
example attributes.colors) is returned in the response, the replaced facet
values (such as dark red and crimson) won't be present as facet values. They
are replaced by their replacement terms (for example, red).
Create a merge facets control
It is better to set correctly the product custom attribute names and values on
your side before the products are ingested into search's
database. However, if you can't change custom attribute names, you can create
merge facets controls. You create a merge facets control if you want to
merge (replace) a facet with another facet. For example, you might have
several custom facet keys for colors like attributes.colors_jeans,
attributes.colors_clothes and attributes.colors_hue and you want to replace
them with an existing custom facet key called attributes.colors.
Preferably, merged keys should be:
- Custom attribute names that are permanent and won't change type.
- Attribute names of many ingested products.
If you delete a merged key, you lose its engagement data, which is used to train dynamic facet models.
During indexing for each product, both the keys and the merged keys are included as attribute names, unless you exceed the maximum number of attributes allowed per product. If the maximum number of attributes exceed the quota allowed per product, search arbitrarily truncates the merged keys that become attribute names.
For example, if you already have the maximum number of custom attribute names for a specific product
and one of its custom attribute names is colors_jeans, suppose you
use a merge facets control to merge attributes.colors_jeans into
attributes.colors. In this case, the attribute name colors won't be added to this
specific product as it already contains the maximum number of custom keys per
product. The merged keys won't be deleted from the (custom) attribute names of
products, but they won't be returned as dynamic facet keys either. Similarly, if you
merge several keys with the same key and this results in the number of
attribute values for the merged key exceeding the limit of attribute values
allowed, search arbitrarily truncates the attribute values.
To create a control that merged a facet into another:
Go to the Controls page in the Search for commerce console.
On the Facet controls tab, click add_boxCreate control.
The Create control pane opens.
Select Merge facets.
Specify a valid custom facet key that merges into another one.
This feature works only for custom attributes, which start with the prefix with
attributes—for example,attributes.colors_clothesandattributes.colors_jeans.Specify a valid custom facet key as the merged key.
Click Submit.
This control typically takes effect in 2-4 days.
Create a set numerical intervals control
The set numerical intervals control lets you determine the intervals for a numeric facet or tile instead of having to accept calculated intervals.
For example, search might calculate the intervals [10,15),
[15,20) [20,25), [25,30), [30,40) and [40,50) and [50,infinity) for the custom
numerical facet key attributes.monitor_size. But, you might prefer the
intervals [0,14), [14,17), [17,21), [21,24), [24,27), [27,32) and [32,infinity)
instead.
About calculated intervals and set intervals
For all numerical custom attributes and the numerical system attributes price,
rating and ratingCount, search calculates some intervals
with round bounds based on the distribution of all the (numerical) attribute
values for each of these attributes. You can also specify some intervals in the
request. As a last option, you can set your own intervals for each numerical
facet key using the following
set numerical intervals controls.
Here is the priority order that determines which intervals are used:
First, if some intervals are specified in the request for a numerical facet key, these intervals are kept.
Otherwise, if a numerical facet key is dynamic or passed in the request without intervals, then the intervals that you include using the set numerical intervals controls are added to that numerical facet key if these intervals are non-empty.
Otherwise, the previously mentioned calculated intervals with round bounds are be added.
Create the control
If you want to specify your own intervals for numeric facet and tile keys instead of using the ones that Vertex AI Search for commerce calculates for you, then create a set numerical intervals controls.
To create a control for adding intervals:
Go to the Controls page in the Search for commerce console.
On the Facet controls tab, click add_boxCreate control.
The Create control pane opens.
Select Set numerical facet and tile intervals.
Specify the name of a numerical attribute.
For example,
pricefor a system attribute. For a custom attribute, the name starts withattributes.—for example,attributes.number_of_pieces.Specify at least one of Minimum or Maximum. If both are specified, the minimum can't be greater than the maximum. You can choose each bound to be Inclusive or Exclusive.
To add more intervals, click add_boxAdd intervals. The maximum number of intervals is 40.
Click Submit.
Create a control for removing facets and tiles
The remove facets control lets you to remove a specific facet and tile key from the dynamic facets. Facet and tile keys are removed based on some given query terms or page categories.
This facet control type controls the attribute itself. No facets or tiles associated with this facet as members will be returned in the search if this facet control type is applied.
This control is useful if you want to remove some facet and tile keys for some query
terms or browse. For example, you can use this control to remove the facet key
attributes.shoe_size for the query shoes.
You can use the Merchandising console or the Google Cloud console to remove a facet or tile:
Merchandising console
Click the URL provided by the administrator. Sign in.
This takes you to the Controls page in the Merchandising console.
Click add_boxCreate control.
Define the goals for your end users and timing required. All questions are required to be answered. Click Next.
Select a control. Enter the name for your control, select the Search product, then choose the control type Remove facets.
Configure your Remove facets control:
Under Triggers, define what catalog attribute triggers this control by giving criteria to a related search query, such as contains or not in range. If no catalog attribute has been configured, this control will always apply.
Define an Applicable time range by entering a Date range. If any of the specified time ranges are met, the catalog attribute will be matched with the query during any of the specified time ranges. Add a time range with add_boxAdd time range.
Define the Attribute to ignore under the Remove facets actions section for attirbutes you don't want to appear in dynamic facets for the query terms specified under the previous Triggers section.
Click class="material-icons">add_boxAdd attribute to add more attributes.
Click Submit to submit your control request to an Approver. You will be able to see the status of submitted requests in the Merchandising Console. If you change your mind, you can delete your control request.
Cloud console
Go to the Controls page in the Search for commerce console.
On the Facet controls tab, click add_boxCreate control. The Create control pane opens.
Select Remove facets and tiles.
Each control is for search or browse, but it can't apply to both. Do one of the following:
For search queries, click Search and specify some partial query terms or some exact query terms to match. See detailed information in query terms and conditions. The query terms need to be lowercase for both cases. For example, you can specify the partial query terms
shirts,polo,jackets,t-shirtandfall coatsand the facet keys specified next won't appear as a dynamic facet if the lowercase query is one of these query terms or contains any of these query terms as a unigram.For browse, click Browse categories and specify some page categories. You can specify a list (up to 10 entries) of categories or departments. The format should be the same as the user event page categories. For example, it could be
page_categories:Sales > 2023 Black Friday Deals. If there is an exact match (case sensitive) between the latter and one of the page categories passed in the event (for browse), then the facet keys specified next won't appear as a dynamic facet.
Specify at least one valid facet key in Attributes to ignore.
Click Submit.
Create a force return facets control
The force return facets control can affect the list position of a dynamic facet key for a specific query or browse event.
This control is useful if you want to force a specific facet key among the
dynamic facets for some query terms or browse. For example, you can use this
control to force the facet key brands to appear to position 10 or a smaller
position for the query handbags. If the facet brands is already in the top
10 for the dynamic facets for this query, then it shouldn't move much. If it is
not in the top 10 or not in the list of dynamic facets, then it should move to
position 10 approximately.
You can create a control for force return facets in the Merchandising console or the Google Cloud console.
Merchandising console
Click the URL provided by the administrator. Sign in.
This takes you to the Controls page in the Merchandising console.
Click add_boxCreate control.
Define the goals for your end users and timing required. All questions are required to be answered. Click Next.
Select a control. Enter the name for your control, select the Search or Browse product, then choose the control type Force return facets.
Configure your Force return facets control:
Under Triggers, define what catalog attribute triggers this control by giving criteria to a related search query, such as contains or not in range. If no catalog attribute has been configured, this control will always apply.
Define an Applicable time range by entering a Date range. If any of the specified time ranges are met, the catalog attribute will be matched with the query during any of the specified time ranges. Add a time range with add_boxAdd time range.
Define the Attribute position adjustment under the Force return facets actions section. Here you can choose an attribute that you want included in the dynamic facets or tiles for the query or page category you set in the previous Triggers section. Choosing a position of 5, for example, sets the facet to appear at the fifth position from the bottom of the page or higher.
Click add_boxAdd adjustment to add more attributes to be governed by this control.
Click Submit to submit your control request to an Approver. You will be able to see the status of submitted requests in the Merchandising Console. If you change your mind, you can delete your control request.
Cloud console
Go to the Controls page in the Search for commerce console.
On the Facet controls tab, click add_boxCreate control.
The Create control pane opens.
Select Force return facets.
Each control is for search or browse, but it can't apply to both. Do one of the following:
For search queries, click Search and specify some partial query terms or some exact query terms to match. See detailed information in query terms and conditions. The query terms need to be lowercase for both cases. For example, you can specify the partial query terms
shirts,polo,jackets,t-shirtandfall coatsand the facet keys specified next should appear around their respective position or higher among the dynamic facets if the lowercase query is one of these query terms or contains any of these query terms as a unigram.For browse, click Browse categories and specify some page categories. You can specify a list (up to 10 entries) of categories or departments. The format should be the same as the user event page categories. For example, it could be
page_categories:Sales > 2023 Black Friday Deals. If there is an exact match (case sensitive) between the latter and one of the page categories passed in the event (for browse), then the facet keys specified next should appear around their respective position or higher among the dynamic facets.
Specify a valid facet key and an integer position between 1 and 100 (inclusive).
If you want to specify more than one facet key, click add_boxAdd adjustment and redo the previous step.
Click Submit.
Create a rerank dynamic facets control
The dynamic facet ranking depends on the query (search) or page categories (browse). The rerank dynamic facets control also allows the ranking to depend on some facet values engaged by the user.
For example, using this control, if the
user engages the facet value watches of the facet key attributes.department
following a search or browse, then the ranking will also depend on the facet
value watches. You can specify the facet values that you want to rerank on by
facet key, or specify only the facet key and rerank on all its facet values.
To create a control for rerank dynamic facets:
Go to the Controls page in the Search for commerce console.
On the Facet controls tab, click add_boxCreate control.
The Create control pane opens.
Select Rerank dynamic facets.
Specify a valid custom textual facet key (all custom keys have the prefix
attributes.).You can either specify some specific facet values or apply to all.
If you want to rerank on all its facet values, click add_boxAny value changes.
If you want to rerank on specific facet values, click add_boxSelected values changes. Then insert all the facet values that you would like to rerank on (case sensitive). For example, it could be
watches,luggages,bed.
Click Submit.
You need to pass all the facet keys engaged by the user in the request for the following reasons:
- Suppose that a user browses for sales and gets a first list of facet keys presented.
- Then, the user engages first the facet key
attributes.age_group. - Next, they engage the facet key
attributes.departmentwith the facet valueswatches, for which you set up a control to rerank on.
At that point, search reranks the keys.
So, it is possible that the previously engaged facet key attributes.age_group won't be returned in the
response. If you pass this key in the request (using a
Facetspec with
enableDynamicPosition set to true),
it will automatically be returned in the response.
However, search could return that key at position 27 and you might show only the first 20 keys to the user. Because of this, make sure that these keys previously engaged by the user will be shown to the user. If you don't want to show too many keys to the user, you might have to filter out some intermediate non-engaged keys in the response.