This page describes how to create serving controls.
Serving controls are rules that you define and apply to individual serving configs.
You can create a serving control in the Search for commerce console consisting of a condition, which triggers the control, and an action that takes place when the condition triggers. You can then attach the new serving control to a serving configuration.
Relationship between serving controls and configs
Serving configs have a multi-to-multi relationship with controls. You can add multiple controls to a serving config, and a single control can be associated with multiple serving configs.
When you create serving controls and serving configs, you select a product (recommendations or search) that the control can be used for.
Serving controls can be associated only with serving configs of the same product type. For example, a serving control created for recommendations can't be associated with a serving config that was created for search.
Serving configs manage which controls are applied during a search or prediction request. Only the controls on the active serving config for a request are considered at serving time. For example, suppose you have created two controls: a control called gShoe Sale that boosts results for the brand gShoe when shoes is searched for and a control called More shoes that expands queries using the term running shoes to include sport shoes. If you attach only the gShoe Sale control to a serving config, then search requests using that serving config boosts gShoe results for queries using the term shoes, but the More shoes control has no effect because it is not attached to the serving config you are using.
For more information, refer to About serving configs.
Quickstart videos and guides
- Introduction to serving controls: Serving controls enable you to create rules that customize how your serving configurations return search results.
- Boost/bury: Affects result ranking and order in the returned result list.
Available for search and recommendations.
- Filter: Removes results that do not pass the filter from the returned
result list. Available for search only.
- Redirect: Redirects your users to a specific page depending on
the search query. Available for search only.
This tutorial shows you to how to use the redirect control.
To follow step-by-step guidance for this task directly in the Cloud Shell Editor, click Guide me:
- Linguistic: Customizes search query linguistics. Available for
search only.
Several types of linguistic controls are available:
- Synonym: Expands considered synonyms for a search query.
- One-way synonym: Expands considered synonyms unidirectionally for specific terms.
- Do not associate: Prevent a group of terms from being used in search when specific terms appear.
- Ignore: Prevent a term from being used in searches.
- Replacement: Replaces terms in the search query.
- Pinning: Affects result ordering, placing a result at a specific position — for example, at position 4. Available for search and browse.
For examples of these controls, see About serving controls.
Serving control configuration options
You can create controls and then add or swap them into a live serving configuration.
You can create up to 100 serving controls. If you need more serving controls, request additional quota. For how to request additional quota, see Increase your quotas. A serving config can have up to 100 serving controls of any type besides redirect controls, whose limit is 1000 per serving config.
You can create a serving control in these ways:
On the Controls page in the Google Cloud console: Here, you can optionally create controls during the serving config creation process.
You can use the Merchandising console.
You can create a serving control inline, using the
Controls.createmethod.
Use the Google Cloud console
To use the Google Cloud console to create serving controls:
Go to the Controls page in the Search for commerce console.
Go to the Controls pageFollow the Google Cloud console steps under each serving control section.
Use the Merchandising console
The Merchandising console is a tool designed for merchandisers to create and administer controls. It provides an approval flow so that every control can be proposed by all merchandisers and reviewed by merchandisers approvers.
The Merchandising console helps create serving controls such as pinning, boost/bury, synonyms and facets. The Merchandising console features a user-friendly interface that enables merchandisers to efficiently create and manage controls. This tool also facilitates an approval process, allowing any merchandiser to propose controls and merchandiser approvers to review them.
In Google Cloud, to access the Merchandising console tab, you must have at a minimum the following permissions:
- Project Viewer (Viewer): To access the project.
- Retail Editor: To edit and save Merchandising console settings.
Use the console as an administrator
Before you start, you must be a Google Cloud administrator to onboard users to the Merchandising console.
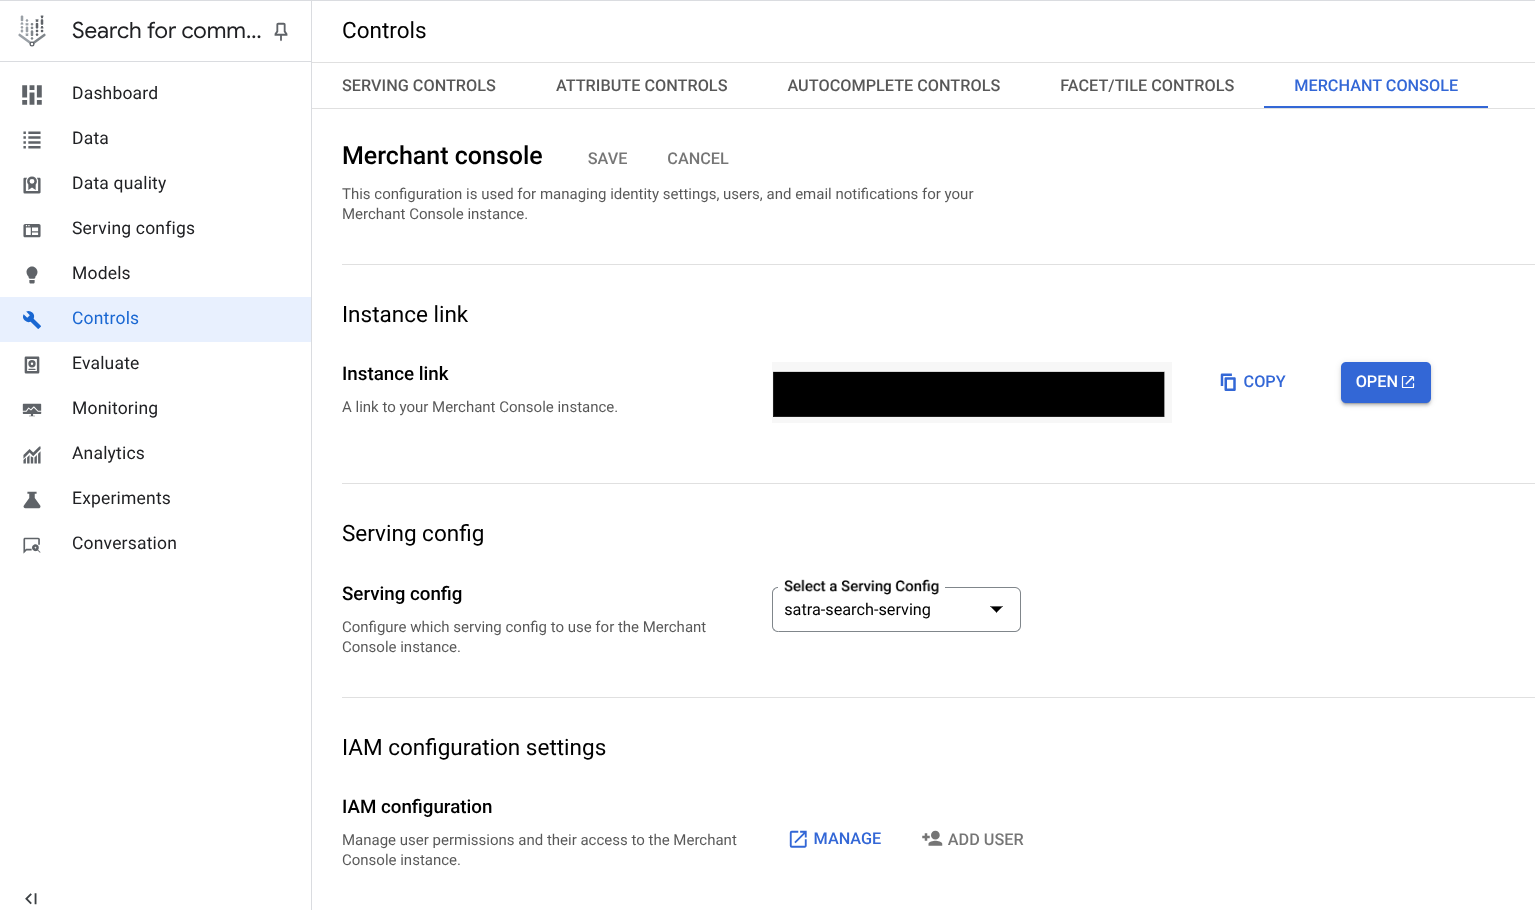
Then, initialize the Merchandising console by accessing the Merchandising console tab within the Google Cloud console:
You need these IAM roles to access, edit, and assign Creator or Approver roles to a Merchandising console user:
- To edit the Merchandising console, at least the Retail Editor role is required.
- To assign Creator or Approver roles to a user, a project-level IAM admin role is required.
For a complete layout of IAM project-level and Vertex AI Search for commerce permissions, refer to the [Predefined administrator roles](/retail/docs/iam#roles) section in this [Vertex AI Search for commerce product](/retail/docs/iam) documentation.
Onboard Merchandising console users
If you're a Google Cloud console administrator, to give site merchandisers access to the Merchandising console and assign either a Creator or an Approver role to them:
-
Go to the Controls page in the Search for commerce console.
Go to the Controls page - Navigate to the Merchandising console tab.
- ou can see the unique URL to the Merchandising console associated with the current Google Cloud project. Copy the link or directly open it in the Google Cloud console.
- Select the default serving config merchandisers will use to Preview and Attach approved controls.
- Give users either Approver or Creator roles.
- You can see the unique URL to the Merchandising console associated with the current Google Cloud project. Copy the link or directly open it in the Google Cloud console.
- Select the default serving config for Preview in the Merchandising console.
- (Optional) Edit access to the Merchandising console using these functions:
- Add users: Give users Approver or Creator access to the Merchandising console.
- Delete users: Revoke access to the Merchandising console by deleting Approvers or Creators.
- Add approver emails. For each control submitted by merchandisers, the approver emails list will receive an email to review and approve this control.
Access the console as a user
If you have been given access with the URL, you have the option of using the Merchandising console instead of the standard Google Cloud console. To create controls using the Merchandising console:
- Sign in using the credentials that your administrator provides you.
- Follow the Merchandising console documentation steps under each serving control section.
- After submission, you receive a notification email with the subject [Merchant Console] Proposed control awaiting review.
- As an Approver, you can accept, deny, or change the control request.
Use the console as a site merchandiser
Follow these steps to get started in the Merchandising console as a site merchandiser.
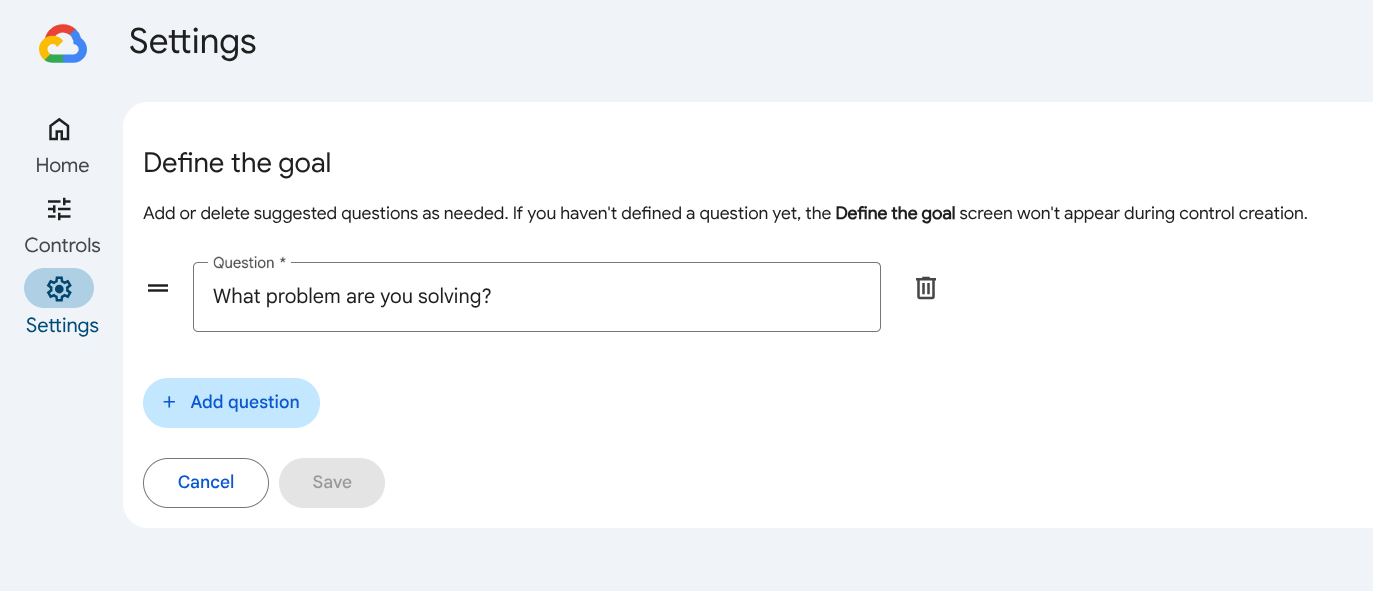
- Set approval flow for questions.
- Navigate to the settingsSettings part of the main menu.
- By default, a predefined list of questions are set in Define the goal screen.
- Add a question by clicking add_boxAdd question to help Approvers understand the purpose of the new controls.
- Click Save to save the questions.
- Create a control.
- Go to the Controls section.
- Click add_boxCreate control.
- Define the goal: All questions previously defined are required to be answered. If you haven't defined any questions yet, this screen won't appear.
- Select a control. Specify the control type and assign a name to the control.
- Set rules: For each rule, you can define triggers and actions.
- Define Triggers: The goal is to establish when to apply this control.
- Query terms: This rule can be triggered when your search query contains or exactly matches specific terms. You can define these query terms.
- Applicable time ranges: Time restrictions can be applied to confine the activation of this rule to specific time periods.
- Define actions: Depending on the type of control, you can define actions, such as Item ID and position for a pinning control.
- Preview a rule: A dynamic preview of the rule can be seen on the screen.
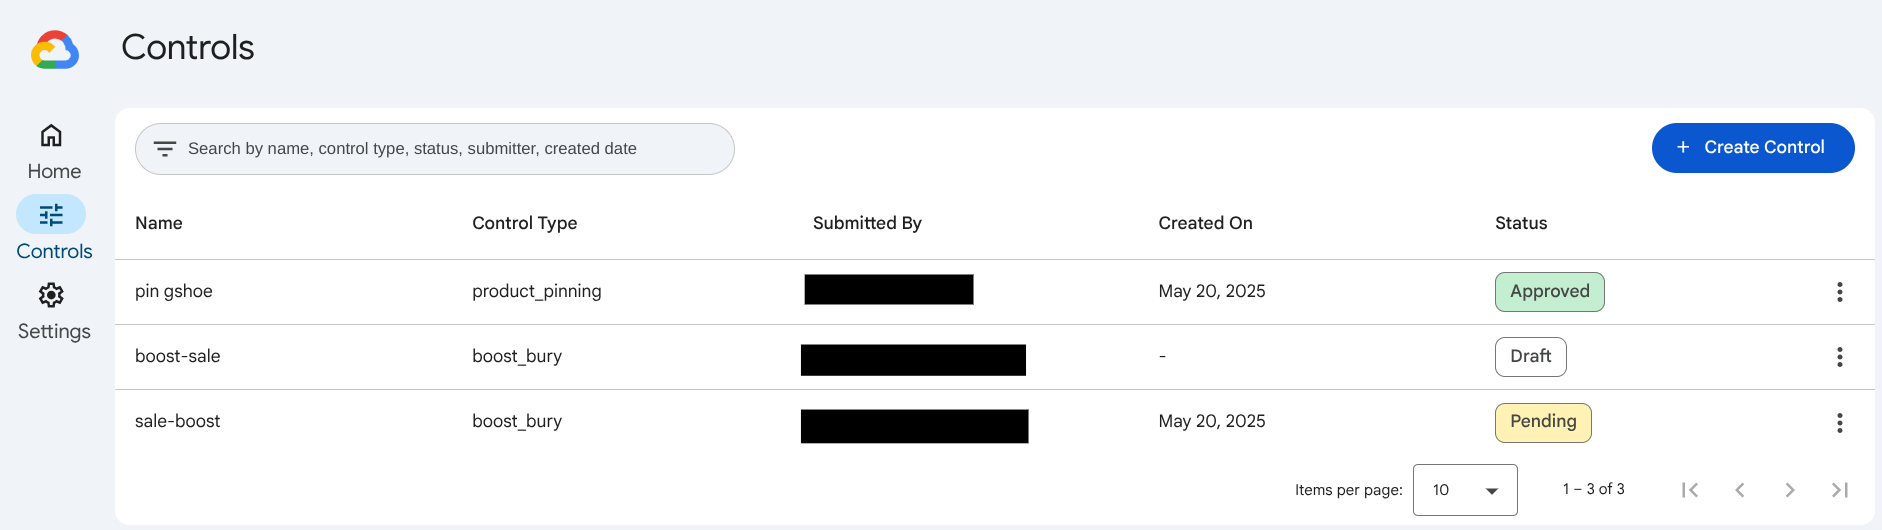
- Submit a rule: After you click Submit to submit the rule set by the merchandiser, you can view the control as Pending in the controls list.
- Approve a control
- To grant approval for a control, click the more_vertMore icon next to the control in the control list. Select Review.
- A screen is provided for the given control where you can Approve, Deny, or Approve with edits.
-
After approval, you are redirected to the controls list page that shows the control as Approved.
Merchandising console stages
Control types
Controls have different requirements depending on their type. Go to the creation procedure for the control type you plan to create:
- Create a boost/bury control
- Create a filter control
- Create a redirect control
- Create a pinning control
- Create a two-way synonym control
- Create a one-way synonym control
- Create a do-not-associate control
- Create an ignore control
- Create a replacement control
Create a boost/bury control
This control type is available for search and recommendations.
See Boost/bury controls for more about this control type.
Create a search boost/bury control
To create a search boost/bury control:
Merchandising console
Click the URL provided by the administrator. Sign in.
This takes you to the Controls page in the Merchandising console.
Click add_boxCreate control.
Define the goals for your end users and timing required. All questions are required to be answered. Click Next.
Select a control. Enter the name for your control, select the Search product, then choose the control type Boost/Bury.
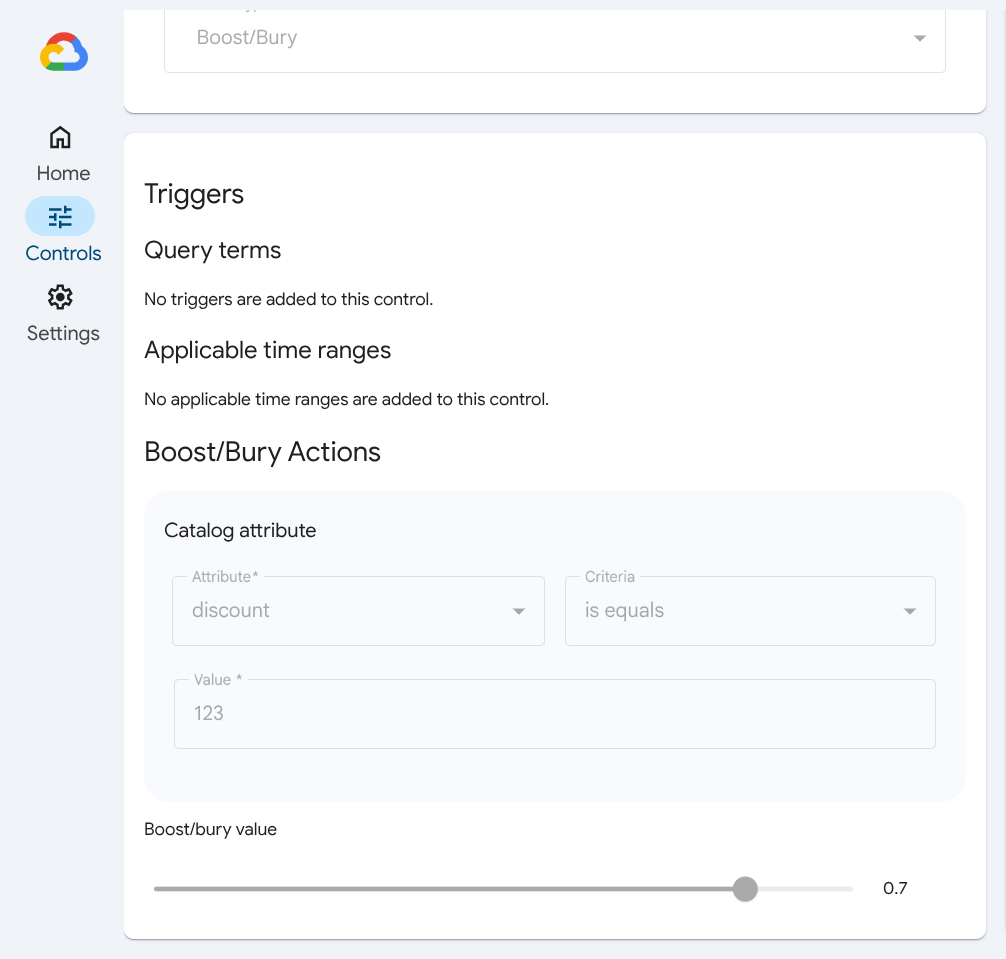
Configure your Boost/Bury control:
Under Triggers, define what catalog attribute triggers this control by giving criteria to a related search query, such as contains or not in range. If no catalog attribute has been configured, this control will always apply.
Define an Applicable time range by entering a Date range. If any of the specified time ranges are met, the catalog attribute will be matched with the query during any of the specified time ranges. Add a time range with add_boxAdd time range.
Define the Boost/Bury actions you want to trigger with this control. These actions are defined by a Catalog attribute such as colors, a Criteria such as contains, and Value such as red.
Click add_boxAdd attribute to add more attributes.
Use the slider to set your Boost/bury value. Negative numbers are bury, and positive numbers are boost.
Click Submit to submit your control request to an Approver. You will be able to see the status of submitted requests in the Merchandising Console. If you change your mind, you can delete your control request.
Cloud console
Go to the Controls page in the Search for commerce console.
Go to the Controls pageUnder the Serving controls tab, click add_boxCreate control.
The Create control pane opens.
In the Preferences section, in the Control name field, enter a name for your new control.
Optional: To change the automatically created control ID, click Edit and enter a new control ID.
In the Product selection section, select Search.
Choose Boost/bury controls as the control type. Click Continue
In the Triggers section, select what type of user behavior triggers this control.
Browse categories: The rule is triggered when a user browses categories on your site (
search.request.queryis empty).Search: The rule is triggered when a user searches on your site (
search.request.queryisn't empty). To set this control to trigger when any category is browsed, or any query is searched for, skip the following step.
Optional: Set specific categories or queries that can trigger this control depending on whether a specific category is browsed or a specific query is searched for.
If you chose Browse categories: In the Categories field, enter which categories will trigger this control when browsed.
If you chose Search: Click the Add query button to add query terms (for example,
running shoes) to be filtered. For each term, choose either Partial match or Full match.
Optional: Click the Add Time Range button to add one or more time ranges during which this control can be applied.
Click Continue to proceed to the Actions section.
Add filters for product attributes in the Boost/bury product field.
Use the filter expression syntax documented in Filtering and ordering. For example, to specify red and blue versions of "product1" and "product2":
(id: ANY("product1","product2")) AND
(colorFamily: ANY("Red","Blue"))
For Boost/bury value, use the slider to set the strength of the boost. Positive values boost the results, and negative values bury them. Click Continue.
In the Serving configs section, select which serving configs to apply the control to.
Submit your control settings.
It takes a few minutes for newly created or updated controls to be ready to serve live traffic. You can test if your changes have been applied on the console Evaluate page.
You can now find the new control listed on the Serving controls tab of the Controls page.
curl
Make a Control.create request with a control ID and an
instance of Control contained in the request body.
For field details, see the
Controls API reference and the
Controls.create API reference.
A boost/bury control can be triggered when a user browses categories on your
site (search.request.query is empty), or when a user
searches on your site (search.request.query isn't empty).
The following example shows fields for a browse-triggered control, where
searchSolutionUseCase is set to SEARCH_SOLUTION_USE_CASE_BROWSE.
curl -X POST \
     -H "Authorization: Bearer $(gcloud auth application-default print-access-token)" \
     -H "Content-Type: application/json; charset=utf-8" \
     --data '{
              "displayName": "DISPLAY_NAME",
              "solutionTypes": [ "SOLUTION_TYPE_SEARCH" ],
              "searchSolutionUseCase": [
                "SEARCH_SOLUTION_USE_CASE_BROWSE"
              ],
              "rule": {
                "condition": {
                  "pageCategories": [
                      "CATEGORY_ABC",
                      "CATEGORY_XYZ"
                  ],
                  "activeTimeRange": [
                    {
                      "startTime": "START_TIMESTAMP_1",
                      "endTime": "END_TIMESTAMP_1"
                    },
                    {
                      "startTime": "START_TIMESTAMP_2",
                      "endTime": "END_TIMESTAMP_2"
                    }
                  ]
                },
                "boostAction": {
                  "boost": BOOST_NUMBER,
                  "productsFilter": "FILTER_EXPRESSION"
                }
              }
    }' \
    "https://retail.googleapis.com/v2beta/projects/PROJECT_NUMBER/locations/global/catalogs/default_catalog/controls?controlId=CONTROL_ID"
The following example shows fields for a search-triggered control, where
searchSolutionUseCase is set to SEARCH_SOLUTION_USE_CASE_SEARCH.
curl -X POST \
     -H "Authorization: Bearer $(gcloud auth application-default print-access-token)" \
     -H "Content-Type: application/json; charset=utf-8" \
     --data '{
              "displayName": "DISPLAY_NAME",
              "solutionTypes": [ "SOLUTION_TYPE_SEARCH" ],
              "searchSolutionUseCase": [
                "SEARCH_SOLUTION_USE_CASE_SEARCH"
              ],
              "rule": {
                "condition": {
                  "queryTerms": [
                    {
                      "value": "VALUE_1",
                      "fullMatch": "FULLMATCH_BOOLEAN_1"
                    },
                    {
                      "value": "VALUE_2",
                      "fullMatch": "FULLMATCH_BOOLEAN_2"
                    }
                  ],
                  "activeTimeRange": [
                    {
                      "startTime": "START_TIMESTAMP_1",
                      "endTime": "END_TIMESTAMP_1"
                    },
                    {
                      "startTime": "START_TIMESTAMP_2",
                      "endTime": "END_TIMESTAMP_2"
                    }
                  ]
                },
                "boostAction": {
                  "boost": BOOST_NUMBER,
                  "productsFilter": "FILTER_EXPRESSION"
                }
              }
    }' \
    "https://retail.googleapis.com/v2beta/projects/PROJECT_NUMBER/locations/global/catalogs/default_catalog/controls?controlId=CONTROL_ID"
It takes a few minutes for newly created or updated controls to be ready to serve live traffic. You can test if your changes have been applied on the console Evaluate page.
To add a control to a serving config, use the ServingConfig.addControl
method:
For more about this method, see the
ServingConfig.addControlAPI reference.For an example of this method, see Manage serving configs.
Create a recommendations boost/bury control
To create a recommendations boost/bury control:
Cloud console
Go to the Controls page in the Search for commerce console.
Go to the Controls pageOn the Serving controls tab, click add_boxCreate control.
The Create control pane opens.
In the Preferences section, in the Control name field, enter a name for your new control.
(Optional) To change the automatically created control ID, click Edit and enter a new control ID.
In the Product selection section, select Recommendation.
Choose Boost/bury controls as the control type.
Click Continue to proceed to the Actions section.
Add filters for product attributes in the Boost/bury product field.
Use the filter expression syntax documented in Filter recommendations.
For example, to specify red and blue versions of "product1" and "product2":
(id: ANY("product1","product2")) AND (colorFamily: ANY("Red","Blue"))For Boost/bury value, use the slider to set the strength of the boost. Positive values boost the results, and negative values bury them.
Click Continue to proceed to the Serving configs section.
Select which serving configs to apply the control to.
Submit your control settings.
It takes a few minutes for newly created or updated controls to be ready to serve live traffic. You can test if your changes have been applied on the console Evaluate page.
You can find the new control listed on the Serving controls tab of the Controls page.
curl
Make a Control.create request with a control ID and an
instance of Control contained in the request body.
For field details, see the
Controls API reference and the
Controls.create API reference.
To create a filter expression, use the filter expression syntax documented in Filter recommendations.
curl -X POST \
     -H "Authorization: Bearer $(gcloud auth application-default print-access-token)" \
     -H "Content-Type: application/json; charset=utf-8" \
     --data '{
              "displayName": "DISPLAY_NAME",
              "solutionTypes": [ "SOLUTION_TYPE_RECOMMENDATION" ],
                "boostAction": {
                  "boost": BOOST_NUMBER,
                  "productsFilter": "FILTER_EXPRESSION"
                }
              }
    }' \
    "https://retail.googleapis.com/v2beta/projects/PROJECT_NUMBER/locations/global/catalogs/default_catalog/controls?controlId=CONTROL_ID"
It takes a few minutes for newly created or updated controls to be ready to serve live traffic. You can test if your changes have been applied on the console Evaluate page.
To add a control to a serving config, use the ServingConfig.addControl
method:
For more about this method, see the
ServingConfig.addControlAPI reference.For an example of this method, see Manage serving configs.
Create a filter control
See Filter controls for more about this control type.
Merchandising console
Click the URL provided by the administrator. Sign in.
This takes you to the Controls page in the Merchandising console.
Click add_boxCreate control.
Define the goals for your end users and timing required. All questions are required to be answered. Click Next.
Select a control. Enter the name for your control, select the Search or Browse product, then choose the control type Filter.
Configure your Filter control:
Under Triggers, define what catalog attribute triggers this control by giving criteria to a related search query or page category, such as contains or not in range. If no catalog attribute has been configured, this control will always apply.
Define an Applicable time range by entering a Date range. If any of the specified time ranges are met, the catalog attribute will be matched with the query during any of the specified time ranges. Add a time range with add_boxAdd time range.
Define the Filter actions you want to trigger with this control. These actions are defined by a Catalog attribute such as colors, a Criteria such as contains, and Value such as red.
Click add_boxAdd attribute to add more attributes.
Click Submit to submit your control request to an Approver. You will be able to see the status of submitted requests in the Merchandising Console. If you change your mind, you can delete your control request.
Cloud console
Go to the Controls page in the Search for commerce console.
Go to the Controls pageOn the Serving controls tab, click add_boxCreate control.
The Create control pane opens.
In the Preferences section, in the Control name field, enter a name for your new control.
Optional: To change the automatically created control ID, click Edit and enter a new control ID.
Choose Filter controls as the control type.
Click continue to proceed to the Triggers section.
Select what type of user behavior triggers this control:
Browse categories: The rule is triggered when a user browses categories on your site (
search.request.queryis empty).Search: The rule is triggered when a user searches on your site (
search.request.queryisn't empty).
Optional: Set a control condition that triggers the rule based on what category is browsed, or what query is searched for. The available option depends on if you chose Browse categories or Search:
If you chose Browse categories: In the Categories field, enter which categories will trigger this control when browsed.
If you chose Search: Click the Add query button to add query terms (for example,
running shoes) to be filtered, and select one of the following for each term:- Partial match: This control applies when a query contains a partial match to this query term.
- Full match: This control applies only when a query contains a full match to this query term.
When one of these terms is included in a query, the control is applied.
Optional: Click the Add Time Range button to add one or more time ranges during which this control can be applied.
Click Continue to proceed to the Actions section.
Add filters for product attributes in the Filter action field.
Use the filter expression syntax documented in Filtering and ordering.
For example, to specify red and blue versions of "product1" and "product2":
(id: ANY("product1","product2")) AND (colorFamily: ANY("Red","Blue"))Click Continue to proceed to the Serving configs section.
Select which serving configs to apply the control to.
Submit your control settings.
It takes a few minutes for newly created or updated controls to be ready to serve live traffic. You can test if your changes have been applied on the console Evaluate page.
You can find the new control listed on the Serving controls tab of the Controls page.
curl
Make a Control.create request with a control ID and an
instance of Control contained in the request body.
For field details, see the
Controls API reference and the
Controls.create API reference.
A filter control can be triggered when a user browses categories on your
site (search.request.query is empty), or when a user
searches on your site (search.request.query isn't empty).
The following example shows fields for a browse-triggered control, where
searchSolutionUseCase is set to SEARCH_SOLUTION_USE_CASE_BROWSE.
curl -X POST \
     -H "Authorization: Bearer $(gcloud auth application-default print-access-token)" \
     -H "Content-Type: application/json; charset=utf-8" \
     --data '{
              "displayName": "DISPLAY_NAME",
              "solutionTypes": [ "SOLUTION_TYPE_SEARCH" ],
              "searchSolutionUseCase": [
                "SEARCH_SOLUTION_USE_CASE_BROWSE"
              ],
              "rule": {
                "condition": {
                  "pageCategories": [
                      "CATEGORY_ABC",
                      "CATEGORY_XYZ"
                  ],
                  "activeTimeRange": [
                    {
                      "startTime": "START_TIMESTAMP_1",
                      "endTime": "END_TIMESTAMP_1"
                    },
                    {
                      "startTime": "START_TIMESTAMP_2",
                      "endTime": "END_TIMESTAMP_2"
                    }
                  ]
                },
                "filterAction": {
                  "filter": "FILTER_EXPRESSION"
                }
              }
    }' \
    "https://retail.googleapis.com/v2beta/projects/PROJECT_NUMBER/locations/global/catalogs/default_catalog/controls?controlId=CONTROL_ID"
The following example shows fields for a search-triggered control, where
searchSolutionUseCase is set to SEARCH_SOLUTION_USE_CASE_SEARCH.
curl -X POST \
     -H "Authorization: Bearer $(gcloud auth application-default print-access-token)" \
     -H "Content-Type: application/json; charset=utf-8" \
     --data '{
              "displayName": "DISPLAY_NAME",
              "solutionTypes": [ "SOLUTION_TYPE_SEARCH" ],
              "searchSolutionUseCase": [
                "SEARCH_SOLUTION_USE_CASE_SEARCH"
              ],
              "rule": {
                "condition": {
                  "pageCategories": [
                      "CATEGORY_ABC",
                      "CATEGORY_XYZ"
                  ],
                  "activeTimeRange": [
                    {
                      "startTime": "START_TIMESTAMP_1",
                      "endTime": "END_TIMESTAMP_1"
                    },
                    {
                      "startTime": "START_TIMESTAMP_2",
                      "endTime": "END_TIMESTAMP_2"
                    }
                  ]
                },
                "filterAction": {
                  "filter": "FILTER_EXPRESSION"
                }
              }
    }' \
    "https://retail.googleapis.com/v2beta/projects/PROJECT_NUMBER/locations/global/catalogs/default_catalog/controls?controlId=CONTROL_ID"
To add a control to a serving config, use the ServingConfig.addControl
method:
For more about this method, see the
ServingConfig.addControlAPI reference.For an example of this method, see Manage serving configs.
Create a redirect control
See Redirect controls for more about this control type.
Merchandising console
Click the URL provided by the administrator. Sign in.
This takes you to the Controls page in the Merchandising console.
Click add_boxCreate control.
Define the goals for your end users and timing required. All questions are required to be answered. Click Next.
Select a control. Enter the name for your control, select the Search product, then choose the control type Redirect.
Configure your Redirect control:
Under Triggers, define what catalog attribute triggers this control by giving criteria to a related search query, such as contains or not in range. If no catalog attribute has been configured, this control will always apply.
Define an Applicable time range by entering a Date range. If any of the specified time ranges are met, the catalog attribute will be matched with the query during any of the specified time ranges. Add a time range with add_boxAdd time range.
Define the Redirect actions you want to trigger with this control by entering the redirect URL.
Click Submit to submit your control request to an Approver. You will be able to see the status of submitted requests in the Merchandising Console. If you change your mind, you can delete your control request.
Cloud console
Go to the Controls page in the Search for commerce console.
Go to the Controls pageOn the Serving controls tab, click add_boxCreate control.
The Create control pane opens.
In the Preferences section, in the Control name field, enter a name for your new control.
Optional: To change the automatically created control ID, click Edit and enter a new control ID.
Choose Redirect controls as the control type.
Click continue to proceed to the Triggers section.
Create at least one query term or time range trigger. Redirect controls require at least one trigger:
Select what type of user behavior triggers this control:
Browse categories: The rule is triggered when a user browses categories on your site (
search.request.queryis empty).Search: The rule is triggered when a user searches on your site (
search.request.queryisn't empty).
Set a control condition that triggers the rule based on what category is browsed, or what query is searched for. The available option depends on if you chose Browse categories or Search:
If you chose Browse categories: In the Categories field, enter which categories will trigger this control when browsed.
If you chose Search: Click the Add query button to add query terms (for example,
running shoes) to be filtered, and select one of the following for each term:- Partial match: This control applies when a query contains a partial match to this query term.
- Full match: This control applies only when a query contains a full match to this query term.
When one of these terms is included in a query, the control is applied.
Click the Add Time Range button to add one or more time ranges during which this control can be applied.
Click Continue to proceed to the Actions section.
Enter the URI to redirect to when this control is triggered.
Click Continue to proceed to the Serving configs section.
Select which serving configs to apply the control to.
Submit your control settings.
It takes a few minutes for newly created or updated controls to be ready to serve live traffic. You can test if your changes have been applied on the console Evaluate page.
You can find the new control listed on the Serving controls tab of the Controls page.
curl
Make a Control.create request with a control ID and an
instance of Control contained in the request body.
For field details, see the
Controls API reference and the
Controls.create API reference.
A redirect control can be triggered when a user browses categories on your
site (search.request.query is empty), or when a user
searches on your site (search.request.query isn't empty).
The following example shows fields for a browse-triggered control, where
searchSolutionUseCase is set to SEARCH_SOLUTION_USE_CASE_BROWSE.
curl -X POST \
     -H "Authorization: Bearer $(gcloud auth application-default print-access-token)" \
     -H "Content-Type: application/json; charset=utf-8" \
     --data '{
              "displayName": "DISPLAY_NAME",
              "solutionTypes": [ "SOLUTION_TYPE_SEARCH" ],
              "searchSolutionUseCase": [
                "SEARCH_SOLUTION_USE_CASE_BROWSE"
              ],
              "rule": {
                "condition": {
                  "queryTerms": [
                    {
                      "value": "VALUE_1",
                      "fullMatch": "FULLMATCH_BOOLEAN_1"
                    },
                    {
                      "value": "VALUE_2",
                      "fullMatch": "FULLMATCH_BOOLEAN_2"
                    }
                  ],
                  "activeTimeRange": [
                    {
                      "startTime": "START_TIMESTAMP_1",
                      "endTime": "END_TIMESTAMP_1"
                    },
                    {
                      "startTime": "START_TIMESTAMP_2",
                      "endTime": "END_TIMESTAMP_2"
                    }
                  ]
                },
                "redirectAction": {
                  "redirectUri": "REDIRECT_URI",
                }
              }
    }' \
    "https://retail.googleapis.com/v2beta/projects/PROJECT_NUMBER/locations/global/catalogs/default_catalog/controls?controlId=CONTROL_ID"
The following example shows fields for a search-triggered control, where
searchSolutionUseCase is set to SEARCH_SOLUTION_USE_CASE_SEARCH.
curl -X POST \
     -H "Authorization: Bearer $(gcloud auth application-default print-access-token)" \
     -H "Content-Type: application/json; charset=utf-8" \
     --data '{
              "displayName": "DISPLAY_NAME",
              "solutionTypes": [ "SOLUTION_TYPE_SEARCH" ],
              "searchSolutionUseCase": [
                "SEARCH_SOLUTION_USE_CASE_SEARCH"
              ],
              "rule": {
                "condition": {
                  "queryTerms": [
                    {
                      "value": "VALUE_1",
                      "fullMatch": "FULLMATCH_BOOLEAN_1"
                    },
                    {
                      "value": "VALUE_2",
                      "fullMatch": "FULLMATCH_BOOLEAN_2"
                    }
                  ],
                  "activeTimeRange": [
                    {
                      "startTime": "START_TIMESTAMP_1",
                      "endTime": "END_TIMESTAMP_1"
                    },
                    {
                      "startTime": "START_TIMESTAMP_2",
                      "endTime": "END_TIMESTAMP_2"
                    }
                  ]
                },
                "redirectAction": {
                  "redirectUri": "REDIRECT_URI",
                }
              }
    }' \
    "https://retail.googleapis.com/v2beta/projects/PROJECT_NUMBER/locations/global/catalogs/default_catalog/controls?controlId=CONTROL_ID"
To add a control to a serving config, use the ServingConfig.addControl
method:
For more about this method, see the
ServingConfig.addControlAPI reference.For an example of this method, see Manage serving configs.
Create a two-way synonym control
See Two-way synonym controls for more about this control type.
Merchandising console
Click the URL provided by the administrator. Sign in.
This takes you to the Controls page in the Merchandising console.
Click add_boxCreate control.
Define the goals for your end users and timing required. All questions are required to be answered. Click Next.
Select a control. Enter the name for your control, select the Search product, then choose the control type Synonyms.
Configure your Two-way synonym control:
Under Triggers, define what catalog attribute triggers this control by giving criteria to a related search query, such as contains or not in range. If no catalog attribute has been configured, this control will always apply.
Define an Applicable time range by entering a Date range. If any of the specified time ranges are met, the catalog attribute will be matched with the query during any of the specified time ranges. Add a time range with add_boxAdd time range.
Define the Synonym type you want to trigger with this control. Select Two-way. See the section on Synonyms for more information on synonym types.
Click Submit. This takes you to a detailed Two-way synonym configuration screen.
Enter the synonyms in the field under Two-way synonym actions. This action links terms together bidirectionally to be treated the same in search results, so that a red sofa query results in red maroon sofa but maroon sofa queries are expanded to include all types of red sofas, such as crimson or pink.
Submit again to send your control request to an Approver. You will be able to see the status of submitted requests in the Merchandising Console. If you change your mind, you can delete your control request.
Cloud console
Go to the Controls page in the Search for commerce console.
Go to the Controls pageOn the Serving controls tab, click add_boxCreate control.
In the Control name field, enter a name for your new control.
The Create control pane opens.
You will be in the Preferences section.
Optional: To change the automatically created control ID, click Edit and enter a new control ID.
Choose Two-way synonym control as the control type.
Click continue to proceed to the Triggers section.
Optional: Click the Add Time Range button to add one or more time ranges during which this control can be applied.
Click Continue to proceed to the Actions section.
In the Synonyms field, enter 2 to 100 query terms (for example,
shirtandtop) that should be synonyms of each other.When any one of these terms is included in a query, search considers the other query terms as synonyms of the included term.
Click Continue to proceed to the Serving configs section.
Select which serving configs to apply the control to.
Submit your control settings.
It takes a few minutes for newly created or updated controls to be ready to serve live traffic. You can test if your changes have been applied on the console Evaluate page.
You can find the new control listed on the Serving controls tab of the Controls page.
curl
Make a Control.create request with a control ID and an
instance of Control contained in the request body.
For field details, see the
Controls API reference and the
Controls.create API reference.
curl -X POST \
     -H "Authorization: Bearer $(gcloud auth application-default print-access-token)" \
     -H "Content-Type: application/json; charset=utf-8" \
     --data '{
              "displayName": "DISPLAY_NAME",
              "solutionTypes": [ "SOLUTION_TYPE_SEARCH" ],
              "rule": {
                "condition": {
                  "activeTimeRange": [
                    {
                      "startTime": "START_TIMESTAMP_1",
                      "endTime": "END_TIMESTAMP_1"
                    },
                    {
                      "startTime": "START_TIMESTAMP_2",
                      "endTime": "END_TIMESTAMP_2"
                    }
                    ]
                },
                "twoWaySynonymAction": {
                  "synonyms": [
                    "SYNONYM_1",
                    "SYNONYM_2"
                  ]
                }
              }
    }' \
    "https://retail.googleapis.com/v2beta/projects/PROJECT_NUMBER/locations/global/catalogs/default_catalog/controls?controlId=CONTROL_ID"
To add a control to a serving config, use the
ServingConfig.addControl method. See
Add controls to serving configs inline.
Create a one-way synonym control
See One-way synonym controls for more about this control type.
Merchandising console
Click the URL provided by the administrator. Sign in.
This takes you to the Controls page in the Merchandising console.
Click add_boxCreate control.
Define the goals for your end users and timing required. All questions are required to be answered. Click Next.
Select a control. Enter the name for your control, select the Search product, then choose the control type Synonyms.
Configure your One-way synonym control:
Under Triggers, define what catalog attribute triggers this control by giving criteria to a related search query, such as contains or not in range. If no catalog attribute has been configured, this control will always apply.
Define an Applicable time range by entering a Date range. If any of the specified time ranges are met, the catalog attribute will be matched with the query during any of the specified time ranges. Add a time range with add_boxAdd time range.
Define the Synonym type you want to trigger with this control. Select One-way. See the section on Synonyms for more information on synonym types.
Click Submit. This takes you to a detailed One-way synonym configuration screen.
Enter your synonyms in the field under One-way synonym actions. This action links terms together unidirectionally to be treated the same in search results, so that a red sofa query includes maroon sofas, but a maroon sofa query does not return other types of red sofas, restricting the results to only maroon sofas.
Click Submit again to send your control request to an Approver. You will be able to see the status of submitted requests in the Merchandising Console. If you change your mind, you can delete your control request.
Cloud console
Go to the Controls page in the Search for commerce console.
Go to the Controls pageOn the Serving controls tab, click add_boxCreate control.
The Create control pane opens.
In the Preferences section, in the Control name field, enter a name for your new control.
Optional: To change the automatically created control ID, click Edit and enter a new control ID.
Choose One-way synonym control as the control type.
Click continue to proceed to the Triggers section.
Optional: Click the Add Time Range button to add one or more time ranges during which this control can be applied.
Click Continue to proceed to the Actions section.
In the Query terms field, enter terms (for example,
shoes) that should have synonyms associated with them when any of them is included in a query.In the Synonyms field, enter terms that should be used as synonyms for the query terms you specified (for example,
sneakersandsandalsas one-way synonyms for the query termshoes).Click Continue to proceed to the Serving configs section.
Select which serving configs to apply the control to.
Submit your control settings.
It takes a few minutes for newly created or updated controls to be ready to serve live traffic. You can test if your changes have been applied on the console Evaluate page.
You can find the new control listed on the Serving controls tab of the Controls page.
curl
Make a Control.create request with a control ID and an
instance of Control contained in the request body.
For field details, see the
Controls API reference and the
Controls.create API reference.
curl -X POST \
     -H "Authorization: Bearer $(gcloud auth application-default print-access-token)" \
     -H "Content-Type: application/json; charset=utf-8" \
     --data '{
              "displayName": "DISPLAY_NAME",
              "solutionTypes": [ "SOLUTION_TYPE_SEARCH" ],
              "rule": {
                "condition": {
                  "activeTimeRange": [
                    {
                      "startTime": "START_TIMESTAMP_1",
                      "endTime": "END_TIMESTAMP_1"
                    },
                    {
                      "startTime": "START_TIMESTAMP_2",
                      "endTime": "END_TIMESTAMP_2"
                    }
                  ]
                },
                "oneWaySynonymAction": {
                  "synonyms": [
                    "queryTerms": [
                      "QUERY_TERM_1",
                      "QUERY_TERM_2"
                    ],
                    "synonyms": [
                      "SYNONYM_1",
                      "SYNONYM_2"
                    ]
                  ]
                }
              }
    }' \
    "https://retail.googleapis.com/v2beta/projects/PROJECT_NUMBER/locations/global/catalogs/default_catalog/controls?controlId=CONTROL_ID"
To add a control to a serving config, use the ServingConfig.addControl
method:
For more about this method, see the
ServingConfig.addControlAPI reference.For an example of this method, see Manage serving configs.
Create a do-not-associate control
See Do-not-associate controls for more about this control type.
Merchandising console
Click the URL provided by the administrator. Sign in.
This takes you to the Controls page in the Merchandising console.
Click add_boxCreate control.
Define the goals for your end users and timing required. All questions are required to be answered. Click Next.
Select a control. Enter the name for your control, select the Search product, then choose the control type Do not associate.
Configure your Do-not-associate control:
Under Triggers, define what catalog attribute triggers this control by giving criteria to a related search query, such as contains or not in range. If no catalog attribute has been configured, this control will always apply.
Define an Applicable time range by entering a Date range. If any of the specified time ranges are met, the catalog attribute will be matched with the query during any of the specified time ranges. Add a time range with add_boxAdd time range.
Under Do not associate actions, specify the terms that should not be associated with the query terms you entered in the previous Triggers section. Enter them into the query terms and disassociated terms fields, respectively.
Click Submit to send your control request to an Approver. You will be able to see the status of submitted requests in the Merchandising Console. If you change your mind, you can delete your control request.
Cloud console
Go to the Controls page in the Search for commerce console.
Go to the Controls pageOn the Serving controls tab, click add_boxCreate control.
The Create control pane opens.
In the Preferences section, in the Control name field, enter a name for your new control.
Optional: To change the automatically created control ID, click Edit and enter a new control ID.
Choose Do not associate control as the control type.
Click continue to proceed to the Triggers section.
Optional: Click the Add Time Range button to add one or more time ranges during which this control can be applied.
Click Continue to proceed to the Actions section.
In the Query terms field, enter terms (for example,
gShoe) that you want to explicitly disambiguate from others.In the Dissociated terms field, enter terms that to be disassociated from search results with the query terms you have specified.
For example, you can dissociate the query term
gShoefrom the termcheap.Click Continue to proceed to the Serving configs section.
Select which serving configs to apply the control to.
Submit your control settings.
It takes a few minutes for newly created or updated controls to be ready to serve live traffic. You can test if your changes have been applied on the console Evaluate page.
You can find the new control listed on the Serving controls tab of the Controls page.
curl
Make a Control.create request with a control ID and an
instance of Control contained in the request body.
For field details, see the
Controls API reference and the
Controls.create API reference.
curl -X POST \
     -H "Authorization: Bearer $(gcloud auth application-default print-access-token)" \
     -H "Content-Type: application/json; charset=utf-8" \
     --data '{
              "displayName": "DISPLAY_NAME",
              "solutionTypes": [ "SOLUTION_TYPE_SEARCH" ],
              "rule": {
                "condition": {
                  "activeTimeRange": [
                    {
                      "startTime": "START_TIMESTAMP_1",
                      "endTime": "END_TIMESTAMP_1"
                    },
                    {
                      "startTime": "START_TIMESTAMP_2",
                      "endTime": "END_TIMESTAMP_2"
                    }
                  ]
                },
                "doNotAssociateAction": {
                    "queryTerms": [
                      "QUERY_TERM_1",
                      "QUERY_TERM_2"
                    ],
                    "doNotAssociateTerms": [
                      "DISSOCIATED_TERM_1",
                      "DISSOCIATED_TERM_2"
                    ]
                  ]
                }
              }
    }' \
    "https://retail.googleapis.com/v2beta/projects/PROJECT_NUMBER/locations/global/catalogs/default_catalog/controls?controlId=CONTROL_ID"
To add a control to a serving config, use the ServingConfig.addControl
method:
For more about this method, see the
ServingConfig.addControlAPI reference.For an example of this method, see Manage serving configs.
Create an ignore control
See Ignore controls for more about this control type.
Merchandising console
Click the URL provided by the administrator. Sign in.
This takes you to the Controls page in the Merchandising console.
Click add_boxCreate control.
Define the goals for your end users and timing required. All questions are required to be answered. Click Next.
Select a control. Enter the name for your control, select the Search product, then choose the control type Ignore.
Configure your Ignore control:
Under Triggers, define what catalog attribute triggers this control by giving criteria to a related search query, such as contains or not in range. If no catalog attribute has been configured, this control will always apply.
Define an Applicable time range by entering a Date range. If any of the specified time ranges are met, the catalog attribute will be matched with the query during any of the specified time ranges. Add a time range with add_boxAdd time range.
Enter the terms you want to have ignored under Ignore actions.
Click Submit to submit your control request to an Approver. You will be able to see the status of submitted requests in the Merchandising Console. If you change your mind, you can delete your control request.
Cloud console
Go to the Controls page in the Search for commerce console.
Go to the Controls pageOn the Serving controls tab, click add_boxCreate control.
The Create control pane opens.
In the Preferences section, in the Control name field, enter a name for your new control.
Optional: To change the automatically created control ID, click Edit and enter a new control ID.
Choose Do not associate control as the control type.
Click continue to proceed to the Triggers section.
Optional: Click the Add Time Range button to add one or more time ranges during which this control can be applied.
Click Continue to proceed to the Actions section.
In the Ignore terms field, enter terms (for example,
shoddy) that you want a search to ignore when they are entered as query terms.Click Continue to proceed to the Serving configs section.
Select which serving configs to apply the control to.
Submit your control settings.
It takes a few minutes for newly created or updated controls to be ready to serve live traffic. You can test if your changes have been applied on the console Evaluate page.
You can find the new control listed on the Serving controls tab of the Controls page.
curl
Make a Control.create request with a control ID and an
instance of Control contained in the request body.
For field details, see the
Controls API reference and the
Controls.create API reference.
curl -X POST \
     -H "Authorization: Bearer $(gcloud auth application-default print-access-token)" \
     -H "Content-Type: application/json; charset=utf-8" \
     --data '{
              "displayName": "DISPLAY_NAME",
              "solutionTypes": [ "SOLUTION_TYPE_SEARCH" ],
              "rule": {
                "condition": {
                  "activeTimeRange": [
                    {
                      "startTime": "START_TIMESTAMP_1",
                      "endTime": "END_TIMESTAMP_1"
                    },
                    {
                      "startTime": "START_TIMESTAMP_2",
                      "endTime": "END_TIMESTAMP_2"
                    }
                  ]
                },
                "ignoreAction": {
                  "ignoreTerms": [
                      "IGNORE_TERM_1",
                      "IGNORE_TERM_2"
                    ]
                  ]
                }
              }
    }' \
    "https://retail.googleapis.com/v2beta/projects/PROJECT_NUMBER/locations/global/catalogs/default_catalog/controls?controlId=CONTROL_ID"
To add a control to a serving config, use the ServingConfig.addControl
method:
For more about this method, see the
ServingConfig.addControlAPI reference.For an example of this method, see Manage serving configs.
Create a replacement control
See Replacement controls for more about this control type.
Merchandising console
Click the URL provided by the administrator. Sign in.
This takes you to the Controls page in the Merchandising console.
Click add_boxCreate control.
Define the goals for your end users and timing required. All questions are required to be answered. Click Next.
Select a control. Enter the name for your control, select the Search product, then choose the control type Replacement.
Configure your Replacement control:
Under Triggers, define what catalog attribute triggers this control by giving criteria to a related search query, such as contains or not in range. If no catalog attribute has been configured, this control will always apply.
Define an Applicable time range by entering a Date range. If any of the specified time ranges are met, the catalog attribute will be matched with the query during any of the specified time ranges. Add a time range with add_boxAdd time range.
Under Replacement actions, define the query terms you want replaced in the first field, and their substitutes in the second field.
Click Submit to send your control request to an Approver. You will be able to see the status of submitted requests in the Merchandising Console. If you change your mind, you can delete your control request.
Cloud console
Go to the Controls page in the Search for commerce console.
Go to the Controls pageOn the Serving controls tab, click add_boxCreate control.
The Create control pane opens.
In the Preferences section, in the Control name field, enter a name for your new control.
Optional: To change the automatically created control ID, click Edit and enter a new control ID.
Choose Replacement control as the control type.
Click continue to proceed to the Triggers section.
Optional: Click the Add Time Range button to add one or more time ranges during which this control can be applied.
Click Continue to proceed to the Actions section.
In the Query terms field, enter query terms (for example,
gShoe) that you want to have replaced by the replacement term.In the Replacement term field, enter the term that should replace the query terms you specified.
For example, you can replace the query term
gShoewith the replacement termGoogle Shoe.Click Continue to proceed to the Serving configs section.
Select which serving configs to apply the control to.
Submit your control settings.
It takes a few minutes for newly created or updated controls to be ready to serve live traffic. You can test if your changes have been applied on the console Evaluate page.
You can find the new control listed on the Serving controls tab of the Controls page.
curl
Make a Control.create request with a control ID and an
instance of Control contained in the request body.
For field details, see the
Controls API reference and the
Controls.create API reference.
curl -X POST \
     -H "Authorization: Bearer $(gcloud auth application-default print-access-token)" \
     -H "Content-Type: application/json; charset=utf-8" \
     --data '{
              "displayName": "DISPLAY_NAME",
              "solutionTypes": [ "SOLUTION_TYPE_SEARCH" ],
              "rule": {
                "condition": {
                  "activeTimeRange": [
                    {
                      "startTime": "START_TIMESTAMP_1",
                      "endTime": "END_TIMESTAMP_1"
                    },
                    {
                      "startTime": "START_TIMESTAMP_2",
                      "endTime": "END_TIMESTAMP_2"
                    }
                  ]
                },
                "replacementAction": {
                    "queryTerms": [
                      "QUERY_TERM_1",
                      "QUERY_TERM_2"
                    ],
                    "replacementTerm": "REPLACEMENT_TERM"
                  }
                }
              }
    }' \
    "https://retail.googleapis.com/v2beta/projects/PROJECT_NUMBER/locations/global/catalogs/default_catalog/controls?controlId=CONTROL_ID"
To add a control to a serving config, use the ServingConfig.addControl
method:
For more about this method, see the
ServingConfig.addControlAPI reference.For an example of this method, see Manage serving configs.
Create a pinning control
To create a pinning control:
Merchandising console
Click the URL provided by the administrator. Sign in.
This takes you to the Controls page in the Merchandising console.
Click add_boxCreate control.
Define the goals for your end users and timing required. All questions are required to be answered. Click Next.
Select a control. Enter the name for your control, select the Search product, then choose the control type Pinning.
Configure your Pinning control:
Under Triggers, define what catalog attribute triggers this control by giving criteria to a related search query, such as contains or not in range. If no catalog attribute has been configured, this control will always apply.
Define an Applicable time range by entering a Date range. If any of the specified time ranges are met, the catalog attribute will be matched with the query during any of the specified time ranges. Add a time range with add_boxAdd time range.
Define the Pinning actions you want to trigger with this control. These actions are defined by Product ID and the pin position, preferably a number less than 120 (the typical page size). You can click add_boxAdd product and add up to 10.
Click Submit to submit your control request to an Approver. You will be able to see the status of submitted requests in the Merchandising Console. If you change your mind, you can delete your control request.
Cloud console
Go to the Controls page in the Search for commerce console.
Go to the Controls pageOn the Serving controls tab, click add_boxCreate control.
The Create control pane opens.
In the Control name field of the Preferences section, enter a name for your new control.
Optional: To change the automatically created control ID, click Edit and enter a new control ID.
In the Product selection section, select Search or Browse.
Choose Pinning control as the control type. Click Continue.
In the Triggers section, choose the user behavior that triggers this control:
Browse categories: Browse requests are required to have the
page_categoriesfield populated in addition to thesearch.request.querybeing empty.Search: Search requests require only the
search.request.queryto be populated.By default, all categories browsed and queries searched trigger this control.
Optional: Set a condition that triggers the rule based on a particular category browsed or query searched for:
Browse categories: In the Categories field, enter which categories trigger the control.
Search: To add query terms to be filtered (for example,
running shoes), click Add query. For each term, choose Partial match or Full match.
Optional: Click Add Time Range or Add Date Range to add one or more time ranges during which this control can be applied.
Click Continue to proceed to the Actions section. For Pin location, use the slider to specify which position the products are to be pinned to. The pin value slider won't accept values of 0, negative numbers, or non-integers.
Vertex AI Search for commerce allows 10 pins in the pin map of any single control. The position can be any value between 1 and 120 (the maximum request page size).
Click Continue to proceed to the Serving configs section. Select which serving configs to apply the control to, and submit your control settings.
It takes a few minutes for newly created or updated controls to be ready to serve live traffic. You can test if your changes have been applied on the console Evaluate page.
You can find the new control listed on the Serving controls tab of the Controls page.
curl
Make a Control.create request with a control ID and an
instance of Control contained in the request body.
For field details, see the
Controls API reference and the
Controls.create API reference.
curl -X POST \
 -H "Authorization: Bearer $(gcloud auth application-default print-access-token)" \
 -H "Content-Type: application/json; charset=utf-8" \
 -H "X-Goog-User-Project: PROJECT_NUMBER" \
 --data '{
          "displayName": "DisplayName",
          "solutionTypes": "SOLUTION_TYPE_SEARCH",
          "searchSolutionUseCase": ["SEARCH_SOLUTION_USE_CASE_SEARCH"],
     "rule": {
            "condition": {
 "queryTerms": [
                {
                  "value": "Term1",
                  "fullMatch": "boolean: true / false"
                },
                {
                  "value": "Term2",
                  "fullMatch": "boolean: true / false"
                },
             ],
             "activeTimeRange": [
               {
                 "startTime": timestamp1,
                 "endTime": timestamp2
               },
               {
                 "startTime": timestamp3,
                 "endTime": timestamp4
               }
             ]
            },
            "pinAction": {
               "pinMap" :  {
                        "pin_position1": "product_id",
                      "pin_position2": "product_id>"
                    }
            }
              }
}' \
"https://retail.googleapis.com/v2alpha/projects/PROJECT_NUMBER/locations/LOCATION/catalogs/default_catalog/controls?controlId=CONTROL_ID"
The pin_position should be an integer between [1,10] inclusive and product_id must exist in your catalog. The maximum number of allowed elements in the pin map is 10 for each control.
Next, attach the pinning control to your serving config:
curl -X POST \
-H "Authorization: Bearer $(gcloud auth application-default print-access-token)" \
-H "Content-Type: application/json; charset=utf-8" \
-H "X-Goog-User-Project: PROJECT_NUMBER" \
-d '{
      "controlId": "CONTROL_ID"
  }' \
'https://retail.googleapis.com/v2alpha/projects/PROJECT_NUMBER/locations/LOCATION/catalogs/default_catalog/servingConfigs/SERVING_CONFIG_ID:addControl'
In this case, CONTROL_ID should be the pinning control id you created previously.
To add a control to a serving config, use the ServingConfig.addControl
method:
For more about this method, see the
ServingConfig.addControlAPI reference.For an example of this method, see Manage serving configs.
Finally, to test your setup, make a search request. To make sure that a request will have the pinning control applied successfully, use query terms (in search) or page categories (in browse) that match the terms/categories provided in the control you created in the preceding steps.
Cloud console
Go to the Evaluate page in the Search for commerce console.
Go to the Evaluate pageGo to the Search tab.
Enter a test query in the search query field.
Click Search preview.
View the results to ensure that your chosen products are pinned.
curl
curl -s -X POST -H "Authorization: Bearer" -H "Content-Type: application/json" --data "{'query': '','visitorId': ' \ "https://retail.googleapis.com/v2/projects/PROJECT/locations/global/catalogs/CATALOG/placements/default_search:search"'}"
Constraints for error checking
For error checking, keep these constraints in mind:
- Two products cannot be pinned to the same position, that is, products "a" and "b" cannot both occupy position #2.
- Conversely, one product cannot be pinned to more than one location, that is, product "a" cannot be pinned to positions #2 and #3 at the same time for the same query.
- The
product_idmust exist as a product in the catalog, assuming that no filters or sorting are applied.