Usage
explore: explore_name {
  aggregate_table: table_name {

    query:  {
      dimensions: [dimension1, dimension2, ... ]
      measures: [measure1, measure2, ... ]
      sorts: [field1: asc, field2: desc, ... ]
      filters: [field1: "value1", field2: "value2", ... ]
      timezone: timezone
    }

    materialization:  {
      ...
    }
  }

  ...

}
|
Hierarchy
aggregate_table |
Default Value
None
Accepts
A name for the aggregate table, the query subparameter to define the table, and the materialization subparameter to define the table's persistence strategy
Special Rules
|
Definition
The aggregate_table parameter is used to create aggregate tables that will minimize the number of queries required for the large tables in your database.
Looker uses aggregate awareness logic to find the smallest, most efficient aggregate table that's available in your database to run a query while still maintaining correctness. (See the Aggregate awareness documentation page for an overview of and strategies for creating aggregate tables.)
For very large tables in your database, you can create smaller aggregate tables of data, grouped by various combinations of attributes. The aggregate tables act as roll-ups or summary tables that Looker can use for queries whenever possible, instead of the original large table.
Once you create your aggregate tables, you can run queries in the Explore to see which aggregate tables Looker uses. For more information, see the Determining which aggregate table is used for a query section on the Aggregate awareness documentation page.
See the Troubleshooting section on the Aggregate awareness documentation page for common reasons that aggregate tables aren't used.
Defining an aggregate table in LookML
Each aggregate_table parameter must have a name that is unique within a given explore.
The aggregate_table parameter has the query and materialization subparameters.
query
The query parameter defines the query for the aggregate table, including which dimensions and measures to use. The query parameter includes the following subparameters:
| Parameter Name | Description | Example |
|---|---|---|
dimensions |
A comma-separated list of the dimensions from the Explore to be included in your aggregate table. The dimensions field uses this format: dimensions: [dimension1, dimension2, ...]
Each dimension in this list must be defined as a dimension in the view file for the query's Explore. If you want to include a field that is defined as a filter field in the Explore query, you can add it to the filters list in the aggregate table's query.
|
dimensions: [orders.created_month, orders.country] |
measures |
A comma-separated list of the measures from the Explore to be included in your aggregate table. The measures field uses this format: measures: [measure1, measure2, ...]
For information on the measure types supported for aggregate awareness, see the Measure type factors section on the Aggregate awareness documentation page.
|
measures: [orders.count] |
filters |
Optionally, adds a filter to a query. Filters are added to the WHERE clause of the SQL that generates the aggregate table.
The filters field uses this format: filters: [field1: "value1", field2: "value2", ...]
For information on how filters can prevent your aggregate table from being used, see the Filter factors section on the Aggregate awareness documentation page. |
filters: [orders.country: "United States", orders.state: "California"]
|
sorts |
Optionally, specifies sort fields and sort direction (ascending or descending) for the query.
The sorts field uses this format: sorts: [field1: asc|desc, field2: asc|desc, ...]
|
[orders.country: asc, orders.state: desc] |
timezone |
Sets the time zone for the query. If a time zone is not specified, the aggregate table won't perform any time zone conversion, and instead will use the database time zone.
For information on setting the time zone so that your aggregate table is used as a query source, see the Time zone factors section on the Aggregate awareness documentation page.
The IDE autosuggests the time zone value when you type the timezone parameter in the IDE. The IDE also displays the list of supported time zone values in the Quick Help panel. |
timezone: America/Los_Angeles |
materialization
The materialization parameter specifies the persistence strategy for your aggregate table, as well as other options for distribution, partitioning, indexes, and clustering that may be supported by your SQL dialect.
To be accessible for aggregate awareness, your aggregate table must be persisted in your database. The materialization parameter of your aggregate table must have one of the following subparameters to specify the persistence strategy:
datagroup_triggersql_trigger_valuepersist_for(not recommended)
In addition, the following materialization subparameters may be supported for your aggregate table, depending on your SQL dialect:
To create an incremental aggregate table, use the following materialization subparameters:
datagroup_trigger
Use the datagroup_trigger parameter to trigger the regeneration of the aggregate table based on an existing datagroup defined in the model file:
explore: event {
  aggregate_table: monthly_orders {
    materialization: {
      datagroup_trigger: order_datagroup
    }
    query: {
      ...
    }
  }
  ...
}
sql_trigger_value
Use the sql_trigger_value parameter to trigger the regeneration of the aggregate table based on a SQL statement that you provide. If the result of the SQL statement is different from the previous value, the table is regenerated. This sql_trigger_value statement will trigger regeneration when the date changes:
explore: event {
  aggregate_table: monthly_orders {
    materialization: {
      sql_trigger_value: SELECT CURDATE() ;;
    }
    query: {
      ...
    }
  }
  ...
}
persist_for
The persist_for parameter is also supported for aggregate tables. However, the persist_for strategy may not give you the best performance for aggregate awareness. This is because when a user runs a query that relies on a persist_for table, Looker checks the age of the table against the persist_for setting. If the table is older than the persist_for setting, the table is regenerated before the query is run. If the age is less than the persist_for setting, the existing table is used. So, unless a user runs a query within the persist_for time, the aggregate table must be rebuilt before it can be used for aggregate awareness.
explore: event {
  aggregate_table: monthly_orders {
    materialization: {
      persist_for: "90 minutes"
    }
    query: {
      ...
    }
  }
  ...
}
Unless you understand the limitations and have a specific use case for the persist_for implementation, it is better to use datagroup_trigger or sql_trigger_value as a persistence strategy for aggregate tables.
cluster_keys
The cluster_keys parameter lets you add a clustered column to partitioned tables on BigQuery or Snowflake. Clustering sorts the data in a partition that is based on the values in the clustered columns and organizes the clustered columns in optimally sized storage blocks.
See the cluster_keys parameter documentation page for more information.
distribution
The distribution parameter lets you specify the column from an aggregate table on which to apply a distribution key. distribution works only with Redshift and Aster databases. For other SQL dialects (such as MySQL and Postgres), use indexes instead.
See the distribution parameter documentation page for more information.
distribution_style
The distribution_style parameter lets you specify how the query for an aggregate table is distributed across the nodes in a Redshift database:
distribution_style: allindicates that all rows are fully copied to each node.distribution_style: evenspecifies even distribution, so that rows are distributed to different nodes in a round-robin fashion.
See the distribution_style parameter documentation page for more information.
indexes
The indexes parameter lets you apply indexes to the columns of an aggregate table.
See the indexes parameter documentation page for more information.
partition_keys
The partition_keys parameter defines an array of columns by which the aggregate table will be partitioned. partition_keys supports database dialects that have the ability to partition columns. When a query is run that is filtered on a partitioned column, the database will scan only those partitions that include the filtered data, rather than scanning the entire table. partition_keys is supported only with Presto and BigQuery dialects.
See the partition_keys parameter documentation page for more information.
publish_as_db_view
The publish_as_db_view parameter lets you flag an aggregate table for querying outside of Looker. For aggregate tables with publish_as_db_view set to yes, Looker creates a stable database view on the database for the aggregate table. The stable database view is created on the database itself, so that it can be queried outside of Looker.
See the publish_as_db_view parameter documentation page for more information.
sortkeys
The sortkeys parameter lets you specify one or more columns of an aggregate table on which to apply a regular sort key.
See the sortkeys parameter documentation page for more information.
increment_key
You can create incremental PDTs in your project if your dialect supports them. An incremental PDT is a persistent derived table (PDT) that Looker builds by appending fresh data to the table, instead of rebuilding the table in its entirety. See the Incremental PDTs documentation page for more information.
Aggregate tables are a type of PDT, and they can be built incrementally by adding the increment_key parameter. The increment_key parameter specifies the time increment for which fresh data should be queried and appended to the aggregate table.
See the increment_key parameter documentation page for more information.
increment_offset
The increment_offset parameter defines the number of previous time periods (at the increment key's granularity) that will be rebuilt when appending data to the aggregate table. The increment_offset parameter is optional for incremental PDTs and aggregate tables.
See the increment_offset parameter documentation page for more information.
Getting aggregate table LookML from an Explore
As a shortcut, Looker developers can use an Explore query to create an aggregate table and then copy the LookML into the LookML project:
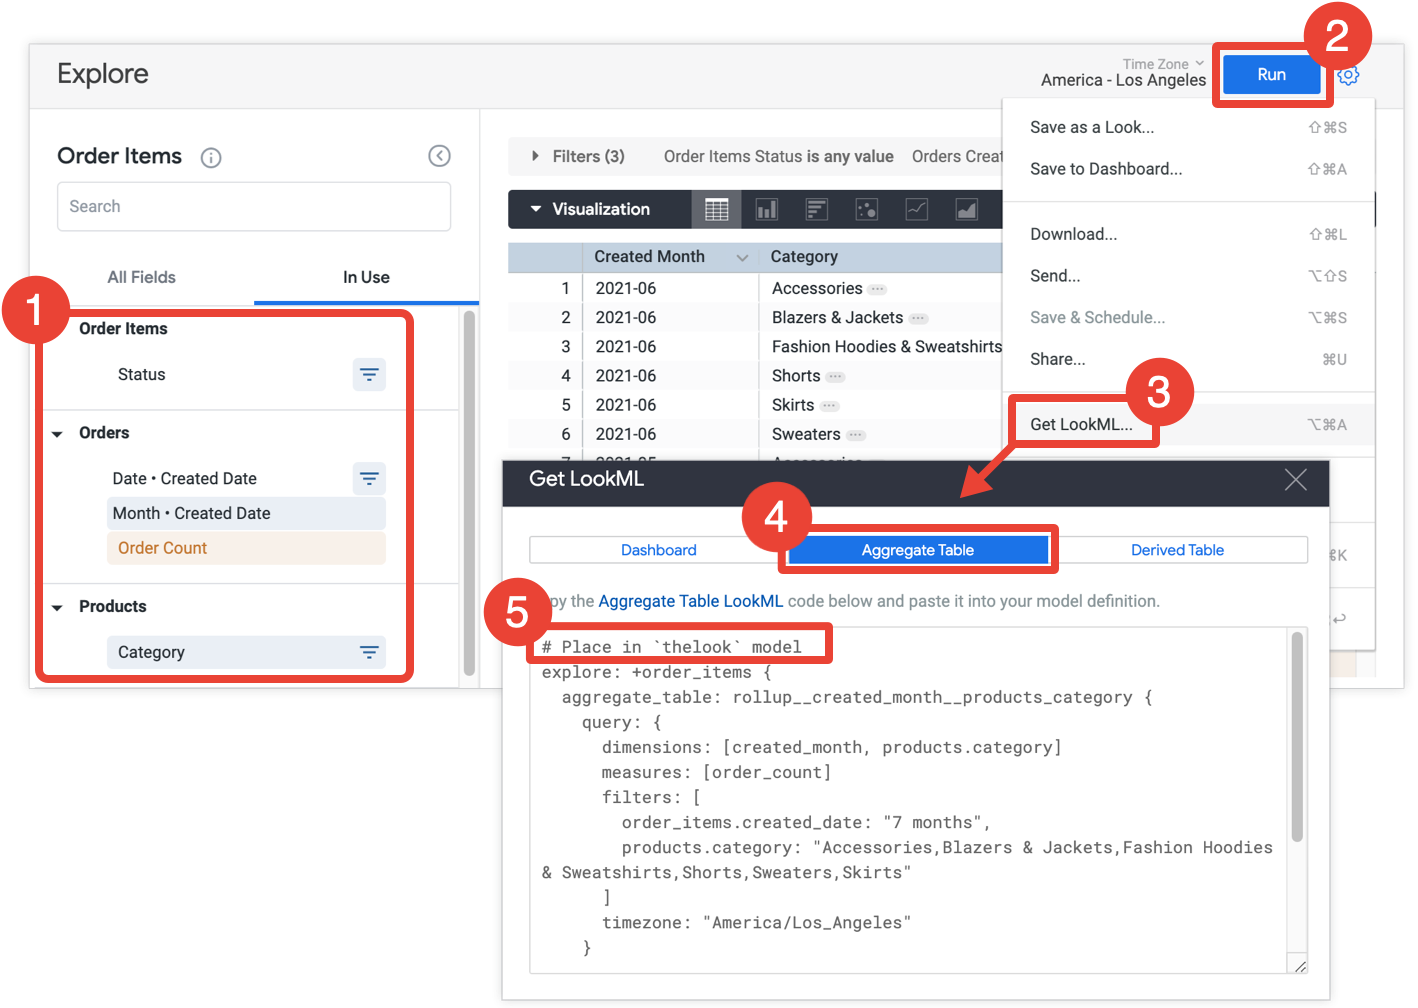
- In your Explore, select all the fields and filters that you want to include in your aggregate table.
- Click Run to get the results.
- Select Get LookML from the Explore's gear menu. This option is available for Looker developers only.
- Click the Aggregate Table tab.
- Looker provides the LookML for an Explore refinement that will add the aggregate table to the Explore. Copy the LookML and paste it into the associated model file, which is indicated in the comment that precedes the Explore refinement. If the Explore is defined in a separate Explore file, and not in a model file, you can add the refinement to the Explore's file instead of the model file. Either location will work.
If you need to modify the aggregate table LookML, you can do so with the parameters that are described in the Defining an aggregate table in LookML section on this page. You can rename the aggregate table without changing its applicability to the original Explore query. However, any other changes to the aggregate table may affect the ability for Looker to use the aggregate table for the Explore query. See the Designing aggregate tables section of the Aggregate awareness documentation page for tips on optimizing your aggregate tables to ensure that they are used for aggregate awareness.
Getting aggregate table LookML from a dashboard
Another option for Looker developers is to get the aggregate table LookML for all tiles on a dashboard and then copy the LookML into the LookML project.
Creating aggregate tables can drastically improve the performance of a dashboard, especially for tiles that query huge datasets.
If you have develop permission, you can get the LookML to create aggregate tables for a dashboard by opening the dashboard, selecting Get LookML from the dashboard's three-dot menu, and choosing the Aggregate Tables tab:
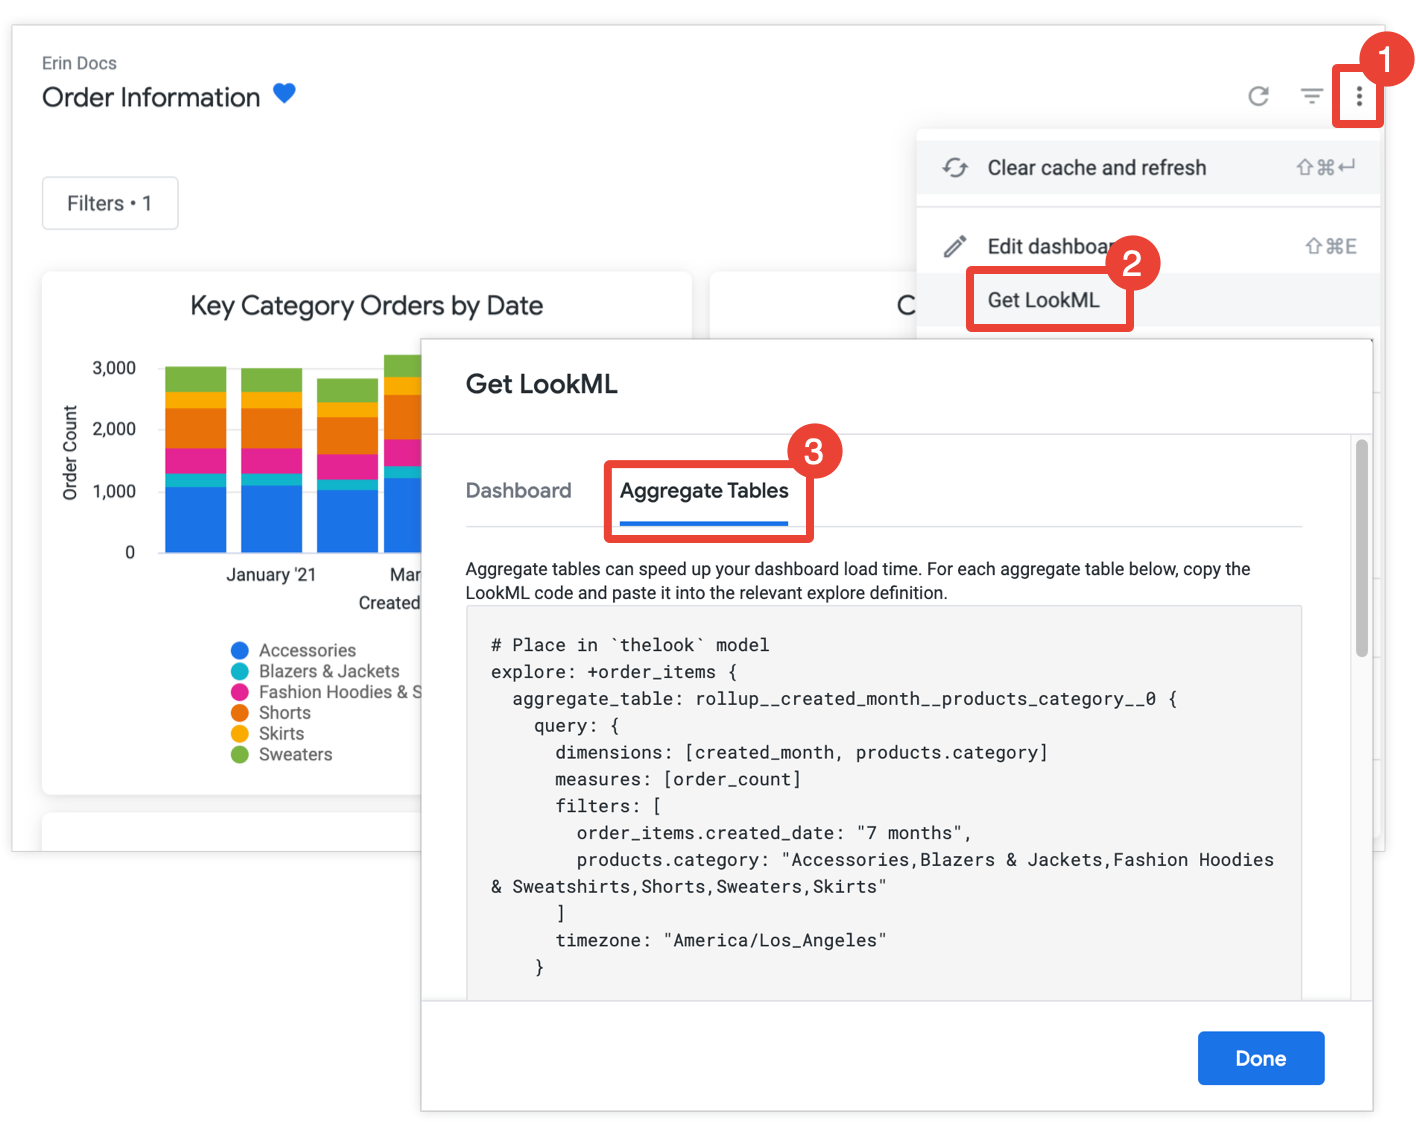
For each tile that isn't already optimized with aggregate awareness, Looker provides the LookML for an Explore refinement that will add the aggregate table to the Explore. If the dashboard includes multiple tiles from the same Explore, Looker puts all the aggregate tables in a single Explore refinement. To reduce the number of generated aggregate tables, Looker determines whether a generated aggregate table could be used for more than one tile and, if so, drops any redundant aggregate tables that can be used for fewer tiles.
Copy and paste each Explore refinement into the associated model file, which is indicated in the comment preceding the Explore refinement. If the Explore is defined in a separate Explore file, and not in a model file, you can add the refinement to the Explore file instead of the model file. Either location will work.
If a dashboard filter is applied to a tile, Looker will add the filter's dimension to the tile's aggregate table so that the aggregate table can be used for the tile. This is because aggregate tables can be used for a query only if the query's filters reference fields that are available as dimensions in the aggregate table. See the Aggregate awareness documentation page for information.
If you need to modify the aggregate table LookML, you can do so with the parameters that are described in the Defining an aggregate table in LookML section on this page. You can rename the aggregate table without changing its applicability to the original dashboard tile, but any other changes to the aggregate table may affect the ability for Looker to use the aggregate table for the dashboard. See the Designing aggregate tables section of the Aggregate awareness documentation page for tips on optimizing your aggregate tables to ensure that they are used for aggregate awareness.
Example
The following example creates a monthly_orders aggregate table for the event Explore. The aggregate table creates a monthly count of orders. Looker will use the aggregate table for order count queries that can leverage the monthly granularity, such as queries for yearly, quarterly, and monthly order counts.
The aggregate table is set up with persistence using the datagroup orders_datagroup. Also, the aggregate table is defined with publish_as_db_view: yes, which means that Looker will create a stable database view on the database for the aggregate table.
The aggregate table definition looks like the following:
explore: event {
  aggregate_table: monthly_orders {
    materialization: {
      datagroup_trigger: orders_datagroup
      publish_as_db_view: yes
    }
    query: {
      dimensions: [orders.created_month]
      measures: [orders.count]
      filters: [orders.created_date: "1 year", orders.status: "fulfilled"]
      timezone: America/Los_Angeles
    }
  }
}
Things to consider
See the Designing aggregate tables section of the Aggregate awareness documentation page for tips on strategically creating your aggregate tables:
Dialect support for aggregate awareness
The ability to use aggregate awareness depends on the database dialect that your Looker connection is using. In the latest release of Looker, the following dialects support aggregate awareness:
| Dialect | Supported? |
|---|---|
| Actian Avalanche | Yes |
| Amazon Athena | Yes |
| Amazon Aurora MySQL | Yes |
| Amazon Redshift | Yes |
| Amazon Redshift 2.1+ | Yes |
| Amazon Redshift Serverless 2.1+ | Yes |
| Apache Druid | No |
| Apache Druid 0.13+ | No |
| Apache Druid 0.18+ | No |
| Apache Hive 2.3+ | Yes |
| Apache Hive 3.1.2+ | Yes |
| Apache Spark 3+ | Yes |
| ClickHouse | No |
| Cloudera Impala 3.1+ | Yes |
| Cloudera Impala 3.1+ with Native Driver | Yes |
| Cloudera Impala with Native Driver | Yes |
| DataVirtuality | No |
| Databricks | Yes |
| Denodo 7 | No |
| Denodo 8 & 9 | No |
| Dremio | No |
| Dremio 11+ | No |
| Exasol | Yes |
| Google BigQuery Legacy SQL | Yes |
| Google BigQuery Standard SQL | Yes |
| Google Cloud PostgreSQL | Yes |
| Google Cloud SQL | No |
| Google Spanner | No |
| Greenplum | Yes |
| HyperSQL | No |
| IBM Netezza | Yes |
| MariaDB | Yes |
| Microsoft Azure PostgreSQL | Yes |
| Microsoft Azure SQL Database | Yes |
| Microsoft Azure Synapse Analytics | Yes |
| Microsoft SQL Server 2008+ | Yes |
| Microsoft SQL Server 2012+ | Yes |
| Microsoft SQL Server 2016 | Yes |
| Microsoft SQL Server 2017+ | Yes |
| MongoBI | No |
| MySQL | Yes |
| MySQL 8.0.12+ | Yes |
| Oracle | Yes |
| Oracle ADWC | Yes |
| PostgreSQL 9.5+ | Yes |
| PostgreSQL pre-9.5 | Yes |
| PrestoDB | Yes |
| PrestoSQL | Yes |
| SAP HANA | Yes |
| SAP HANA 2+ | Yes |
| SingleStore | Yes |
| SingleStore 7+ | Yes |
| Snowflake | Yes |
| Teradata | Yes |
| Trino | Yes |
| Vector | Yes |
| Vertica | Yes |