始める前に
まだ設定していない場合は、 Google Cloud プロジェクトと 2 つの Cloud Storage バケットを設定します。
プロジェクトを設定する
- Sign in to your Google Cloud account. If you're new to Google Cloud, create an account to evaluate how our products perform in real-world scenarios. New customers also get $300 in free credits to run, test, and deploy workloads.
-
In the Google Cloud console, on the project selector page, select or create a Google Cloud project.
Roles required to select or create a project
- Select a project: Selecting a project doesn't require a specific IAM role—you can select any project that you've been granted a role on.
-
Create a project: To create a project, you need the Project Creator
(
roles/resourcemanager.projectCreator), which contains theresourcemanager.projects.createpermission. Learn how to grant roles.
-
Verify that billing is enabled for your Google Cloud project.
-
Enable the Dataproc, Compute Engine, Cloud Storage, and Cloud Run functions APIs.
Roles required to enable APIs
To enable APIs, you need the Service Usage Admin IAM role (
roles/serviceusage.serviceUsageAdmin), which contains theserviceusage.services.enablepermission. Learn how to grant roles. -
Install the Google Cloud CLI.
-
外部 ID プロバイダ(IdP)を使用している場合は、まず連携 ID を使用して gcloud CLI にログインする必要があります。
-
gcloud CLI を初期化するには、次のコマンドを実行します。
gcloud init -
In the Google Cloud console, on the project selector page, select or create a Google Cloud project.
Roles required to select or create a project
- Select a project: Selecting a project doesn't require a specific IAM role—you can select any project that you've been granted a role on.
-
Create a project: To create a project, you need the Project Creator
(
roles/resourcemanager.projectCreator), which contains theresourcemanager.projects.createpermission. Learn how to grant roles.
-
Verify that billing is enabled for your Google Cloud project.
-
Enable the Dataproc, Compute Engine, Cloud Storage, and Cloud Run functions APIs.
Roles required to enable APIs
To enable APIs, you need the Service Usage Admin IAM role (
roles/serviceusage.serviceUsageAdmin), which contains theserviceusage.services.enablepermission. Learn how to grant roles. -
Install the Google Cloud CLI.
-
外部 ID プロバイダ(IdP)を使用している場合は、まず連携 ID を使用して gcloud CLI にログインする必要があります。
-
gcloud CLI を初期化するには、次のコマンドを実行します。
gcloud init - In the Google Cloud console, go to the Cloud Storage Buckets page.
- Click Create.
- On the Create a bucket page, enter your bucket information. To go to the next
step, click Continue.
-
In the Get started section, do the following:
- Enter a globally unique name that meets the bucket naming requirements.
- To add a
bucket label,
expand the Labels section (),
click add_box
Add label, and specify a
keyand avaluefor your label.
-
In the Choose where to store your data section, do the following:
- Select a Location type.
- Choose a location where your bucket's data is permanently stored from the Location type drop-down menu.
- If you select the dual-region location type, you can also choose to enable turbo replication by using the relevant checkbox.
- To set up cross-bucket replication, select
Add cross-bucket replication via Storage Transfer Service and
follow these steps:
Set up cross-bucket replication
- In the Bucket menu, select a bucket.
In the Replication settings section, click Configure to configure settings for the replication job.
The Configure cross-bucket replication pane appears.
- To filter objects to replicate by object name prefix, enter a prefix that you want to include or exclude objects from, then click Add a prefix.
- To set a storage class for the replicated objects, select a storage class from the Storage class menu. If you skip this step, the replicated objects will use the destination bucket's storage class by default.
- Click Done.
-
In the Choose how to store your data section, do the following:
- Select a default storage class for the bucket or Autoclass for automatic storage class management of your bucket's data.
- To enable hierarchical namespace, in the Optimize storage for data-intensive workloads section, select Enable hierarchical namespace on this bucket.
- In the Choose how to control access to objects section, select whether or not your bucket enforces public access prevention, and select an access control method for your bucket's objects.
-
In the Choose how to protect object data section, do the
following:
- Select any of the options under Data protection that you
want to set for your bucket.
- To enable soft delete, click the Soft delete policy (For data recovery) checkbox, and specify the number of days you want to retain objects after deletion.
- To set Object Versioning, click the Object versioning (For version control) checkbox, and specify the maximum number of versions per object and the number of days after which the noncurrent versions expire.
- To enable the retention policy on objects and buckets, click the Retention (For compliance) checkbox, and then do the following:
- To enable Object Retention Lock, click the Enable object retention checkbox.
- To enable Bucket Lock, click the Set bucket retention policy checkbox, and choose a unit of time and a length of time for your retention period.
- To choose how your object data will be encrypted, expand the Data encryption section (), and select a Data encryption method.
- Select any of the options under Data protection that you
want to set for your bucket.
-
In the Get started section, do the following:
- Click Create.
- ワークフロー テンプレートを作成します。
  gcloud dataproc workflow-templates create wordcount-template \
      --region=us-central1
- wordcount ジョブをワークフロー テンプレートに追加します。
-
コマンドを実行する前に output-bucket-name を指定します(関数は入力バケットを提供します)。出力バケット名を挿入すると、出力バケット引数は
gs://your-output-bucket/wordcount-output"のようになります。 -
「count」ステップ ID は必須です。追加された Hadoop ジョブを識別します。
          gcloud dataproc workflow-templates add-job hadoop \
              --workflow-template=wordcount-template \
              --step-id=count \
              --jar=file:///usr/lib/hadoop-mapreduce/hadoop-mapreduce-examples.jar \
              --region=us-central1 \
              -- wordcount gs://input-bucket gs://output-bucket-name/wordcount-output
-
コマンドを実行する前に output-bucket-name を指定します(関数は入力バケットを提供します)。出力バケット名を挿入すると、出力バケット引数は
- ワークフローを実行するには、マネージドの単一ノードクラスタを使用します。Dataproc によってクラスタが作成され、ワークフローがクラスタ上で実行され、ワークフローの完了時にクラスタが削除されます。
gcloud dataproc workflow-templates set-managed-cluster wordcount-template \ --cluster-name=wordcount \ --single-node \ --region=us-central1 - Google Cloud コンソールの Dataproc の [ワークフロー] ページで名前
wordcount-templateをクリックし、[ワークフロー テンプレートの詳細] ページを開きます。wordcount-template 属性を確認します。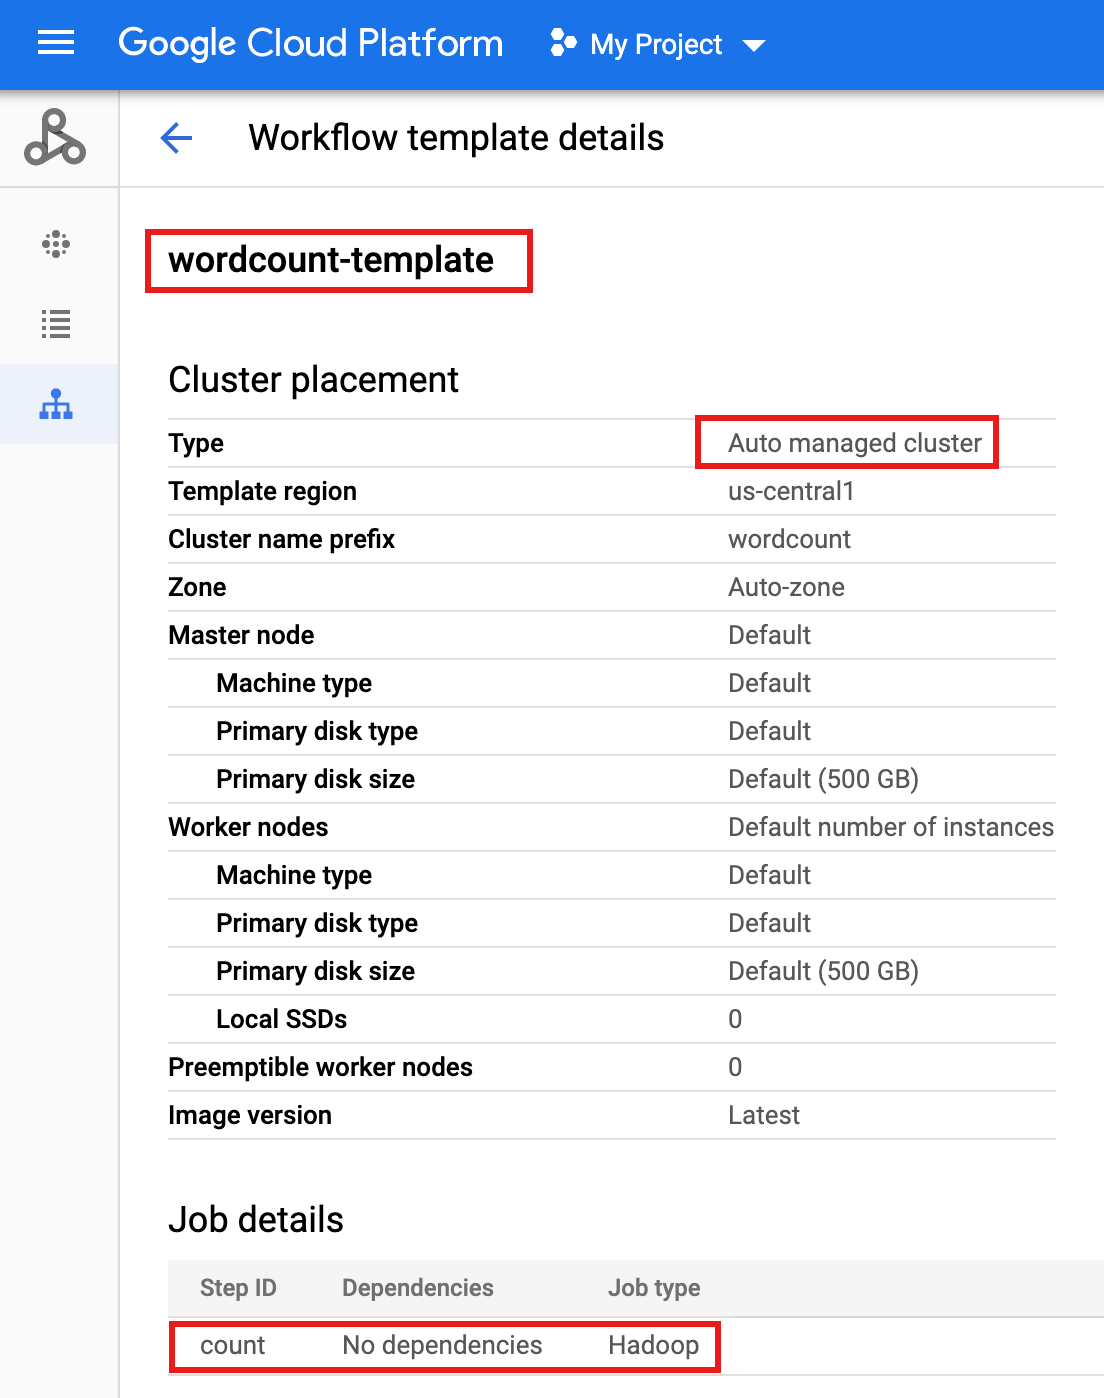
- パラメータ化のために、ワークフロー テンプレートを
wordcount.yamlテキスト ファイルにエクスポートします。gcloud dataproc workflow-templates export wordcount-template \ --destination=wordcount.yaml \ --region=us-central1
- テキスト エディタを使用して
wordcount.yamlを開き、ワークフローがトリガーされた際に、ワードカウント バイナリにargs[1]として Cloud Storage の INPUT_BUCKET_URI が渡されるようにするため、YAML ファイルの末尾にparametersブロックを追加します。エクスポートされた YAML ファイルの例を以下に示します。テンプレートを更新する方法は次の 2 つがあります。このうちの 1 つを選びます。
- your-output_bucket を出力バケット名に置き換えたあと、エクスポートした
wordcount.yamlを置き換えるため、ファイル全体をコピーして貼り付けます。 - エクスポートした
wordcount.yamlファイルの末尾に、parametersセクションのみをコピーして貼り付けます。
jobs: - hadoopJob: args: - wordcount - gs://input-bucket - gs://your-output-bucket/wordcount-output mainJarFileUri: file:///usr/lib/hadoop-mapreduce/hadoop-mapreduce-examples.jar stepId: count placement: managedCluster: clusterName: wordcount config: softwareConfig: properties: dataproc:dataproc.allow.zero.workers: 'true' parameters: - name: INPUT_BUCKET_URI description: wordcount input bucket URI fields: - jobs['count'].hadoopJob.args[1] - your-output_bucket を出力バケット名に置き換えたあと、エクスポートした
- パラメータ化された
wordcount.yamlテキスト ファイルをインポートします。テンプレートを上書きするように求められたら、「Y」(Yes の Y)を入力します。gcloud dataproc workflow-templates import wordcount-template \ --source=wordcount.yaml \ --region=us-central1
Google Cloud コンソールで [Cloud Run functions] ページを開き、[関数の作成] をクリックします。
[関数の作成] ページで、次の情報を入力または選択します。
- 名前: wordcount
- 割り当てられているメモリ: デフォルトの選択のままにします。
- トリガー:
- Cloud Storage
- イベント タイプ: 確定 / 作成
- バケット: 入力バケットを選択します(プロジェクトで Cloud Storage バケットを作成するを参照)。このバケットにファイルが追加されると、この関数はワークフローをトリガーします。ワークフローでワードカウント アプリケーションが実行され、バケット内のすべてのテキスト ファイルが処理されます。
ソースコード:
- インライン エディタ
- ランタイム: Node.js 8
INDEX.JSタブ: デフォルトのコード スニペットを次のコードに置き換え、-your-project-id-(先頭または末尾に「-」がないもの)を指定するようにconst projectId行を編集します。
const dataproc = require('@google-cloud/dataproc').v1; exports.startWorkflow = (data) => { const projectId = '-your-project-id-' const region = 'us-central1' const workflowTemplate = 'wordcount-template' const client = new dataproc.WorkflowTemplateServiceClient({ apiEndpoint: `${region}-dataproc.googleapis.com`, }); const file = data; console.log("Event: ", file); const inputBucketUri = `gs://${file.bucket}/${file.name}`; const request = { name: client.projectRegionWorkflowTemplatePath(projectId, region, workflowTemplate), parameters: {"INPUT_BUCKET_URI": inputBucketUri} }; client.instantiateWorkflowTemplate(request) .then(responses => { console.log("Launched Dataproc Workflow:", responses[1]); }) .catch(err => { console.error(err); }); };PACKAGE.JSONタブ: デフォルトのコード スニペットを次のコードに置き換えます。
{ "name": "dataproc-workflow", "version": "1.0.0", "dependencies":{ "@google-cloud/dataproc": ">=1.0.0"} }- 実行する関数: 「startWorkflow」を挿入します。
[作成] をクリックします。
公開ファイル
rose.txtをバケットにコピーして、関数をトリガーします。コマンドに your-input-bucket-name(関数のトリガーに使用されるバケット)を挿入します。gcloud storage cp gs://pub/shakespeare/rose.txt gs://your-input-bucket-name
30 秒待ってから、次のコマンドを実行して関数が正常に完了したことを確認します。
gcloud functions logs read wordcount
...
Function execution took 1348 ms, finished with status: 'ok'
Google Cloud コンソールの [関数] リストページから関数ログを表示するには、関数名
wordcountをクリックし、[ファンクションの詳細] ページで [ログを表示] をクリックします。
出力バケットの
wordcount-outputフォルダは、Google Cloud コンソールのストレージ ブラウザ ページで確認できます。
ワークフローの完了後、ジョブの詳細はGoogle Cloud コンソールに残ります。Dataproc の [ジョブ] ページに表示されている
count...ジョブをクリックして、ワークフロー ジョブの詳細を表示します。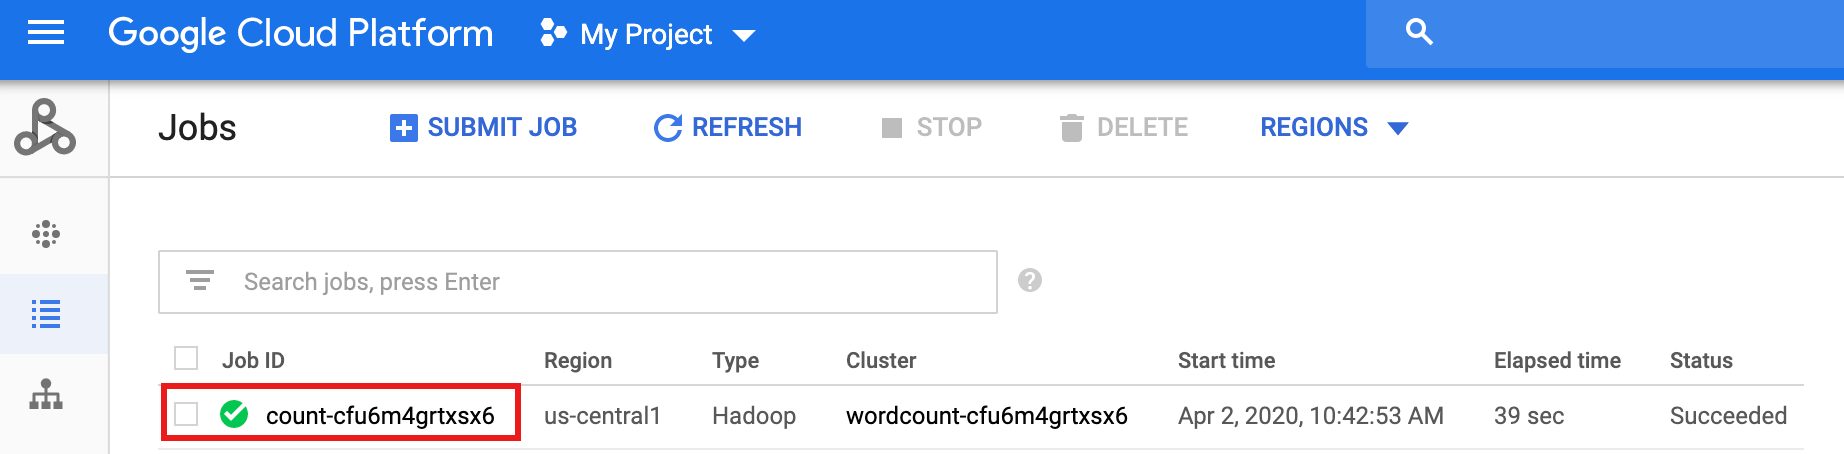
- In the Google Cloud console, go to the Manage resources page.
- In the project list, select the project that you want to delete, and then click Delete.
- In the dialog, type the project ID, and then click Shut down to delete the project.
- In the Google Cloud console, go to the Cloud Storage Buckets page.
- Click the checkbox for the bucket that you want to delete.
- To delete the bucket, click Delete, and then follow the instructions.
プロジェクトで 2 つの Cloud Storage バケットを作成または使用する
プロジェクトには、入力ファイル用と出力ファイル用の 2 つの Cloud Storage バケットが必要です。
ワークフロー テンプレートを作成する
ワークフロー テンプレートを作成して定義するには、ローカル ターミナル ウィンドウまたは Cloud Shell で次のコマンドをコピーして実行します。
ワークフロー テンプレートをパラメータ化する
ワークフロー テンプレートに渡す入力バケット変数をパラメータ化します。
Cloud Functions の関数を作成する
関数をテストする
クリーンアップ
このチュートリアルのワークフローでは、ワークフローが完了するとマネージド クラスタが削除されます。繰り返し費用が発生しないようにするには、このチュートリアルに関連する他のリソースを削除します。
プロジェクトを削除する
Cloud Storage バケットを削除する
ワークフロー テンプレートを削除する
gcloud dataproc workflow-templates delete wordcount-template \
    --region=us-central1
Cloud Functions の関数を削除する
Google Cloud コンソールで [Cloud Run functions] ページを開き、wordcount 関数の左側にあるボックスを選択して [削除] をクリックします。