In diesem Dokument wird beschrieben, wie Sie Serverless for Apache Spark SQL- und PySpark-Batcharbeitslasten ausführen, um eine Apache Iceberg-Tabelle mit Metadaten zu erstellen, die im BigLake Metastore gespeichert sind. Informationen zu anderen Möglichkeiten zum Ausführen von Spark-Code finden Sie unter PySpark-Code in einem BigQuery-Notebook ausführen und Apache Spark-Arbeitslast ausführen.
Hinweise
Erstellen Sie ein Google Cloud Projekt und einen Cloud Storage-Bucket, falls noch nicht geschehen.
Projekt einrichten
- Sign in to your Google Cloud account. If you're new to Google Cloud, create an account to evaluate how our products perform in real-world scenarios. New customers also get $300 in free credits to run, test, and deploy workloads.
-
In the Google Cloud console, on the project selector page, select or create a Google Cloud project.
Roles required to select or create a project
- Select a project: Selecting a project doesn't require a specific IAM role—you can select any project that you've been granted a role on.
-
Create a project: To create a project, you need the Project Creator
(
roles/resourcemanager.projectCreator), which contains theresourcemanager.projects.createpermission. Learn how to grant roles.
-
Enable the Dataproc, BigQuery, and Cloud Storage APIs.
Roles required to enable APIs
To enable APIs, you need the Service Usage Admin IAM role (
roles/serviceusage.serviceUsageAdmin), which contains theserviceusage.services.enablepermission. Learn how to grant roles. -
In the Google Cloud console, on the project selector page, select or create a Google Cloud project.
Roles required to select or create a project
- Select a project: Selecting a project doesn't require a specific IAM role—you can select any project that you've been granted a role on.
-
Create a project: To create a project, you need the Project Creator
(
roles/resourcemanager.projectCreator), which contains theresourcemanager.projects.createpermission. Learn how to grant roles.
-
Enable the Dataproc, BigQuery, and Cloud Storage APIs.
Roles required to enable APIs
To enable APIs, you need the Service Usage Admin IAM role (
roles/serviceusage.serviceUsageAdmin), which contains theserviceusage.services.enablepermission. Learn how to grant roles. Erstellen Sie einen Cloud Storage-Bucket in Ihrem Projekt.
- In the Google Cloud console, go to the Cloud Storage Buckets page.
- Click Create.
- On the Create a bucket page, enter your bucket information. To go to the next
step, click Continue.
-
In the Get started section, do the following:
- Enter a globally unique name that meets the bucket naming requirements.
- To add a
bucket label,
expand the Labels section (),
click add_box
Add label, and specify a
keyand avaluefor your label.
-
In the Choose where to store your data section, do the following:
- Select a Location type.
- Choose a location where your bucket's data is permanently stored from the Location type drop-down menu.
- If you select the dual-region location type, you can also choose to enable turbo replication by using the relevant checkbox.
- To set up cross-bucket replication, select
Add cross-bucket replication via Storage Transfer Service and
follow these steps:
Set up cross-bucket replication
- In the Bucket menu, select a bucket.
In the Replication settings section, click Configure to configure settings for the replication job.
The Configure cross-bucket replication pane appears.
- To filter objects to replicate by object name prefix, enter a prefix that you want to include or exclude objects from, then click Add a prefix.
- To set a storage class for the replicated objects, select a storage class from the Storage class menu. If you skip this step, the replicated objects will use the destination bucket's storage class by default.
- Click Done.
-
In the Choose how to store your data section, do the following:
- Select a default storage class for the bucket or Autoclass for automatic storage class management of your bucket's data.
- To enable hierarchical namespace, in the Optimize storage for data-intensive workloads section, select Enable hierarchical namespace on this bucket.
- In the Choose how to control access to objects section, select whether or not your bucket enforces public access prevention, and select an access control method for your bucket's objects.
-
In the Choose how to protect object data section, do the
following:
- Select any of the options under Data protection that you
want to set for your bucket.
- To enable soft delete, click the Soft delete policy (For data recovery) checkbox, and specify the number of days you want to retain objects after deletion.
- To set Object Versioning, click the Object versioning (For version control) checkbox, and specify the maximum number of versions per object and the number of days after which the noncurrent versions expire.
- To enable the retention policy on objects and buckets, click the Retention (For compliance) checkbox, and then do the following:
- To enable Object Retention Lock, click the Enable object retention checkbox.
- To enable Bucket Lock, click the Set bucket retention policy checkbox, and choose a unit of time and a length of time for your retention period.
- To choose how your object data will be encrypted, expand the Data encryption section (), and select a Data encryption method.
- Select any of the options under Data protection that you
want to set for your bucket.
-
In the Get started section, do the following:
- Click Create.
Gewähren Sie dem Compute Engine-Standarddienstkonto,
PROJECT_NUMBER-compute@developer.gserviceaccount.com, die Rolle BigQuery-Datenbearbeiter (roles/bigquery.dataEditor). Eine Anleitung finden Sie unter Einzelne Rolle zuweisen.Beispiel für Google Cloud CLI:
gcloud projects add-iam-policy-binding PROJECT_ID \
    --member PROJECT_NUMBER-compute@developer.gserviceaccount.com \
--role roles/bigquery.dataEditor
Hinweise:
- PROJECT_ID und PROJECT_NUMBER werden im Bereich Projektinformationen im Google Cloud Console-Dashboard aufgeführt.
Kopieren Sie die folgenden Spark SQL-Befehle lokal oder in Cloud Shell in eine
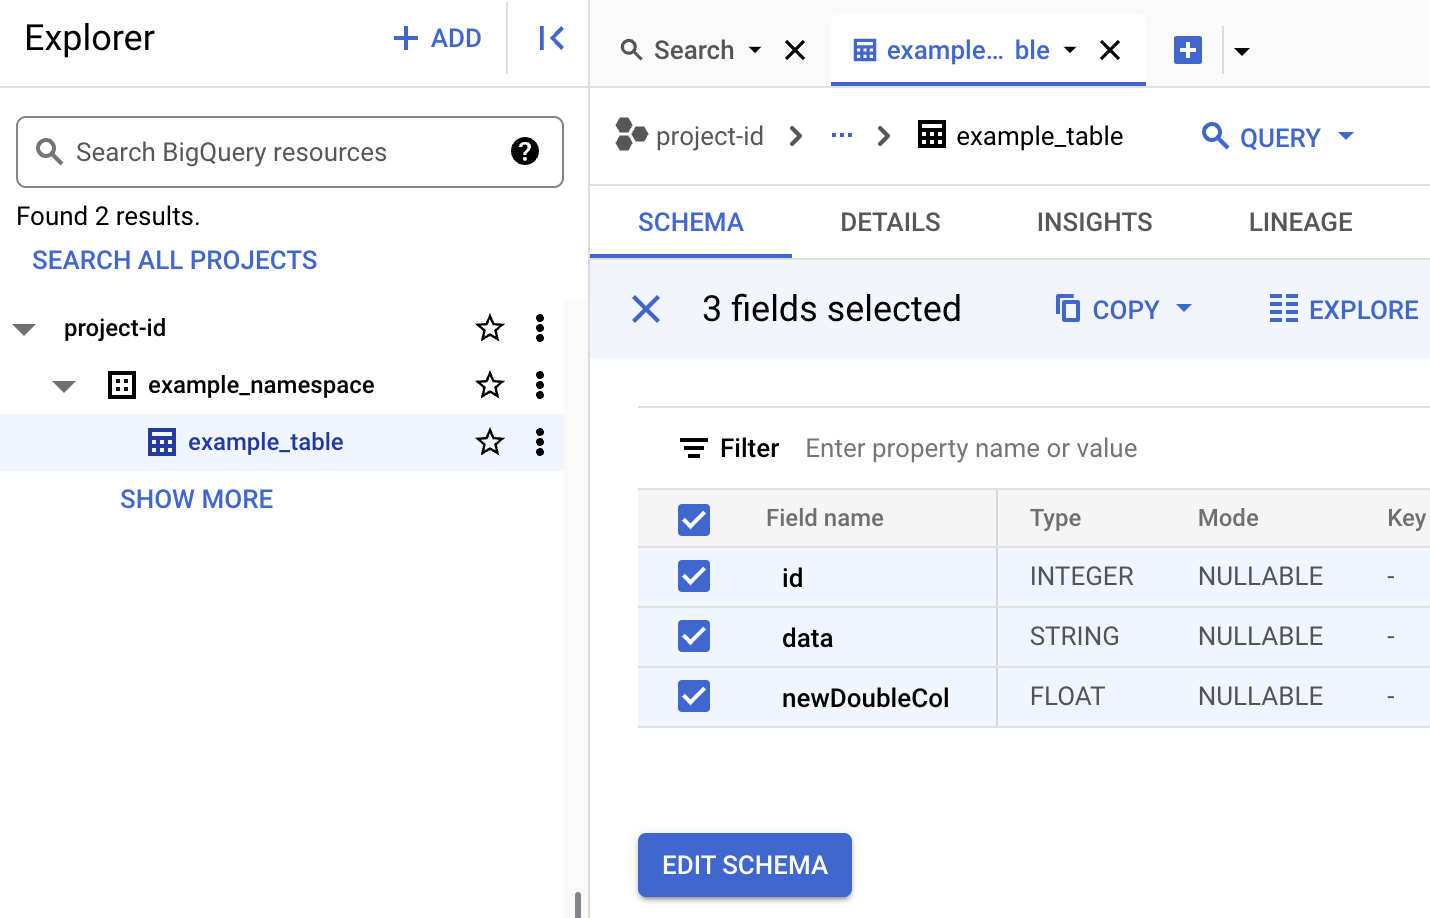
iceberg-table.sql-Datei.USE CATALOG_NAME; CREATE NAMESPACE IF NOT EXISTS example_namespace; DROP TABLE IF EXISTS example_table; CREATE TABLE example_table (id int, data string) USING ICEBERG LOCATION 'gs://BUCKET/WAREHOUSE_FOLDER'; INSERT INTO example_table VALUES (1, 'first row'); ALTER TABLE example_table ADD COLUMNS (newDoubleCol double); DESCRIBE TABLE example_table;
Ersetzen Sie Folgendes:
- CATALOG_NAME: Name des Iceberg-Katalogs.
- BUCKET und WAREHOUSE_FOLDER: Cloud Storage-Bucket und -Ordner, die als Iceberg-Warehouse-Verzeichnis verwendet werden.
Führen Sie den folgenden Befehl lokal oder in Cloud Shell aus dem Verzeichnis aus, das
iceberg-table.sqlenthält, um die Spark SQL-Arbeitslast zu übergeben.gcloud dataproc batches submit spark-sql iceberg-table.sql \ --project=PROJECT_ID \ --region=REGION \ --deps-bucket=BUCKET_NAME \ --version=2.2 \ --subnet=SUBNET_NAME \ --properties="spark.sql.catalog.CATALOG_NAME=org.apache.iceberg.spark.SparkCatalog,spark.sql.catalog.CATALOG_NAME.catalog-impl=org.apache.iceberg.gcp.bigquery.BigQueryMetastoreCatalog,spark.sql.catalog.CATALOG_NAME.gcp_project=PROJECT_ID,spark.sql.catalog.CATALOG_NAME.gcp_location=LOCATION,spark.sql.catalog.CATALOG_NAME.warehouse=gs://BUCKET/WAREHOUSE_FOLDER"
Hinweise:
- PROJECT_ID: Ihre Google Cloud Projekt-ID Projekt-IDs werden im Bereich Projektinformationen im Dashboard der Google Cloud Console aufgeführt.
- REGION: Eine verfügbare Compute Engine-Region zum Ausführen der Arbeitslast.
- BUCKET_NAME: Der Name Ihres Cloud Storage-Buckets Spark lädt Arbeitslastabhängigkeiten in den Ordner
/dependenciesin diesem Bucket hoch, bevor die Batcharbeitslast ausgeführt wird. WAREHOUSE_FOLDER befindet sich in diesem Bucket. --version:Serverless for Apache Spark-Laufzeitversion 2.2 oder höher.- SUBNET_NAME: Der Name eines VPC-Subnetzes in der
REGION. Wenn Sie dieses Flag weglassen, wird dasdefault-Subnetz in der Sitzungsregion von Serverless for Apache Spark ausgewählt. Serverless for Apache Spark aktiviert privaten Google-Zugriff (Private Google Access, PGA) für das Subnetz. Informationen zu den Anforderungen an die Netzwerkverbindung finden Sie unter Google Cloud Serverless for Apache Spark-Netzwerkkonfiguration. - LOCATION: Ein unterstützter BigQuery-Standort. Der Standardspeicherort ist „US“.
--propertiesKatalogeigenschaften
Tabellenmetadaten in BigQuery ansehen
Öffnen Sie in der Google Cloud Console die Seite BigQuery.
Metadaten von Iceberg-Tabellen ansehen
- Kopieren Sie den folgenden PySpark-Code lokal oder in Cloud Shell in eine
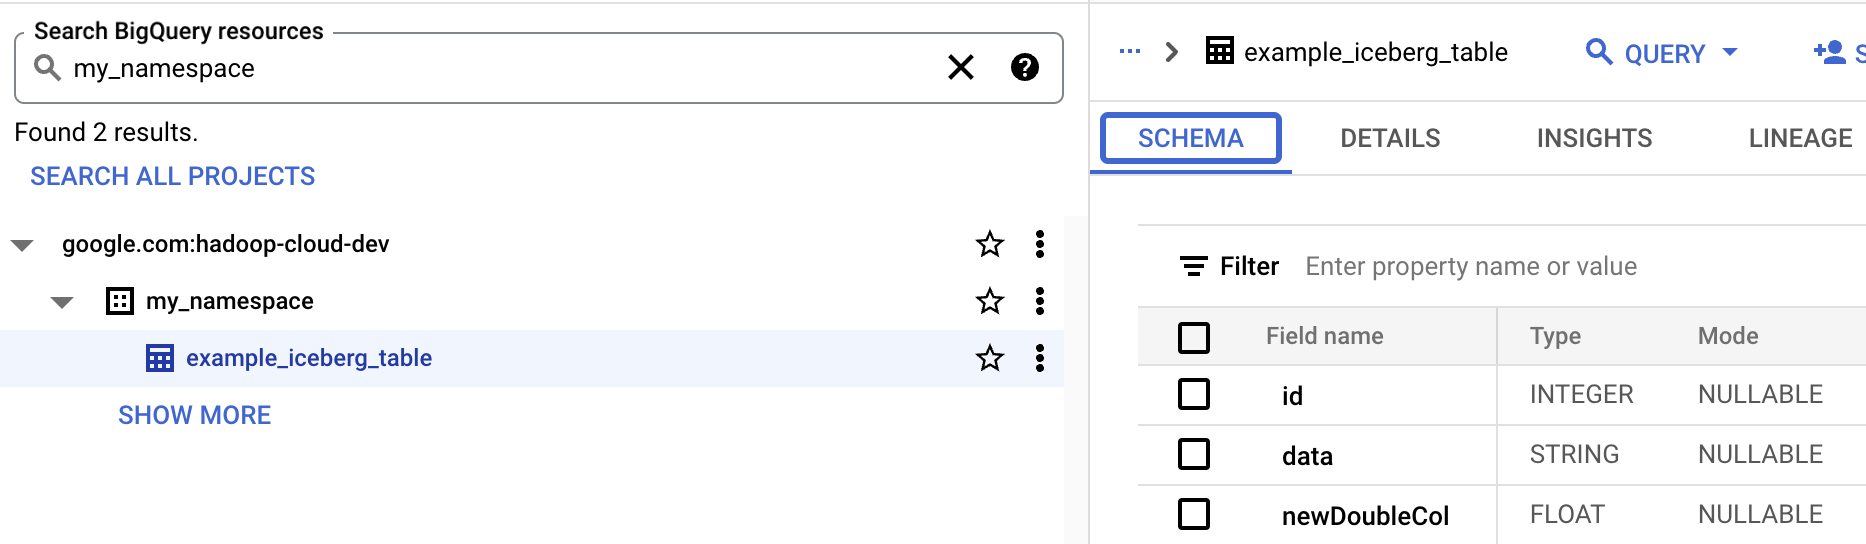
iceberg-table.py-Datei.from pyspark.sql import SparkSession spark = SparkSession.builder.appName("iceberg-table-example").getOrCreate() catalog = "CATALOG_NAME" namespace = "NAMESPACE" spark.sql(f"USE `{catalog}`;") spark.sql(f"CREATE NAMESPACE IF NOT EXISTS `{namespace}`;") spark.sql(f"USE `{namespace}`;") # Create table and display schema spark.sql("DROP TABLE IF EXISTS example_iceberg_table") spark.sql("CREATE TABLE example_iceberg_table (id int, data string) USING ICEBERG") spark.sql("DESCRIBE example_iceberg_table;") # Insert table data. spark.sql("INSERT INTO example_iceberg_table VALUES (1, 'first row');") # Alter table, then display schema. spark.sql("ALTER TABLE example_iceberg_table ADD COLUMNS (newDoubleCol double);") spark.sql("DESCRIBE example_iceberg_table;")
Ersetzen Sie Folgendes:
- CATALOG_NAME und NAMESPACE: Der Name und der Namespace des Iceberg-Katalogs werden kombiniert, um die Iceberg-Tabelle (
catalog.namespace.table_name) zu identifizieren.
- CATALOG_NAME und NAMESPACE: Der Name und der Namespace des Iceberg-Katalogs werden kombiniert, um die Iceberg-Tabelle (
-
Führen Sie den folgenden Befehl lokal oder in Cloud Shell aus dem Verzeichnis aus, das
iceberg-table.pyenthält, um die PySpark-Arbeitslast zu senden.gcloud dataproc batches submit pyspark iceberg-table.py \ --project=PROJECT_ID \ --region=REGION \ --deps-bucket=BUCKET_NAME \ --version=2.2 \ --subnet=SUBNET_NAME \ --properties="spark.sql.catalog.CATALOG_NAME=org.apache.iceberg.spark.SparkCatalog,spark.sql.catalog.CATALOG_NAME.catalog-impl=org.apache.iceberg.gcp.bigquery.BigQueryMetastoreCatalog,spark.sql.catalog.CATALOG_NAME.gcp_project=PROJECT_ID,spark.sql.catalog.CATALOG_NAME.gcp_location=LOCATION,spark.sql.catalog.CATALOG_NAME.warehouse=gs://BUCKET/WAREHOUSE_FOLDER"Hinweise:
- PROJECT_ID: Ihre Google Cloud Projekt-ID Projekt-IDs werden im Bereich Projektinformationen im Dashboard der Google Cloud Console aufgeführt.
- REGION: Eine verfügbare Compute Engine-Region zum Ausführen der Arbeitslast.
- BUCKET_NAME: Der Name Ihres Cloud Storage-Buckets Spark lädt Arbeitslastabhängigkeiten in einen
/dependencies-Ordner in diesem Bucket hoch, bevor die Batcharbeitslast ausgeführt wird. --version:Serverless for Apache Spark-Laufzeitversion 2.2 oder höher.- SUBNET_NAME: Der Name eines VPC-Subnetzes in der
REGION. Wenn Sie dieses Flag weglassen, wird in Serverless for Apache Spark dasdefault-Subnetz in der Sitzungsregion ausgewählt. Mit Serverless for Apache Spark wird privater Google-Zugriff (Private Google Access, PGA) für das Subnetz aktiviert. Informationen zu den Anforderungen an die Netzwerkverbindung finden Sie unter Google Cloud Serverless for Apache Spark-Netzwerkkonfiguration. - LOCATION: Ein unterstützter BigQuery-Standort. Der Standardspeicherort ist „US“.
- BUCKET und WAREHOUSE_FOLDER: Cloud Storage-Bucket und -Ordner, die als Iceberg-Warehouse-Verzeichnis verwendet werden.
--properties: Katalogattribute.
- Tabellenschema in BigQuery ansehen
- Öffnen Sie in der Google Cloud Console die Seite BigQuery. Zu BigQuery Studio
- Metadaten von Iceberg-Tabellen ansehen
Zuordnung von OSS-Ressourcen zu BigQuery-Ressourcen
Beachten Sie die folgende Zuordnung zwischen Open-Source-Ressourcen und BigQuery-Ressourcenbegriffen:
OSS-Ressource BigQuery-Ressource Namespace, Datenbank Dataset Partitionierte oder nicht partitionierte Tabelle Tabelle Ansehen Ansehen Iceberg-Tabelle erstellen
In diesem Abschnitt erfahren Sie, wie Sie eine Iceberg-Tabelle mit Metadaten in BigLake Metastore mit Serverless for Apache Spark Spark SQL- und PySpark-Batcharbeitslasten erstellen.
Spark SQL
Spark SQL-Arbeitslast ausführen, um eine Iceberg-Tabelle zu erstellen
In den folgenden Schritten wird gezeigt, wie Sie einen Serverless for Apache Spark Spark SQL-Batcharbeitslast ausführen, um eine Iceberg-Tabelle mit Tabellenmetadaten zu erstellen, die in BigLake Metastore gespeichert sind.
PySpark
In den folgenden Schritten wird gezeigt, wie Sie einen Serverless for Apache Spark-PySpark-Batch-Arbeitslast ausführen, um eine Iceberg-Tabelle mit Tabellenmetadaten zu erstellen, die in BigLake Metastore gespeichert sind.