Ce guide explique comment utiliser Sensitive Data Protection avec Cloud Data Fusion.
Cloud Data Fusion fournit un plug-in Sensitive Data Protection qui permet trois transformations pouvant filtrer, masquer ou déchiffrer vos données sensibles :
La transformation "Filtre d'informations personnelles" vous permet de filtrer les enregistrements sensibles d'un flux de données entrantes.
La transformation "Masquer" vous permet de transformer des données sensibles, par exemple en les masquant ou en les chiffrant.
La transformation "Déchiffrer" vous permet de déchiffrer des données sensibles précédemment chiffrées à l'aide de la transformation "Masquer".
Coûts
Dans ce document, vous utilisez les composants facturables de Google Cloudsuivants :
Obtenez une estimation des coûts en fonction de votre utilisation prévue à l'aide du simulateur de coût.
Avant de commencer
Dans la console Google Cloud , accédez à la page de sélection du projet, puis sélectionnez ou créez un projet.
Activez l'API Cloud Data Fusion pour votre projet.
Activez l'API DLP (qui fait partie de la protection des données sensibles) pour votre projet.
Accorder des autorisations Sensitive Data Protection
Dans la console Google Cloud , accédez à la page IAM.
Dans le tableau des autorisations, sélectionnez l'un des comptes de service suivants dans la colonne Compte principal :
Pour autoriser l'accès aux ressources lors de l'exécution, sélectionnez le compte de service utilisé par votre cluster Dataproc. Par défaut, le compte de service Compute Engine est utilisé, mais il n'est pas recommandé pour des raisons de sécurité.
Pour autoriser l'accès aux ressources lorsque vous utilisez Wrangler ou l'aperçu dans Cloud Data Fusion (et non au moment de l'exécution), sélectionnez plutôt le compte de service correspondant au format suivant :
service-project-number@gcp-sa-datafusion.iam.gserviceaccount.com.

Cliquez sur l'icône en forme de crayon située à droite du compte de service.
Cliquez sur Ajouter un autre rôle.
Cliquez sur le menu déroulant qui s'affiche.
Utilisez la barre de recherche pour afficher et sélectionner Administrateur DLP.
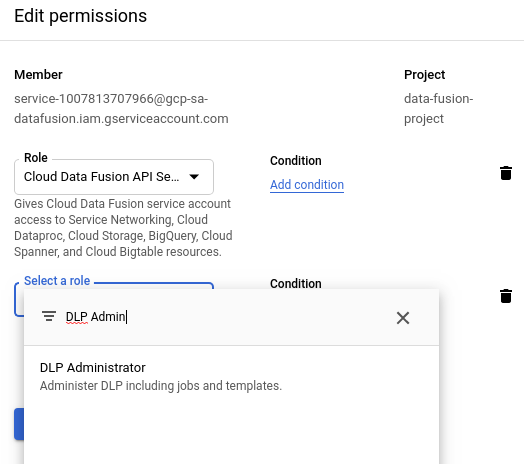
Cliquez sur Enregistrer. Vérifiez que Administrateur DLP apparaît dans la colonne Rôle.

Déployer le plug-in Sensitive Data Protection
Accédez à votre instance :
Dans la console Google Cloud , accédez à la page Cloud Data Fusion.
Pour ouvrir l'instance dans Cloud Data Fusion Studio, cliquez sur Instances, puis sur Afficher l'instance.
Dans l'interface utilisateur Web de Cloud Data Fusion, cliquez sur Hub en haut à droite.
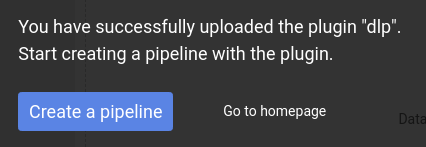
Cliquez sur le plug-in Protection contre la perte de données.
Cliquez sur Déployer.
Cliquez sur Terminer.
Cliquez sur Créer un pipeline.
Utiliser la transformation de Filtre d'informations personnelles
Cette transformation sépare les enregistrements sensibles des enregistrements non sensibles. Un enregistrement est considéré comme sensible s'il correspond aux critères que vous définissez dans un modèle de protection des données sensibles. Vous pouvez par exemple définir des informations de carte de paiement ou des numéros de sécurité sociale en tant que données sensibles lorsque vous créez votre modèle.
Ouvrez votre pipeline dans Cloud Data Fusion, puis cliquez sur Studio > Transformer.
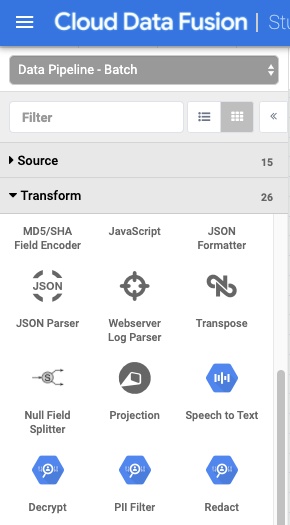
Cliquez sur la transformation Filtre d'informations personnelles.
Maintenez le pointeur de la souris sur le nœud Filtre d'informations personnelles et cliquez sur Propriétés.
Sous Filtre activé, indiquez si vous souhaitez filtrer les enregistrements ou les champs.
Conformément aux limites de Sensitive Data Protection, si un enregistrement dépasse 0,5 Mo, votre pipeline Cloud Data Fusion échouera. Pour éviter un tel échec, filtrez par champ plutôt que par enregistrement.
Sous ID du modèle, saisissez l'ID du modèle Sensitive Data Protection que vous avez créé.
Sous Traitement des erreurs, définissez la procédure à suivre lorsque votre pipeline rencontre des données sensibles. Choisissez l'une des options de traitement des erreurs suivantes :
- Arrêter le pipeline : arrête le pipeline dès qu'une erreur se produit.
- Ignorer l'enregistrement : ignore l'enregistrement à l'origine de l'erreur. Le pipeline continue de s'exécuter et aucune erreur n'est signalée.
- Envoyer vers l'erreur : envoie les erreurs au port d'erreur. Le pipeline continue de s'exécuter.
Cliquez sur le bouton X.
Utiliser la transformation "Masquer"
Cette transformation identifie les enregistrements sensibles dans le flux d'entrée et applique les transformations que vous définissez à ces enregistrements. Un enregistrement est considéré comme sensible s'il correspond à des filtres de protection des données sensibles prédéfinis que vous avez choisis ou à un modèle personnalisé que vous avez défini.
Sur la page Studio de l'interface utilisateur Web de Cloud Data Fusion, cliquez pour développer le menu Transformation.
Cliquez sur la transformation Masquer.
Maintenez le pointeur de la souris sur le nœud Masquer et cliquez sur Propriétés.
Choisissez si vous souhaitez appliquer des transformations à des filtres prédéfinis ou si vous souhaitez créer les vôtres.
Vous ne pouvez pas combiner ces deux options. Vous pouvez utiliser des filtres prédéfinis OU créer un modèle personnalisé.
Filtres prédéfinis
Pour appliquer des transformations à des filtres prédéfinis, laissez le Modèle personnalisé défini sur Non et, sous Correspondance, définissez une règle :
À la suite de Appliquer, cliquez sur le menu déroulant et choisissez une transformation. Pour en savoir plus sur les transformations disponibles, consultez la section Description de l'onglet Documentation du plug-in.
À la suite de sur, cliquez sur le menu déroulant et choisissez une catégorie, à savoir un ensemble de filtres Sensitive Data Protection prédéfinis regroupés par type. Pour obtenir la liste complète des catégories fournies et des filtres qu'elles contiennent, consultez la section Mappage des filtres DLP dans l'onglet Documentation du plug-in.
Pour définir plusieurs règles de correspondance, cliquez sur le bouton +.

Modèle personnalisé
Pour appliquer des transformations en fonction d'un modèle personnalisé, définissez le Modèle personnalisé sur Oui.
De retour dans l'interface utilisateur Web de Cloud Data Fusion, dans le menu des propriétés "Masquer", sous ID du modèle, saisissez l'ID du modèle personnalisé que vous avez créé.
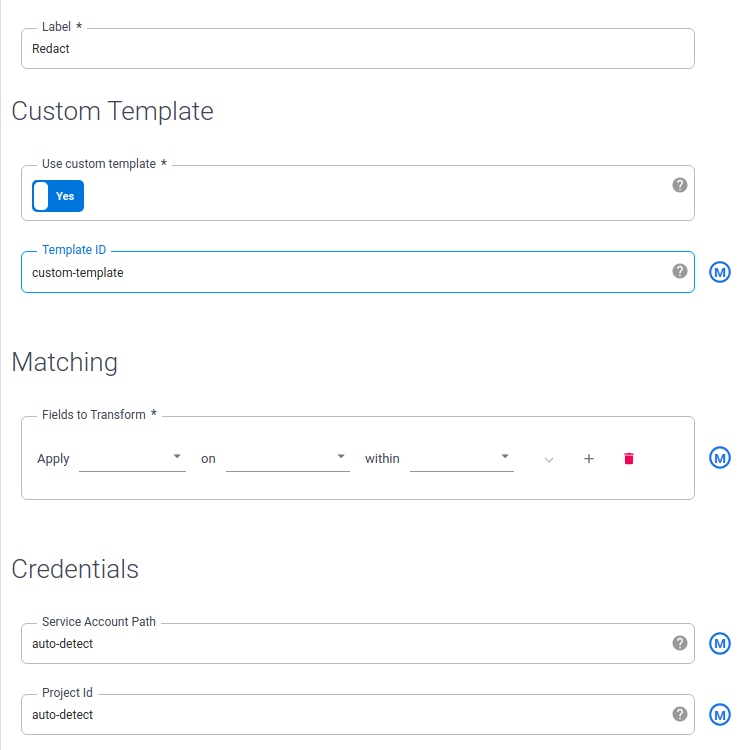
Cliquez sur le bouton X.
Utiliser la transformation Déchiffrer
Cette transformation identifie les enregistrements chiffrés à l'aide de Sensitive Data Protection dans le flux d'entrée et applique le déchiffrement. Seuls les enregistrements chiffrés à l'aide d'un algorithme réversible tel que le chiffrement préservant le format ou le chiffrement déterministe peuvent être déchiffrés.
Sur la page Studio de l'interface utilisateur Web de Cloud Data Fusion, cliquez pour développer le menu Transformation.
Cliquez sur la transformation Déchiffrer.
Maintenez le pointeur de la souris sur le nœud Déchiffrer et cliquez sur Propriétés.
Saisissez les mêmes valeurs que celles utilisées pour configurer le plug-in Masquer qui a chiffré ces données. Les propriétés de ce plug-in sont identiques à celles du plug-in Masquer.
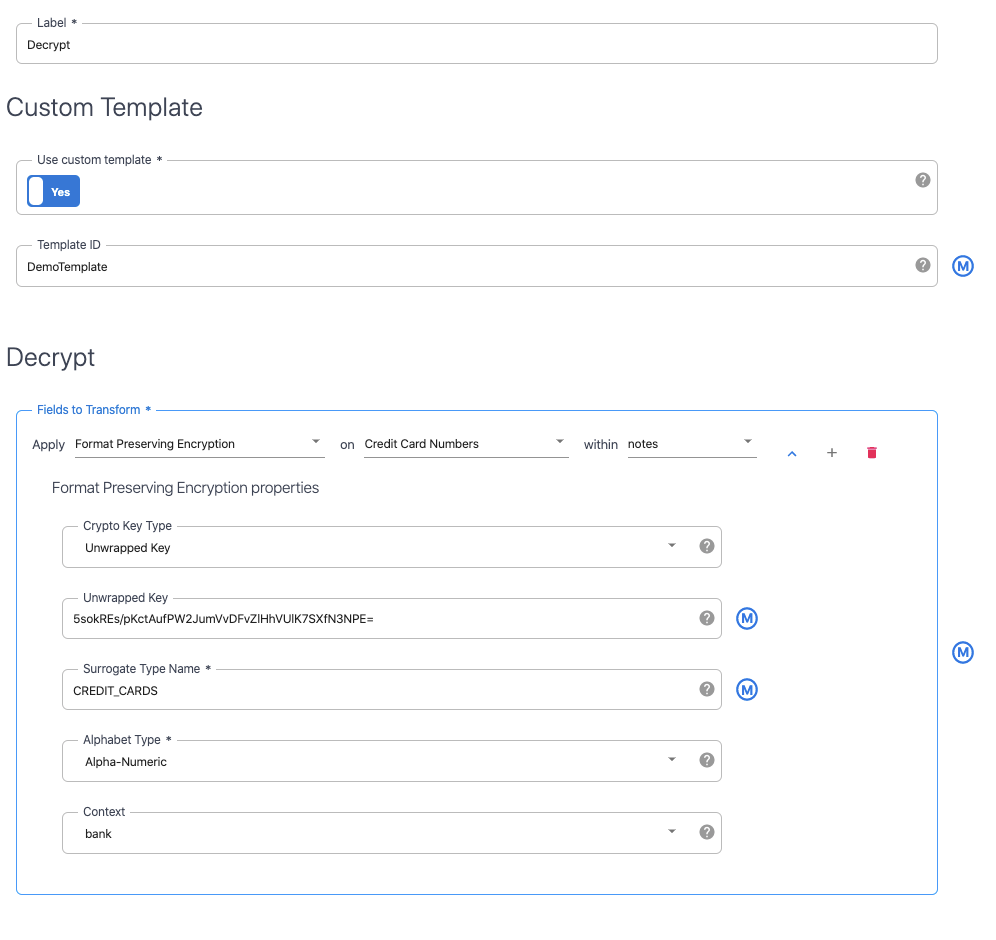
Cliquez sur le bouton X.
Étape suivante
- Suivez un tutoriel pour masquer les données utilisateur sensibles.
- En savoir plus sur Sensitive Data Protection