Puoi modificare un'integrazione configurando attività, attivatori o connessioni perimetrali. Puoi anche aggiornare i dettagli dell'integrazione, ad esempio modificare l'impostazione per la mascheratura delle variabili nei log, in Cloud Logging e nei log locali, nonché aggiornare l'account di servizio e la descrizione dell'integrazione.
Blocchi di modifica dell'integrazione
Le integrazioni sono entità di design time spesso sviluppate in collaborazione con più autori.
Sebbene un'integrazione possa essere modificata attivamente da un solo autore alla volta, i team possono collaborare a un'integrazione e monitorare le modifiche dello stato tramite le relative versioni.
Puoi modificare solo una versione DRAFT dell'integrazione ed eseguire solo la versione ACTIVE dell'integrazione. Per informazioni sulle diverse versioni di integrazione, vedi Versioni di integrazione.
Quando apri un'integrazione, nell'editor dell'integrazione potresti trovare un messaggio simile al seguente:
Se apri l'integrazione che è in fase di modifica da parte di un altro utente, nell'editor dell'integrazione viene visualizzato il seguente messaggio, perché in un determinato momento solo un utente può aggiornare l'integrazione:
test-user@gmail.com is currently editing the integration. Edit features are temporarily disabled.
Per modificare l'integrazione, fai clic su Riassegna. Nell'integrazione viene creata una nuova versione nello stato DRAFT per te e la funzionalità di modifica viene disattivata per gli altri utenti. La figura seguente mostra il blocco delle modifiche nell'editor di integrazione.
Se apri un'integrazione pubblicata, la versione dell'integrazione è nello stato ACTIVE. Per modificare l'integrazione, fai clic su Attiva modifica. Viene creata una nuova versione con lo stato DRAFT.
This version is currently active. Editing features are disabled.
Per modificare l'integrazione, fai clic su Attiva modifica. Nell'integrazione viene creata una nuova versione nello stato DRAFT.
La figura seguente mostra il blocco delle modifiche nell'editor di integrazione.
Modificare un'integrazione
Per visualizzare e modificare un flusso di integrazione:
Nella Google Cloud console, vai alla pagina Application Integration.
Nel menu di navigazione, fai clic su Integrations (Integrazioni).
Viene visualizzata la pagina Integrazioni, che elenca tutte le integrazioni disponibili nel Google Cloud progetto.
Fai clic sull'integrazione che vuoi modificare. Si apre l'integrazione nell'editor integrazioni.
Se l'integrazione non è in stato DRAFT, significa che non è possibile modificarla. Per informazioni sui blocchi di modifica, consulta Blocchi di modifica dell'integrazione.
Eliminare le integrazioni
Per eliminare un'integrazione:
Nella console Google Cloud, vai alla pagina Integrazione delle applicazioni.
Fai clic su Integrazioni nel menu di navigazione a sinistra per aprire la pagina Integrazioni.
Esegui uno dei seguenti passaggi nella pagina Elenco integrazioni:
Per l'integrazione esistente che vuoi eliminare, fai clic su more_vertAzioni.
Seleziona Elimina nel menu a discesa.
Viene visualizzata una finestra di dialogo di conferma.
Oppure
Fai clic sull'integrazione esistente che vuoi eliminare.
Si apre l'integrazione nell'editor di integrazione.
Nella barra degli strumenti del designer, fai clic su
more_vert
(menu Azioni) e seleziona Clona integrazione > Elimina tutte le versioni.
Viene visualizzata una finestra di dialogo di conferma.
Fai clic su Elimina per eliminare definitivamente l'integrazione.
Gestire i dettagli dell'integrazione
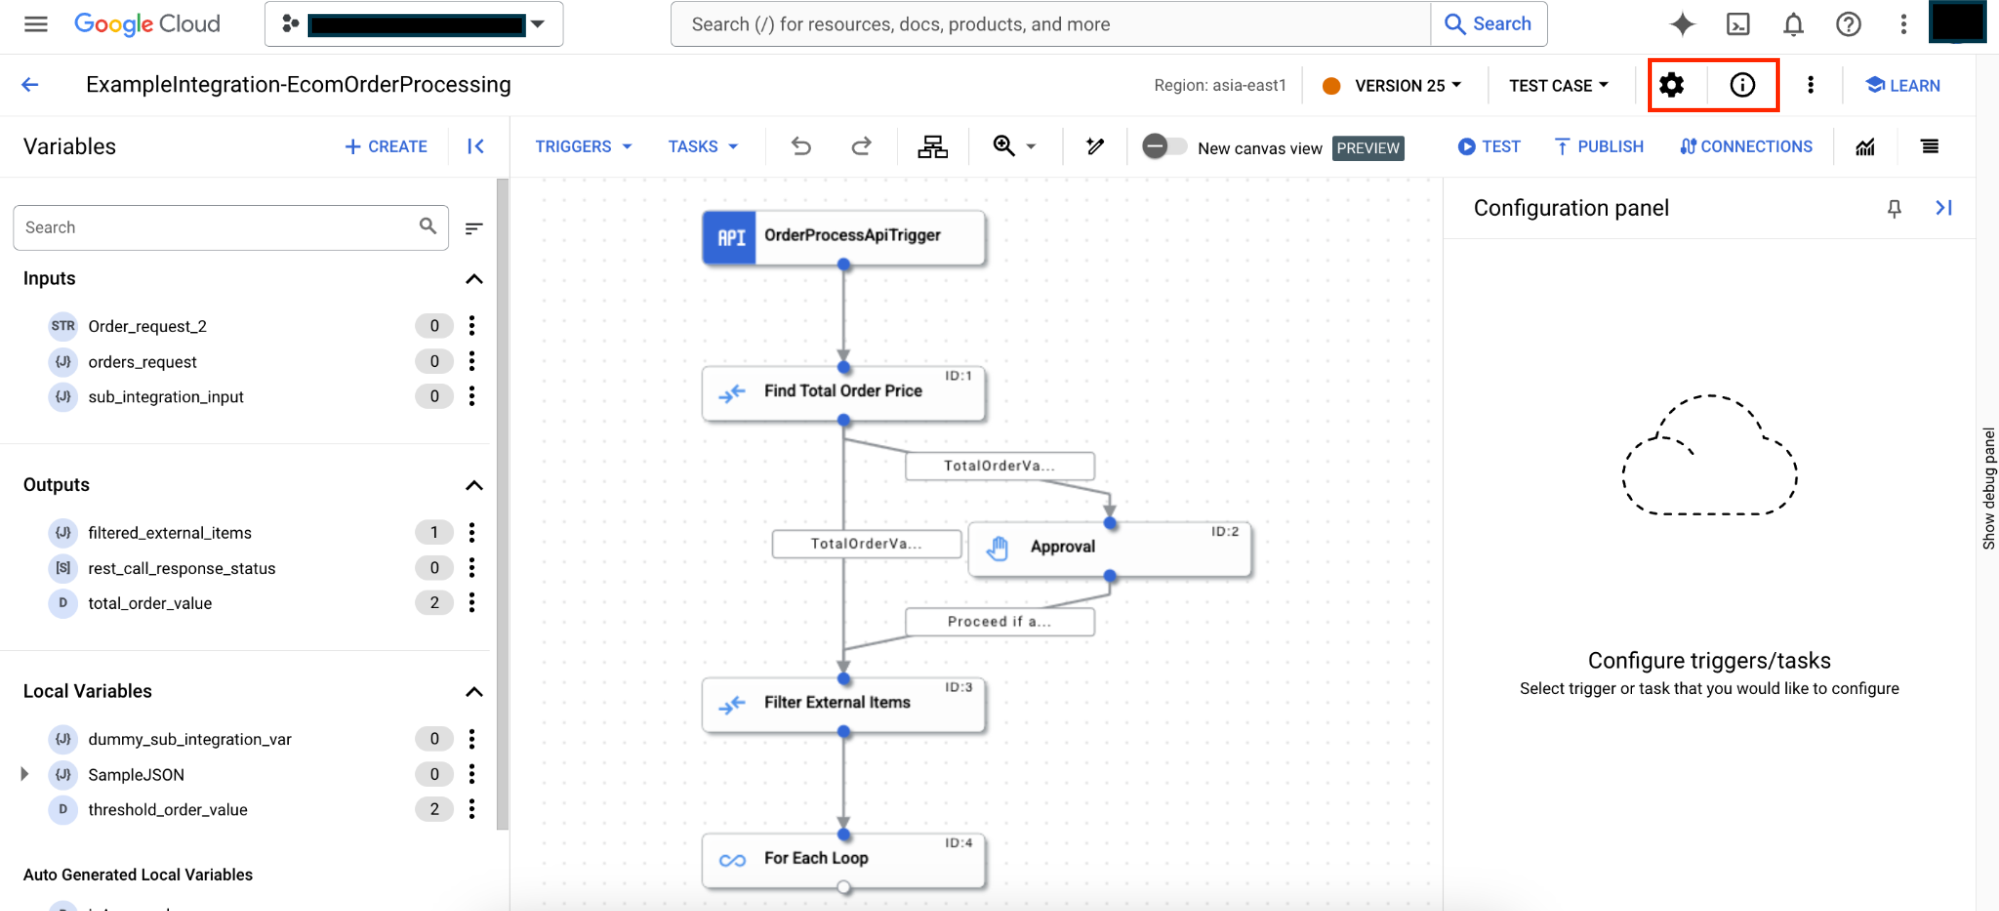
Puoi visualizzare il riepilogo dell'integrazione e aggiornare le impostazioni. L'immagine seguente mostra le icone settings Impostazioni di integrazione e info Informazioni sull'integrazione nella barra degli strumenti dell'editor di Application Integration:
Visualizza i dettagli dell'integrazione
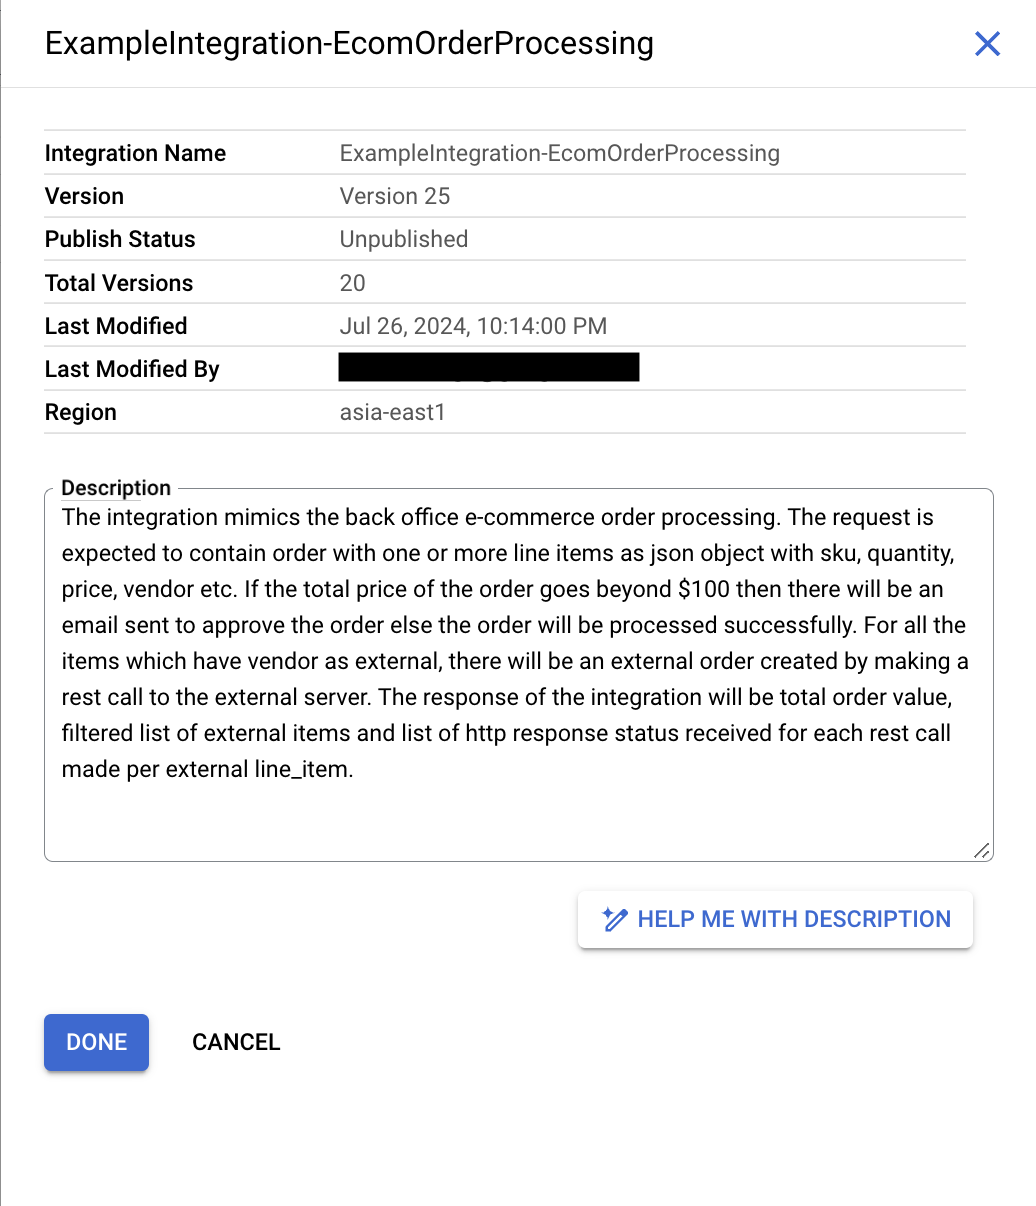
Per visualizzare i dettagli di un'integrazione, apri l'integrazione nell'editor di integrazione e fai clic su info (Informazioni sull'integrazione) nella barra degli strumenti del designer. L'immagine seguente mostra i dettagli dell'integrazione:
Il riepilogo dell'integrazione include le seguenti informazioni:
Nome integrazione:il nome dell'integrazione.
Versione: la versione corrente dell'integrazione e il nome della versione (se presente). Per informazioni sul controllo delle versioni, vedi Versioni.
Stato pubblicazione:lo stato di pubblicazione della versione corrente dell'integrazione; Pubblicato o Non pubblicato.
Totale versioni: il conteggio del numero totale di versioni di integrazione create per l'integrazione.
Ultima modifica:la data e l'ora dell'ultima modifica della versione corrente dell'integrazione.
Ultima modifica da: il nome dell'utente che ha modificato per ultimo la versione dell'integrazione.
Regione:la posizione regionale in cui è stata creata l'integrazione.
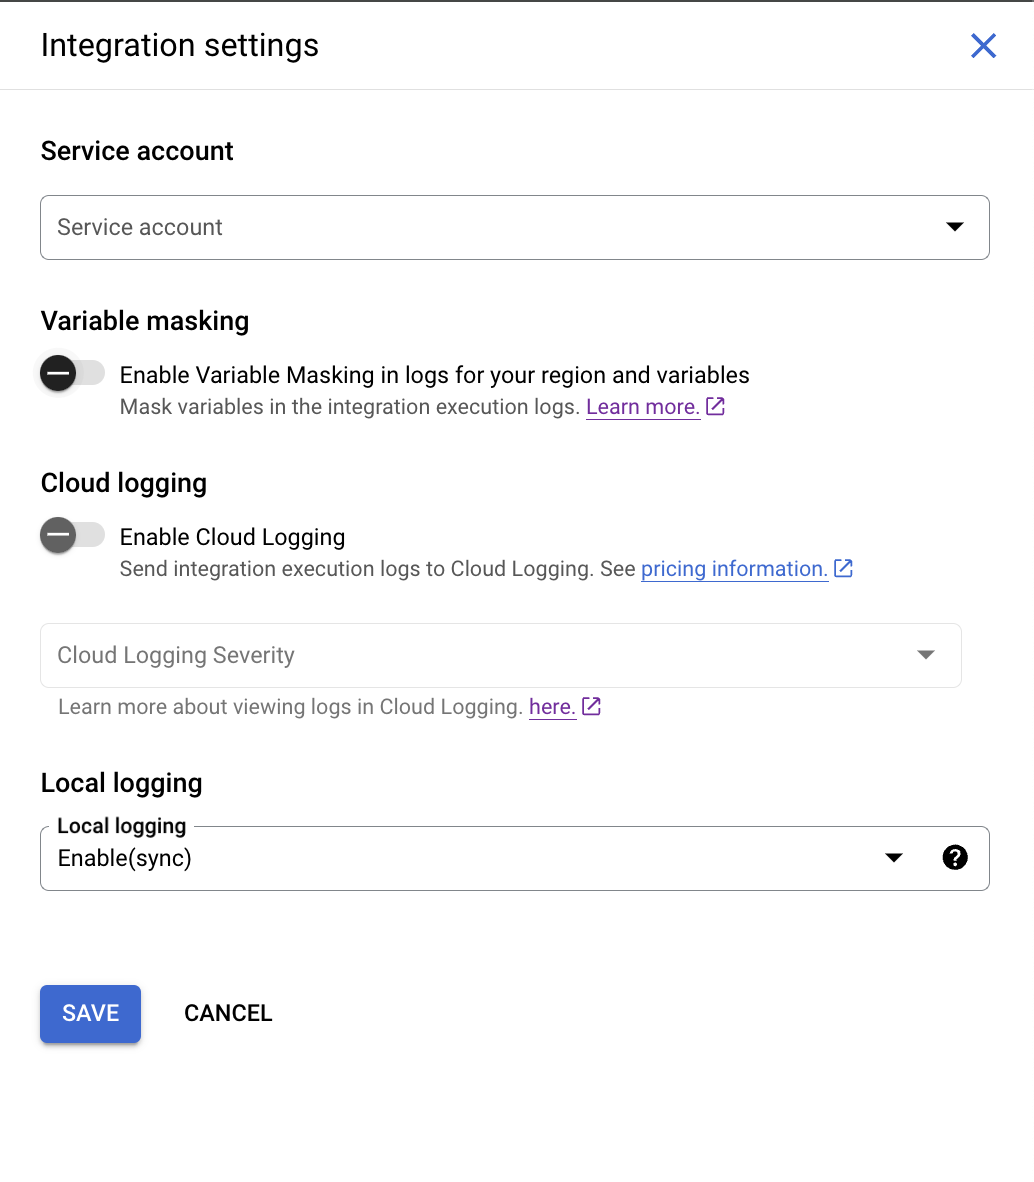
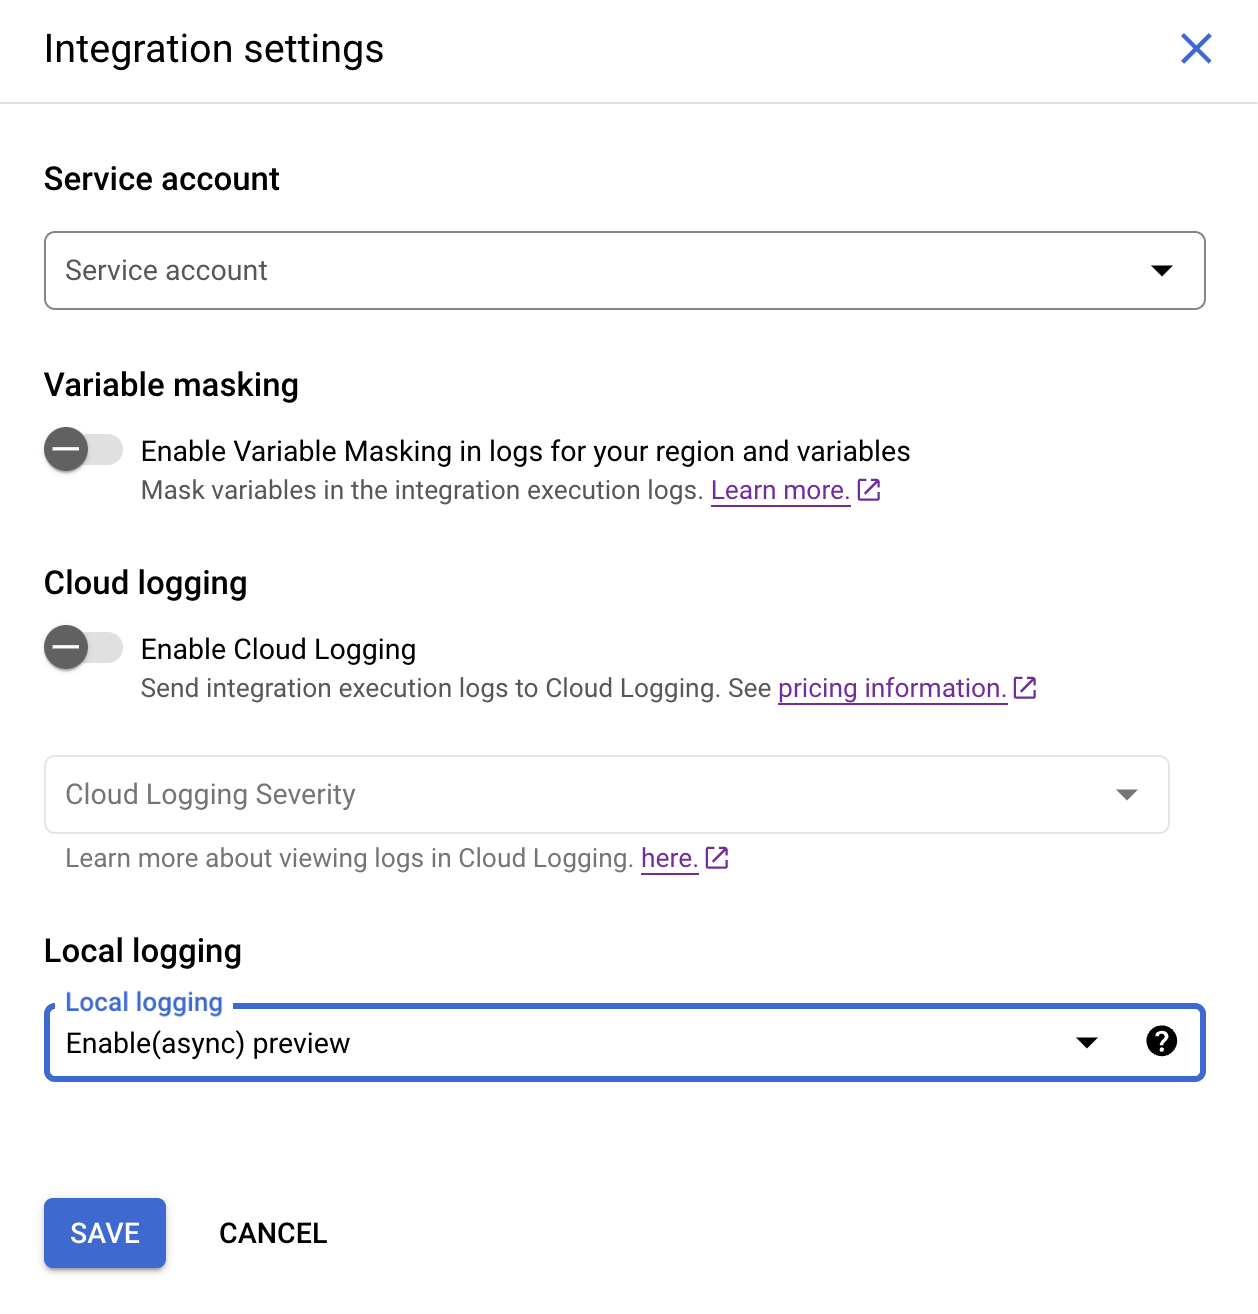
Per modificare i dettagli di un'integrazione, apri l'integrazione nell'editor e fai clic su settings (Impostazioni integrazione) nella barra degli strumenti del designer. L'immagine seguente mostra il riquadro Impostazioni di integrazione:
Il riepilogo dell'integrazione include le seguenti informazioni:
Account di servizio:l'account di servizio associato all'integrazione.
Attiva il mascheramento delle variabili nei log (anteprima): l'impostazione per attivare il mascheramento delle variabili nei log di esecuzione dell'integrazione. Se attivi il mascheramento per l'integrazione, assicurati di averlo attivato anche a livello di regione e variabile.
Attiva Cloud Logging:l'impostazione per attivare o disattivare Cloud Logging. Per ulteriori informazioni, consulta Visualizzare i log in Cloud Logging.
Logging locale:l'impostazione per attivare o disattivare il salvataggio dei dati o dei metadati dell'integrazione durante la sua esecuzione. Per impostazione predefinita, il logging locale è impostato su Enable(async). In questa modalità, l'esecuzione dell'integrazione richiede un tempo relativamente inferiore rispetto alla modalità Attiva(sincronizza), perché Application Integration scrive i dati dei log in modo asincrono durante l'esecuzione dell'integrazione. Tuttavia, questa modalità non garantisce la generazione di log per tutte le esecuzioni. In rari casi, ad esempio in caso di guasto del server fisico, è possibile che i log non vengano generati per l'esecuzione di un'integrazione. Per ulteriori informazioni, consulta Logging locale.
[[["Facile da capire","easyToUnderstand","thumb-up"],["Il problema è stato risolto","solvedMyProblem","thumb-up"],["Altra","otherUp","thumb-up"]],[["Difficile da capire","hardToUnderstand","thumb-down"],["Informazioni o codice di esempio errati","incorrectInformationOrSampleCode","thumb-down"],["Mancano le informazioni o gli esempi di cui ho bisogno","missingTheInformationSamplesINeed","thumb-down"],["Problema di traduzione","translationIssue","thumb-down"],["Altra","otherDown","thumb-down"]],["Ultimo aggiornamento 2025-09-03 UTC."],[[["\u003cp\u003eIntegrations can be modified by configuring tasks, triggers, or edge connections, and by updating details such as logging settings, service accounts, and descriptions.\u003c/p\u003e\n"],["\u003cp\u003eOnly one user can edit an integration at a time, with edits limited to \u003ccode\u003eDRAFT\u003c/code\u003e versions, while \u003ccode\u003eACTIVE\u003c/code\u003e versions are for execution, and a 15 minute lock is in place when a user makes a change.\u003c/p\u003e\n"],["\u003cp\u003eDeleting an integration is permanent and removes all versions, variables, triggers, tasks, and data mappings associated with it.\u003c/p\u003e\n"],["\u003cp\u003eIntegration details, such as name, version, publish status, last modified information, region, and description, can be viewed within the integration editor.\u003c/p\u003e\n"],["\u003cp\u003eSettings for service accounts, variable masking, Cloud Logging, and local logging can be modified within the integration's settings.\u003c/p\u003e\n"]]],[],null,["# Manage integrations\n\nSee the [supported connectors](/integration-connectors/docs/connector-reference-overview) for Application Integration.\n\nManage integrations\n===================\n\nYou can modify an integration by configuring tasks, triggers, or edge connections. You can also update the integration details, such as modifying the setting for masking variables in logs, Cloud Logging, local logging, and updating the service account and the description of your integration.\n\nIntegration edit locks\n----------------------\n\nIntegrations are design time entities that are often developed in collaboration with multiple authors.\nAlthough an integration can only be actively edited by one author at a time,\nteams can collaborate on an integration and track changes in state through its *versions*.\n\nYou can edit only a `DRAFT` version of the integration, and execute only the `ACTIVE` version of the integration. For information about different integration versions, see [Integration versions](/application-integration/docs/integration-versions).\n\nWhen you open an integration, you might find a message similar to the following in the integration editor:\n\n- If you open the integration that is being edited by another user, the following message appears in the integration editor because only one user can update the integration at a given time: \n\n ```\n test-user@gmail.com is currently editing the integration. Edit features are temporarily disabled.\n ```\n | **Note:** The integration is locked for editing by others for 15 minutes from the last update. Locks are released after 15 minutes from the last update.\n\n To edit the integration, click **Take Over** . A new version in the `DRAFT` state is created in the integration for you and the editing capability is disabled for the other users. The following figure shows the edit lock in the integration editor.\n\n\n- If you open a published integration, then the integration version is in the `ACTIVE` state. To edit the integration, click **Enable Editing** . A new version is created with the `DRAFT` state.\n\n ```\n This version is currently active. Editing features are disabled.\n ```\n\n To edit the integration, click **Enable Editing** . A new version in the `DRAFT` state is created in the integration for you.\n The following figure shows the edit lock in the integration editor.\n\n\nEdit an integration\n-------------------\n\nTo view and edit an integration flow, follow these steps:\n\n1. In the Google Cloud console, go to the **Application Integration** page.\n\n [Go to Application Integration](https://console.cloud.google.com/integrations)\n2. In the navigation menu, click **Integrations** .\n\n\n The **Integrations** page appears, listing all the integrations available in the Google Cloud project.\n3. Click the integration that you want to edit. This opens the integration in the integration editor.If the integration is not in `DRAFT` state, then the integration is locked for editing. For information about edit locks, see [Integration edit locks](#edit-locks).\n\nDelete integrations\n-------------------\n\n| **Warning:** When you delete an integration, you permanently delete all the versions of that integration, including all the integration variables, configured triggers, tasks, and data mappings. Deleting an integration cannot be undone.\n\nTo delete an integration, perform the following steps:\n\n1. In the Google Cloud console, go to the **Application Integration** page.\n\n [Go to Application Integration](https://console.cloud.google.com/integrations)\n2. Click **Integrations** from the left navigation menu to open the **Integrations** page.\n3. Do any one of the following steps in the **Integrations List** page:\n 1. For the existing integration that you want to delete, click more_vert **Actions**.\n 2. Select **Delete** in the drop-down menu.\n\n A confirmation dialog appears.\n\n Or\n \u003c!-- --\u003e\n\n 1. Click the existing integration that you want to delete. This opens the integration in the *integration editor*.\n\n 2. In the designer toolbar, click more_vert (Actions menu) and select **Clone integration \\\u003e Delete all versions** .\n\n A confirmation dialog appears.\n 3. Click **Delete** to permanently delete the integration.\n\nManage integration details\n--------------------------\n\nYou can view the integration summary and update settings for your integration. The following image shows the **settings Integration settings** and **info Integration information** icons on the Application Integration editor toolbar:\n\n\n### View integration details\n\nTo view the details of an integration, open the integration in the integration editor and click info (**Integration information**) in the designer toolbar. The following image shows the integration details:\n\n\nThe integration summary includes the following information:\n\n- **Integration name:** The name of the integration.\n- **Version:** The current version of the integration along with the version name (if any). For information about versioning, see [Versions](/application-integration/docs/integration-versions).\n- **Publish status:** The publish status of the current version of the integration; **Published** or **Unpublished**.\n- **Total versions:** The count of the total number of integration versions created for the integration.\n- **Last modified:** The date and time when the current integration version was last edited or modified.\n- **Last modified by** The name of the user who last edited or modified the integration version.\n- **Region:** The regional location where the integration was created.\n- **Description:** The integration description. To generate integration description using Gemini, see [Build integrations with Gemini Code Assist](/application-integration/docs/build-integrations-gemini).\n\n### Edit integration details\n\nTo edit the details of an integration, open the integration in the integration editor and click settings (**Integration settings** ) in the designer toolbar. The following image shows the **Integration Settings** pane:\n\n\nThe integration summary includes the following information:\n\n- **Service account:** The service account attached to the integration.\n- **Enable Variable Masking in logs ([preview](/products#product-launch-stages)):** The setting to enable masking of variables in the integration execution logs. If you enable masking for your integration, ensure that you have also enabled masking at the [region](/application-integration/docs/enable-new-region#edit-region) and the [variable](/application-integration/docs/variables) levels.\n\n For information about masking, see [Mask sensitive data in logs](/application-integration/docs/mask-sensitive-data-logs).\n- **Enable Cloud Logging:** The setting to enable or disable Cloud Logging. For more information, see [View logs in Cloud Logging](/application-integration/docs/cloud-logging).\n- **Local logging:** The setting to enable or disable saving integration's data or metadata during its execution. By default, local logging is set to **Enable(async)** . In this mode, the integration takes a relatively lesser time to execute when compared to the **Enable(sync)** mode, because Application Integration writes the log data asynchronously during the integration execution. However, this mode doesn't guarantee the generation of logs for all the executions. In rare cases--such as a physical server failure--it's possible that logs aren't generated for an integration execution. For more information, see [Local logging](/application-integration/docs/local-logging).\n\n| **Note:** Except for the **Service account** and **Description** fields, you can't edit or change any of the other integration information.\n\nWhat's next\n-----------\n\n- Learn how to [test and publish integrations](/application-integration/docs/test-publish-integrations).\n- Learn how to [create an integration](/application-integration/docs/create-integrations#create-a-new-integration).\n- Learn how to [clone integrations](/application-integration/docs/clone-integrations).\n- Learn about [logs in Application Integration](/application-integration/docs/introduction-logs)."]]