Questo documento descrive come configurare gli scenari di test per le tue integrazioni. Per informazioni sugli scenari di test, sulle configurazioni di test supportate e sulle relative limitazioni, consulta Introduzione agli scenari di test.
Assicurati che l'integrazione sia nello stato DRAFT. Se l'integrazione è nello stato PUBLISHED, fai clic su Attiva modifica. Nell'integrazione viene creata una nuova versione con stato DRAFT.
La figura seguente mostra il blocco di modifica nell'editor di integrazione.
Assicurati di avere uno scenario di test nell'integrazione. Per informazioni su come creare uno scenario di test, consulta Creare scenari di test.
Configurare le configurazioni di test per i trigger
Per configurare le configurazioni di test per il trigger, seleziona una delle seguenti opzioni:
Nella console Google Cloud , vai alla pagina Integrazione di applicazioni.
Nel menu di navigazione, fai clic su Integrazioni.
Viene visualizzata la pagina Integrazioni, che elenca tutte le integrazioni disponibili nel progetto Google Cloud .
Seleziona un'integrazione esistente per cui vuoi creare un test.
Si apre l'integrazione nell'editor integrazioni.
Fai clic su Scenario di test e poi su
Apri scenari di test. Viene visualizzato il riquadro Scenari di test con un elenco di scenari di test per la versione di integrazione corrente.
Seleziona lo scenario di test dall'elenco.
Nella pagina dell'editor di integrazione, il canvas del designer mostra La modalità Scenario di test è attiva. L'immagine seguente mostra il riquadro Configurazione test per il trigger:
Nella pagina dell'Editor integrazioni, fai clic sul trigger per aprire il riquadro di configurazione del trigger. Poi:
Se hai variabili di input per l'integrazione, la scheda Testa configurazione mostra queste variabili. I valori inseriti nelle variabili vengono salvati automaticamente.
Per visualizzare le proprietà dell'attivatore, fai clic sulla scheda Proprietà attivatore.
Configurare le configurazioni di test per le attività
Per configurare le proprietà di test per l'attività di integrazioni, seleziona una delle seguenti opzioni:
Nella console Google Cloud , vai alla pagina Integrazione di applicazioni.
Nel menu di navigazione, fai clic su Integrazioni.
Viene visualizzata la pagina Integrazioni, che elenca tutte le integrazioni disponibili nel progetto Google Cloud .
Seleziona un'integrazione esistente per cui vuoi creare un test.
Si apre l'integrazione nell'editor integrazioni.
Fai clic su Scenario di test e poi su
Apri scenari di test. Viene visualizzato il riquadro Scenari di test con un elenco di scenari di test per la versione di integrazione corrente.
Seleziona lo scenario di test dall'elenco.
Nella pagina dell'editor di integrazione, il canvas del designer mostra La modalità Scenario di test è attiva.
Nella pagina dell'Editor integrazioni, fai clic sull'attività per aprire il riquadro di configurazione del test. L'immagine seguente mostra il riquadro Configurazione test per l'attività:
Nella scheda Test configuration (Configurazione test), segui questi passaggi:
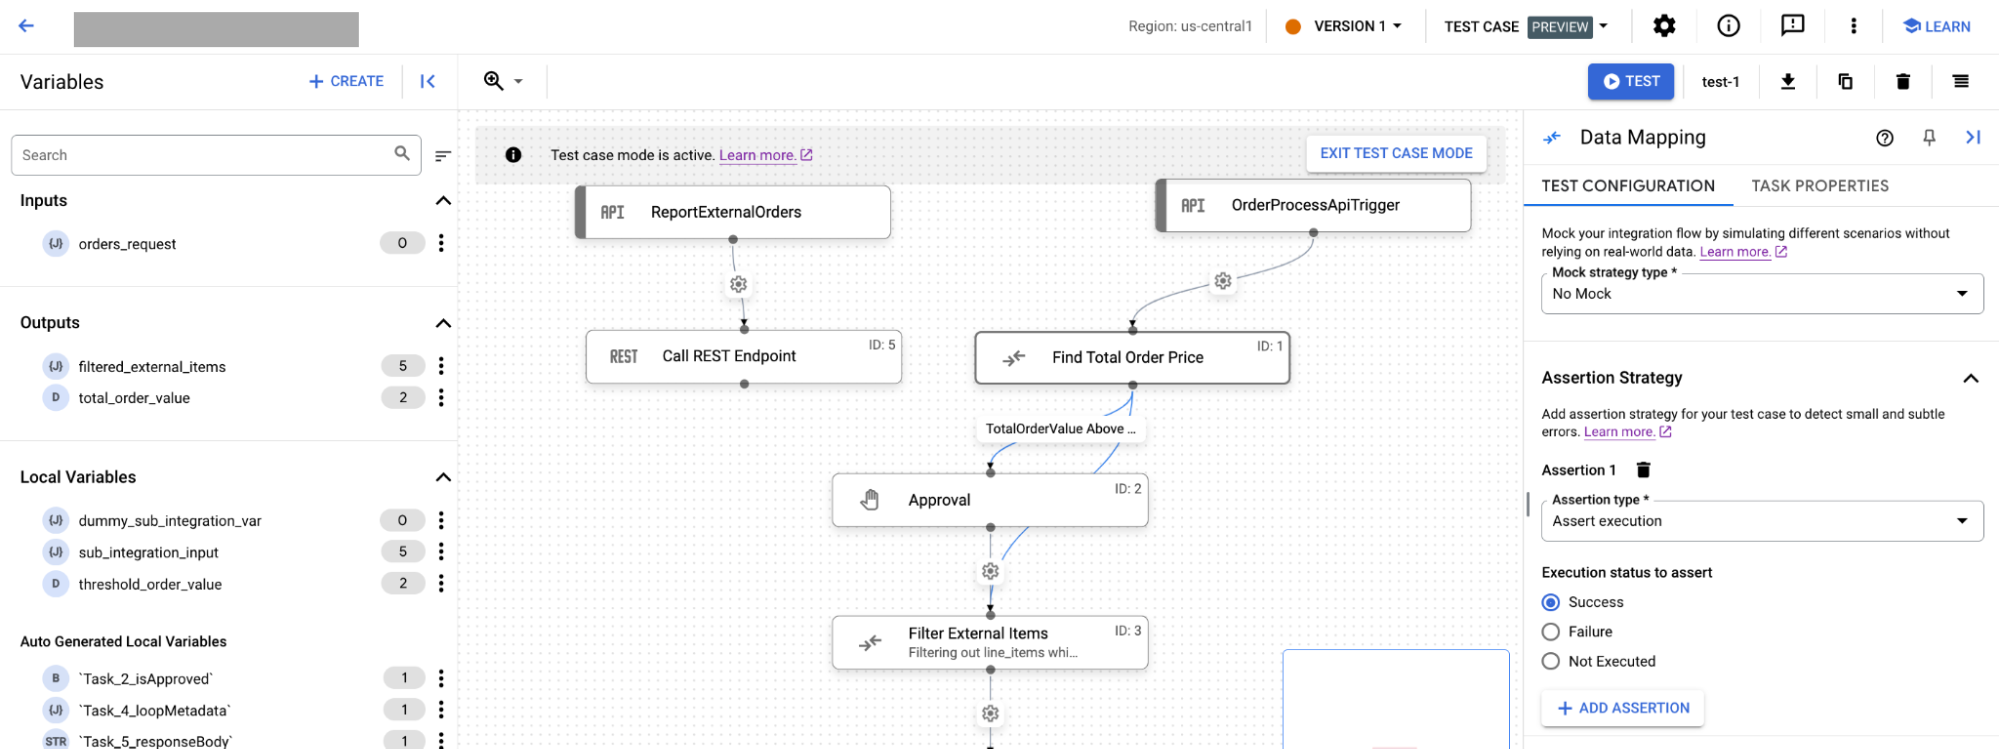
In Tipo di strategia simulata, seleziona una delle seguenti strategie simulate:
Se selezioni Nessuna simulazione, l'attività viene eseguita dall'integrazione principale come dovrebbe avvenire nell'integrazione effettiva. Per impostazione predefinita, per le attività è selezionato il tipo di strategia Nessuna simulazione.
Se selezioni Esecuzione simulata, per Stato esecuzione simulata devi selezionare una delle seguenti opzioni:
Salta:l'attività è contrassegnata come completata correttamente.
Errore: l'attività è contrassegnata come non riuscita
Se selezioni Output simulato, per l'elenco Output attività devi fornire l'output delle attività per il nodo successivo nell'integrazione.
Nella sezione Strategia di asserzione, segui questi passaggi:
Nel campo Tipo di asserzione, seleziona una delle seguenti opzioni:
Se selezioni Assert execution, scegli una delle seguenti opzioni per Execution status to assert:
Operazione riuscita
Errore
Non eseguito
Se selezioni Assert parameters (Asserisci parametri), procedi nel seguente modo:
In Parametri da verificare, seleziona se vuoi verificare i parametri, inclusi quelli di input e output.
Seleziona l'operatore per confrontare il parametro dichiarato con il valore inserito. Le operazioni per confrontare il parametro dichiarato possono essere una delle seguenti:
Uguale a
Non uguale
Contiene
Nel campo Valore, inserisci il valore con cui vuoi confrontare il parametro.
(Facoltativo) Per aggiungere altre asserzioni, fai clic su + Aggiungi asserzione.
[[["Facile da capire","easyToUnderstand","thumb-up"],["Il problema è stato risolto","solvedMyProblem","thumb-up"],["Altra","otherUp","thumb-up"]],[["Difficile da capire","hardToUnderstand","thumb-down"],["Informazioni o codice di esempio errati","incorrectInformationOrSampleCode","thumb-down"],["Mancano le informazioni o gli esempi di cui ho bisogno","missingTheInformationSamplesINeed","thumb-down"],["Problema di traduzione","translationIssue","thumb-down"],["Altra","otherDown","thumb-down"]],["Ultimo aggiornamento 2025-09-03 UTC."],[[["\u003cp\u003eThis document provides instructions on how to configure test cases for integrations within Application Integration, covering both triggers and tasks.\u003c/p\u003e\n"],["\u003cp\u003eTo configure test cases, users must have the \u003ccode\u003eApplication Integration Editor\u003c/code\u003e IAM role, and their integration must be in the \u003ccode\u003eDRAFT\u003c/code\u003e state, accessible via the integrations page.\u003c/p\u003e\n"],["\u003cp\u003eTest configurations for triggers allow users to set input variables and view trigger properties, while test configurations for tasks allow selecting mock strategies and setting assertions.\u003c/p\u003e\n"],["\u003cp\u003eUsers have options to mock or skip tasks in test scenarios, or to assert their execution status or input/output parameters, all based on the selected testing criteria.\u003c/p\u003e\n"],["\u003cp\u003eThe guide also gives key information on how to create, copy, delete, run, upload and download test cases as well as view test case execution logs.\u003c/p\u003e\n"]]],[],null,["# Configure test cases\n\nSee the [supported connectors](/integration-connectors/docs/connector-reference-overview) for Application Integration.\n\nConfigure test cases\n====================\n\n|\n| **Preview\n| --- Test cases**\n|\n|\n| This feature is subject to the \"Pre-GA Offerings Terms\" in the General Service Terms section\n| of the [Service Specific Terms](/terms/service-terms#1).\n|\n| Pre-GA features are available \"as is\" and might have limited support.\n|\n| For more information, see the\n| [launch stage descriptions](/products#product-launch-stages).\n\nThis document describes how to configure test cases for your integrations. For information about test cases, supported test configurations, and its limitations, see [Introduction to test cases](/application-integration/docs/test-cases).\n\nBefore you begin\n----------------\n\n-\n\n To get the permission that\n you need to configure test cases,\n\n ask your administrator to grant you the\n\n\n [Application Integration Editor](/iam/docs/roles-permissions/integrations#integrations.integrationEditor) (`roles/integrations.integrationEditor`)\n IAM role on project.\n\n\n For more information about granting roles, see [Manage access to projects, folders, and organizations](/iam/docs/granting-changing-revoking-access).\n\n\n This predefined role contains the\n ` integrations.googleapis.com/testCases.create`\n permission,\n which is required to\n configure test cases.\n\n\n You might also be able to get\n this permission\n with [custom roles](/iam/docs/creating-custom-roles) or\n other [predefined roles](/iam/docs/roles-overview#predefined).\n- Ensure that your integration is in the `DRAFT` state. If your integration is in the `PUBLISHED` state, click **Enable Editing** . A new version in the `DRAFT` state is created in the integration for you. The following figure shows the edit lock in the integration editor.\n\n \u003cbr /\u003e\n\n\n- Ensure that you have a test case in the integration. For information about how to create a test case, see [Create Test Cases](/application-integration/docs/create-test-cases).\n\nConfigure test configurations for triggers\n------------------------------------------\n\nTo configure the test configurations for the trigger, select one of the following options:\n\n1. In the Google Cloud console, go to the **Application Integration** page.\n\n [Go to Application Integration](https://console.cloud.google.com/integrations)\n2. In the navigation menu, click **Integrations** .\n\n The **Integrations** page appears listing all the integrations available in the Google Cloud project.\n3. Select an existing integration for which you want to create a test. This opens the integration in the *integration editor*.\n\n4. Click **Test Case** and then click **Open test cases** . The **Test Cases** pane appears with a list of test cases for the current integration version.\n5. Select the test case from the list. In the Integration editor page, the designer canvas displays **Test case mode is active** . The following image shows the **Test configuration** pane for the trigger:\n\n\n6. In the Integration editor page, click the trigger to open the trigger configuration pane. Then, do the following:\n - If you have input variables for your integration, then the **Test configuration** tab shows those input variables. The values that you enter in the variables are saved automatically.\n - To view the trigger properties, click the **Trigger properties** tab.\n\nConfigure test configurations for tasks\n---------------------------------------\n\nTo configure the test properties for the integrations task, select one of the following options:\n\n1. In the Google Cloud console, go to the **Application Integration** page.\n\n [Go to Application Integration](https://console.cloud.google.com/integrations)\n2. In the navigation menu, click **Integrations** .\n\n The **Integrations** page appears listing all the integrations available in the Google Cloud project.\n3. Select an existing integration for which you want to create a test. This opens the integration in the *integration editor*.\n\n4. Click **Test Case** and then click **Open test cases** . The **Test Cases** pane appears with a list of test cases for the current integration version.\n5. Select the test case from the list. In the Integration editor page, the designer canvas displays **Test case mode is active**.\n\n6. In the Integration editor page, click the task to open the test configuration pane. The following image shows the **Test configuration** pane for the task:\n\n\n In the **Test configuration** tab, follow these steps:\n 1. From the **Mock strategy type** , select one of the following mock strategies:\n - If you select **No mock** , then your task executes from the main integration as it should in the actual integration. By default, **No mock** strategy type is selected for tasks.\n - If you select **Mock execution** , then for **Mock execution status** , you must select one of the following:\n - **Skip:** Task is marked as successfully completed\n - **Failure:** Task is marked as failed\n - If you select **Mock Output** , then for **Task Output list**, you must provide the output of the tasks for the next node in the integration.\n 2. In the **Assertion strategy** section, do the following:\n 1. From the **Assertion type** field, select one of the following options:\n - If you select **Assert execution** , then select one of the following options for **Execution status to assert** :\n - **Success**\n - **Failure**\n - **Not executed**\n - If you select **Assert parameters** , then do the following:\n 1. From the **Parameters to assert** select if you want to assert parameters including input and output parameters.\n 2. Select the **Operator** for comparing the asserted parameter with the entered value. The operations to compare the asserted parameter can be one of the following:\n - Equals\n - Not equals\n - Contains\n 3. In the **Value** field, enter the value to which you want to compare the parameter.\n 2. Optional: To add more assertions, click **+ Add Assertion**.\n\nWhat's next\n-----------\n\n- Learn about [test cases](/application-integration/docs/test-cases).\n- Learn how to do the following:\n\n - [Create test cases](/application-integration/docs/create-test-cases).\n - [Copy](/application-integration/docs/manage-test-cases#copy) and [delete](/application-integration/docs/manage-test-cases#delete) test cases.\n - [Run a test case](/application-integration/docs/run-test-cases) and [view test case execution logs](/application-integration/docs/integration-execution-logs#view-integration-execution-logs).\n - [Upload and download test cases](/application-integration/docs/upload-download-test-cases)."]]