Ce document explique comment configurer des scénarios de test pour vos intégrations. Pour en savoir plus sur les cas de test, les configurations de test compatibles et les limites, consultez Présentation des cas de test.
Assurez-vous que votre intégration est à l'état DRAFT. Si votre intégration est à l'état PUBLISHED, cliquez sur Activer la modification. Une nouvelle version à l'état DRAFT est créée pour vous dans l'intégration.
La figure suivante montre le verrouillage de la modification dans l'éditeur d'intégration.
Assurez-vous d'avoir un cas de test dans l'intégration. Pour savoir comment créer un scénario de test, consultez Créer des scénarios de test.
Configurer des configurations de test pour les déclencheurs
Pour configurer les configurations de test du déclencheur, sélectionnez l'une des options suivantes :
Dans la console Google Cloud , accédez à la page Application Integration.
Dans le menu de navigation, cliquez sur Intégrations.
La page Intégrations s'affiche et liste toutes les intégrations disponibles dans le projet Google Cloud .
Sélectionnez une intégration existante pour laquelle vous souhaitez créer un test.
Cela entraîne son ouverture dans l'éditeur d'intégrations.
Cliquez sur Scénario de test, puis sur Ouvrir les scénarios de test. Le volet Scénarios de test s'affiche avec la liste des scénarios de test pour la version actuelle de l'intégration.
Sélectionnez le cas de test dans la liste.
Sur la page de l'éditeur d'intégration, le canevas du concepteur affiche Le mode "Cas de test" est actif. L'image suivante montre le volet Tester la configuration pour le déclencheur :
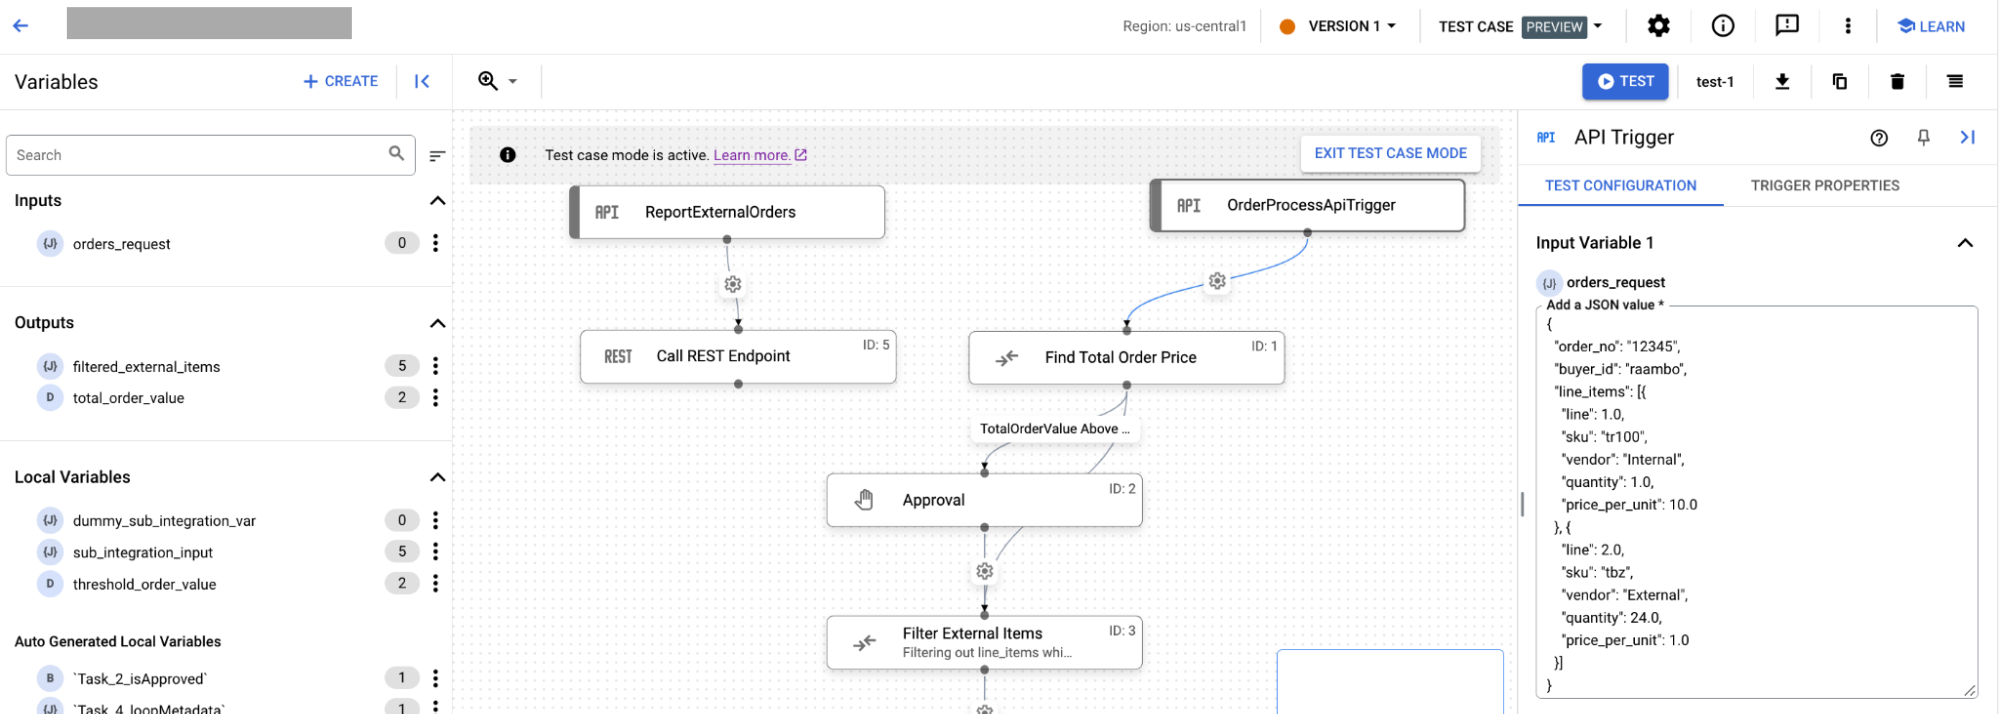
Sur la page de l'éditeur d'intégration, cliquez sur le déclencheur pour ouvrir le volet de configuration du déclencheur. Ensuite, procédez comme suit :
Si votre intégration comporte des variables d'entrée, l'onglet Tester la configuration les affiche. Les valeurs que vous saisissez dans les variables sont enregistrées automatiquement.
Pour afficher les propriétés du déclencheur, cliquez sur l'onglet Propriétés du déclencheur.
Configurer des configurations de test pour les tâches
Pour configurer les propriétés de test de la tâche d'intégrations, sélectionnez l'une des options suivantes :
Dans la console Google Cloud , accédez à la page Application Integration.
Dans le menu de navigation, cliquez sur Intégrations.
La page Intégrations s'affiche et liste toutes les intégrations disponibles dans le projet Google Cloud .
Sélectionnez une intégration existante pour laquelle vous souhaitez créer un test.
Cela entraîne son ouverture dans l'éditeur d'intégrations.
Cliquez sur Scénario de test, puis sur Ouvrir les scénarios de test. Le volet Scénarios de test s'affiche avec la liste des scénarios de test pour la version actuelle de l'intégration.
Sélectionnez le cas de test dans la liste.
Sur la page de l'éditeur d'intégration, le canevas du concepteur affiche Le mode "Cas de test" est actif.
Sur la page de l'éditeur d'intégrations, cliquez sur la tâche pour ouvrir le volet de configuration du test. L'image suivante montre le volet Tester la configuration de la tâche :
Dans l'onglet Configuration du test, procédez comme suit :
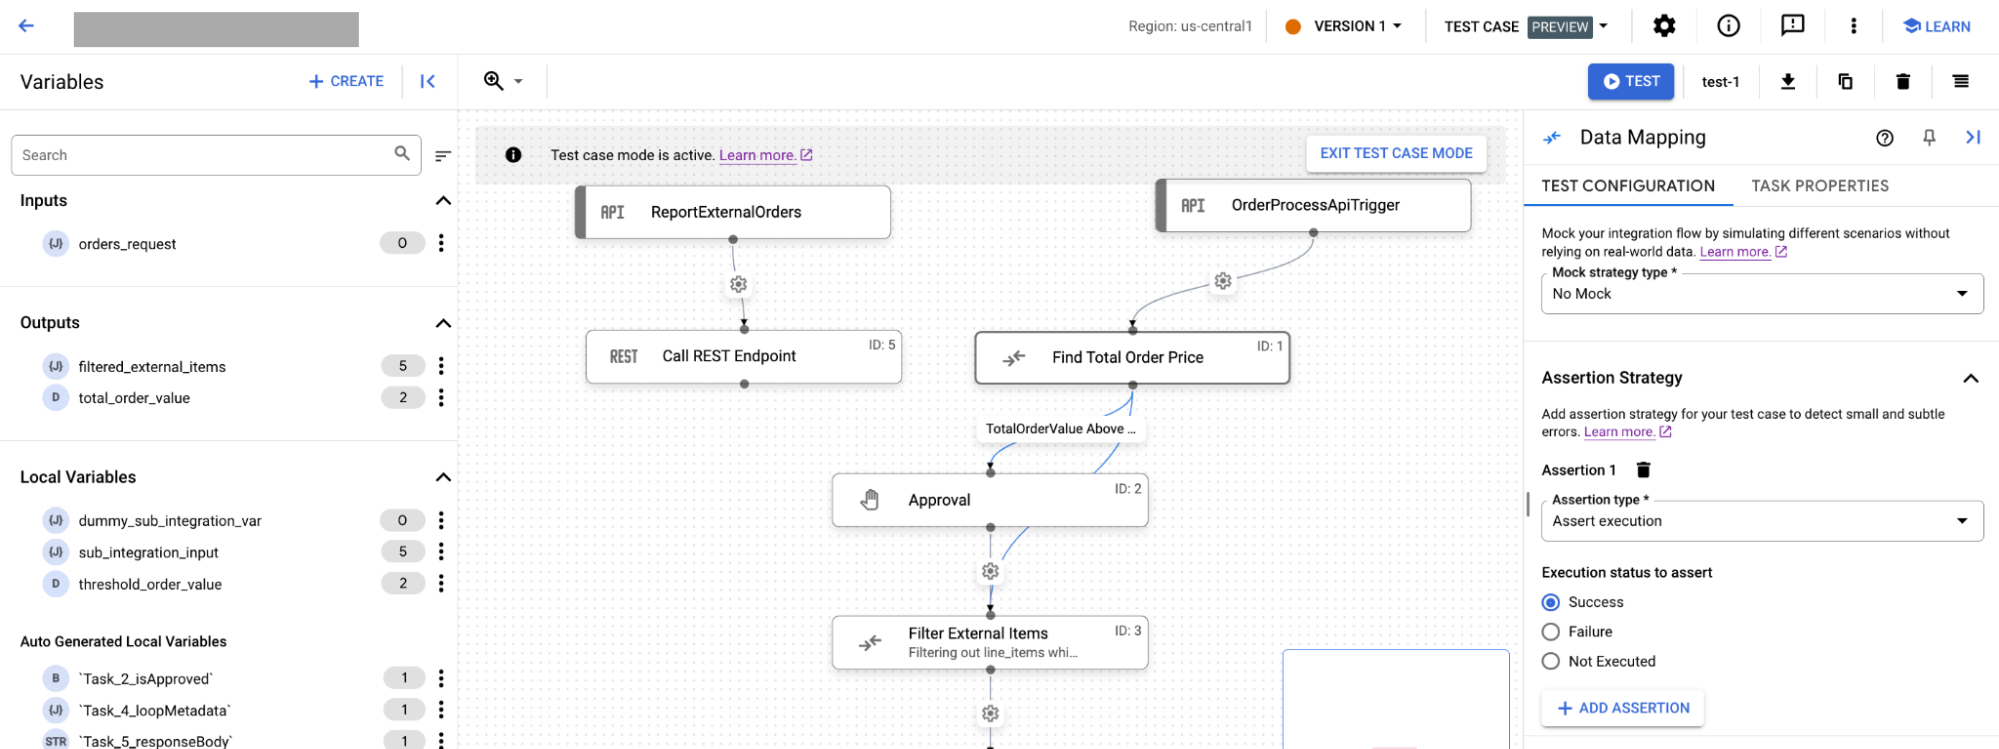
Dans Type de stratégie fictive, sélectionnez l'une des stratégies fictives suivantes :
Si vous sélectionnez Aucune simulation, votre tâche s'exécute à partir de l'intégration principale comme elle le devrait dans l'intégration réelle. Par défaut, le type de stratégie Aucune simulation est sélectionné pour les tâches.
Si vous sélectionnez Exécution fictive, vous devez choisir l'un des états suivants pour État de l'exécution fictive :
Ignorer : la tâche est marquée comme terminée.
Échec : la tâche est marquée comme ayant échoué.
Si vous sélectionnez Sortie fictive, vous devez fournir la sortie des tâches pour le nœud suivant dans l'intégration dans la liste des sorties de tâches.
Dans la section Stratégie d'assertion, procédez comme suit :
Dans le champ Type d'assertion, sélectionnez l'une des options suivantes :
Si vous sélectionnez Affirmer l'exécution, choisissez l'une des options suivantes pour État d'exécution à affirmer :
Opération réussie
Échec
Non exécuté
Si vous sélectionnez Assert parameters (Affirmer les paramètres), procédez comme suit :
Dans Paramètres à affirmer, sélectionnez si vous souhaitez affirmer des paramètres, y compris les paramètres d'entrée et de sortie.
Sélectionnez l'opérateur pour comparer le paramètre affirmé à la valeur saisie. Les opérations permettant de comparer le paramètre affirmé peuvent être les suivantes :
Est égal(e) à
Est différent(e) de
Contient
Dans le champ Valeur, saisissez la valeur à laquelle vous souhaitez comparer le paramètre.
Facultatif : Pour ajouter d'autres assertions, cliquez sur + Ajouter une assertion.
Sauf indication contraire, le contenu de cette page est régi par une licence Creative Commons Attribution 4.0, et les échantillons de code sont régis par une licence Apache 2.0. Pour en savoir plus, consultez les Règles du site Google Developers. Java est une marque déposée d'Oracle et/ou de ses sociétés affiliées.
Dernière mise à jour le 2025/09/03 (UTC).
[[["Facile à comprendre","easyToUnderstand","thumb-up"],["J'ai pu résoudre mon problème","solvedMyProblem","thumb-up"],["Autre","otherUp","thumb-up"]],[["Difficile à comprendre","hardToUnderstand","thumb-down"],["Informations ou exemple de code incorrects","incorrectInformationOrSampleCode","thumb-down"],["Il n'y a pas l'information/les exemples dont j'ai besoin","missingTheInformationSamplesINeed","thumb-down"],["Problème de traduction","translationIssue","thumb-down"],["Autre","otherDown","thumb-down"]],["Dernière mise à jour le 2025/09/03 (UTC)."],[[["\u003cp\u003eThis document provides instructions on how to configure test cases for integrations within Application Integration, covering both triggers and tasks.\u003c/p\u003e\n"],["\u003cp\u003eTo configure test cases, users must have the \u003ccode\u003eApplication Integration Editor\u003c/code\u003e IAM role, and their integration must be in the \u003ccode\u003eDRAFT\u003c/code\u003e state, accessible via the integrations page.\u003c/p\u003e\n"],["\u003cp\u003eTest configurations for triggers allow users to set input variables and view trigger properties, while test configurations for tasks allow selecting mock strategies and setting assertions.\u003c/p\u003e\n"],["\u003cp\u003eUsers have options to mock or skip tasks in test scenarios, or to assert their execution status or input/output parameters, all based on the selected testing criteria.\u003c/p\u003e\n"],["\u003cp\u003eThe guide also gives key information on how to create, copy, delete, run, upload and download test cases as well as view test case execution logs.\u003c/p\u003e\n"]]],[],null,["# Configure test cases\n\nSee the [supported connectors](/integration-connectors/docs/connector-reference-overview) for Application Integration.\n\nConfigure test cases\n====================\n\n|\n| **Preview\n| --- Test cases**\n|\n|\n| This feature is subject to the \"Pre-GA Offerings Terms\" in the General Service Terms section\n| of the [Service Specific Terms](/terms/service-terms#1).\n|\n| Pre-GA features are available \"as is\" and might have limited support.\n|\n| For more information, see the\n| [launch stage descriptions](/products#product-launch-stages).\n\nThis document describes how to configure test cases for your integrations. For information about test cases, supported test configurations, and its limitations, see [Introduction to test cases](/application-integration/docs/test-cases).\n\nBefore you begin\n----------------\n\n-\n\n To get the permission that\n you need to configure test cases,\n\n ask your administrator to grant you the\n\n\n [Application Integration Editor](/iam/docs/roles-permissions/integrations#integrations.integrationEditor) (`roles/integrations.integrationEditor`)\n IAM role on project.\n\n\n For more information about granting roles, see [Manage access to projects, folders, and organizations](/iam/docs/granting-changing-revoking-access).\n\n\n This predefined role contains the\n ` integrations.googleapis.com/testCases.create`\n permission,\n which is required to\n configure test cases.\n\n\n You might also be able to get\n this permission\n with [custom roles](/iam/docs/creating-custom-roles) or\n other [predefined roles](/iam/docs/roles-overview#predefined).\n- Ensure that your integration is in the `DRAFT` state. If your integration is in the `PUBLISHED` state, click **Enable Editing** . A new version in the `DRAFT` state is created in the integration for you. The following figure shows the edit lock in the integration editor.\n\n \u003cbr /\u003e\n\n\n- Ensure that you have a test case in the integration. For information about how to create a test case, see [Create Test Cases](/application-integration/docs/create-test-cases).\n\nConfigure test configurations for triggers\n------------------------------------------\n\nTo configure the test configurations for the trigger, select one of the following options:\n\n1. In the Google Cloud console, go to the **Application Integration** page.\n\n [Go to Application Integration](https://console.cloud.google.com/integrations)\n2. In the navigation menu, click **Integrations** .\n\n The **Integrations** page appears listing all the integrations available in the Google Cloud project.\n3. Select an existing integration for which you want to create a test. This opens the integration in the *integration editor*.\n\n4. Click **Test Case** and then click **Open test cases** . The **Test Cases** pane appears with a list of test cases for the current integration version.\n5. Select the test case from the list. In the Integration editor page, the designer canvas displays **Test case mode is active** . The following image shows the **Test configuration** pane for the trigger:\n\n\n6. In the Integration editor page, click the trigger to open the trigger configuration pane. Then, do the following:\n - If you have input variables for your integration, then the **Test configuration** tab shows those input variables. The values that you enter in the variables are saved automatically.\n - To view the trigger properties, click the **Trigger properties** tab.\n\nConfigure test configurations for tasks\n---------------------------------------\n\nTo configure the test properties for the integrations task, select one of the following options:\n\n1. In the Google Cloud console, go to the **Application Integration** page.\n\n [Go to Application Integration](https://console.cloud.google.com/integrations)\n2. In the navigation menu, click **Integrations** .\n\n The **Integrations** page appears listing all the integrations available in the Google Cloud project.\n3. Select an existing integration for which you want to create a test. This opens the integration in the *integration editor*.\n\n4. Click **Test Case** and then click **Open test cases** . The **Test Cases** pane appears with a list of test cases for the current integration version.\n5. Select the test case from the list. In the Integration editor page, the designer canvas displays **Test case mode is active**.\n\n6. In the Integration editor page, click the task to open the test configuration pane. The following image shows the **Test configuration** pane for the task:\n\n\n In the **Test configuration** tab, follow these steps:\n 1. From the **Mock strategy type** , select one of the following mock strategies:\n - If you select **No mock** , then your task executes from the main integration as it should in the actual integration. By default, **No mock** strategy type is selected for tasks.\n - If you select **Mock execution** , then for **Mock execution status** , you must select one of the following:\n - **Skip:** Task is marked as successfully completed\n - **Failure:** Task is marked as failed\n - If you select **Mock Output** , then for **Task Output list**, you must provide the output of the tasks for the next node in the integration.\n 2. In the **Assertion strategy** section, do the following:\n 1. From the **Assertion type** field, select one of the following options:\n - If you select **Assert execution** , then select one of the following options for **Execution status to assert** :\n - **Success**\n - **Failure**\n - **Not executed**\n - If you select **Assert parameters** , then do the following:\n 1. From the **Parameters to assert** select if you want to assert parameters including input and output parameters.\n 2. Select the **Operator** for comparing the asserted parameter with the entered value. The operations to compare the asserted parameter can be one of the following:\n - Equals\n - Not equals\n - Contains\n 3. In the **Value** field, enter the value to which you want to compare the parameter.\n 2. Optional: To add more assertions, click **+ Add Assertion**.\n\nWhat's next\n-----------\n\n- Learn about [test cases](/application-integration/docs/test-cases).\n- Learn how to do the following:\n\n - [Create test cases](/application-integration/docs/create-test-cases).\n - [Copy](/application-integration/docs/manage-test-cases#copy) and [delete](/application-integration/docs/manage-test-cases#delete) test cases.\n - [Run a test case](/application-integration/docs/run-test-cases) and [view test case execution logs](/application-integration/docs/integration-execution-logs#view-integration-execution-logs).\n - [Upload and download test cases](/application-integration/docs/upload-download-test-cases)."]]