En este documento, se describe cómo configurar casos de prueba para tus integraciones. Para obtener información sobre los casos de prueba, las configuraciones de prueba admitidas y sus limitaciones, consulta Introducción a los casos de prueba.
Asegúrate de que tu integración esté en el estado DRAFT. Si tu integración está en el estado PUBLISHED, haz clic en Habilitar edición. Se creará una versión nueva en el estado DRAFT en la integración.
En la siguiente figura, se muestra el bloqueo de edición en el editor de integración.
Asegúrate de tener un caso de prueba en la integración. Para obtener información sobre cómo crear un caso de prueba, consulta Crea casos de prueba.
Cómo configurar pruebas para activadores
Para configurar las opciones de prueba del activador, selecciona una de las siguientes opciones:
En la consola de Google Cloud , ve a la página Application Integration.
En el menú de navegación, haz clic en Integraciones.
Aparecerá la página Integraciones, en la que se enumeran todas las integraciones disponibles en el proyecto Google Cloud .
Selecciona una integración existente para la que deseas crear una prueba.
Esto abrirá la integración en la página del editor de integración.
Haz clic en Caso de prueba y, luego, en Abrir casos de prueba. Aparecerá el panel Casos de prueba con una lista de casos de prueba para la versión de integración actual.
Selecciona el caso de prueba de la lista.
En la página del editor de integración, el lienzo del diseñador muestra Test case mode is active. En la siguiente imagen, se muestra el panel Probar configuración del activador:
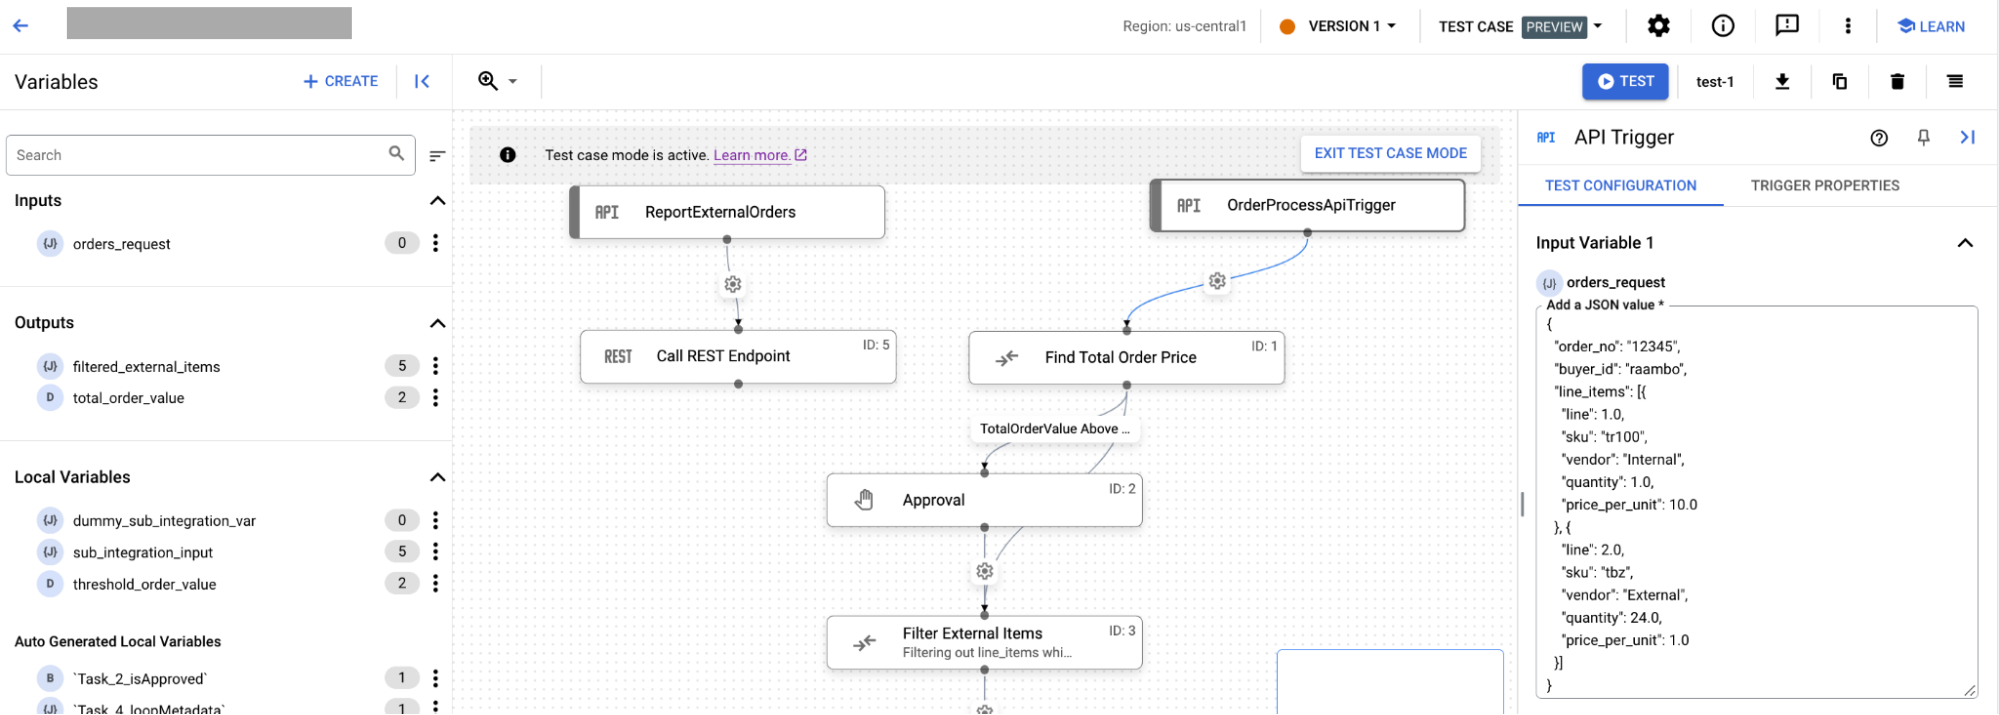
En la página del editor de integración, haz clic en el activador para abrir el panel de configuración del activador. Luego, sigue estos pasos:
Si tienes variables de entrada para tu integración, la pestaña Configuración de prueba mostrará esas variables. Los valores que ingreses en las variables se guardarán automáticamente.
Para ver las propiedades del activador, haz clic en la pestaña Propiedades del activador.
Configura pruebas para tareas
Para configurar las propiedades de prueba de la tarea de integraciones, selecciona una de las siguientes opciones:
En la consola de Google Cloud , ve a la página Application Integration.
En el menú de navegación, haz clic en Integraciones.
Aparecerá la página Integraciones, en la que se enumeran todas las integraciones disponibles en el proyecto Google Cloud .
Selecciona una integración existente para la que deseas crear una prueba.
Esto abrirá la integración en la página del editor de integración.
Haz clic en Caso de prueba y, luego, en Abrir casos de prueba. Aparecerá el panel Casos de prueba con una lista de casos de prueba para la versión de integración actual.
Selecciona el caso de prueba de la lista.
En la página del editor de integración, el lienzo del diseñador muestra Test case mode is active.
En la página del editor de integración, haz clic en la tarea para abrir el panel de configuración de la prueba. En la siguiente imagen, se muestra el panel Probar configuración de la tarea:
En la pestaña Configuración de la prueba, sigue estos pasos:
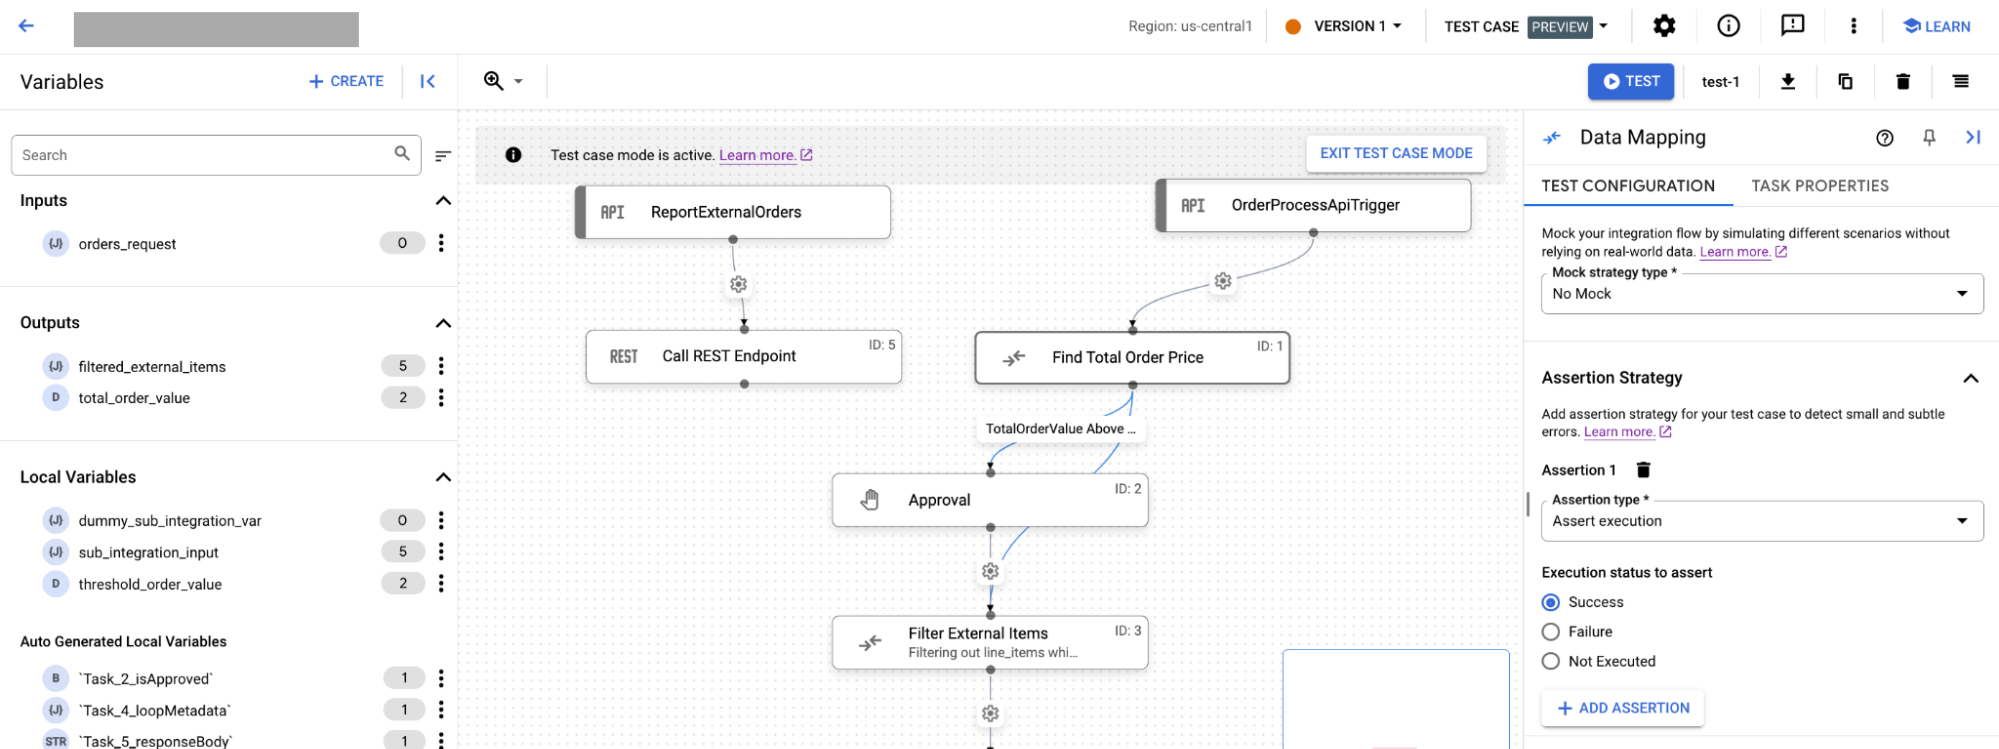
En Tipo de estrategia simulada, selecciona una de las siguientes estrategias simuladas:
Si seleccionas Sin simulación, la tarea se ejecutará desde la integración principal como debería hacerlo en la integración real. De forma predeterminada, se selecciona el tipo de estrategia Sin simulación para las tareas.
Si seleccionas Simular ejecución, en Estado de simulación de ejecución, debes seleccionar una de las siguientes opciones:
Omitir: La tarea se marca como completada correctamente.
Falla: La tarea se marca como con errores
Si seleccionas Mock Output, para la lista de resultados de la tarea, debes proporcionar el resultado de las tareas para el siguiente nodo de la integración.
En la sección Estrategia de aserción, haz lo siguiente:
En el campo Tipo de aserción, selecciona una de las siguientes opciones:
Si seleccionas Assert execution, elige una de las siguientes opciones para Execution status to assert:
Listo
Falla
No se ejecutó
Si seleccionas Assert parameters, haz lo siguiente:
En Parámetros para confirmar, selecciona si deseas confirmar parámetros, incluidos los de entrada y salida.
Selecciona el operador para comparar el parámetro confirmado con el valor ingresado. Las operaciones para comparar el parámetro confirmado pueden ser una de las siguientes:
Es igual a
No es igual a
Contiene
En el campo Valor, ingresa el valor con el que deseas comparar el parámetro.
Opcional: Para agregar más aserciones, haz clic en + Agregar aserción.
[[["Fácil de comprender","easyToUnderstand","thumb-up"],["Resolvió mi problema","solvedMyProblem","thumb-up"],["Otro","otherUp","thumb-up"]],[["Difícil de entender","hardToUnderstand","thumb-down"],["Información o código de muestra incorrectos","incorrectInformationOrSampleCode","thumb-down"],["Faltan la información o los ejemplos que necesito","missingTheInformationSamplesINeed","thumb-down"],["Problema de traducción","translationIssue","thumb-down"],["Otro","otherDown","thumb-down"]],["Última actualización: 2025-09-03 (UTC)"],[[["\u003cp\u003eThis document provides instructions on how to configure test cases for integrations within Application Integration, covering both triggers and tasks.\u003c/p\u003e\n"],["\u003cp\u003eTo configure test cases, users must have the \u003ccode\u003eApplication Integration Editor\u003c/code\u003e IAM role, and their integration must be in the \u003ccode\u003eDRAFT\u003c/code\u003e state, accessible via the integrations page.\u003c/p\u003e\n"],["\u003cp\u003eTest configurations for triggers allow users to set input variables and view trigger properties, while test configurations for tasks allow selecting mock strategies and setting assertions.\u003c/p\u003e\n"],["\u003cp\u003eUsers have options to mock or skip tasks in test scenarios, or to assert their execution status or input/output parameters, all based on the selected testing criteria.\u003c/p\u003e\n"],["\u003cp\u003eThe guide also gives key information on how to create, copy, delete, run, upload and download test cases as well as view test case execution logs.\u003c/p\u003e\n"]]],[],null,["# Configure test cases\n\nSee the [supported connectors](/integration-connectors/docs/connector-reference-overview) for Application Integration.\n\nConfigure test cases\n====================\n\n|\n| **Preview\n| --- Test cases**\n|\n|\n| This feature is subject to the \"Pre-GA Offerings Terms\" in the General Service Terms section\n| of the [Service Specific Terms](/terms/service-terms#1).\n|\n| Pre-GA features are available \"as is\" and might have limited support.\n|\n| For more information, see the\n| [launch stage descriptions](/products#product-launch-stages).\n\nThis document describes how to configure test cases for your integrations. For information about test cases, supported test configurations, and its limitations, see [Introduction to test cases](/application-integration/docs/test-cases).\n\nBefore you begin\n----------------\n\n-\n\n To get the permission that\n you need to configure test cases,\n\n ask your administrator to grant you the\n\n\n [Application Integration Editor](/iam/docs/roles-permissions/integrations#integrations.integrationEditor) (`roles/integrations.integrationEditor`)\n IAM role on project.\n\n\n For more information about granting roles, see [Manage access to projects, folders, and organizations](/iam/docs/granting-changing-revoking-access).\n\n\n This predefined role contains the\n ` integrations.googleapis.com/testCases.create`\n permission,\n which is required to\n configure test cases.\n\n\n You might also be able to get\n this permission\n with [custom roles](/iam/docs/creating-custom-roles) or\n other [predefined roles](/iam/docs/roles-overview#predefined).\n- Ensure that your integration is in the `DRAFT` state. If your integration is in the `PUBLISHED` state, click **Enable Editing** . A new version in the `DRAFT` state is created in the integration for you. The following figure shows the edit lock in the integration editor.\n\n \u003cbr /\u003e\n\n\n- Ensure that you have a test case in the integration. For information about how to create a test case, see [Create Test Cases](/application-integration/docs/create-test-cases).\n\nConfigure test configurations for triggers\n------------------------------------------\n\nTo configure the test configurations for the trigger, select one of the following options:\n\n1. In the Google Cloud console, go to the **Application Integration** page.\n\n [Go to Application Integration](https://console.cloud.google.com/integrations)\n2. In the navigation menu, click **Integrations** .\n\n The **Integrations** page appears listing all the integrations available in the Google Cloud project.\n3. Select an existing integration for which you want to create a test. This opens the integration in the *integration editor*.\n\n4. Click **Test Case** and then click **Open test cases** . The **Test Cases** pane appears with a list of test cases for the current integration version.\n5. Select the test case from the list. In the Integration editor page, the designer canvas displays **Test case mode is active** . The following image shows the **Test configuration** pane for the trigger:\n\n\n6. In the Integration editor page, click the trigger to open the trigger configuration pane. Then, do the following:\n - If you have input variables for your integration, then the **Test configuration** tab shows those input variables. The values that you enter in the variables are saved automatically.\n - To view the trigger properties, click the **Trigger properties** tab.\n\nConfigure test configurations for tasks\n---------------------------------------\n\nTo configure the test properties for the integrations task, select one of the following options:\n\n1. In the Google Cloud console, go to the **Application Integration** page.\n\n [Go to Application Integration](https://console.cloud.google.com/integrations)\n2. In the navigation menu, click **Integrations** .\n\n The **Integrations** page appears listing all the integrations available in the Google Cloud project.\n3. Select an existing integration for which you want to create a test. This opens the integration in the *integration editor*.\n\n4. Click **Test Case** and then click **Open test cases** . The **Test Cases** pane appears with a list of test cases for the current integration version.\n5. Select the test case from the list. In the Integration editor page, the designer canvas displays **Test case mode is active**.\n\n6. In the Integration editor page, click the task to open the test configuration pane. The following image shows the **Test configuration** pane for the task:\n\n\n In the **Test configuration** tab, follow these steps:\n 1. From the **Mock strategy type** , select one of the following mock strategies:\n - If you select **No mock** , then your task executes from the main integration as it should in the actual integration. By default, **No mock** strategy type is selected for tasks.\n - If you select **Mock execution** , then for **Mock execution status** , you must select one of the following:\n - **Skip:** Task is marked as successfully completed\n - **Failure:** Task is marked as failed\n - If you select **Mock Output** , then for **Task Output list**, you must provide the output of the tasks for the next node in the integration.\n 2. In the **Assertion strategy** section, do the following:\n 1. From the **Assertion type** field, select one of the following options:\n - If you select **Assert execution** , then select one of the following options for **Execution status to assert** :\n - **Success**\n - **Failure**\n - **Not executed**\n - If you select **Assert parameters** , then do the following:\n 1. From the **Parameters to assert** select if you want to assert parameters including input and output parameters.\n 2. Select the **Operator** for comparing the asserted parameter with the entered value. The operations to compare the asserted parameter can be one of the following:\n - Equals\n - Not equals\n - Contains\n 3. In the **Value** field, enter the value to which you want to compare the parameter.\n 2. Optional: To add more assertions, click **+ Add Assertion**.\n\nWhat's next\n-----------\n\n- Learn about [test cases](/application-integration/docs/test-cases).\n- Learn how to do the following:\n\n - [Create test cases](/application-integration/docs/create-test-cases).\n - [Copy](/application-integration/docs/manage-test-cases#copy) and [delete](/application-integration/docs/manage-test-cases#delete) test cases.\n - [Run a test case](/application-integration/docs/run-test-cases) and [view test case execution logs](/application-integration/docs/integration-execution-logs#view-integration-execution-logs).\n - [Upload and download test cases](/application-integration/docs/upload-download-test-cases)."]]