Le déclencheur de collecteur d'erreur vous permet d'appeler un collecteur d'erreur défini ou personnalisé pour gérer l'échec d'une condition de déclencheur, de tâche ou de périphérie identifiée dans votre intégration.
Ajouter un déclencheur de collecteur d'erreur
Pour ajouter un déclencheur de collecteur d'erreur dans votre intégration, procédez comme suit :
Dans la console Google Cloud , accédez à la page Application Integration (Intégration d'applications).
Dans le menu de navigation, cliquez sur Intégrations.
La page Liste des intégrations s'affiche et liste toutes les intégrations disponibles dans le projet Google Cloud.
Sélectionnez une intégration existante ou cliquez sur Créer une intégration pour en créer une.
Si vous créez une intégration :
Saisissez un nom et une description dans le volet Créer une intégration.
Sélectionnez une région pour l'intégration.
Sélectionnez un compte de service pour l'intégration. Vous pouvez modifier ou mettre à jour les informations du compte de service d'une intégration à tout moment dans le volet infoRécapitulatif de l'intégration de la barre d'outils d'intégration.
Cliquez sur Créer.
L'intégration créée s'ouvre dans l'éditeur d'intégration.
Dans la barre de navigation de l'éditeur d'intégrations, cliquez sur Déclencheurs pour afficher la liste des déclencheurs disponibles.
Cliquez sur l'élément de déclencheur de collecteur d'erreur et placez-le dans le concepteur d'intégration.
Configurer le déclencheur de collecteur d'erreur
Cliquez sur l'élément déclencheur de collecteur d'erreur dans le concepteur d'intégration pour afficher le volet de configuration du déclencheur.
L'onglet Configuration affiche l'ID du collecteur d'erreur, qui est généré automatiquement lorsque vous ajoutez le déclencheur dans votre concepteur d'intégration. Si nécessaire, vous pouvez modifier l'ID généré automatiquement. Aucune configuration supplémentaire n'est requise pour ce déclencheur.
Créer la logique de collecteur d'erreurs
Une fois que vous avez ajouté le déclencheur de collecteur d'erreur dans le concepteur d'intégration, vous pouvez créer votre logique collecteur d'erreur personnalisée à l'aide des tâches disponibles dans Application Integration. Cliquez sur les éléments de tâches d'intégration souhaités dans le concepteur d'intégration, puis connectez-les à votre déclencheur de collecteur d'erreurs.
Associer le collecteur d'erreurs
Une fois que vous avez créé votre logique personnalisée de collecteur d'erreurs, vous pouvez l'utiliser pour gérer les erreurs ou les échecs d'exécution au niveau de la tâche et de l'événement. Pour utiliser ou associer un collecteur d'erreurs dans votre intégration principale, procédez comme suit :
Cliquez sur le déclencheur ou la tâche existante dans votre intégration principale pour ouvrir le volet de configuration du déclencheur ou de la tâche.
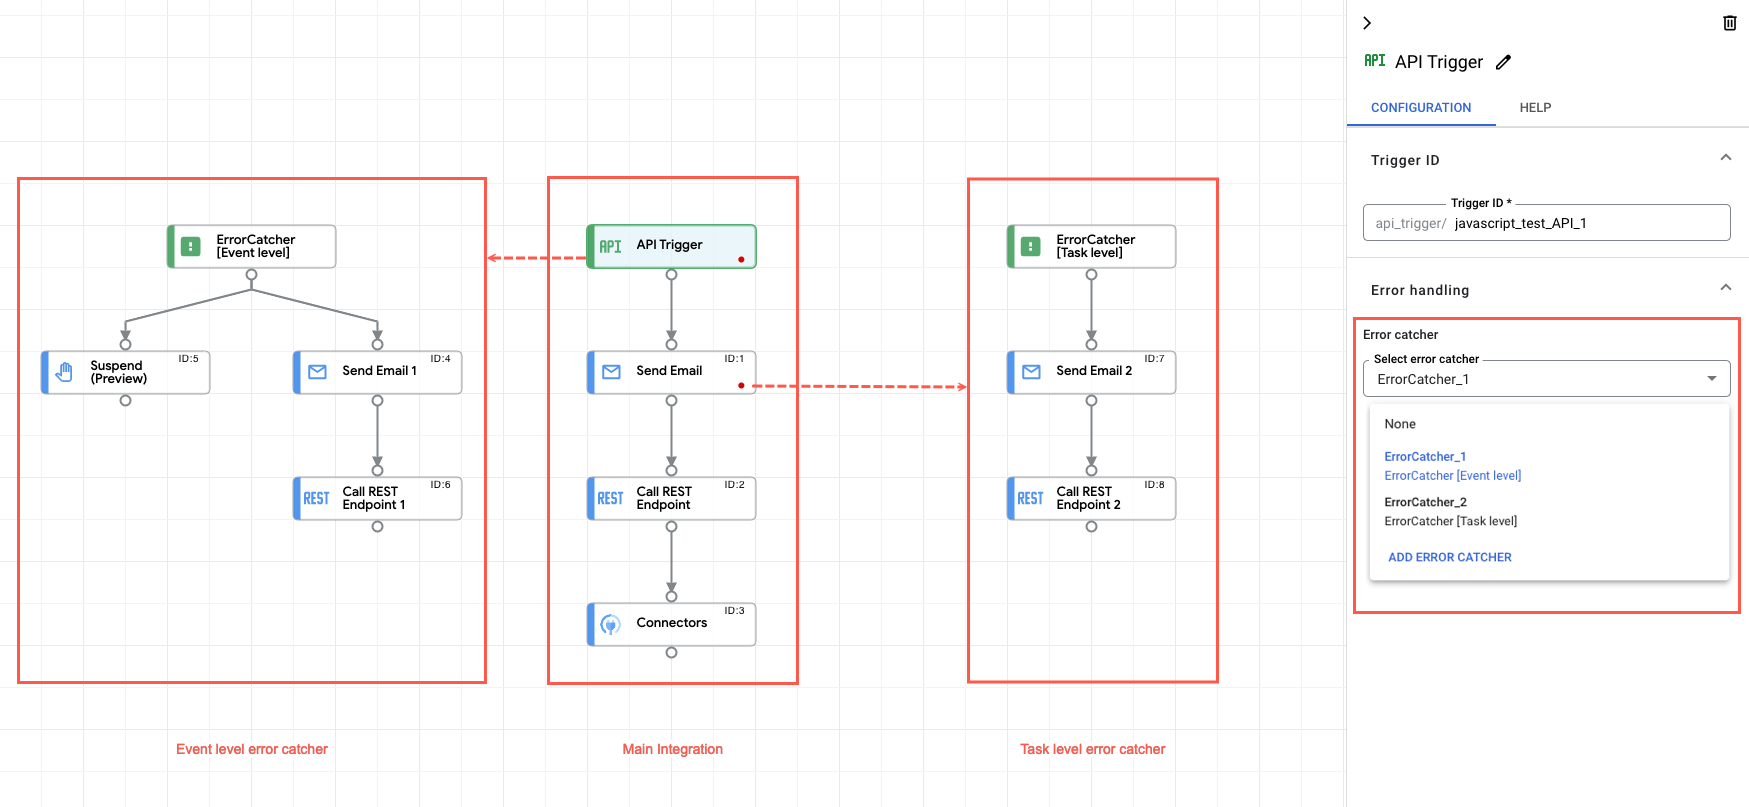
Dans le volet de configuration, développez la section Traitement des erreurs, puis accédez à Collecteur d'erreurs.
Cliquez sur Sélectionner le collecteur d'erreurs et sélectionnez l'ID du déclencheur de collecteur d'erreurs que vous souhaitez utiliser.
Un indicateur rouge s'affiche sur l'élément de tâche ou de déclencheur correspondant pour indiquer qu'il est associé à un collecteur d'erreurs.
L'image suivante montre un exemple de flux d'intégration qui utilise un collecteur d'erreurs :
Quotas et limites
Pour plus d'informations sur les quotas et les limites, consultez la section Quotas et limites.
Sauf indication contraire, le contenu de cette page est régi par une licence Creative Commons Attribution 4.0, et les échantillons de code sont régis par une licence Apache 2.0. Pour en savoir plus, consultez les Règles du site Google Developers. Java est une marque déposée d'Oracle et/ou de ses sociétés affiliées.
Dernière mise à jour le 2025/09/03 (UTC).
[[["Facile à comprendre","easyToUnderstand","thumb-up"],["J'ai pu résoudre mon problème","solvedMyProblem","thumb-up"],["Autre","otherUp","thumb-up"]],[["Difficile à comprendre","hardToUnderstand","thumb-down"],["Informations ou exemple de code incorrects","incorrectInformationOrSampleCode","thumb-down"],["Il n'y a pas l'information/les exemples dont j'ai besoin","missingTheInformationSamplesINeed","thumb-down"],["Problème de traduction","translationIssue","thumb-down"],["Autre","otherDown","thumb-down"]],["Dernière mise à jour le 2025/09/03 (UTC)."],[[["\u003cp\u003eThe Error Catcher trigger allows you to define custom logic to handle failures in your integration at the trigger, task, or edge level.\u003c/p\u003e\n"],["\u003cp\u003eAdding the Error Catcher trigger involves placing it in the integration designer, after navigating to the integration editor and selecting the triggers panel.\u003c/p\u003e\n"],["\u003cp\u003eThe Error Catcher trigger has an auto-generated ID that can be edited, and this ID is unique, meaning no other Error Catcher trigger can share it.\u003c/p\u003e\n"],["\u003cp\u003eAfter creating the Error Catcher trigger, you can build custom error-handling logic using the available tasks in Application Integration.\u003c/p\u003e\n"],["\u003cp\u003eTo attach the Error Catcher, you select the desired ID in the error handling section of a trigger or task in the main integration.\u003c/p\u003e\n"]]],[],null,["# Error catcher trigger\n\nSee the [supported connectors](/integration-connectors/docs/connector-reference-overview) for Application Integration.\n\nError catcher trigger\n=====================\n\n\nThe **Error Catcher** trigger lets you invoke an [error catcher](/application-integration/docs/error-catcher) that is defined or customized to handle the failure of an identified trigger, task, or edge condition in your integration.\n\nAdd an Error Catcher trigger\n----------------------------\n\nTo add an **Error Catcher** trigger in your integration, perform the following steps:\n\n1. In the Google Cloud console, go to the **Application Integration** page.\n\n [Go to Application Integration](https://console.cloud.google.com/integrations)\n2. In the navigation menu, click **Integrations**\n\n\n The **Integrations List** page appears listing all the integrations available in the Google Cloud project.\n3. Select an existing integration or click **Create integration** to create a new one.\n\n\n If you are creating a new integration:\n 1. Enter a name and description in the **Create Integration** pane.\n 2. Select a region for the integration. **Note:** The **Regions** dropdown only lists the regions provisioned in your Google Cloud project. To provision a new region, Click **Enable Region** . See [Enable new region](/application-integration/docs/enable-new-region) for more information.\n 3. Select a service account for the integration. You can change or update the service account details of an integration any time from the info **Integration summary** pane in the integration toolbar. **Note:** The option to select a service account is displayed only if you have enabled integration governance for the selected region.\n 4. Click **Create**.\n\n\n The newly created integration opens in the *integration editor*.\n4. In the *integration editor* navigation bar, click **Triggers** to view the list of available triggers.\n5. Click and place the **Error Catcher** trigger element in the integration designer.\n\nConfigure the Error Catcher trigger\n-----------------------------------\n\nClick the **Error Catcher** trigger element in the integration designer to view the trigger configuration\npane.\n\nThe **Configuration** tab displays the **Error catcher ID**, which is auto-generated when you add the trigger in your integration designer. You can optionally edit the auto-generated ID if needed. No further configuration is required for this trigger.\n| **Note:** Error catcher IDs are unique to each **Error Catcher** trigger, therefore you can't have more than one **Error Catcher** trigger with the same **Error catcher ID**.\n\n\u003cbr /\u003e\n\nCreate the error catcher logic\n------------------------------\n\n\nOnce you have added the **Error Catcher** trigger in the integration designer, you can create your custom [error catcher](/application-integration/docs/error-catcher) logic using the available tasks in Application Integration. Click and place the desired\n[integration tasks](/application-integration/docs/how-to-guides#configure-integration-tasks)\nelements in the integration designer and connect them with your **Error Catcher** trigger.\n\n\n### Attach the error catcher\n\nOnce you have created your custom error catcher logic, you can use it to handle the errors or execution failures at both, the [task](/application-integration/docs/error-catcher#task) and [event](/application-integration/docs/error-catcher#event) levels. To use or attach an error catcher in your main integration, perform the following steps:\n\n1. Click the existing trigger or task in your main integration to open the trigger or task configuration pane.\n2. In the configuration pane, expand the **Error handling** section and go to **Error catcher**.\n3. Click **Select error catcher** and select the **Error Catcher** trigger ID that you want to use.\n\n A red indicator appears on the respective trigger or task element indicating that the element is attached to an error catcher.\n\n| **Notes:**\n|\n| - You can't attach multiple error catchers to the same task or trigger in your main integration.\n| - Error catchers can't be nested. This means that you cannot invoke an Error catcher trigger using another Error catcher trigger in your integration.\n| - You cannot establish an edge connection between the tasks configured inside an error catcher and the tasks or triggers used in your main integration flow.\n\nThe following image shows a sample integration flow that uses error catcher:\n\n\nQuotas and limits\n-----------------\n\nFor information about quotas and limits, see [Quotas and limits](/application-integration/docs/quotas).\n\nWhat's next\n-----------\n\n- Learn about [all tasks and triggers](/application-integration/docs/all-triggers-tasks).\n- Learn how to [test and publish an integration](/application-integration/docs/test-publish-integrations).\n\n- Learn about [error handling](/application-integration/docs/error-handling-strategy).\n- Learn about [integration execution logs](/application-integration/docs/introduction-logs)."]]