This page shows how to mount a Cloud Storage bucket as a storage volume, using Cloud Run volume mounts.
Mounting the bucket as a volume in Cloud Run presents the bucket content as files in the container file system. After you mount the bucket as a volume, you access the bucket as if it were a directory on your local file system, using your programming language's file system operations and libraries instead of using Google API Client Libraries.
You can mount your volume as read-only and you can also specify mount options for your volume.
Memory requirements
Cloud Storage volume mounts use the Cloud Run container memory for the following activities:For all Cloud Storage FUSE caching, Cloud Run uses the stat cache setting with a Time-to-live (TTL) of 60 seconds by default. The default maximum size of the stat cache is 32 MB, the default maximum size of the type cache is 4 MiB.
When reading from Cloud Storage, Cloud Storage FUSE makes API calls to read an object directly, without downloading the whole file to a local directory. Cloud Storage FUSE establishes a TCP connection, and reads back the entire Cloud Storage object, or just portions of the file you specify in your application or the operating system through an offset. When reading, Cloud Storage FUSE also consumes memory other than stat and type caches, such as a 1 MiB array for every file it reads, and for
goroutines.When writing to Cloud Storage, Cloud Storage FUSE supports
streaming-writes, a write path, by default. Cloud Storage FUSE uploads data directly to Cloud Storage without fully staging the file. Each file you open for streaming writes consumes approximately 64 MiB of memory during the upload process. This reduces both latency and disk space usage, making it particularly beneficial for large, sequential writes.
Limitations
Since Cloud Run uses Cloud Storage FUSE for this volume mount, there are a few things to keep in mind when mounting a Cloud Storage bucket as a volume:
- Cloud Storage FUSE does not provide concurrency control for multiple writes (file locking) to the same file. When multiple writes try to replace a file, the last write wins and all previous writes are lost.
- Cloud Storage FUSE is not a fully POSIX-compliant file system. For more details, refer to the Cloud Storage FUSE documentation.
Disallowed paths
Cloud Run does not allow you to mount a volume at /dev,
/proc, or /sys, or on their subdirectories.
Before you begin
You need a Cloud Storage bucket to mount as the volume.
For optimal read/write performance to Cloud Storage, see Optimizing Cloud Storage FUSE network bandwidth performance.
Required roles
To get the permissions that you need to configure Cloud Storage volume mounts, ask your administrator to grant you the following IAM roles:
-
Cloud Run Developer (
roles/run.developer) on the Cloud Run service -
Service Account User (
roles/iam.serviceAccountUser) on the service identity
To get the permissions that your service identity
needs to access the file and Cloud Storage bucket, ask your administrator
to grant the service identity the
Storage Object Viewer
(roles/storage.objectViewer) role. If the service identity needs to also
perform write operations in a bucket, grant the
Storage Object User
(roles/storage.objectUser) role instead.
For more details on Cloud Storage roles and permissions, see IAM for Cloud Storage.
For a list of IAM roles and permissions that are associated with Cloud Run, see Cloud Run IAM roles and Cloud Run IAM permissions. If your Cloud Run service interfaces with Google Cloud APIs, such as Cloud Client Libraries, see the service identity configuration guide. For more information about granting roles, see deployment permissions and manage access.
Mount a Cloud Storage volume
You can mount multiple buckets at different mount paths. You can also mount a volume to more than one container using the same or different mount paths across containers.
If you are using multiple containers, first specify the volumes, then specify the volume mounts for each container.
Volume mounts require the second generation execution environment. Cloud Run automatically selects the second generation execution environment for your service if no execution environment is explicitly configured.
Console
In the Google Cloud console, go to Cloud Run:
Select Services from the menu, and click Deploy container to configure a new service. If you are configuring an existing service, click the service, then click Edit and deploy new revision.
If you are configuring a new service, fill out the initial service settings page, then click Container(s), Volumes, Networking, Security to expand the service configuration page.
Click the Volumes tab.
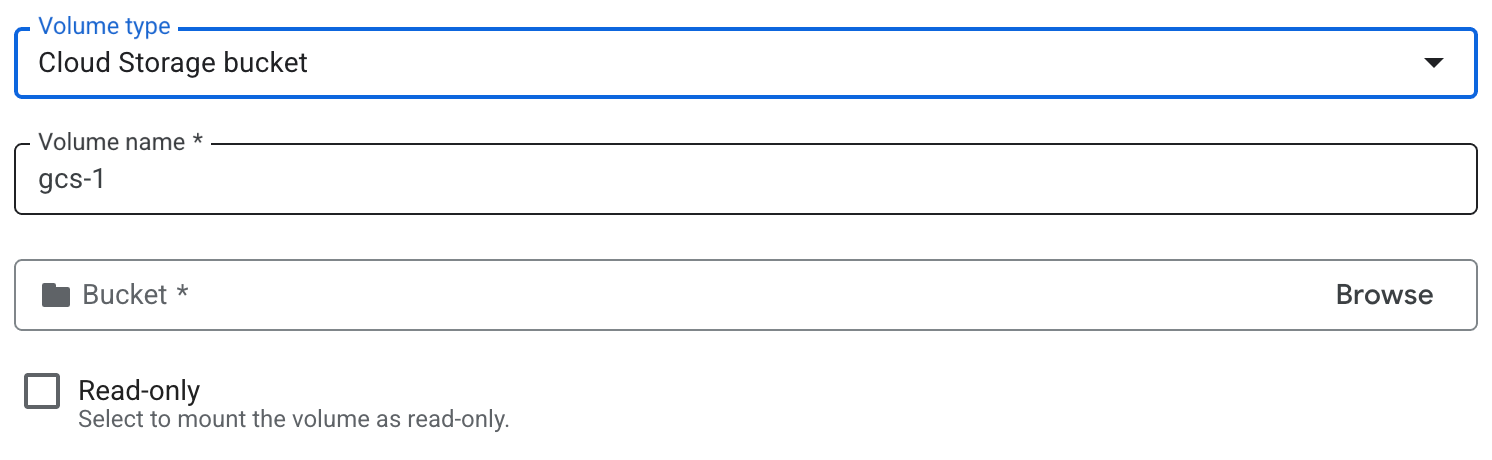
- Click Add volume.
- In the Volume type drop-down, select Cloud Storage bucket as the volume type.
- In the Volume name field, enter the name you want to use for the volume.
- Browse and select the Cloud Storage bucket or a specific directory to be used for the volume. Optionally, create a new bucket.
- If you want to make the bucket read-only, select the Read-only checkbox.
- Click Done.
- Click the Container tab:
- Click the Volume Mounts tab.
- Click Mount volume.
- Select the storage volume from the menu.
- Specify the path where you want to mount the volume.
- Click Done
Click Create or Deploy.
gcloud
To add a volume and mount it:
gcloud run services update SERVICE \
--add-volume name=VOLUME_NAME,type=cloud-storage,bucket=BUCKET_NAME \
--add-volume-mount volume=VOLUME_NAME,mount-path=MOUNT_PATH
Replace the following:
- SERVICE: the name of your service.
- MOUNT_PATH: the relative path where you are mounting the
volume—for example,
/mnt/my-volume. - VOLUME_NAME: any name you want for your volume. The VOLUME_NAME value is used to map the volume to the volume mount.
- BUCKET_NAME: the name of your Cloud Storage bucket.
To mount your volume as a read-only volume:
--add-volume=name=VOLUME_NAME,type=cloud-storage,bucket=BUCKET_NAME,readonly=true
If you are using multiple containers, first specify your volume(s), then specify the volume mount(s) for each container:
gcloud run services update SERVICE \
--add-volume name=VOLUME_NAME,type=cloud-storage,bucket=BUCKET_NAME \
--container CONTAINER_1 \
--add-volume-mount volume=VOLUME_NAME,mount-path=MOUNT_PATH \
--container CONTAINER_2 \
--add-volume-mount volume=VOLUME_NAME,mount-path=MOUNT_PATH2
YAML
If you are creating a new service, skip this step. If you are updating an existing service, download its YAML configuration:
gcloud run services describe SERVICE --format export > service.yaml
Update as needed.
apiVersion: serving.knative.dev/v1
kind: Service
metadata:
  name: SERVICE
spec:
  template:
    metadata:
      annotations:
        run.googleapis.com/execution-environment: gen2
    spec:
      containers:
      - image: IMAGE_URL
        volumeMounts:
        - name: VOLUME_NAME
          mountPath: MOUNT_PATH
      volumes:
      - name: VOLUME_NAME
        csi:
          driver: gcsfuse.run.googleapis.com
          readOnly: IS_READ_ONLY
          volumeAttributes:
            bucketName: BUCKET_NAME
Replace the following:
- IMAGE_URL: a reference to the container image, for
example,
us-docker.pkg.dev/cloudrun/container/hello:latest. If you use Artifact Registry, the repository REPO_NAME must already be created. The URL follows the format ofLOCATION-docker.pkg.dev/PROJECT_ID/REPO_NAME/PATH:TAG. - MOUNT_PATH: the relative path where you are mounting the
volume—for example,
/mnt/my-volume. - VOLUME_NAME: any name you want for your volume. The VOLUME_NAME value is used to map the volume to the volume mount.
- IS_READ_ONLY:
Trueto make the volume read-only, orFalseto allow writes. - BUCKET_NAME: the name of the Cloud Storage bucket.
- IMAGE_URL: a reference to the container image, for
example,
Create or update the service using the following command:
gcloud run services replace service.yaml
Terraform
To learn how to apply or remove a Terraform configuration, see Basic Terraform commands.
Add the following to agoogle_cloud_run_v2_service
resource in your Terraform configuration: resource "google_cloud_run_v2_service" "default" {
name = "SERVICE"
location = "REGION"
template {
containers {
image = "IMAGE_URL"
volume_mounts {
name = "VOLUME_NAME"
mount_path = "MOUNT_PATH"
}
}
volumes {
name = "VOLUME_NAME"
gcs {
bucket = google_storage_bucket.default.name
read_only = IS_READ_ONLY
}
}
}
}
resource "google_storage_bucket" "default" {
name = "BUCKET_NAME"
location = "REGION"
}
Replace the following:
- SERVICE: the name of your Cloud Run service.
- REGION: the Google Cloud region.
- IMAGE_URL: a reference to the container image, for
example,
us-docker.pkg.dev/cloudrun/container/hello:latest. If you use Artifact Registry, the repository REPO_NAME must already be created. The URL follows the format ofLOCATION-docker.pkg.dev/PROJECT_ID/REPO_NAME/PATH:TAG. - VOLUME_NAME: any name you want for your volume. The VOLUME_NAME value is used to map the volume to the volume mount.
- MOUNT_PATH: the relative path where you are mounting the
volume—for example,
/mnt/my-volume. - IS_READ_ONLY:
Trueto make the volume read-only, orFalseto allow writes. - BUCKET_NAME: the name of the Cloud Storage bucket.
Reading and writing to a volume
If you use the Cloud Run volume mount feature, you access a mounted volume using the same libraries in your programming language that you use to read and write files on your local file system.
This is especially useful if you're using an existing container that expects data to be stored on the local file system and uses regular file system operations to access it.
The following snippets assume a volume mount with a mountPath set to /mnt/my-volume.
Nodejs
Use the File System module to create a new file or append to an existing file
in the volume, /mnt/my-volume:
var fs = require('fs');
fs.appendFileSync('/mnt/my-volume/sample-logfile.txt', 'Hello logs!', { flag: 'a+' });
Python
Write to a file kept in the volume, /mnt/my-volume:
f = open("/mnt/my-volume/sample-logfile.txt", "a")Go
Use the os package to create a new file kept in the volume, /mnt/my-volume:
f, err := os.Create("/mnt/my-volume/sample-logfile.txt")Java
Use the Java.io.File class to create a log file in the volume, /mnt/my-volume:
import java.io.File;
File f = new File("/mnt/my-volume/sample-logfile.txt");
Volume configuration using mount options
You can optionally use mount options to configure various properties of your volume mount. The available mount options allow you to configure cache settings, mount a specific directory, enable debug logging, and other behaviors.
Specify mount options
You can specify mount options using the Google Cloud console, the Google Cloud CLI, YAML, or Terraform. The mount options are separated by semicolons (;) in Google Cloud CLI and are separated by commas in YAML, as shown in the following tabs:
Console
To specify mount options for an existing volume:
In the Google Cloud console, go to Cloud Run:
Select Services from the menu.
Click the service, then click Edit and deploy new revision.
Click the Volumes tab.
- Click the volume you want to edit.
- Click Configure mount options.
- Configure mount options by updating the appropriate fields or by adding mount options manually.
- Click Save.
If you haven't already mounted this volume in a container, click the Container tab:
- Click the Volume Mounts tab.
- Click Mount volume.
- Select the storage volume from the menu.
- Specify the path where you want to mount the volume.
Click Done.
Click Deploy.
gcloud
To add a volume and mount it with mount options:
gcloud run services update SERVICE \
    --execution-environment gen2 \
    --add-volume name=VOLUME_NAME,type=cloud-storage,bucket=BUCKET_NAME,mount-options="OPTION_1=VALUE_1;OPTION_N=VALUE_N" \
    --add-volume-mount volume=VOLUME_NAME,mount-path=MOUNT_PATH
Replace the following:
- SERVICE: the name of your service.
- VOLUME_NAME: any name you want for your volume. The VOLUME_NAME value is used to map the volume to the volume mount.
- BUCKET_NAME: the name of your Cloud Storage bucket.
- OPTION_1: the first mount option. Note that you can specify as many mount options as you need, with each mount option and value pair separated by a semicolon.
- VALUE_1: the setting you want for the first mount option.
- OPTION_N: the next mount option.
- VALUE_N: the setting for the next mount option.
- MOUNT_PATH: the relative path where you are mounting the
volume—for example,
/cache.
YAML
If you are creating a new service, skip this step. If you are updating an existing service, download its YAML configuration:
gcloud run services describe SERVICE --format export > service.yaml
Update as needed.
apiVersion: serving.knative.dev/v1
kind: Service
metadata:
  name: SERVICE
spec:
  template:
    metadata:
      annotations:
        run.googleapis.com/execution-environment: gen2
    spec:
      containers:
      - image: IMAGE_URL
        volumeMounts:
        - name: VOLUME_NAME
          mountPath: MOUNT_PATH
      volumes:
      - name: VOLUME_NAME
        csi:
          driver: gcsfuse.run.googleapis.com
          readOnly: IS_READ_ONLY
          volumeAttributes:
            bucketName: BUCKET_NAME
            mountOptions: OPTION_1=VALUE_1,OPTION_N=VALUE_N
Replace the following:
- IMAGE_URL: a reference to the container image that
contains the worker pool, such as
us-docker.pkg.dev/cloudrun/container/worker-pool:latest - MOUNT_PATH: the relative path where you are mounting the
volume—for example,
/cache. - VOLUME_NAME: any name you want for your volume. The VOLUME_NAME value is used to map the volume to the volume mount.
- IS_READ_ONLY:
Trueto make the volume read-only, orFalseto allow writes. - BUCKET_NAME: the name of the Cloud Storage bucket.
- OPTION_1: the first mount option. Note that you can specify as many mount options as you need, with each mount option and value pair separated by a comma.
- VALUE_1: the setting you want for the first mount option.
- OPTION_N: the next mount option.
- VALUE_N: the setting for the next mount option.
- IMAGE_URL: a reference to the container image that
contains the worker pool, such as
Create or update the service using the following command:
gcloud run services replace service.yaml
Terraform
To learn how to apply or remove a Terraform configuration, see Basic Terraform commands.
Add the following to agoogle_cloud_run_v2_service
resource in your Terraform configuration: resource "google_cloud_run_v2_service" "default" {
provider = google-beta
name = "SERVICE"
location = "REGION"
template {
containers {
image = "IMAGE_URL"
volume_mounts {
name = "VOLUME_NAME"
mount_path = "MOUNT_PATH"
}
}
volumes {
name = "VOLUME_NAME"
gcs {
bucket = google_storage_bucket.default.name
read_only = IS_READ_ONLY
mount_options = ["OPTION_1=VALUE_1", "OPTION_N=VALUE_N", "OPTION_O"]
}
}
}
}
Replace the following:
- SERVICE: the name of your Cloud Run service.
- REGION: the Google Cloud region.
- IMAGE_URL: a reference to the container image that
contains the worker pool, such as
us-docker.pkg.dev/cloudrun/container/worker-pool:latest - VOLUME_NAME: any name you want for your volume. The VOLUME_NAME value is used to map the volume to the volume mount.
- MOUNT_PATH: the relative path where you are mounting the
volume—for example,
/mnt/my-volume. - IS_READ_ONLY:
Trueto make the volume read-only, orFalseto allow writes. - BUCKET_NAME: the name of the Cloud Storage bucket.
- OPTION_1: the first mount option. Note that you can specify as many mount options as you need, with each mount option and value pair separated by a comma.
- VALUE_1: the setting you want for the first mount option.
- OPTION_N: the second mount option, if applicable.
- VALUE_N: the setting for the second mount option.
- OPTION_O: the third mount option, if applicable. Some mount options don't have a value.
Commonly used mount options
Mount options are commonly used to:
- Configure cache settings
- Mount only a specific directory from the Cloud Storage bucket
- Configure the ownership of the volume (
uid,gid) - Turn off implicit directories
- Specify debug logging levels.
Configure caching settings
You can change the caching settings for your volume by setting the caching-related mount options. The following table lists the settings, along with the default Cloud Run values :
| Cache setting | Description | Default |
|---|---|---|
metadata-cache-ttl-secs |
Time to live (TTL) in seconds of cached metadata entries. For example, metadata-cache-ttl-secs=120s. To use the most up-to-date file, specify a value of 0. To always use the cached version, specify a value of -1. To learn more, see Configuring cache invalidation. |
60 |
stat-cache-max-size-mb |
Maximum size in mebibytes (MiB) that the stat cache can use. The stat cache is always entirely kept in memory, impacting memory consumption. Specify a value of 32 if your workload involves up to 20,000 files. If your workload uses more than 20,000 files, increase the size by values of 10 for every additional 6,000 files, where the stat cache uses an average of 1,500 MiB per file.To let the stat cache use as much memory as needed, specify a value of -1. To disable the stat cache, specify a value of 0. |
32 |
type-cache-max-size-mb |
The maximum size in MiB per directory that the type cache can use. The type cache is always entirely kept in memory, impacting memory consumption. Specify a value of 4 if the maximum number of files within a single directory from the bucket you're mounting contains 20,000 files or less. If the maximum number of files within a single directory that you're mounting contains more than 20,000 files, increase the value by 1 for every 5,000 files, which is an average of around 200 bytes per file.To let the type cache use as much memory as needed, specify a value of -1.To disable the type cache, specify a value of 0. |
4 |
The following Google Cloud CLI command sets the metadata-cache-ttl-secs to 120 seconds and increases the stat and type cache capacity to 52 and 7 MiB, respectively:
gcloud run services update SERVICE \
    --add-volume name=VOLUME_NAME,type=cloud-storage,bucket=BUCKET_NAME,mount-options="metadata-cache-ttl-secs=120;stat-cache-max-size-mb=52;type-cache-max-size-mb=7" \
    --add-volume-mount volume=VOLUME_NAME,mount-path=MOUNT_PATH
Replace the following:
- SERVICE: the name of your service.
- VOLUME_NAME: any name you want for your volume. The VOLUME_NAME value is used to map the volume to the volume mount.
- BUCKET_NAME: the name of your Cloud Storage bucket.
- MOUNT_PATH: the relative path where you are mounting the
volume—for example,
/cache.
Enable debug logging
By default, Cloud Storage FUSE logs events that have Info or higher. You can change the logging settings using any of the following log-severity levels, listed
in order from lowest to highest:
tracedebuginfowarningerror- To turn off all logging, specify the value
off.
When you specify a severity level, Cloud Storage FUSE generates logs for
events that have avseverity level equal to or higher than the specified severity. For example, whenvyou specify the warning level, Cloud Storage FUSE generates logs for warnings
and errors.
Setting log severity to levels higher than info can impact performance and generate a large amount of logging data, so we recommend doing this only as needed.
The following command line turns on debug logging:
gcloud run services update SERVICE \
    --add-volume name=VOLUME_NAME,type=cloud-storage,bucket=BUCKET_NAME,mount-options="log-severity=debug" \
    --add-volume-mount volume=VOLUME_NAME,mount-path=MOUNT_PATH
Replace the following:
- SERVICE: the name of your service.
- VOLUME_NAME: any name you want for your volume. The VOLUME_NAME value is used to map the volume to the volume mount.
- BUCKET_NAME: the name of your Cloud Storage bucket.
- MOUNT_PATH: the relative path where you are mounting the volume—for example,
/cache.
Disable implicit directories
To make Cloud Storage appear more like a standard file system, Cloud Run enables implicit directories by default when mounting a Cloud Storage bucket. You can turn implicit directories off using the implicit-dirs mount option. Disabling implicit directories can improve performance and cost, but comes with compatibility tradeoffs.
The implicit directories feature enables Cloud Run to recognize pre-existing Cloud Storage files whose filenames mimic a directory structure, such as /mydir/myfile.txt. If you disable implicit directories, Cloud Run won't be able to list or read such files.
Turning off implicit directories reduces the number of requests to Cloud Storage, which might improve your application performance and cost. Read the Cloud Storage FUSE Files and directories documentation to learn more.
The following command line disables implicit directories:
gcloud run services update SERVICE \
    --add-volume name=VOLUME_NAME,type=cloud-storage,bucket=BUCKET_NAME,mount-options="implicit-dirs=false" \
    --add-volume-mount volume=VOLUME_NAME,mount-path=MOUNT_PATH
Replace the following:
- SERVICE: the name of your service.
- VOLUME_NAME: any name you want for your volume. The VOLUME_NAME value is used to map the volume to the volume mount.
- BUCKET_NAME: the name of your Cloud Storage bucket.
- MOUNT_PATH: the relative path where you are mounting the
volume—for example,
/cache.
Mount a specific directory inside your Cloud Storage bucket
By default, Cloud Run mounts the entire Cloud Storage bucket, which gives Cloud Run services access to all its contents. In some cases you might want to mount only a specific directory. For example, in the case where the bucket contains a large number of files, mounting a specific directory can improve performance.
You can also implement this for isolation purposes where you need different services to have access to different directories in the storage bucket.
The following command line specifies the directory to mount:
gcloud run services update SERVICE \
    --add-volume name=VOLUME_NAME,type=cloud-storage,bucket=BUCKET_NAME,mount-options="only-dir=images" \
    --add-volume-mount volume=VOLUME_NAME,mount-path=MOUNT_PATH
Replace the following:
- SERVICE: the name of your service.
- VOLUME_NAME: any name you want for your volume. The VOLUME_NAME value is used to map the volume to the volume mount.
- BUCKET_NAME: the name of your Cloud Storage bucket.
- MOUNT_PATH: the relative path where you are mounting the
volume—for example,
/cache.
Set the volume UID and GID
Use the uid and gid mount options to change the User Identifier and Group Identifier for the volume. This is useful if you want to set ownership of the
file to a specific user or group matching the identity of one or multiple running containers. By default, volumes are owned by root.
The following command line sets uid and gid:
gcloud run services update SERVICE \
    --add-volume name=VOLUME_NAME,type=cloud-storage,bucket=BUCKET_NAME,mount-options="uid=UID;gid=GID" \
    --add-volume-mount volume=VOLUME_NAME,mount-path=MOUNT_PATH
Replace the following:
- SERVICE: the name of your service.
- VOLUME_NAME: any name you want for your volume. The VOLUME_NAME value is used to map the volume to the volume mount.
- BUCKET_NAME: the name of your Cloud Storage bucket.
- MOUNT_PATH: the relative path where you are mounting the
volume—for example,
/cache.
Set other mount options
The following is the complete list of all of the mount options supported by Cloud Run.
Directory
implicit-dirsonly-dirrename-dir-limit
Debug
debug_fuse_errorsdebug_fusedebug_gcsdebug-invariantsdebug_mutex
Cache
stat-cache-capacitystat-cache-ttltype-cache-ttlenable-nonexistent-type-cache
Permissions
uidgidfile-modedir-mode
Other
billing-projectclient-protocolexperimental-enable-json-readexperimental-opentelemetry-collector-addresshttp-client-timeoutlimit-bytes-per-seclimit-ops-per-secmax-conns-per-hostmax-idle-conns-per-hostmax-retry-sleep-oretry-multipliersequential-read-size-mbstackdriver-export-interval
For full documentation of the supported mount options, see the Cloud Storage FUSE command line mount options.
View Volume mounts settings
Console
In the Google Cloud console, go to the Cloud Run services page:
In the services list, click the service you are interested in to open the Service details page.
Click the Volumes tab.
Locate the Volume mounts setting in the volumes detail page.
gcloud
Use the following command:
gcloud run services describe SERVICE_NAME
Locate the Volume mounts setting in the returned configuration.
Optimizing Cloud Storage FUSE network bandwidth performance
For better read and write performance, connect your Cloud Run service to a VPC network using Direct VPC and route all outbound traffic through your VPC network. You can do this using any of the following options:
- Enable Private Google Access, making sure to set the
vpc-egressparameter toall-traffic. - Use one of the options described in the networking best practices page, in the section Internal traffic to a Google API.
Container startup time and Cloud Storage FUSE mounts
Using Cloud Storage FUSE can slightly increase your Cloud Run container cold start time because Cloud Run starts the volume mount prior to starting the container(s). Your container will start only if Cloud Storage FUSE is successfully mounted.
Note that Cloud Storage FUSE successfully mounts a volume only after establishing a connection to Cloud Storage. Any networking delays can have an impact on container startup time. Correspondingly, if the connection attempt fails, Cloud Storage FUSE will fail to mount and the Cloud Run service will fail to start. Also, if Cloud Storage FUSE takes longer than 30 seconds to mount, the Cloud Run service will fail to start because Cloud Run has a total timeout of 30 seconds to perform all mounts.
Cloud Storage FUSE performance characteristics
If you define two volumes, each pointing to a different bucket, two Cloud Storage FUSE processes will be started. The mounts and processes occur in parallel.
Operations using Cloud Storage FUSE are impacted by network bandwidth because Cloud Storage FUSE communicates with Cloud Storage using the Cloud Storage API. Some operations such as listing the contents of a bucket can be slow if the network bandwidth is low. Similarly, reading a large file can take time as this is also limited by network bandwidth.
When you write to a bucket, Cloud Storage FUSE fully stages the object in memory. This means that writing large files is limited by the amount of memory available to the container instance (the maximum container memory limit is 32 GiB).
The write is flushed to the bucket only when you perform a close or
an fsync: the full object is then uploaded to the bucket. The
only exception to an object being entirely re-uploaded to the bucket is in the
case of a file with appended content when the file is 2 MiB or more.
For more information, see the following resources:
Clear and remove volumes and volume mounts
You can clear all volumes and mounts or you can remove individual volumes and volume mounts.
Clear all volumes and volume mounts
To clear all volumes and volume mounts from your single-container service, run the following command:
gcloud run services update SERVICE \
    --clear-volumes
    --clear-volume-mounts
If you have multiple containers, follow the sidecars CLI conventions to clear volumes and volume mounts:
gcloud run services update SERVICE \
    --container=container1 \
    --clear-volumes
    -–clear-volume-mounts \
    --container=container2 \
    --clear-volumes \
    -–clear-volume-mounts
Remove individual volumes and volume mounts
In order to remove a volume, you must also remove all volume mounts using that volume.
To remove individual volumes or volume mounts, use the remove-volume and remove-volume-mount flags:
gcloud run services update SERVICE \
    --remove-volume VOLUME_NAME \
    --container=container1 \
    --remove-volume-mount MOUNT_PATH \
    --container=container2 \
    --remove-volume-mount MOUNT_PATH