This tutorial shows how a service developer can troubleshoot a broken Cloud Run service using Google Cloud Observability tools for discovery and a local development workflow for investigation.
This step-by-step "case study" companion to the troubleshooting guide uses a sample project that results in runtime errors when deployed, which you troubleshoot to find and fix the problem.
Objectives
- Write, build, and deploy a service to Cloud Run
- Use Error Reporting and Cloud Logging to identify an error
- Retrieve the container image from Container Registry for a root cause analysis
- Fix the "production" service, then improve the service to mitigate future problems
Costs
In this document, you use the following billable components of Google Cloud:
To generate a cost estimate based on your projected usage,
use the pricing calculator.
Before you begin
- Sign in to your Google Cloud account. If you're new to Google Cloud, create an account to evaluate how our products perform in real-world scenarios. New customers also get $300 in free credits to run, test, and deploy workloads.
-
In the Google Cloud console, on the project selector page, select or create a Google Cloud project.
Roles required to select or create a project
- Select a project: Selecting a project doesn't require a specific IAM role—you can select any project that you've been granted a role on.
-
Create a project: To create a project, you need the Project Creator
(
roles/resourcemanager.projectCreator), which contains theresourcemanager.projects.createpermission. Learn how to grant roles.
-
Verify that billing is enabled for your Google Cloud project.
-
In the Google Cloud console, on the project selector page, select or create a Google Cloud project.
Roles required to select or create a project
- Select a project: Selecting a project doesn't require a specific IAM role—you can select any project that you've been granted a role on.
-
Create a project: To create a project, you need the Project Creator
(
roles/resourcemanager.projectCreator), which contains theresourcemanager.projects.createpermission. Learn how to grant roles.
-
Verify that billing is enabled for your Google Cloud project.
- Enable the Cloud Run Admin API
- Install and initialize the gcloud CLI.
- Update components:
gcloud components update
- Follow the instructions to install Docker locally
Required roles
To get the permissions that you need to complete the tutorial, ask your administrator to grant you the following IAM roles on your project:
-
Cloud Build Editor (
roles/cloudbuild.builds.editor) -
Cloud Run Admin (
roles/run.admin) -
Error Reporting Viewer (
roles/errorreporting.viewer) -
Logs View Accessor (
roles/logging.viewAccessor) -
Project IAM Admin (
roles/resourcemanager.projectIamAdmin) -
Service Account User (
roles/iam.serviceAccountUser) -
Service Usage Consumer (
roles/serviceusage.serviceUsageConsumer) -
Storage Admin (
roles/storage.admin)
For more information about granting roles, see Manage access to projects, folders, and organizations.
You might also be able to get the required permissions through custom roles or other predefined roles.
Setting up gcloud defaults
To configure gcloud with defaults for your Cloud Run service:
Set your default project:
gcloud config set project PROJECT_ID
Replace PROJECT_ID with the name of the project you created for this tutorial.
Configure gcloud for your chosen region:
gcloud config set run/region REGION
Replace REGION with the supported Cloud Run region of your choice.
Cloud Run locations
Cloud Run is regional, which means the infrastructure that
runs your Cloud Run services is located in a specific region and is
managed by Google to be redundantly available across
all the zones within that region.
Meeting your latency, availability, or durability requirements are primary
factors for selecting the region where your Cloud Run services are run.
You can generally select the region nearest to your users but you should consider
the location of the other Google Cloud
products that are used by your Cloud Run service.
Using Google Cloud products together across multiple locations can affect
your service's latency as well as cost.
Cloud Run is available in the following regions:
Subject to Tier 1 pricing
asia-east1(Taiwan)asia-northeast1(Tokyo)asia-northeast2(Osaka)asia-south1(Mumbai, India)europe-north1(Finland) Low CO2
europe-north2(Stockholm) Low CO2
europe-southwest1(Madrid) Low CO2
europe-west1(Belgium) Low CO2
europe-west4(Netherlands) Low CO2
europe-west8(Milan)europe-west9(Paris) Low CO2
me-west1(Tel Aviv)northamerica-south1(Mexico)us-central1(Iowa) Low CO2
us-east1(South Carolina)us-east4(Northern Virginia)us-east5(Columbus)us-south1(Dallas) Low CO2
us-west1(Oregon) Low CO2
Subject to Tier 2 pricing
africa-south1(Johannesburg)asia-east2(Hong Kong)asia-northeast3(Seoul, South Korea)asia-southeast1(Singapore)asia-southeast2(Jakarta)asia-south2(Delhi, India)australia-southeast1(Sydney)australia-southeast2(Melbourne)europe-central2(Warsaw, Poland)europe-west10(Berlin)europe-west12(Turin)europe-west2(London, UK) Low CO2
europe-west3(Frankfurt, Germany)europe-west6(Zurich, Switzerland) Low CO2
me-central1(Doha)me-central2(Dammam)northamerica-northeast1(Montreal) Low CO2
northamerica-northeast2(Toronto) Low CO2
southamerica-east1(Sao Paulo, Brazil) Low CO2
southamerica-west1(Santiago, Chile) Low CO2
us-west2(Los Angeles)us-west3(Salt Lake City)us-west4(Las Vegas)
If you already created a Cloud Run service, you can view the region in the Cloud Run dashboard in the Google Cloud console.
Assembling the code
Build a new Cloud Run greeter service step-by-step. As a reminder, this service creates a runtime error on purpose for the troubleshooting exercise.
Create a new project:
Node.js
Create a Node.js project by defining the service package, initial dependencies, and some common operations.Create a new
hello-servicedirectory:mkdir hello-service cd hello-serviceCreate a new Node.js project by generating a
package.jsonfile:npm init --yes npm install express@4Open the new
package.jsonfile in your editor and configure astartscript to runnode index.js. When you're done, the file will look like this:
If you continue to evolve this service beyond the immediate tutorial, consider filling in the description, author, and evaluate the license. For more details, read the package.json documentation.
Python
Create a new
hello-servicedirectory:mkdir hello-service cd hello-serviceCreate a requirements.txt file and copy your dependencies into it:
Go
Create a new
hello-servicedirectory:mkdir hello-service cd hello-serviceCreate a Go project by initializing a new go module:
go mod init example.com/hello-service
You can update the specific name as you wish: you should update the name if the code is published to a web-reachable code repository.
Java
Create a new maven project:
mvn archetype:generate \
  -DgroupId=com.example.cloudrun \
  -DartifactId=hello-service \
  -DarchetypeArtifactId=maven-archetype-quickstart \
  -DinteractiveMode=false
Copy the dependencies into your
pom.xmldependency list (between the<dependencies>elements):Copy the build setting into your
pom.xml(under the<dependencies>elements):
Create an HTTP service to handle incoming requests:
Node.js
Python
Go
Java
Create a
Dockerfileto define the container image used to deploy the service:Node.js
Python
Go
Java
This sample uses Jib to build Docker images using common Java tools. Jib optimizes container builds without the need for a Dockerfile or having Docker installed. Learn more about building Java containers with Jib.
Shipping the code
Shipping code consists of three steps: building a container image with Cloud Build, uploading the container image to Container Registry, and deploying the container image to Cloud Run.
To ship your code:
Build your container and publish on Container Registry:
Node.js
gcloud builds submit --tag gcr.io/PROJECT_ID/hello-service
Where PROJECT_ID is your Google Cloud project ID. You can check your current project ID with
gcloud config get-value project.Upon success, you should see a SUCCESS message containing the ID, creation time, and image name. The image is stored in Container Registry and can be re-used if desired.
Python
gcloud builds submit --tag gcr.io/PROJECT_ID/hello-service
Where PROJECT_ID is your Google Cloud project ID. You can check your current project ID with
gcloud config get-value project.Upon success, you should see a SUCCESS message containing the ID, creation time, and image name. The image is stored in Container Registry and can be re-used if desired.
Go
gcloud builds submit --tag gcr.io/PROJECT_ID/hello-service
Where PROJECT_ID is your Google Cloud project ID. You can check your current project ID with
gcloud config get-value project.Upon success, you should see a SUCCESS message containing the ID, creation time, and image name. The image is stored in Container Registry and can be re-used if desired.
Java
- Use the gcloud credential helper
to authorize Docker to push to your Container Registry.
gcloud auth configure-docker
- Use the Jib Maven Plugin to build and push the container to Container Registry.
mvn compile jib:build -Dimage=gcr.io/PROJECT_ID/hello-service
Where PROJECT_ID is your Google Cloud project ID. You can check your current project ID with
gcloud config get-value project.Upon success, you should see a BUILD SUCCESS message. The image is stored in Container Registry and can be re-used if desired.
- Use the gcloud credential helper
to authorize Docker to push to your Container Registry.
Run the following command to deploy your app:
gcloud run deploy hello-service --image gcr.io/PROJECT_ID/hello-service
Replace PROJECT_ID with your Google Cloud project ID.
hello-serviceis both the container image name and name of the Cloud Run service. Notice that the container image is deployed to the service and region that you configured previously under Setting up gcloudRespond
y, "Yes", to the allow unauthenticated prompt. See Managing Access for more details on IAM-based authentication.Wait until the deployment is complete: this can take about half a minute. On success, the command line displays the service URL.
Trying it out
Try out the service to confirm you have successfully deployed it. Requests should fail with a HTTP 500 or 503 error (members of the class 5xx Server errors). The tutorial walks through troubleshooting this error response.
The service is auto-assigned a navigable URL.
Navigate to this URL with your web browser:
Open a web browser
Find the service URL output by the earlier deploy command.
If the deploy command did not provide a URL then something went wrong. Review the error message and act accordingly: if no actionable guidance is present, review the troubleshooting guide and possibly retry the deployment command.
Navigate to this URL by copying it into your browser's address bar and pressing ENTER.
View the HTTP 500 or HTTP 503 error.
If you receive a HTTP 403 error, you may have rejected
allow unauthenticated invocationsat the deployment prompt. Grant public access to the service to fix this:gcloud run services add-iam-policy-binding hello-service \ --member="allUsers" \ --role="roles/run.invoker"
For more information, read Allowing public (unauthenticated) access.
Investigating the problem
Visualize that the HTTP 5xx error encountered above in Trying it out was encountered as a production runtime error. This tutorial walks through a formal process for handling it. Although production error resolution processes vary widely, this tutorial presents a particular sequence of steps to show the application of useful tools and techniques.
To investigate this problem you will work through these phases:
- Collect more details on the reported error to support further investigation and set a mitigation strategy.
- Relieve user impact by deciding to push forward in a fix or rollback to a known-healthy version.
- Reproduce the error to confirm the correct details have been gathered and that the error is not a one-time glitch
- Perform a root cause analysis on the bug to find the code, configuration, or process which created this error
At the start of the investigation you have a URL, timestamp, and the message "Internal Server Error".
Gathering further details
Gather more information about the problem to understand what happened and determine next steps.
Use available Google Cloud Observability tools to collect more details:
Use the Error Reporting console, which provides a dashboard with details and recurrence tracking for errors with a recognized stack trace.

List of recorded errors. Errors are grouped by message across revisions, services, and platforms. Click on the error to see the stack trace details, noting the function calls made just prior to the error.
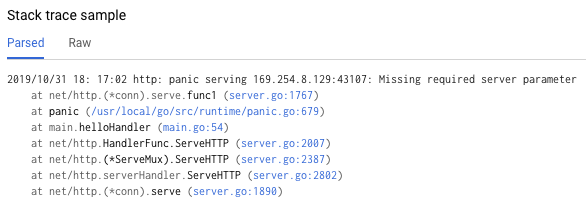
The "Stack trace sample" in the error details page shows a single instance of the error. You can review each individual instances. Use Cloud Logging to review the sequence of operations leading to the problem, including error messages that are not included in the Error Reporting console because of a lack of a recognized error stack trace:
Select Cloud Run Revision > hello-service from the first drop-down box. This will filter the log entries to those generated by your service.
Read more about viewing logs in Cloud Run
Rollback to a healthy version
If this is an established service, known to work, there will be a previous revision of the service on Cloud Run. This tutorial uses a new service with no previous versions, so you cannot do a rollback.
However, if you have a service with previous versions you can roll back to, follow Viewing revision details to extract the container name and configuration details necessary to create a new working deployment of your service.
Reproducing the error
Using the details you obtained previously, confirm the problem consistently occurs under test conditions.
Send the same HTTP request by trying it out again, and see if the same error and details are reported. It may take some time for error details to show up.
Because the sample service in this tutorial is read-only and doesn't trigger any complicating side effects, reproducing errors in production is safe. However, for many real services, this won't be the case: you may need to reproduce errors in a test environment or limit this step to local investigation.
Reproducing the error establishes the context for further work. For example, if developers cannot reproduce the error further investigation may require additional instrumentation of the service.
Performing a root cause analysis
Root cause analysis is an important step in effective troubleshooting to ensure you fix the problem instead of a symptom.
Previously in this tutorial, you reproduced the problem on Cloud Run which confirms the problem is active when the service is hosted on Cloud Run. Now reproduce the problem locally to determine if the problem is isolated to the code or if it only emerges in production hosting.
If you have not used Docker CLI locally with Container Registry, authenticate it with gcloud:
gcloud auth configure-docker
For alternative approaches see Container Registry authentication methods.
If the most recently used container image name is not available, the service description has the information of the most recently deployed container image:
gcloud run services describe hello-service
Find the container image name inside the
specobject. A more targeted command can directly retrieve it:gcloud run services describe hello-service \ --format="value(spec.template.spec.containers.image)"
This command reveals a container image name such as
gcr.io/PROJECT_ID/hello-service.Pull the container image from the Container Registry to your environment, this step might take several minutes as it downloads the container image:
docker pull gcr.io/PROJECT_ID/hello-service
Later updates to the container image that reuse this name can be retrieved with the same command. If you skip this step, the
docker runcommand below pulls a container image if one is not present on the local machine.Run locally to confirm the problem is not unique to Cloud Run:
PORT=8080 && docker run --rm -e PORT=$PORT -p 9000:$PORT \
   gcr.io/PROJECT_ID/hello-service
Breaking down the elements of the command above,
- The
PORTenvironment variable is used by the service to determine the port to listen on inside the container. - The
runcommand starts the container, defaulting to the entrypoint command defined in the Dockerfile or a parent container image. - The
--rmflag deletes the container instance on exit. - The
-eflag assigns a value to an environment variable.-e PORT=$PORTis propagating thePORTvariable from the local system into the container with the same variable name. - The
-pflag publishes the container as a service available on localhost at port 9000. Requests to localhost:9000 will be routed to the container on port 8080. This means output from the service about the port number in use will not match how the service is accessed. - The final argument
gcr.io/PROJECT_ID/hello-serviceis a container imagetag, a human-readable label for a container image's sha256 hash identifier. If not available locally, docker attempts to retrieve the image from a remote registry.
In your browser, open http://localhost:9000. Check the terminal output for error messages that match those on {ops_name}}.
If the problem is not reproducible locally, it may be unique to the Cloud Run environment. Review the Cloud Run troubleshooting guide for specific areas to investigate.
In this case the error is reproduced locally.
- The
Now that the error is doubly-confirmed as persistent and caused by the service code instead of the hosting platform, it's time to investigate the code more closely.
For purposes of this tutorial it is safe to assume the code inside the container and the code in the local system is identical.
Revisit the error report's stack trace and cross-reference with the code to find the specific lines at fault.
Node.js
Find the source of the error message in the fileindex.js around the line
number called out in the stack trace shown in the logs:
Python
Find the source of the error message in the filemain.py around the line
number called out in the stack trace shown in the logs:
Go
Find the source of the error message in the file main.go around the line
number called out in the stack trace shown in the logs:
Java
Find the source of the error message in the file App.java around the line number called out in the stack trace shown in the logs:
Examining this code, the following actions are taken when the NAME environment
variable is not set:
- An error is logged to Google Cloud Observability
- An HTTP error response is sent
The problem is caused by a missing variable, but the root cause is more specific: the code change adding the hard dependency on an environment variable did not include related changes to deployment scripts and runtime requirements documentation.
Fixing the root cause
Now that we have collected the code and identified the potential root cause, we can take steps to fix it.
Check whether the service works locally with the
NAMEenvironment available in place:Run the container locally with the environment variable added:
PORT=8080 && docker run --rm -e PORT=$PORT -p 9000:$PORT \
 -e NAME="Local World!" \
 gcr.io/PROJECT_ID/hello-service
Navigate your browser to http://localhost:9000
See "Hello Local World!" appear on the page
Modify the running Cloud Run service environment to include this variable:
Run the services update command to add an environment variable:
gcloud run services update hello-service \
  --set-env-vars NAME=Override
Wait a few seconds while Cloud Run creates a new revision based on the previous revision with the new environment variable added.
Confirm the service is now fixed:
- Navigate your browser to the Cloud Run service URL.
- See "Hello Override!" appear on the page.
- Verify that no unexpected messages or errors appear in Cloud Logging or Error Reporting.
Improving future troubleshooting speed
In this sample production problem, the error was related to operational configuration. There are code changes that will minimize the impact of this problem in the future.
- Improve the error log to include more specific details.
- Instead of returning an error, have the service fall back to a safe default. If using a default represents a change to normal functionality, use a warning message for monitoring purposes.
Let's step through removing the NAME environment variable as a hard dependency.
Remove the existing
NAME-handling code:Node.js
Python
Go
Java
Add new code that sets a fallback value:
Node.js
Python
Go
Java
Test locally by re-building and running the container through the affected configuration cases:
Node.js
docker build --tag gcr.io/PROJECT_ID/hello-service .
Python
docker build --tag gcr.io/PROJECT_ID/hello-service .
Go
docker build --tag gcr.io/PROJECT_ID/hello-service .
Java
mvn compile jib:build
Confirm the
NAMEenvironment variable still works:PORT=8080 && docker run --rm -e PORT=$PORT -p 9000:$PORT \ -e NAME="Robust World" \ gcr.io/PROJECT_ID/hello-service
Confirm the service works without the
NAMEvariable:PORT=8080 && docker run --rm -e PORT=$PORT -p 9000:$PORT \ gcr.io/PROJECT_ID/hello-service
If the service does not return a result, confirm the removal of code in the first step did not remove extra lines, such as those used to write the response.
Deploy this by revisiting the Deploy your code section.
Each deployment to a service creates a new revision and automatically starts serving traffic when ready.
To clear the environment variables set earlier:
gcloud run services update hello-service --clear-env-vars
Add the new functionality for the default value to automated test coverage for the service.
Finding other issues in the logs
You may see other issues in the Log Viewer for this service. For example, an unsupported system call will appear in the logs as a "Container Sandbox Limitation".
For example, the Node.js services sometimes result in this log message:
Container Sandbox Limitation: Unsupported syscall statx(0xffffff9c,0x3e1ba8e86d88,0x0,0xfff,0x3e1ba8e86970,0x3e1ba8e86a90). Please, refer to https://gvisor.dev/c/linux/amd64/statx for more information.
In this case, the lack of support does not impact the hello-service sample service.
Terraform troubleshooting
For Terraform-related troubleshooting or questions, see Terraform policy validation troubleshooting or contact Terraform support.
Clean up
To avoid additional charges to your Google Cloud account, delete all the resources you deployed with this tutorial.
Delete the project
If you created a new project for this tutorial, delete the project. If you used an existing project and need to keep it without the changes you added in this tutorial, delete resources that you created for the tutorial.
The easiest way to eliminate billing is to delete the project that you created for the tutorial.
To delete the project:
- In the Google Cloud console, go to the Manage resources page.
- In the project list, select the project that you want to delete, and then click Delete.
- In the dialog, type the project ID, and then click Shut down to delete the project.
Delete tutorial resources
Delete the Cloud Run service you deployed in this tutorial. Cloud Run services don't incur costs until they receive requests.
To delete your Cloud Run service, run the following command:
gcloud run services delete SERVICE-NAME
Replace SERVICE-NAME with the name of your service.
You can also delete Cloud Run services from the Google Cloud console.
Remove the
gclouddefault region configuration you added during tutorial setup:gcloud config unset run/regionRemove the project configuration:
gcloud config unset projectDelete other Google Cloud resources created in this tutorial:
- Delete the container image named
gcr.io/<var>PROJECT_ID</var>/hello-servicefrom Container Registry.
- Delete the container image named
What's next
- Learn more about how to use Cloud Logging and Error Reporting to gain insight into production behavior.
- For more information about Cloud Run troubleshooting, see the troubleshooting guide.
- Explore reference architectures, diagrams, and best practices about Google Cloud. Take a look at our Cloud Architecture Center.