In the Principal column, find all rows that identify you or a group that
you're included in. To learn which groups you're included in, contact your
administrator.
For all rows that specify or include you, check the Role column to see whether
the list of roles includes the required roles.
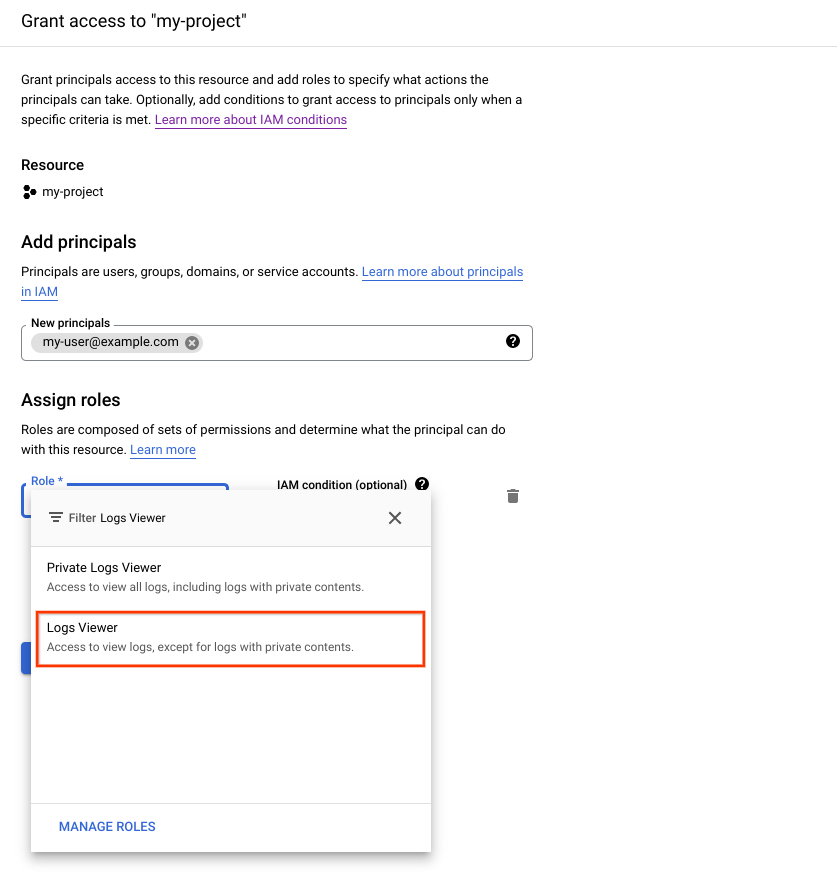
Saisissez un identifiant pour le compte principal. Par exemple, my-user@example.com.
Dans le menu déroulant Sélectionner un rôle, recherchez Lecteur de journaux, puis cliquez sur Lecteur de journaux.
Cliquez sur Enregistrer.
Vérifiez que le membre et le rôle correspondant sont répertoriés sur la page IAM.
Vous avez attribué un rôle IAM à un compte principal.
Observer les effets des rôles IAM
Pour vérifier que le compte principal auquel vous avez attribué un rôle peut accéder aux pages prévues de la console Google Cloud, procédez comme suit :
Envoyez l'URL suivante au compte principal auquel vous venez d'accorder le rôle :
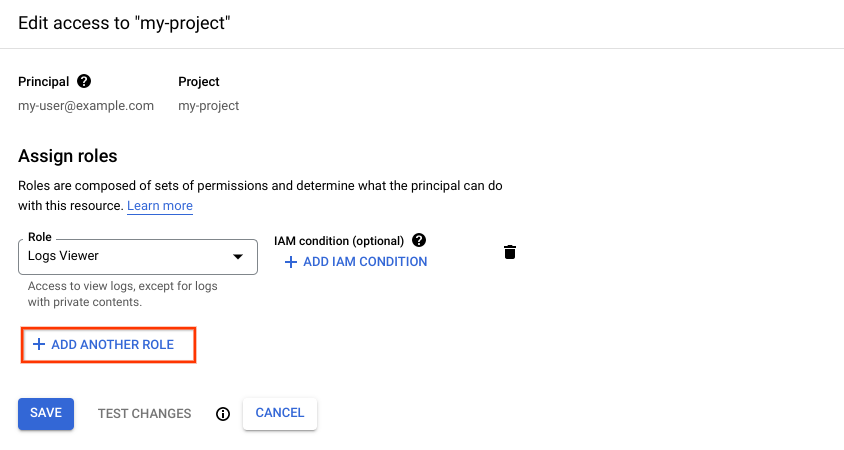
Localisez la ligne contenant le compte principal auquel vous souhaitez accorder un autre rôle, puis cliquez sur Modifier le compte principaledit sur cette ligne.
Dans le volet Edit permissions (Modifier les autorisations), cliquez sur Add another role (Ajouter un autre rôle).
Dans le menu déroulant Sélectionner un rôle, recherchez Lecteur App Engine, puis cliquez sur Lecteur App Engine. Cliquez sur Enregistrer.
Cliquez sur Enregistrer.
Le compte principal dispose désormais d'un second rôle IAM.
Révoquer des rôles IAM
Pour révoquer les rôles attribués au compte principal lors des étapes précédentes, procédez comme suit :
Recherchez la ligne contenant le compte principal auquel vous avez attribué des rôles, puis cliquez sur Modifier le compte principaledit sur cette ligne.
Dans le volet Modifier les autorisations, cliquez sur l'icône de suppression à côté des rôles "Lecteur de journaux" et "Lecteur App Engine".
Cliquez sur Enregistrer.
Vous avez maintenant supprimé le compte principal des deux rôles. S'il tente d'afficher la page de l'explorateur de journaux, le message d'erreur suivant s'affiche :
You don't have permissions to view logs.
Effectuer un nettoyage
Pour éviter que les ressources utilisées sur cette page soient facturées sur votre compte Google Cloud, procédez comme suit :
Effectuez un nettoyage en supprimant le projet que vous avez créé dans ce guide de démarrage rapide.
In the Google Cloud console, go to the Manage resources page.
Sauf indication contraire, le contenu de cette page est régi par une licence Creative Commons Attribution 4.0, et les échantillons de code sont régis par une licence Apache 2.0. Pour en savoir plus, consultez les Règles du site Google Developers. Java est une marque déposée d'Oracle et/ou de ses sociétés affiliées.
Dernière mise à jour le 2025/09/03 (UTC).
[[["Facile à comprendre","easyToUnderstand","thumb-up"],["J'ai pu résoudre mon problème","solvedMyProblem","thumb-up"],["Autre","otherUp","thumb-up"]],[["Difficile à comprendre","hardToUnderstand","thumb-down"],["Informations ou exemple de code incorrects","incorrectInformationOrSampleCode","thumb-down"],["Il n'y a pas l'information/les exemples dont j'ai besoin","missingTheInformationSamplesINeed","thumb-down"],["Problème de traduction","translationIssue","thumb-down"],["Autre","otherDown","thumb-down"]],["Dernière mise à jour le 2025/09/03 (UTC)."],[[["\u003cp\u003eThis guide teaches how to use the Google Cloud console to grant, manage, and revoke IAM roles to principals at the project level.\u003c/p\u003e\n"],["\u003cp\u003eBefore granting roles, you need to create a new Google Cloud project and verify that you have the required "Project IAM Admin" role.\u003c/p\u003e\n"],["\u003cp\u003eYou can grant multiple roles to a principal by selecting them from the "Select a role" menu, such as granting both "Logs Viewer" and "Compute Viewer" roles.\u003c/p\u003e\n"],["\u003cp\u003eYou can use the provided URLs to send to principals to verify that they have the granted roles, and if not, they will receive an error message.\u003c/p\u003e\n"],["\u003cp\u003eThe guide also includes instructions on how to clean up by deleting the project created for the tutorial to avoid incurring charges.\u003c/p\u003e\n"]]],[],null,["# Quickstart: Grant roles in the Google Cloud console\n\nGrant an IAM role by using the Google Cloud console\n===================================================\n\nLearn how to use the Google Cloud console to grant\nIAM roles to principals at the project level.\n| **Note:** If you're getting started with Google Cloud, you can grant the appropriate IAM roles to your organization administrator groups as part of the [Google Cloud setup process](/docs/enterprise/setup-checklist).\n\nSee the following video for a quick walkthrough:\n\n[](https://www.youtube.com/watch?v=Sdt-i-Q7tyA)\n\n*** ** * ** ***\n\nTo follow step-by-step guidance for this task directly in the\nGoogle Cloud console, click **Guide me**:\n\n[Guide me](https://console.cloud.google.com/iam-admin/iam?walkthrough_id=iam--quickstart)\n\n*** ** * ** ***\n\nBefore you begin\n----------------\n\n### Create a Google Cloud project\n\nFor this quickstart, you need a new Google Cloud project.\n| **Warning:** If you use an existing project, then completing this quickstart will enable some users to access resources in that project.\n\n1. In the Google Cloud console, go to the project selector page.\n\n [Go to project selector](https://console.cloud.google.com/projectselector2/home/dashboard)\n2. Click **Create project**.\n\n3. Name your project. Make a note of your generated project ID.\n\n4. Edit the other fields as needed.\n\n5. Click **Create**.\n\n\u003cbr /\u003e\n\n### Ensure that you have the required roles\n\n1.\n\n Make sure that you have the following role or roles on the project:\n\n Project IAM Admin\n\n #### Check for the roles\n\n 1.\n In the Google Cloud console, go to the **IAM** page.\n\n [Go to IAM](https://console.cloud.google.com/projectselector/iam-admin/iam?supportedpurview=project)\n 2. Select the project.\n 3.\n In the **Principal** column, find all rows that identify you or a group that\n you're included in. To learn which groups you're included in, contact your\n administrator.\n\n 4. For all rows that specify or include you, check the **Role** column to see whether the list of roles includes the required roles.\n\n #### Grant the roles\n\n 1.\n In the Google Cloud console, go to the **IAM** page.\n\n [Go to IAM](https://console.cloud.google.com/projectselector/iam-admin/iam?supportedpurview=project)\n 2. Select the project.\n 3. Click person_add **Grant access**.\n 4.\n In the **New principals** field, enter your user identifier.\n\n This is typically the email address for a Google Account.\n\n 5. In the **Select a role** list, select a role.\n 6. To grant additional roles, click add **Add\n another role** and add each additional role.\n 7. Click **Save**.\n\n\u003cbr /\u003e\n\n### Enable the APIs\n\n-\n\n\n Enable the IAM and Resource Manager APIs.\n\n\n [Enable the APIs](https://console.cloud.google.com/flows/enableapi?apiid=iam.googleapis.com,cloudresourcemanager.googleapis.com)\n\nGrant an IAM role\n-----------------\n\nGrant a principal the Logs Viewer role on the project.\n\n1. In the Google Cloud console, go to the **IAM** page.\n\n [Go to IAM](https://console.cloud.google.com/iam-admin/iam?supportedpurview=project)\n2. Select your new project.\n\n3. Click person_add **Grant access**.\n\n4. Enter an identifier for the principal. For example,\n `my-user@example.com`.\n\n5. From the **Select a role** drop-down menu, search for **Logs Viewer** ,\n then click **Logs Viewer**.\n\n6. Click **Save**.\n\n7. Verify that the principal and the corresponding role are listed in the\n IAM page.\n\nYou have successfully granted an IAM role to a principal.\n\nObserve the effects of IAM roles\n--------------------------------\n\nVerify that the principal you granted a role to can access the expected\nGoogle Cloud console pages by doing the following:\n\n1. Send the following URL to the principal to whom you granted the role in the\n preceding step:\n\n https://console.cloud.google.com/logs?project=\u003cvar translate=\"no\"\u003ePROJECT_ID\u003c/var\u003e\n\n This URL takes the principal to the **Logs Explorer** page for your project.\n2. Verify that the principal is able to access and view the URL.\n\nIf the principal tries to access a different Google Cloud console page that\nthey don't have access to, they see an error message.\n\nGrant additional roles to the same principal\n--------------------------------------------\n\nGrant the principal the Compute Viewer role in addition to their Logs Viewer\nrole.\n\n1. In the Google Cloud console, go to the **IAM** page.\n\n [Go to IAM](https://console.cloud.google.com/iam-admin/iam)\n2. Locate the row that contains the principal to whom you want to grant another\n role, and click **Edit principal** edit\n in that row.\n\n3. In the **Edit permissions** pane, click **Add another role**.\n\n\n4. From the **Select a role** drop-down menu, search for **Compute Viewer** ,\n then click **Compute Viewer** . Click **Save**.\n\n5. Click **Save**.\n\nThe principal now has a second IAM role.\n\nRevoke IAM roles\n----------------\n\nRevoke the roles you granted to the principal in the preceding steps by doing\nthe following:\n\n1. Locate the row that contains the principal that you granted roles to and\n click **Edit principal** edit\n in that row.\n\n2. In the **Edit permissions** pane, click the delete icon next to the Logs\n Viewer and Compute Viewer roles.\n\n3. Click **Save**.\n\nYou have now removed the principal from both of the roles. If they try to view\nthe **Logs Explorer** page, they see the following error message:\n\n`You don't have permissions to view logs.`\n\nClean up\n--------\n\n\nTo avoid incurring charges to your Google Cloud account for\nthe resources used on this page, follow these steps.\n\nClean up by deleting the project that you created for this quickstart.\n\n| **Caution** : Deleting a project has the following effects:\n|\n| - **Everything in the project is deleted.** If you used an existing project for the tasks in this document, when you delete it, you also delete any other work you've done in the project.\n| - **Custom project IDs are lost.** When you created this project, you might have created a custom project ID that you want to use in the future. To preserve the URLs that use the project ID, such as an `appspot.com` URL, delete selected resources inside the project instead of deleting the whole project.\n|\n|\n| If you plan to explore multiple architectures, tutorials, or quickstarts, reusing projects\n| can help you avoid exceeding project quota limits.\n1. In the Google Cloud console, go to the **Manage resources** page.\n\n [Go to Manage resources](https://console.cloud.google.com/iam-admin/projects)\n2. In the project list, select the project that you want to delete, and then click **Delete**.\n3. In the dialog, type the project ID, and then click **Shut down** to delete the project.\n\n\u003cbr /\u003e\n\nWhat's next\n-----------\n\n- [Learn the basics](/iam/docs/overview) of IAM.\n- Review the [list of all IAM roles](/iam/docs/understanding-roles).\n- Find out how to [manage access with IAM](/iam/docs/granting-changing-revoking-access)."]]