目标
本教程介绍如何在新集群上安装 Dataproc Jupyter 组件,然后使用 Dataproc 组件网关从本地浏览器连接到在集群上运行的 Jupyter 笔记本界面。
费用
在本文档中,您将使用 Google Cloud的以下收费组件:
如需根据您的预计使用量来估算费用,请使用价格计算器。
准备工作
如果您尚未创建项目和 Cloud Storage 存储桶,请先创建这些资源。 Google Cloud
设置项目
- Sign in to your Google Cloud account. If you're new to Google Cloud, create an account to evaluate how our products perform in real-world scenarios. New customers also get $300 in free credits to run, test, and deploy workloads.
-
In the Google Cloud console, on the project selector page, select or create a Google Cloud project.
Roles required to select or create a project
- Select a project: Selecting a project doesn't require a specific IAM role—you can select any project that you've been granted a role on.
-
Create a project: To create a project, you need the Project Creator
(
roles/resourcemanager.projectCreator), which contains theresourcemanager.projects.createpermission. Learn how to grant roles.
-
Verify that billing is enabled for your Google Cloud project.
-
Enable the Dataproc, Compute Engine, and Cloud Storage APIs.
Roles required to enable APIs
To enable APIs, you need the Service Usage Admin IAM role (
roles/serviceusage.serviceUsageAdmin), which contains theserviceusage.services.enablepermission. Learn how to grant roles. -
Install the Google Cloud CLI.
-
如果您使用的是外部身份提供方 (IdP),则必须先使用联合身份登录 gcloud CLI。
-
如需初始化 gcloud CLI,请运行以下命令:
gcloud init -
In the Google Cloud console, on the project selector page, select or create a Google Cloud project.
Roles required to select or create a project
- Select a project: Selecting a project doesn't require a specific IAM role—you can select any project that you've been granted a role on.
-
Create a project: To create a project, you need the Project Creator
(
roles/resourcemanager.projectCreator), which contains theresourcemanager.projects.createpermission. Learn how to grant roles.
-
Verify that billing is enabled for your Google Cloud project.
-
Enable the Dataproc, Compute Engine, and Cloud Storage APIs.
Roles required to enable APIs
To enable APIs, you need the Service Usage Admin IAM role (
roles/serviceusage.serviceUsageAdmin), which contains theserviceusage.services.enablepermission. Learn how to grant roles. -
Install the Google Cloud CLI.
-
如果您使用的是外部身份提供方 (IdP),则必须先使用联合身份登录 gcloud CLI。
-
如需初始化 gcloud CLI,请运行以下命令:
gcloud init 在您的项目中创建 Cloud Storage 存储分区,以存储您在本教程中创建的任何笔记本。
- In the Google Cloud console, go to the Cloud Storage Buckets page.
- Click Create.
- On the Create a bucket page, enter your bucket information. To go to the next
step, click Continue.
-
In the Get started section, do the following:
- Enter a globally unique name that meets the bucket naming requirements.
- To add a
bucket label,
expand the Labels section (),
click add_box
Add label, and specify a
keyand avaluefor your label.
-
In the Choose where to store your data section, do the following:
- Select a Location type.
- Choose a location where your bucket's data is permanently stored from the Location type drop-down menu.
- If you select the dual-region location type, you can also choose to enable turbo replication by using the relevant checkbox.
- To set up cross-bucket replication, select
Add cross-bucket replication via Storage Transfer Service and
follow these steps:
Set up cross-bucket replication
- In the Bucket menu, select a bucket.
In the Replication settings section, click Configure to configure settings for the replication job.
The Configure cross-bucket replication pane appears.
- To filter objects to replicate by object name prefix, enter a prefix that you want to include or exclude objects from, then click Add a prefix.
- To set a storage class for the replicated objects, select a storage class from the Storage class menu. If you skip this step, the replicated objects will use the destination bucket's storage class by default.
- Click Done.
-
In the Choose how to store your data section, do the following:
- Select a default storage class for the bucket or Autoclass for automatic storage class management of your bucket's data.
- To enable hierarchical namespace, in the Optimize storage for data-intensive workloads section, select Enable hierarchical namespace on this bucket.
- In the Choose how to control access to objects section, select whether or not your bucket enforces public access prevention, and select an access control method for your bucket's objects.
-
In the Choose how to protect object data section, do the
following:
- Select any of the options under Data protection that you
want to set for your bucket.
- To enable soft delete, click the Soft delete policy (For data recovery) checkbox, and specify the number of days you want to retain objects after deletion.
- To set Object Versioning, click the Object versioning (For version control) checkbox, and specify the maximum number of versions per object and the number of days after which the noncurrent versions expire.
- To enable the retention policy on objects and buckets, click the Retention (For compliance) checkbox, and then do the following:
- To enable Object Retention Lock, click the Enable object retention checkbox.
- To enable Bucket Lock, click the Set bucket retention policy checkbox, and choose a unit of time and a length of time for your retention period.
- To choose how your object data will be encrypted, expand the Data encryption section (), and select a Data encryption method.
- Select any of the options under Data protection that you
want to set for your bucket.
-
In the Get started section, do the following:
- Click Create. 您的笔记本将存储在 Cloud Storage 中的
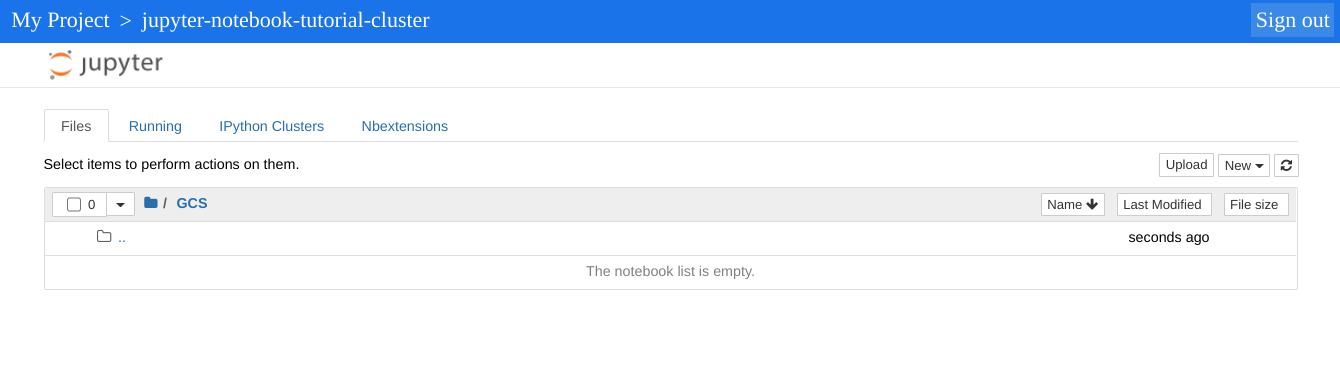
gs://bucket-name/notebooks/jupyter下。- 点击 GCS 链接。Jupyter 笔记本网页界面会显示存储在 Cloud Storage 存储桶中的笔记本,包括您在本教程中创建的所有笔记本。
- In the Google Cloud console, go to the Manage resources page.
- In the project list, select the project that you want to delete, and then click Delete.
- In the dialog, type the project ID, and then click Shut down to delete the project.
- 如需删除您的集群,请输入以下命令:
gcloud dataproc clusters delete cluster-name \ --region=${REGION} - 如需删除您在准备工作第 2 步中创建的 Cloud Storage 存储桶,包括存储在存储桶中的笔记本,请运行以下命令:
gcloud storage rm gs://${BUCKET_NAME} --recursive
创建集群并安装 Jupyter 组件
打开 Jupyter 和 JupyterLab 界面
点击 Google Cloud 控制台的Google Cloud 控制台组件网关链接,以打开集群主节点上运行的 Jupyter 笔记本或 JupyterLab 界面。
Jupyter 实例显示的顶级目录是一个虚拟目录,可让您查看 Cloud Storage 存储桶或本地文件系统的内容。您可以通过点击 Cloud Storage 的 GCS 链接或集群中主节点的本地文件系统的本地磁盘来选择位置。
清理
完成本教程后,您可以清理您创建的资源,让它们停止使用配额,以免产生费用。以下部分介绍如何删除或关闭这些资源。
删除项目
为了避免产生费用,最简单的方法是删除您为本教程创建的项目。
要删除项目,请执行以下操作:
删除集群
删除存储桶
后续步骤