Dokumen ini menunjukkan cara membuat tabel Apache Iceberg dengan metadata di metastore BigLake menggunakan layanan Dataproc Jobs, Spark SQL CLI, atau antarmuka web Zeppelin yang berjalan di cluster Dataproc.
Sebelum memulai
Jika Anda belum melakukannya, buat project Google Cloud , bucket Cloud Storage, dan cluster Dataproc.
Menyiapkan project
- Sign in to your Google Cloud account. If you're new to Google Cloud, create an account to evaluate how our products perform in real-world scenarios. New customers also get $300 in free credits to run, test, and deploy workloads.
-
In the Google Cloud console, on the project selector page, select or create a Google Cloud project.
Roles required to select or create a project
- Select a project: Selecting a project doesn't require a specific IAM role—you can select any project that you've been granted a role on.
-
Create a project: To create a project, you need the Project Creator
(
roles/resourcemanager.projectCreator), which contains theresourcemanager.projects.createpermission. Learn how to grant roles.
-
Verify that billing is enabled for your Google Cloud project.
-
Enable the Dataproc, BigQuery, and Cloud Storage APIs.
Roles required to enable APIs
To enable APIs, you need the Service Usage Admin IAM role (
roles/serviceusage.serviceUsageAdmin), which contains theserviceusage.services.enablepermission. Learn how to grant roles. -
Install the Google Cloud CLI.
-
Jika Anda menggunakan penyedia identitas (IdP) eksternal, Anda harus login ke gcloud CLI dengan identitas gabungan Anda terlebih dahulu.
-
Untuk melakukan inisialisasi gcloud CLI, jalankan perintah berikut:
gcloud init -
In the Google Cloud console, on the project selector page, select or create a Google Cloud project.
Roles required to select or create a project
- Select a project: Selecting a project doesn't require a specific IAM role—you can select any project that you've been granted a role on.
-
Create a project: To create a project, you need the Project Creator
(
roles/resourcemanager.projectCreator), which contains theresourcemanager.projects.createpermission. Learn how to grant roles.
-
Verify that billing is enabled for your Google Cloud project.
-
Enable the Dataproc, BigQuery, and Cloud Storage APIs.
Roles required to enable APIs
To enable APIs, you need the Service Usage Admin IAM role (
roles/serviceusage.serviceUsageAdmin), which contains theserviceusage.services.enablepermission. Learn how to grant roles. -
Install the Google Cloud CLI.
-
Jika Anda menggunakan penyedia identitas (IdP) eksternal, Anda harus login ke gcloud CLI dengan identitas gabungan Anda terlebih dahulu.
-
Untuk melakukan inisialisasi gcloud CLI, jalankan perintah berikut:
gcloud init Buat bucket Cloud Storage di project Anda.
- In the Google Cloud console, go to the Cloud Storage Buckets page.
- Click Create.
- On the Create a bucket page, enter your bucket information. To go to the next
step, click Continue.
-
In the Get started section, do the following:
- Enter a globally unique name that meets the bucket naming requirements.
- To add a
bucket label,
expand the Labels section (),
click add_box
Add label, and specify a
keyand avaluefor your label.
-
In the Choose where to store your data section, do the following:
- Select a Location type.
- Choose a location where your bucket's data is permanently stored from the Location type drop-down menu.
- If you select the dual-region location type, you can also choose to enable turbo replication by using the relevant checkbox.
- To set up cross-bucket replication, select
Add cross-bucket replication via Storage Transfer Service and
follow these steps:
Set up cross-bucket replication
- In the Bucket menu, select a bucket.
In the Replication settings section, click Configure to configure settings for the replication job.
The Configure cross-bucket replication pane appears.
- To filter objects to replicate by object name prefix, enter a prefix that you want to include or exclude objects from, then click Add a prefix.
- To set a storage class for the replicated objects, select a storage class from the Storage class menu. If you skip this step, the replicated objects will use the destination bucket's storage class by default.
- Click Done.
-
In the Choose how to store your data section, do the following:
- Select a default storage class for the bucket or Autoclass for automatic storage class management of your bucket's data.
- To enable hierarchical namespace, in the Optimize storage for data-intensive workloads section, select Enable hierarchical namespace on this bucket.
- In the Choose how to control access to objects section, select whether or not your bucket enforces public access prevention, and select an access control method for your bucket's objects.
-
In the Choose how to protect object data section, do the
following:
- Select any of the options under Data protection that you
want to set for your bucket.
- To enable soft delete, click the Soft delete policy (For data recovery) checkbox, and specify the number of days you want to retain objects after deletion.
- To set Object Versioning, click the Object versioning (For version control) checkbox, and specify the maximum number of versions per object and the number of days after which the noncurrent versions expire.
- To enable the retention policy on objects and buckets, click the Retention (For compliance) checkbox, and then do the following:
- To enable Object Retention Lock, click the Enable object retention checkbox.
- To enable Bucket Lock, click the Set bucket retention policy checkbox, and choose a unit of time and a length of time for your retention period.
- To choose how your object data will be encrypted, expand the Data encryption section (), and select a Data encryption method.
- Select any of the options under Data protection that you
want to set for your bucket.
-
In the Get started section, do the following:
- Click Create.
Buat cluster Dataproc Untuk menghemat resource dan biaya, Anda dapat membuat cluster Dataproc satu node untuk menjalankan contoh yang disajikan dalam dokumen ini.
Subnet di region tempat cluster dibuat harus mengaktifkan Akses Google Pribadi (PGA).
.Jika ingin menjalankan contoh antarmuka web Zeppelin dalam panduan ini, Anda harus menggunakan atau membuat cluster Dataproc dengan komponen opsional Zeppelin diaktifkan.
Memberikan peran ke akun layanan kustom (jika diperlukan): Secara default, VM cluster Dataproc menggunakan akun layanan default Compute Engine untuk berinteraksi dengan Dataproc. Jika Anda ingin menentukan akun layanan kustom saat Anda membuat cluster, akun tersebut harus memiliki peran Dataproc Worker (
roles/dataproc.worker) atau peran kustom dengan izin peran Worker yang diperlukan.Di jendela terminal lokal atau di Cloud Shell, gunakan editor teks, seperti
viataunano, untuk menyalin perintah berikut ke dalam fileiceberg-table.sql, lalu simpan file di direktori saat ini.USE CATALOG_NAME; CREATE NAMESPACE IF NOT EXISTS example_namespace; USE example_namespace; DROP TABLE IF EXISTS example_table; CREATE TABLE example_table (id int, data string) USING ICEBERG LOCATION 'gs://BUCKET/WAREHOUSE_FOLDER'; INSERT INTO example_table VALUES (1, 'first row'); ALTER TABLE example_table ADD COLUMNS (newDoubleCol double); DESCRIBE TABLE example_table;
Ganti kode berikut:
- CATALOG_NAME: Nama katalog Iceberg.
- BUCKET dan WAREHOUSE_FOLDER: Bucket dan folder Cloud Storage yang digunakan untuk gudang Iceberg.
Gunakan gcloud CLI untuk menyalin
iceberg-table.sqllokal ke bucket Anda di Cloud Storage.gcloud storage cp iceberg-table.sql gs://BUCKET/
Di jendela terminal lokal atau di Cloud Shell, jalankan perintah
curlberikut untuk mendownload file JARiceberg-spark-runtime-3.5_2.12-1.6.1ke direktori saat ini.curl -o iceberg-spark-runtime-3.5_2.12-1.6.1.jar https://storage-download.googleapis.com/maven-central/maven2/org/apache/iceberg/iceberg-spark-runtime-3.5_2.12/1.6.1/iceberg-spark-runtime-3.5_2.12-1.6.1.jar
Menggunakan gcloud CLI untuk menyalin file JAR
iceberg-spark-runtime-3.5_2.12-1.6.1lokal dari direktori saat ini ke bucket Anda di Cloud Storage.gcloud storage cp iceberg-spark-runtime-3.5_2.12-1.6.1.jar gs://BUCKET/
Jalankan perintah gcloud dataproc jobs submit spark-sql berikut secara lokal di jendela terminal lokal atau di Cloud Shell untuk mengirimkan tugas Spark SQL guna membuat tabel Iceberg.
gcloud dataproc jobs submit spark-sql \
    --project=PROJECT_ID \
    --cluster=CLUSTER_NAME \
    --region=REGION \
    --jars="gs://BUCKET/1.6.1/iceberg-spark-runtime-3.5_2.12-1.6.1.jar,gs://spark-lib/bigquery/iceberg-bigquery-catalog-1.6.1-1.0.1-beta.jar" \
    --properties="spark.sql.catalog.CATALOG_NAME=org.apache.iceberg.spark.SparkCatalog,spark.sql.catalog.CATALOG_NAME.catalog-impl=org.apache.iceberg.gcp.bigquery.BigQueryMetastoreCatalog,spark.sql.catalog.CATALOG_NAME.gcp_project=PROJECT_ID,spark.sql.catalog.CATALOG_NAME.gcp_location=LOCATION,spark.sql.catalog.CATALOG_NAME.warehouse=gs://BUCKET/WAREHOUSE_FOLDER" \
    -f="gs://BUCKETiceberg-table.sql"
Catatan:
- PROJECT_ID: ID project Google Cloud Anda. Project ID tercantum di bagian Project info di Google Cloud Dasbor konsol.
- CLUSTER_NAME: Nama cluster Dataproc Anda.
- REGION: Region Compute Engine tempat cluster Anda berada.
- CATALOG_NAME: Nama katalog Iceberg.
- BUCKET dan WAREHOUSE_FOLDER: Bucket dan folder Cloud Storage yang digunakan untuk gudang Iceberg.
- LOCATION: Lokasi BigQuery yang didukung. Lokasi defaultnya adalah "US".
--jars: JAR yang tercantum diperlukan untuk membuat metadata tabel di BigLake Metastore.--properties: Properti katalog.-f: File tugasiceberg-table.sqlyang Anda salin ke bucket Anda di Cloud Storage.
Lihat deskripsi tabel di output terminal saat tugas selesai.
Time taken: 2.194 seconds
id                      int
data                    string
newDoubleCol            double
Time taken: 1.479 seconds, Fetched 3 row(s)
Job JOB_ID finished successfully.
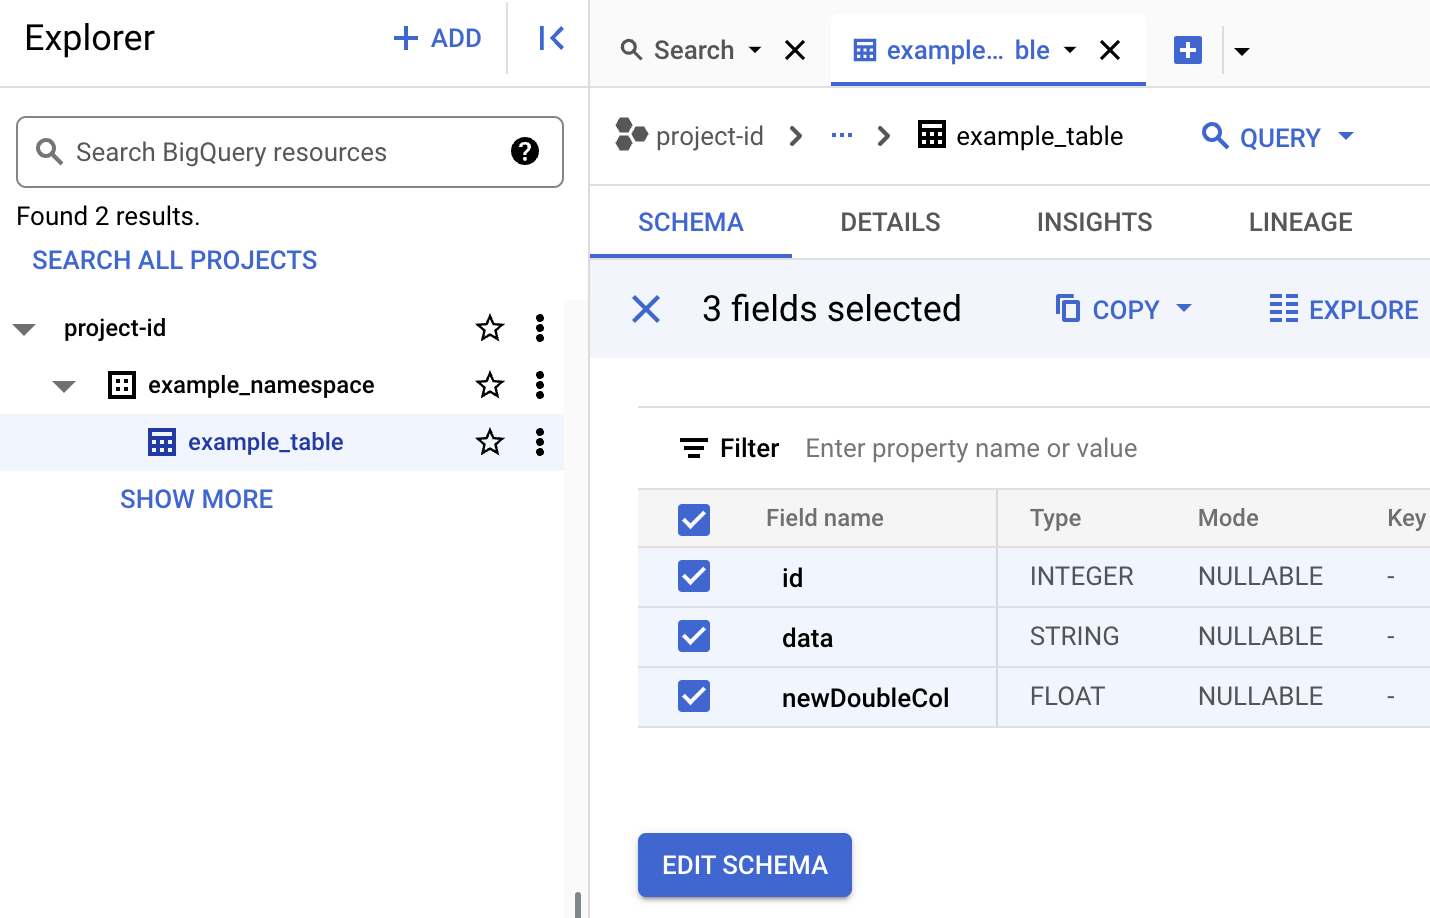
Untuk melihat metadata tabel di BigQuery
Di konsol Google Cloud , buka halaman BigQuery.
Melihat metadata tabel Iceberg.
Di konsol Google Cloud , buka Kirim tugas Dataproc.
Buka halaman Kirimkan tugas, lalu lengkapi kolom berikut:
- Job ID: Terima ID yang disarankan atau masukkan ID Anda sendiri.
- Region: Pilih region tempat cluster Anda berada.
- Cluster: Pilih cluster Anda.
- Jenis tugas: Pilih
SparkSql. - Jenis sumber kueri: Pilih
Query file. - File kueri: Sisipkan
gs://BUCKET/iceberg-table.sql - File JAR: Sisipkan kode berikut:
gs://BUCKET/iceberg-spark-runtime-3.5_2.12-1.6.1.jar,gs://spark-lib/bigquery/iceberg-bigquery-catalog-1.6.1-1.0.1-beta.jar
- Properti: Klik Tambahkan Properti
lima kali untuk membuat daftar lima kolom input
keyvalue, lalu salin pasangan Kunci dan Nilai berikut untuk menentukan lima properti.# Kunci Nilai 1. spark.sql.catalog.CATALOG_NAMEorg.apache.iceberg.spark.SparkCatalog2. spark.sql.catalog.CATALOG_NAME.catalog-implorg.apache.iceberg.gcp.bigquery.BigQueryMetastoreCatalog3. spark.sql.catalog.CATALOG_NAME.gcp_projectPROJECT_ID4. spark.sql.catalog.CATALOG_NAME.gcp_locationLOCATION5. spark.sql.catalog.CATALOG_NAME.warehousegs://BUCKET/WAREHOUSE_FOLDER
Catatan:
- CATALOG_NAME: Nama katalog Iceberg.
- PROJECT_ID: ID project Google Cloud Anda. Project ID tercantum di bagian Project info di Google Cloud Dasbor konsol. region tempat cluster Anda berada.
- LOCATION: Lokasi BigQuery yang didukung. Lokasi defaultnya adalah "US".
- BUCKET dan WAREHOUSE_FOLDER: Bucket dan folder Cloud Storage yang digunakan untuk gudang Iceberg.
Klik Kirim
Untuk memantau progres tugas dan melihat output tugas, buka halaman Tugas Dataproc di konsol Google Cloud , lalu klik
Job IDuntuk membuka halaman Detail tugas.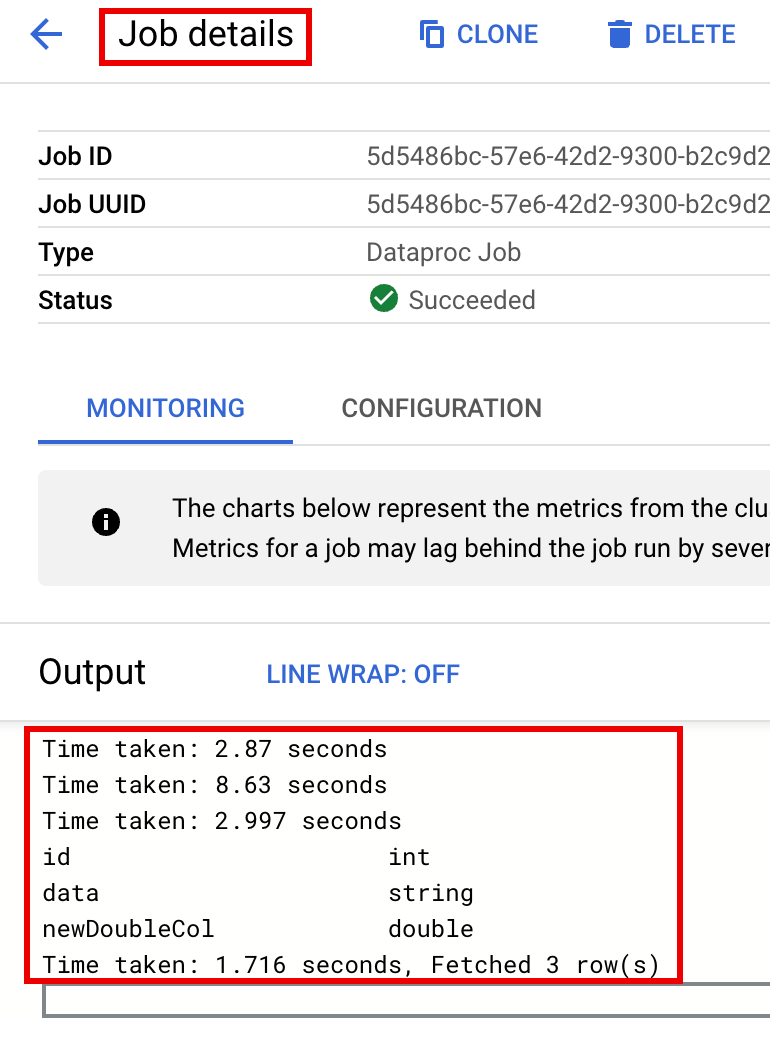
Untuk melihat metadata tabel di BigQuery
Di konsol Google Cloud , buka halaman BigQuery.
Melihat metadata tabel Iceberg.
- PROJECT_ID: ID project Google Cloud Anda. Project ID tercantum di bagian Project info di Google Cloud Dasbor konsol.
- CLUSTER_NAME: Nama cluster Dataproc Anda.
- REGION: Region Compute Engine tempat cluster Anda berada.
- CATALOG_NAME: Nama katalog Iceberg.
- BUCKET dan WAREHOUSE_FOLDER: Bucket dan folder Cloud Storage yang digunakan untuk gudang Iceberg. LOCATION: Lokasi BigQuery yang didukung. Lokasi defaultnya adalah "US".
jarFileUris: JAR yang tercantum diperlukan untuk membuat metadata tabel di BigQuery Metastore.properties: Properti katalog.queryFileUri: File tugasiceberg-table.sqlyang Anda salin ke bucket Anda di Cloud Storage.Di konsol Google Cloud , buka halaman BigQuery.
Melihat metadata tabel Iceberg.
Gunakan SSH untuk terhubung ke node master cluster Dataproc Anda.
Di terminal sesi SSH, gunakan editor teks
viataunanountuk menyalin perintah berikut ke dalam fileiceberg-table.sql.SET CATALOG_NAME = `CATALOG_NAME`; SET BUCKET = `BUCKET`; SET WAREHOUSE_FOLDER = `WAREHOUSE_FOLDER`; USE `${CATALOG_NAME}`; CREATE NAMESPACE IF NOT EXISTS `${CATALOG_NAME}`.example_namespace; DROP TABLE IF EXISTS `${CATALOG_NAME}`.example_namespace.example_table; CREATE TABLE `${CATALOG_NAME}`.example_namespace.example_table (id int, data string) USING ICEBERG LOCATION 'gs://${BUCKET}/${WAREHOUSE_FOLDER}'; INSERT INTO `${CATALOG_NAME}`.example_namespace.example_table VALUES (1, 'first row'); ALTER TABLE `${CATALOG_NAME}`.example_namespace.example_table ADD COLUMNS (newDoubleCol double); DESCRIBE TABLE `${CATALOG_NAME}`.example_namespace.example_table;Ganti kode berikut:
- CATALOG_NAME: Nama katalog Iceberg.
- BUCKET dan WAREHOUSE_FOLDER: Bucket dan folder Cloud Storage yang digunakan untuk gudang Iceberg.
Di terminal sesi SSH, jalankan perintah
spark-sqlberikut untuk membuat tabel iceberg.spark-sql \ --packages org.apache.iceberg:iceberg-spark-runtime-3.5_2.12:1.6.1 \ --jars https://storage-download.googleapis.com/maven-central/maven2/org/apache/iceberg/iceberg-spark-runtime-3.5_2.12/1.6.1/iceberg-spark-runtime-3.5_2.12-1.6.1.jar,gs://spark-lib/bigquery/iceberg-bigquery-catalog-1.6.1-1.0.1-beta.jar \ --conf spark.sql.catalog.CATALOG_NAME=org.apache.iceberg.spark.SparkCatalog \ --conf spark.sql.catalog.CATALOG_NAME.catalog-impl=org.apache.iceberg.gcp.bigquery.BigQueryMetastoreCatalog \ --conf spark.sql.catalog.CATALOG_NAME.gcp_project=PROJECT_ID \ --conf spark.sql.catalog.CATALOG_NAME.gcp_location=LOCATION \ --conf spark.sql.catalog.CATALOG_NAME.warehouse=gs://BUCKET/WAREHOUSE_FOLDER \ -f iceberg-table.sql
Ganti kode berikut:
- PROJECT_ID: ID project Google Cloud Anda. Project ID tercantum di bagian Project info di Google Cloud Dasbor konsol.
- LOCATION: Lokasi BigQuery yang didukung. Lokasi defaultnya adalah "US".
Melihat metadata tabel di BigQuery
Di konsol Google Cloud , buka halaman BigQuery.
Melihat metadata tabel Iceberg.
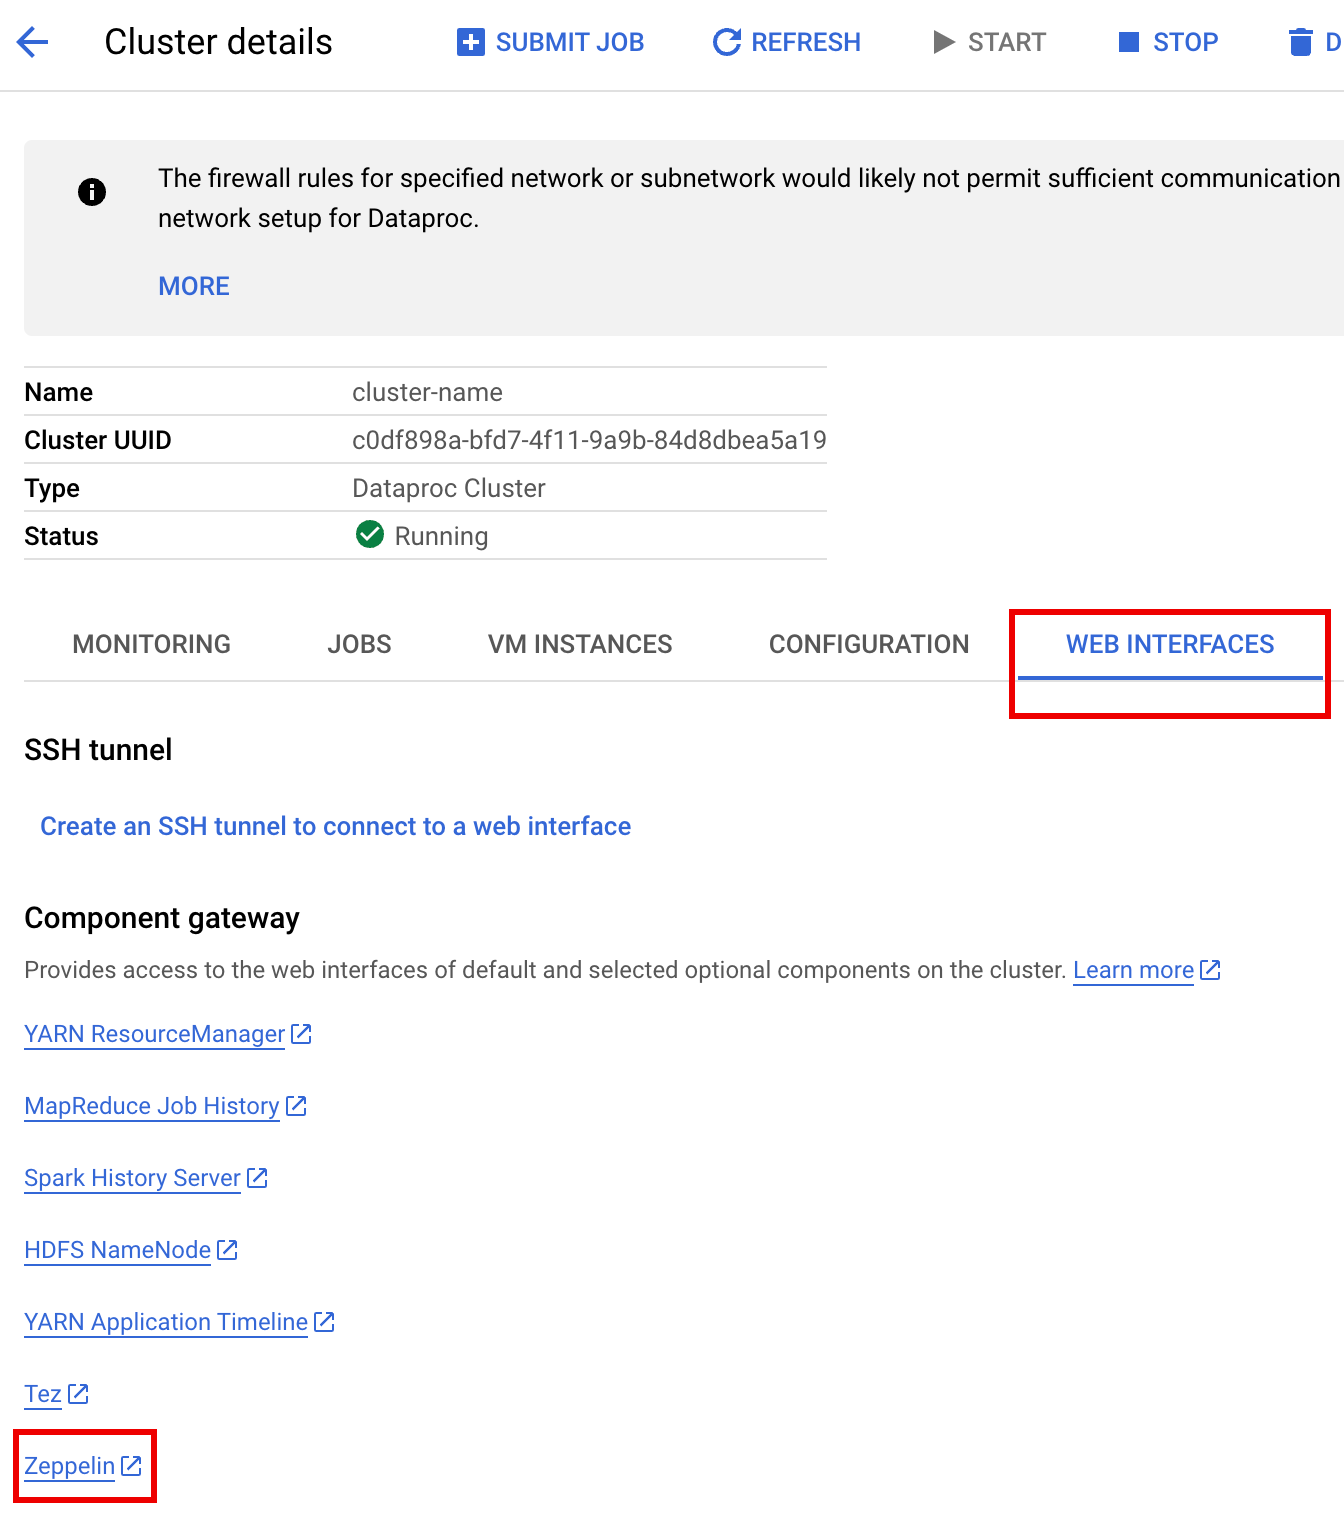
Di konsol Google Cloud , buka halaman Cluster Dataproc.
Pilih nama cluster Anda untuk membuka halaman Cluster details.
Klik tab Web Interfaces untuk menampilkan daftar link Component Gateway ke antarmuka web komponen default dan opsional yang diinstal di cluster.
Klik link Zeppelin untuk membuka antarmuka web Zeppelin.
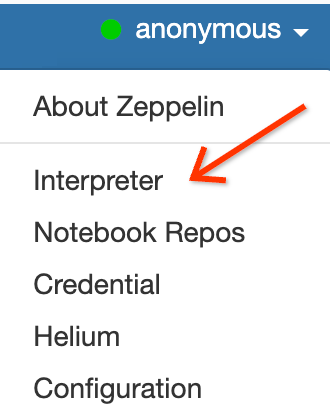
Di antarmuka web Zeppelin, klik menu anonymous, lalu klik Interpreter untuk membuka halaman Interpreters.
Tambahkan dua JAR ke interpreter Zeppelin Spark, sebagai berikut:
- Ketik "Spark" di kotak
Search interpretersuntuk men-scroll ke bagian interpreter Spark. - Klik edit.
Tempelkan yang berikut ini di kolom spark.jars:
https://storage-download.googleapis.com/maven-central/maven2/org/apache/iceberg/iceberg-spark-runtime-3.5_2.12/1.6.1/iceberg-spark-runtime-3.5_2.12-1.6.1.jar,gs://spark-lib/bigquery/iceberg-bigquery-catalog-1.6.1-1.0.1-beta.jar

Klik Simpan di bagian bawah bagian interpreter Spark, lalu klik Oke untuk memperbarui interpreter dan memulai ulang interpreter Spark dengan setelan baru.
- Ketik "Spark" di kotak
Dari menu notebook Zeppelin, klik Create new note.
Dalam dialog Create new note, masukkan nama untuk notebook, dan terima interpreter spark default. Klik Buat untuk membuka notebook.
Salin kode PySpark berikut ke notebook Zeppelin Anda setelah mengisi variabel.
%pyspark
from pyspark.sql import SparkSession
project_id = "PROJECT_ID" catalog = "CATALOG_NAME" namespace = "NAMESPACE" location = "LOCATION" warehouse_dir = "gs://BUCKET/WAREHOUSE_DIRECTORY"
spark = SparkSession.builder \ .appName("BigQuery Metastore Iceberg") \ .config(f"spark.sql.catalog.{catalog}", "org.apache.iceberg.spark.SparkCatalog") \ .config(f"spark.sql.catalog.{catalog}.catalog-impl", "org.apache.iceberg.gcp.bigquery.BigQueryMetastoreCatalog") \ .config(f"spark.sql.catalog.{catalog}.gcp_project", f"{project_id}") \ .config(f"spark.sql.catalog.{catalog}.gcp_location", f"{location}") \ .config(f"spark.sql.catalog.{catalog}.warehouse", f"{warehouse_dir}") \ .getOrCreate()
spark.sql(f"USE `{catalog}`;") spark.sql(f"CREATE NAMESPACE IF NOT EXISTS `{namespace}`;") spark.sql(f"USE `{namespace}`;")
\# Create table and display schema (without LOCATION) spark.sql("DROP TABLE IF EXISTS example_iceberg_table") spark.sql("CREATE TABLE example_iceberg_table (id int, data string) USING ICEBERG") spark.sql("DESCRIBE example_iceberg_table;")
\# Insert table data. spark.sql("INSERT INTO example_iceberg_table VALUES (1, 'first row');")
\# Alter table, then display schema. spark.sql("ALTER TABLE example_iceberg_table ADD COLUMNS (newDoubleCol double);")
\# Select and display the contents of the table. spark.sql("SELECT * FROM example_iceberg_table").show()Ganti kode berikut:
- PROJECT_ID: ID project Google Cloud Anda. Project ID tercantum di bagian Project info di Google Cloud Dasbor konsol.
- CATALOG_NAME dan NAMESPACE: Nama dan namespace katalog Iceberg digabungkan untuk mengidentifikasi tabel Iceberg (
catalog.namespace.table_name). - LOCATION: Lokasi BigQuery yang didukung. Lokasi defaultnya adalah "US".
- BUCKET dan WAREHOUSE_DIRECTORY: Bucket dan folder Cloud Storage yang digunakan sebagai direktori gudang Iceberg.
Klik ikon jalankan atau tekan
Shift-Enteruntuk menjalankan kode. Setelah tugas selesai, pesan status akan menampilkan "Spark Job Finished", dan output akan menampilkan isi tabel: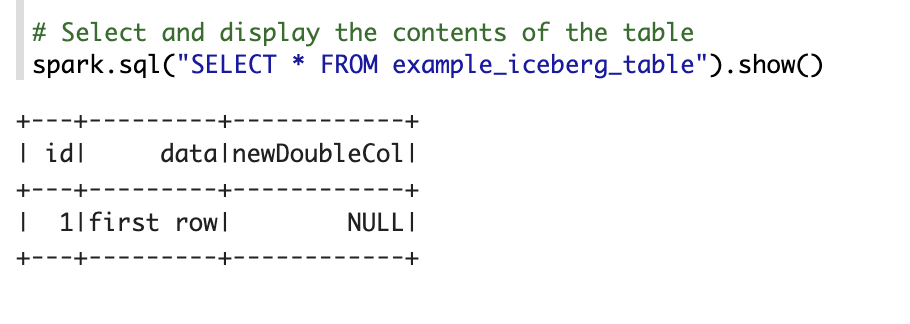
Melihat metadata tabel di BigQuery
Di konsol Google Cloud , buka halaman BigQuery.
Melihat metadata tabel Iceberg.
Pemetaan database OSS ke set data BigQuery
Perhatikan pemetaan berikut antara istilah database open source dan set data BigQuery:
Database OSS BigQuery dataset Namespace, Database Set data Tabel Berpartisi atau Tidak Berpartisi Tabel Lihat Lihat Membuat tabel Iceberg
Bagian ini menunjukkan cara membuat tabel Iceberg dengan metadata di BigLake Metastore dengan mengirimkan kode Spark SQL ke layanan Dataproc, Spark SQL CLI, dan antarmuka web komponen Zeppelin, yang berjalan di cluster Dataproc.
Tugas Dataproc
Anda dapat mengirimkan tugas ke layanan Dataproc dengan mengirimkan tugas ke cluster Dataproc menggunakan konsolGoogle Cloud atau Google Cloud CLI, atau melalui permintaan REST HTTP atau panggilan gRPC Dataproc Cloud Client Libraries terprogram ke Dataproc Jobs API.
Contoh di bagian ini menunjukkan cara mengirimkan tugas Spark SQL Dataproc ke layanan Dataproc untuk membuat tabel Iceberg dengan metadata di BigQuery menggunakan gcloud CLI,konsol, atau Dataproc REST API. Google Cloud
Menyiapkan file tugas
Lakukan langkah-langkah berikut untuk membuat file tugas Spark SQL. File ini berisi perintah Spark SQL untuk membuat dan memperbarui tabel Iceberg.
Selanjutnya, download dan salin file JAR
iceberg-spark-runtime-3.5_2.12-1.6.1ke Cloud Storage.Kirimkan tugas Spark SQL
Pilih tab untuk mengikuti petunjuk tentang cara mengirimkan tugas Spark SQL ke layanan Dataproc menggunakan gcloud CLI, konsol, atau Dataproc REST API.Google Cloud
gcloud
Konsol
Lakukan langkah-langkah berikut untuk menggunakan konsol Google Cloud guna mengirimkan tugas Spark SQL ke layanan Dataproc untuk membuat tabel Iceberg dengan metadata di metastore BigLake.
REST
Anda dapat menggunakan API jobs.submit Dataproc untuk mengirimkan tugas Spark SQL ke layanan Dataproc guna membuat tabel Iceberg dengan metadata di metastore BigLake.
Sebelum menggunakan salah satu data permintaan, lakukan penggantian berikut:
Metode HTTP dan URL:
POST https://dataproc.googleapis.com/v1/projects/PROJECT_ID/regions/REGION/jobs:submit
Meminta isi JSON:
{
  "projectId": "PROJECT_ID",
  "job": {
    "placement": {
      "clusterName": "CLUSTER_NAME"
    },
    "statusHistory": [],
    "reference": {
      "jobId": "",
      "projectId": "PROJECT_ID"
    },
    "sparkSqlJob": {
      "properties": {
        "spark.sql.catalog."CATALOG_NAME": "org.apache.iceberg.spark.SparkCatalog",
        "spark.sql.catalog."CATALOG_NAME".catalog-impl": "org.apache.iceberg.gcp.bigquery.BigQueryMetastoreCatalog",
        "spark.sql.catalog."CATALOG_NAME".gcp_project": "PROJECT_ID",
        "spark.sql.catalog."CATALOG_NAME".gcp_location": "LOCATION",
        "spark.sql.catalog."CATALOG_NAME".warehouse": "gs://BUCKET/WAREHOUSE_FOLDER"
      },
      "jarFileUris": [
        "gs://BUCKET/iceberg-spark-runtime-3.5_2.12-1.5.2.jar,gs://spark-lib/bigquery/iceberg-bigquery-catalog-1.5.2-1.0.1-beta.jar"
      ],
      "scriptVariables": {},
      "queryFileUri": "gs://BUCKET/iceberg-table.sql"
    }
  }
}
Untuk mengirim permintaan Anda, perluas salah satu opsi berikut:
Anda akan melihat respons JSON seperti berikut:
{
  "reference": {
    "projectId": "PROJECT_ID",
    "jobId": "..."
  },
  "placement": {
    "clusterName": "CLUSTER_NAME",
    "clusterUuid": "..."
  },
  "status": {
    "state": "PENDING",
    "stateStartTime": "..."
  },
  "submittedBy": "USER",
  "sparkSqlJob": {
    "queryFileUri": "gs://BUCKET/iceberg-table.sql",
    "properties": {
      "spark.sql.catalog.USER_catalog": "org.apache.iceberg.spark.SparkCatalog",
      "spark.sql.catalog.USER_catalog.catalog-impl": "org.apache.iceberg.gcp.bigquery.BigQueryMetastoreCatalog",
      "spark.sql.catalog.USER_catalog.gcp_project": "PROJECT_ID",
      "spark.sql.catalog.USER_catalog.gcp_location": "LOCATION",
      "spark.sql.catalog.USER_catalog.warehouse": "gs://BUCKET/WAREHOUSE_FOLDER"
    },
    "jarFileUris": [
      "gs://BUCKET/iceberg-spark-runtime-3.5_2.12-1.5.2.jar",
      "gs://spark-lib/bigquery/iceberg-bigquery-catalog-1.5.2-1.0.1-beta.jar"
    ]
  },
  "driverControlFilesUri": "gs://dataproc-...",
  "driverOutputResourceUri": "gs://dataproc-.../driveroutput",
  "jobUuid": "...",
  "region": "REGION"
}
Untuk memantau progres tugas dan melihat output tugas, buka halaman Tugas Dataproc di konsol Google Cloud , lalu klik
Job IDuntuk membuka halaman Detail tugas.
Untuk melihat metadata tabel di BigQuery
CLI Spark SQL
Langkah-langkah berikut menunjukkan cara membuat tabel Iceberg dengan metadata tabel yang disimpan di metastore BigLake menggunakan Spark SQL CLI yang berjalan di node master cluster Dataproc.
Antarmuka web Zeppelin
Langkah-langkah berikut menunjukkan cara membuat tabel Iceberg dengan metadata tabel yang disimpan di metastore BigLake menggunakan antarmuka web Zeppelin yang berjalan di node master cluster Dataproc .