このページでは、マルチテーブル ソースを使用して、Microsoft SQL Server データベースから複数のテーブルを読み取る方法について説明します。パイプラインで複数のテーブルから読み取る場合は、Multi Table ソースを使用します。パイプラインで単一のテーブルから読み取る場合は、SQL Server テーブルからの読み取りをご覧ください。
マルチテーブル ソースは、複数のスキーマを使用してデータを出力し、データの取得元のテーブルを示すテーブル名フィールドを含みます。マルチテーブル ソースを使用する場合は、マルチテーブル シンク、BigQuery マルチテーブル、GCS マルチファイルのいずれかを使用します。
始める前に
- Sign in to your Google Cloud account. If you're new to Google Cloud, create an account to evaluate how our products perform in real-world scenarios. New customers also get $300 in free credits to run, test, and deploy workloads.
-
In the Google Cloud console, on the project selector page, select or create a Google Cloud project.
Roles required to select or create a project
- Select a project: Selecting a project doesn't require a specific IAM role—you can select any project that you've been granted a role on.
-
Create a project: To create a project, you need the Project Creator
(
roles/resourcemanager.projectCreator), which contains theresourcemanager.projects.createpermission. Learn how to grant roles.
-
Verify that billing is enabled for your Google Cloud project.
-
Enable the Cloud Data Fusion, Cloud Storage, BigQuery, and Dataproc APIs.
Roles required to enable APIs
To enable APIs, you need the Service Usage Admin IAM role (
roles/serviceusage.serviceUsageAdmin), which contains theserviceusage.services.enablepermission. Learn how to grant roles. - Cloud Data Fusion インスタンスを作成します。
- SQL Server データベースが Cloud Data Fusion からの接続を受け入れられることを確認します。安全に接続するためには、プライベート Cloud Data Fusion インスタンスを作成することをおすすめします。
Google Cloud コンソールで、Cloud Data Fusion のページに移動します。
Cloud Data Fusion Studio でインスタンスを開くには、[インスタンス]、[インスタンスを表示] の順にクリックします。
Cloud Data Fusion インスタンスを表示する
Cloud Data Fusion を使用する際は、 Google Cloud コンソールと個別の Cloud Data Fusion UI の両方を使用します。 Google Cloud コンソールでは、 Google Cloud プロジェクトの作成、Cloud Data Fusion インスタンスの作成と削除を行うことができます。Cloud Data Fusion UI では、Studio や Wrangler などのさまざまなページを使用して Cloud Data Fusion の機能を使用できます。
SQL Server のパスワードをセキュリティ キーとして保存する
SQL Server のパスワードを Cloud Data Fusion インスタンスでの暗号化に使用するセキュリティ キーとして追加します。このガイドの後の部分で、Cloud KMS を使用してパスワードを取得されるようにします。
Cloud Data Fusion ページの右上隅にある [SYSTEM ADMIN] をクリックします。
[Configuration] タブをクリックします。
[Make HTTP Calls] をクリックします。
![[Configuration] タブ。](https://cloud.google.com/static/data-fusion/docs/images/how-to/reading-from-sqlserver/config.png?authuser=0&hl=ja)
プルダウン メニューで [PUT] を選択します。
[Path] フィールドに「
namespaces/NAMESPACE_ID/securekeys/PASSWORD」と入力します。[Body] フィールドに「
{"data":"SQL_SERVER_PASSWORD"}」と入力します。[送信] をクリックします。
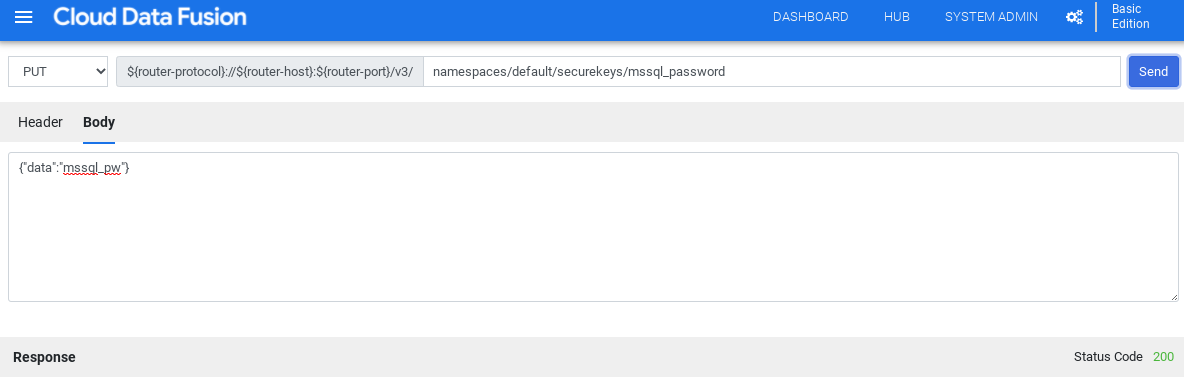
レスポンスとしてステータス コード「200」が返されることを確認します。
SQL Server の JDBC ドライバを取得する
Hub の使用
Cloud Data Fusion UI で、[Hub] をクリックします。
検索バーに「
Microsoft SQL Server JDBC Driver」と入力します。[Microsoft SQL Server JDBC Driver] をクリックします。
[ダウンロード] をクリックします。表示されたダウンロード手順に沿って操作します。
[Deploy] をクリックします。前の手順で作成した Jar ファイルをアップロードします。
[完了] をクリックします。
Studio の使用
Microsoft.com にアクセスします。
ダウンロードするファイルを選択して、[ダウンロード] をクリックします。
Cloud Data Fusion UI で、 メニューをクリックし、[Studio] ページに移動します。
[追加] をクリックします。
[ドライバ] で [アップロード] をクリックします。
ステップ 2 でダウンロードした JAR ファイルをアップロードします。
[Next(次へ)] をクリックします。
[名前] に入力して、ドライバを構成します。
[Class Name] フィールドに「
com.microsoft.sqlserver.jdbc.SQLServerDriver」と入力します。[完了] をクリックします。
Multiple Table Plugins をデプロイする
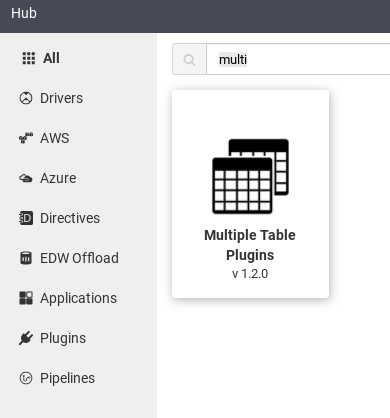
Cloud Data Fusion ウェブ UI で [HUB] をクリックします。
検索バーに「
Multiple table plugins」と入力します。[Multiple Table Plugins] をクリックします。
[デプロイ] をクリックします。
[Finish] をクリックします。
[Create a Pipeline] をクリックします。
SQL Server に接続する
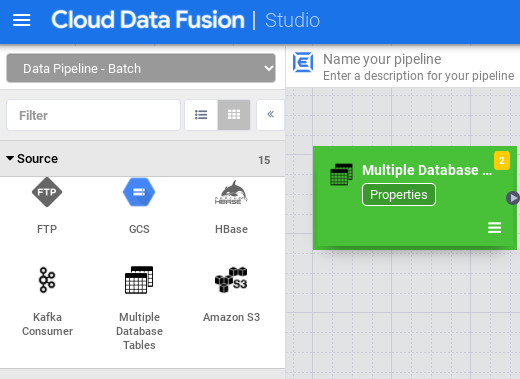
Cloud Data Fusion UI で、 メニューをクリックし、[Studio] ページに移動します。
[Studio] で、[ソース] メニューを開きます。
[Multiple Database Tables] をクリックします。
[Multiple Database Tables] ノードの上にポインタを置き、[プロパティ] をクリックします。
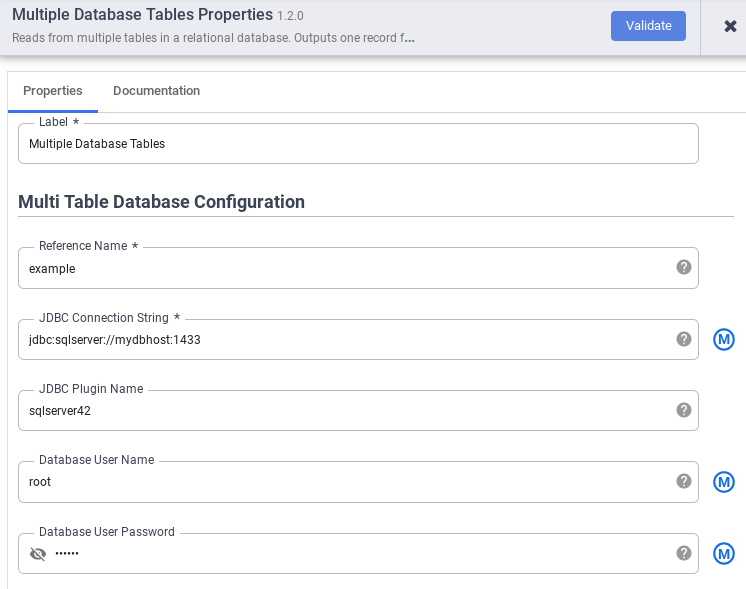
[参照名] フィールドに、SQL Server ソースの識別に使用する参照名を指定します。
[JDBC 接続文字列] フィールドに、JDBC 接続文字列を入力します。例:
jdbc:sqlserver://mydbhost:1433詳細については、接続 URL の作成をご覧ください。[JDBC Plugin Name]、[Database User Name]、[Database User Password] を入力します。
[検証] をクリックします。
[閉じる] をクリックします。
BigQuery または Cloud Storage に接続する
Cloud Data Fusion UI で、 メニューをクリックし、[Studio] ページに移動します。
[シンク] を開きます。
[BigQuery マルチテーブル] または [GCS マルチファイル] をクリックします。
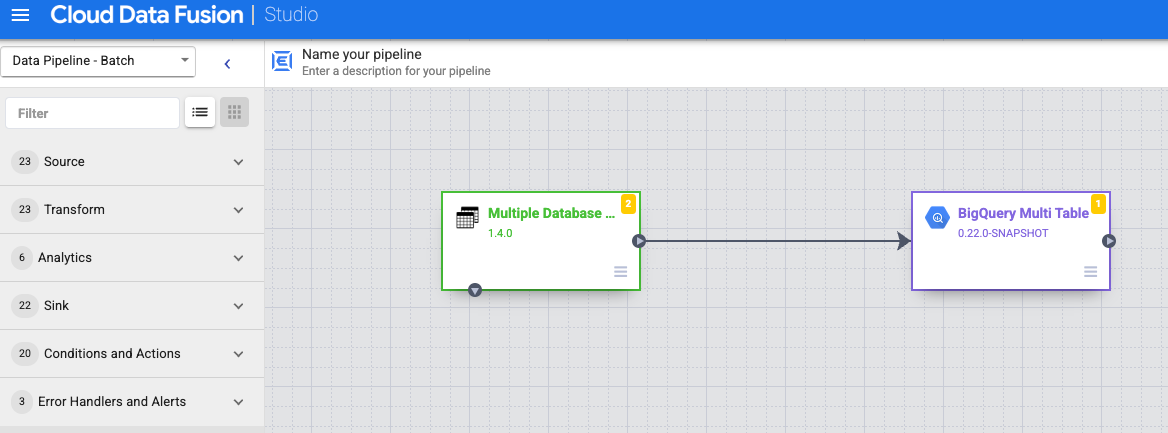
複数のデータベース テーブル ノードを BigQuery マルチテーブルまたは GCS マルチファイルに接続します。
ポインタを BigQuery マルチテーブル ノードまたは GCS マルチファイル ノードの上に置き、[プロパティ] をクリックして、シンクを構成します。
詳細については、Google BigQuery マルチ テーブル シンクと Google Cloud Storage マルチファイル シンクをご覧ください。
[検証] をクリックします。
[閉じる] をクリックします。
パイプラインのプレビューを実行する
Cloud Data Fusion UI で、 メニューをクリックし、[Studio] ページに移動します。
[プレビュー] をクリックします。
[実行] をクリックします。プレビューが正常に完了するまで待ちます。
パイプラインをデプロイする
Cloud Data Fusion UI で、 メニューをクリックし、[Studio] ページに移動します。
[デプロイ] をクリックします。
パイプラインを実行する
Cloud Data Fusion UI で [メニュー] をクリックします。
[リスト] をクリックします。
パイプラインをクリックします。
パイプラインの詳細ページで、[実行] をクリックします。
次のステップ
- Cloud Data Fusion について学ぶ。
- チュートリアルのいずれかに取り組む。