이 페이지에서는 Cloud Data Fusion 인스턴스의 PostgreSQL 데이터베이스에서 데이터를 읽는 방법을 설명합니다.
시작하기 전에
- Cloud Data Fusion 인스턴스 만들기
- Cloud Data Fusion에서 연결할 수 있도록 PostgreSQL 데이터베이스를 사용 설정합니다. 이를 안전하게 수행하려면 비공개 Cloud Data Fusion 인스턴스를 사용하는 것이 좋습니다.
필요한 역할
PostgreSQL 데이터베이스에 연결하는 데 필요한 권한을 얻으려면 관리자에게 다음 IAM 역할을 부여해 달라고 요청하세요.
-
클러스터가 포함된 프로젝트의 Dataproc 서비스 계정에 대한 Dataproc 작업자 (
roles/dataproc.worker) -
클러스터가 포함된 프로젝트의 Dataproc 서비스 계정에 대한 Cloud Data Fusion 실행자 (
roles/datafusion.runner) -
Cloud SQL 인증 프록시 없이 Cloud SQL을 사용하려면 Cloud SQL 인스턴스가 포함된 프로젝트에서 Cloud SQL 클라이언트 (
roles/cloudsql.client)를 선택합니다.
역할 부여에 대한 자세한 내용은 프로젝트, 폴더, 조직에 대한 액세스 관리를 참조하세요.
커스텀 역할이나 다른 사전 정의된 역할을 통해 필요한 권한을 얻을 수도 있습니다.
Cloud Data Fusion에서 인스턴스 열기
Google Cloud 콘솔에서 Cloud Data Fusion 페이지로 이동합니다.
Cloud Data Fusion Studio에서 인스턴스를 열려면 인스턴스를 클릭한 다음 인스턴스 보기를 클릭합니다.
PostgreSQL 비밀번호를 보안 키로 저장
PostgreSQL 비밀번호를 보안 키로 입력하여 Cloud Data Fusion 인스턴스에서 암호화합니다. 키에 대한 자세한 내용은 Cloud KMS를 참조하세요.
Cloud Data Fusion UI에서 시스템 관리자 > 구성을 클릭합니다.
HTTP 호출을 클릭합니다.

드롭다운 메뉴에서 PUT을 선택합니다.
경로 필드에
namespaces/default/securekeys/pg_password를 입력합니다.본문 필드에
{"data":"POSTGRESQL_PASSWORD"}를 입력합니다.POSTGRESQL_PASSWORD를 PostgreSQL 비밀번호로 바꿉니다.보내기를 클릭합니다.
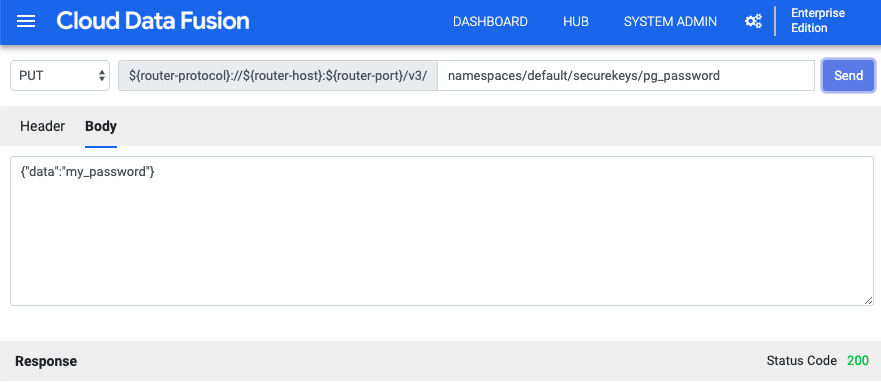
응답 필드는 오류를 알려줍니다.
PostgreSQL용 Cloud SQL에 연결
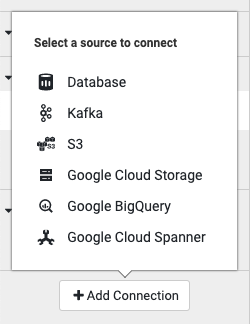
Cloud Data Fusion UI에서 메뉴 menu를 클릭하고 랭글러 페이지로 이동합니다.
연결 추가를 클릭합니다.
연결할 소스 유형으로 데이터베이스를 선택합니다.
PostgreSQL용 Google Cloud SQL에서 업로드를 클릭합니다.
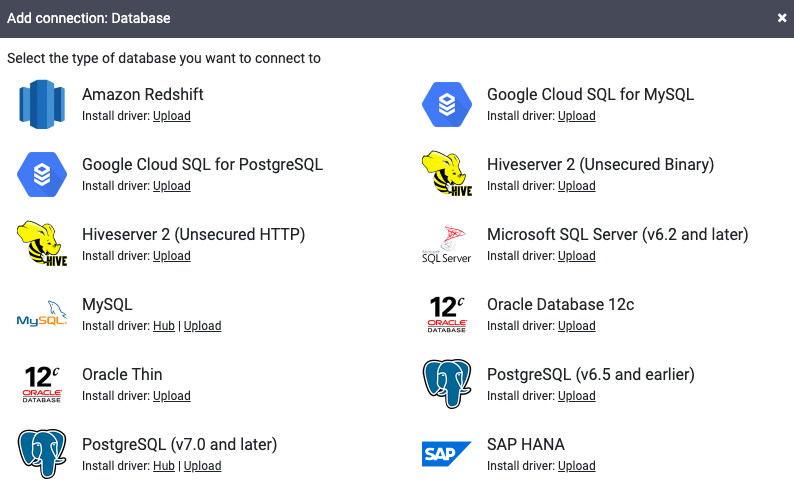
PostgreSQL 드라이버가 포함된 JAR 파일을 업로드합니다. JAR 파일은
NAME-VERSION.jar형식이어야 합니다. JAR 파일 형식이 이 형식이 아니면 업로드하기 전에 이름을 바꿉니다.다음을 클릭합니다.
필드에 드라이버의 이름, 클래스 이름, 버전을 입력합니다.
마침을 클릭합니다.
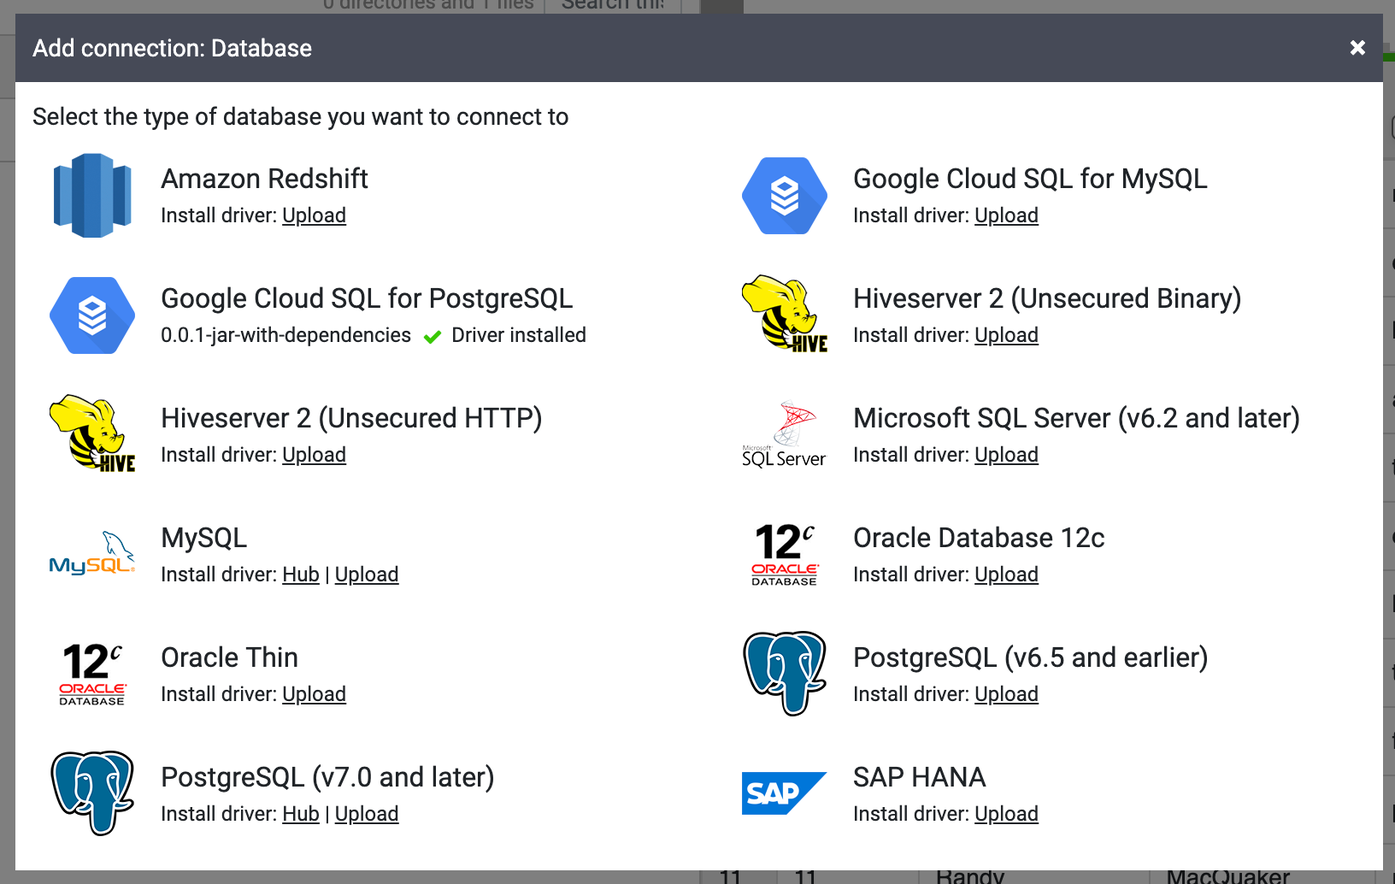
연결 추가 창이 열리면 PostgreSQL용 Google Cloud SQL을 클릭합니다. JAR 이름이 PostgreSQL용 Google Cloud SQL 아래에 표시됩니다.
필수 연결 필드를 작성합니다. 비밀번호 필드에서 이전에 저장한 보안 키를 선택합니다. 이렇게 하면 비밀번호가 Cloud KMS를 통해 검색됩니다.
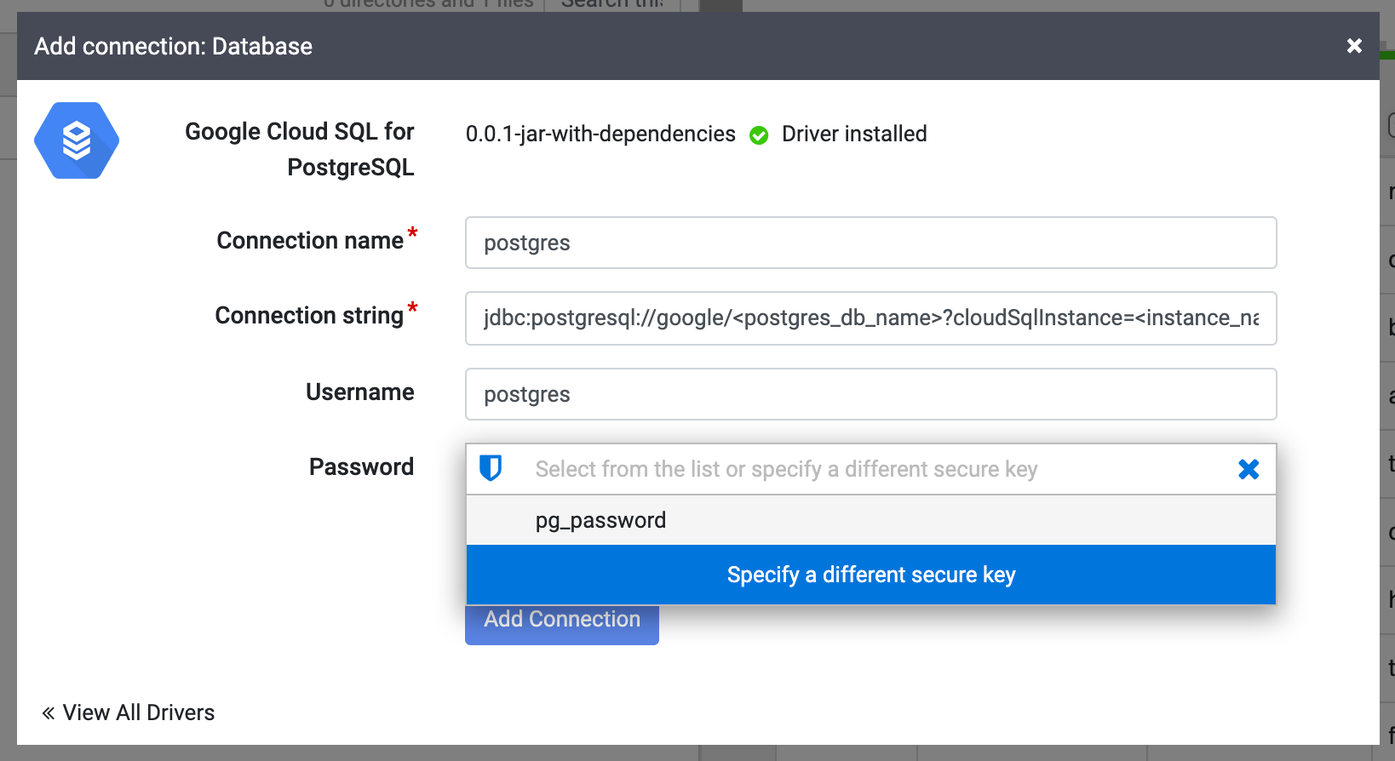
연결 문자열 필드에서 연결 문자열을 다음과 같이 입력합니다.
jdbc:postgresql://google/DATABASE_NAME?cloudSqlInstance=INSTANCE_CONNECTION_NAME&socketFactory=com.google.cloud.sql.postgres.SocketFactory&useSSL=false
다음을 바꿉니다.
DATABASE_NAME: 인스턴스 세부정보 페이지의 데이터베이스 탭에 나열된 Cloud SQL 데이터베이스 이름입니다.INSTANCE_CONNECTION_NAME: 인스턴스 세부정보 페이지의 개요 탭에 표시된 Cloud SQL 인스턴스 연결 이름입니다.

예를 들면 다음과 같습니다.
jdbc:postgresql://google/postgres?cloudSqlInstance=dis-demo:us-central1:pgsql-1&socketFactory=com.google.cloud.sql.postgres.SocketFactory&useSSL=false
Cloud SQL Admin API를 사용 설정합니다.
연결 테스트를 클릭하여 연결이 데이터베이스와 설정되었는지 확인합니다.
연결 추가를 클릭합니다.
PostgreSQL 데이터베이스가 연결되면 (랭글러에서) 데이터에 변환을 적용하고 파이프라인을 만든 후 (스튜디오에서) 출력을 싱크에 씁니다.