Cloud Composer 3 | Cloud Composer 2 | Cloud Composer 1
Questa pagina descrive come utilizzare KubernetesPodOperator per eseguire il deployment di pod Kubernetes da Cloud Composer nel cluster Google Kubernetes Engine che fa parte del tuo ambiente Cloud Composer.
KubernetesPodOperator avvia pod Kubernetes nel cluster del tuo ambiente. In confronto, gli operatori Google Kubernetes Engine eseguono pod Kubernetes in un cluster specificato, che può essere un cluster separato non correlato al tuo ambiente. Puoi anche creare ed eliminare i cluster utilizzando gli operatori Google Kubernetes Engine.
KubernetesPodOperator è una buona opzione se hai bisogno di:
- Dipendenze Python personalizzate non disponibili tramite il repository pubblico PyPI.
- Dipendenze binarie non disponibili nell'immagine worker Cloud Composer di serie.
Prima di iniziare
- Ti consigliamo di utilizzare la versione più recente di Cloud Composer. Come minimo, questa versione deve essere supportata nell'ambito del regolamento relativo al ritiro e al supporto.
- Assicurati che il tuo ambiente disponga di risorse sufficienti. L'avvio di pod in un ambiente con risorse limitate può causare errori dello scheduler e dei worker di Airflow.
Configura le risorse dell'ambiente Cloud Composer
Quando crei un ambiente Cloud Composer, specifichi i relativi parametri di prestazioni, inclusi quelli per il cluster dell'ambiente. L'avvio di pod Kubernetes nel cluster dell'ambiente può causare competizione per le risorse del cluster, come CPU o memoria. Poiché lo scheduler e i worker di Airflow si trovano nello stesso cluster GKE, non funzioneranno correttamente se la concorrenza comporta una carenza di risorse.
Per evitare la carenza di risorse, esegui una o più delle seguenti azioni:
- (Consigliato) Crea un node pool
- Aumentare il numero di nodi nell'ambiente
- Specifica il tipo di macchina appropriato
Crea un node pool
Il modo migliore per evitare la carenza di risorse nell'ambiente Cloud Composer è creare un nuovo pool di nodi e configurare i pod Kubernetes in modo che vengano eseguiti utilizzando solo le risorse di quel pool.
Console
Nella console Google Cloud, vai alla pagina Ambienti.
Fai clic sul nome dell'ambiente.
Nella pagina Dettagli dell'ambiente, vai alla scheda Configurazione dell'ambiente.
Nella sezione Risorse > Cluster GKE, segui il link Visualizza i dettagli del cluster.
Crea un pool di nodi come descritto in Aggiunta di un pool di nodi.
gcloud
Determina il nome del cluster del tuo ambiente:
gcloud composer environments describe ENVIRONMENT_NAME \
  --location LOCATION \
  --format="value(config.gkeCluster)"
Sostituisci:
ENVIRONMENT_NAMEcon il nome dell'ambiente.LOCATIONcon la regione in cui si trova l'ambiente.
L'output contiene il nome del cluster dell'ambiente. Ad esempio, puoi utilizzare
europe-west3-example-enviro-af810e25-gke.Crea un pool di nodi come descritto in Aggiunta di un pool di nodi.
Aumentare il numero di nodi nell'ambiente
L'aumento del numero di nodi nell'ambiente Cloud Composer aumenta la potenza di calcolo disponibile per i tuoi workload. Questo aumento non fornisce risorse aggiuntive per le attività che richiedono più CPU o RAM rispetto a quanto fornito dal tipo di macchina specificato.
Per aumentare il numero di nodi, aggiorna l'ambiente.
Specifica il tipo di macchina appropriato
Durante la creazione dell'ambiente Cloud Composer, puoi specificare un tipo di macchina. Per assicurarti che le risorse siano disponibili, specifica un tipo di macchina per il tipo di calcolo che si verifica nel tuo ambiente Cloud Composer.
Configurazione minima
Per creare un KubernetesPodOperator, sono obbligatori solo i parametri name, image da utilizzare e
task_id del pod. Il file /home/airflow/composer_kube_config
contiene le credenziali per l'autenticazione in GKE.
Airflow 2
Airflow 1
Configurazione dell'affinità dei pod
Quando configuri il parametro affinity in KubernetesPodOperator, controlla su quali nodi pianificare i pod, ad esempio solo i nodi di un determinato node pool. In questo esempio, l'operatore viene eseguito solo sui pool di nodi denominati
pool-0 e pool-1. I nodi dell'ambiente Cloud Composer 1 si trovano nel default-pool, pertanto i pod non vengono eseguiti sui nodi dell'ambiente.
Airflow 2
Airflow 1
Poiché l'esempio è configurato, l'attività non va a buon fine. Se esamini i log, la tâche
non va a buon fine perché i pool di nodi pool-0 e pool-1 non esistono.
Per assicurarti che i pool di nodi in values esistano, apporta una delle seguenti modifiche alla configurazione:
Se hai creato un pool di nodi in precedenza, sostituisci
pool-0epool-1con i nomi dei pool di nodi e carica di nuovo il DAG.Crea un pool di nodi denominato
pool-0opool-1. Puoi creare entrambi, ma l'attività ne richiede solo uno per essere completata.Sostituisci
pool-0epool-1condefault-pool, che è il pool predefinito utilizzato da Airflow. Quindi, carica di nuovo il DAG.
Dopo aver apportato le modifiche, attendi alcuni minuti per l'aggiornamento dell'ambiente.
Quindi, esegui di nuovo l'attività ex-pod-affinity e verifica che l'attività ex-pod-affinity sia andata a buon fine.
Configurazione aggiuntiva
Questo esempio mostra i parametri aggiuntivi che puoi configurare in KubernetesPodOperator.
Per saperne di più, consulta le seguenti risorse:
Per informazioni sull'utilizzo di secret e ConfigMap di Kubernetes, consulta Utilizzare secret e ConfigMap di Kubernetes.
Per informazioni sull'utilizzo dei modelli Jinja con KubernetesPodOperator, consulta Utilizzare i modelli Jinja.
Per informazioni sui parametri di KubernetesPodOperator, consulta la documentazione di riferimento dell'operatore in Airflow.
Airflow 2
Airflow 1
Utilizzare i modelli Jinja
Airflow supporta i modelli Jinja nei DAG.
Devi dichiarare i parametri Airflow richiesti (task_id, name e
image) all'operatore. Come mostrato nell'esempio seguente,
puoi creare un modello per tutti gli altri parametri con Jinja, inclusi cmds,
arguments, env_vars e config_file.
Il parametro env_vars nell'esempio viene impostato da una
variabile Airflow denominata my_value. Il DAG di esempio ricava il proprio valore dalla variabile del modello vars in Airflow. Airflow ha più variabili che forniscono l'accesso a diversi tipi di informazioni. Ad esempio,
puoi utilizzare la variabile del modello conf per accedere ai valori delle
opzioni di configurazione di Airflow. Per ulteriori informazioni e l'elenco delle variabili disponibili in Airflow, consulta la sezione Riferimento ai modelli nella documentazione di Airflow.
Se non modifichi il DAG o non crei la variabile env_vars, l'attività ex-kube-templates nell'esempio non va a buon fine perché la variabile non esiste. Crea questa variabile nell'interfaccia utente di Airflow o con Google Cloud CLI:
UI di Airflow
Vai all'interfaccia utente di Airflow.
Nella barra degli strumenti, seleziona Amministrazione > Voci.
Nella pagina List Variable (Variabile elenco), fai clic su Add a new record (Aggiungi un nuovo record).
Nella pagina Aggiungi variabile, inserisci le seguenti informazioni:
- Chiave:
my_value - Val:
example_value
- Chiave:
Fai clic su Salva.
Se il tuo ambiente utilizza Airflow 1, esegui invece il seguente comando:
Vai all'interfaccia utente di Airflow.
Nella barra degli strumenti, seleziona Amministrazione > Variabili.
Nella pagina Variabili, fai clic sulla scheda Crea.
Nella pagina Variabile, inserisci le seguenti informazioni:
- Chiave:
my_value - Val:
example_value
- Chiave:
Fai clic su Salva.
gcloud
Inserisci questo comando:
gcloud composer environments run ENVIRONMENT \
    --location LOCATION \
    variables set -- \
    my_value example_value
Se il tuo ambiente utilizza Airflow 1, esegui invece il seguente comando:
gcloud composer environments run ENVIRONMENT \
    --location LOCATION \
    variables -- \
    --set my_value example_value
Sostituisci:
ENVIRONMENTcon il nome dell'ambiente.LOCATIONcon la regione in cui si trova l'ambiente.
L'esempio seguente mostra come utilizzare i modelli Jinja con KubernetesPodOperator:
Airflow 2
Airflow 1
Utilizzare secret e ConfigMap di Kubernetes
Un secret Kubernetes è un oggetto che contiene dati sensibili. Un ConfigMap Kubernetes è un oggetto che contiene dati non riservati in coppie chiave/valore.
In Cloud Composer 2, puoi creare secret e ConfigMap utilizzando Google Cloud CLI, l'API o Terraform, quindi accedervi da KubernetesPodOperator.
Informazioni sui file di configurazione YAML
Quando crei un secret o un ConfigMap Kubernetes utilizzando l'API e la CLI Google Cloud, fornisci un file in formato YAML. Questo file deve avere lo stesso formato utilizzato da Kubernetes Secret e ConfigMap. La documentazione di Kubernetes fornisce molti esempi di codice di ConfigMap e secret. Per iniziare, consulta la pagina Distribuzione sicura delle credenziali tramite Secret e ConfigMaps.
Come in Kubernetes Secrets, utilizza la rappresentazione base64 quando definisci i valori nei secret.
Per codificare un valore, puoi utilizzare il seguente comando (questo è uno dei molti modi per ottenere un valore con codifica base64):
echo "postgresql+psycopg2://root:example-password@127.0.0.1:3306/example-db" -n | base64
Output:
cG9zdGdyZXNxbCtwc3ljb3BnMjovL3Jvb3Q6ZXhhbXBsZS1wYXNzd29yZEAxMjcuMC4wLjE6MzMwNi9leGFtcGxlLWRiIC1uCg==
I due esempi di file YAML riportati di seguito vengono utilizzati negli esempi più avanti in questa guida. Esempio di file di configurazione YAML per un segreto Kubernetes:
apiVersion: v1
kind: Secret
metadata:
  name: airflow-secrets
data:
  sql_alchemy_conn: cG9zdGdyZXNxbCtwc3ljb3BnMjovL3Jvb3Q6ZXhhbXBsZS1wYXNzd29yZEAxMjcuMC4wLjE6MzMwNi9leGFtcGxlLWRiIC1uCg==
Un altro esempio che mostra come includere i file. Come nell'esempio precedente, codifica prima i contenuti di un file (cat ./key.json | base64), quindi fornisci questo valore nel file YAML:
apiVersion: v1
kind: Secret
metadata:
  name: service-account
data:
  service-account.json: |
    ewogICJ0eXBl...mdzZXJ2aWNlYWNjb3VudC5jb20iCn0K
Un esempio di file di configurazione YAML per un ConfigMap. Non è necessario utilizzare la rappresentazione base64 nei ConfigMap:
apiVersion: v1
kind: ConfigMap
metadata:
  name: example-configmap
data:
  example_key: example_value
Gestire i secret di Kubernetes
In Cloud Composer 2, crei i secret utilizzando Google Cloud CLI e kubectl:
Ottieni informazioni sul cluster del tuo ambiente:
Esegui questo comando:
gcloud composer environments describe ENVIRONMENT \
    --location LOCATION \
    --format="value(config.gkeCluster)"
Sostituisci:
ENVIRONMENTcon il nome dell'ambiente.LOCATIONcon la regione in cui si trova l'ambiente Cloud Composer.
L'output di questo comando utilizza il seguente formato:
projects/<your-project-id>/zones/<zone-of-composer-env>/clusters/<your-cluster-id>.Per ottenere l'ID cluster GKE, copia l'output dopo
/clusters/(termina con-gke).Per ottenere la zona, copia l'output dopo
/zones/.
Connettiti al cluster GKE con il seguente comando:
gcloud container clusters get-credentials CLUSTER_ID \
  --project PROJECT \
  --zone ZONE
Sostituisci:
CLUSTER_ID: l'ID cluster dell'ambiente.PROJECT_ID: l'ID progetto.ZONEcon la zona in cui si trova il cluster dell'ambiente.
Crea i secret Kubernetes:
I seguenti comandi mostrano due approcci diversi per la creazione di segreti Kubernetes. L'approccio
--from-literalutilizza coppie chiave-valore. L'approccio--from-fileutilizza i contenuti dei file.Per creare un secret Kubernetes fornendo coppie chiave/valore, esegui il seguente comando. Questo esempio crea un secret denominato
airflow-secretscon un camposql_alchemy_conncon il valoretest_value.kubectl create secret generic airflow-secrets \ --from-literal sql_alchemy_conn=test_valuePer creare un secret di Kubernetes fornendo i contenuti del file, esegui il comando seguente. Questo esempio crea un secret denominato
service-accountcon il camposervice-account.jsoncontenente il valore ricavato dai contenuti di un file./key.jsonlocale.kubectl create secret generic service-account \ --from-file service-account.json=./key.json
Utilizzare i secret Kubernetes nei DAG
Questo esempio mostra due modi per utilizzare i secret di Kubernetes: come variabile di ambiente e come volume montato dal pod.
Il primo segreto, airflow-secrets, è impostato su una variabile di ambiente Kubernetes denominata SQL_CONN (anziché su una variabile di ambiente Airflow o Cloud Composer).
Il secondo secret, service-account, monta service-account.json, un file con un token dell'account di servizio, su /var/secrets/google.
Ecco come sono gli oggetti Secret:
Airflow 2
Airflow 1
Il nome del primo secret di Kubernetes è definito nella variabile secret_env.
Questo secret si chiama airflow-secrets. Il parametro deploy_type specifica
che deve essere esposto come variabile di ambiente. Il nome della variabile di ambiente è SQL_CONN, come specificato nel parametro deploy_target. Infine, il valore della variabile di ambiente SQL_CONN viene impostato sul valore della chiave sql_alchemy_conn.
Il nome del secondo secret di Kubernetes è definito nella variabile secret_volume. Questo secret si chiama service-account. Viene visualizzato come volume, come specificato nel parametro deploy_type. Il percorso del file da montare, deploy_target, è /var/secrets/google. Infine, il key del segreto memorizzato nel deploy_target è service-account.json.
Ecco come si presenta la configurazione dell'operatore:
Airflow 2
Airflow 1
Informazioni sul fornitore Kubernetes CNCF
KubernetesPodOperator è implementato nel fornitore apache-airflow-providers-cncf-kubernetes.
Per le note di rilascio dettagliate del provider Kubernetes CNCF, consulta il sito web del provider Kubernetes CNCF.
Versione 6.0.0
Nella versione 6.0.0 del pacchetto del provider Kubernetes CNCF,
la connessione kubernetes_default viene utilizzata per impostazione predefinita in KubernetesPodOperator.
Se hai specificato una connessione personalizzata nella versione 5.0.0, questa connessione personalizzata
viene ancora utilizzata dall'operatore. Per tornare a utilizzare la connessione kubernetes_default, ti consigliamo di modificare di conseguenza i DAG.
Versione 5.0.0
Questa versione introduce alcune modifiche non compatibili con le versioni precedenti rispetto alla versione 4.4.0. Le più importanti riguardano la connessione kubernetes_default, che non viene utilizzata nella versione 5.0.0.
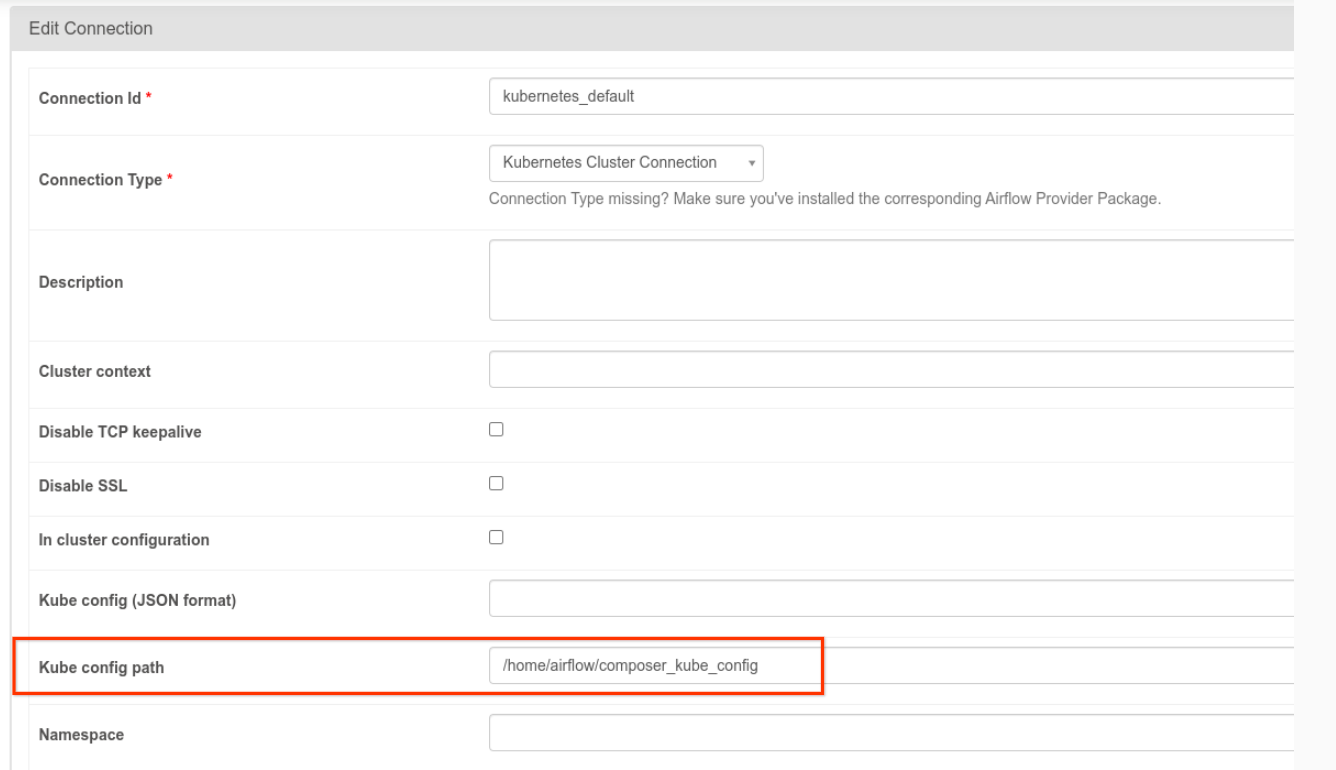
- È necessario modificare la connessione
kubernetes_default. Il percorso della configurazione Kubernetes deve essere impostato su/home/airflow/composer_kube_config(come mostrato nella figura seguente). In alternativa,config_filedeve essere aggiunto alla configurazione di KubernetesPodOperator (come mostrato nell'esempio di codice seguente).
- Modifica il codice di un'attività utilizzando KubernetesPodOperator nel seguente modo:
KubernetesPodOperator(
  # config_file parameter - can be skipped if connection contains this setting
  config_file="/home/airflow/composer_kube_config",
  # definition of connection to be used by the operator
  kubernetes_conn_id='kubernetes_default',
  ...
)
Per ulteriori informazioni sulla versione 5.0.0, consulta le note di rilascio del provider Kubernetes CNCF.
Risoluzione dei problemi
Questa sezione fornisce consigli per la risoluzione dei problemi comuni di KubernetesPodOperator:
Visualizza i log
Per risolvere i problemi, puoi controllare i log nel seguente ordine:
Log delle attività Airflow:
Nella console Google Cloud, vai alla pagina Ambienti.
Nell'elenco degli ambienti, fai clic sul nome dell'ambiente. Viene visualizzata la pagina Dettagli dell'ambiente.
Vai alla scheda DAG.
Fai clic sul nome del DAG, quindi sulla relativa esecuzione per visualizzarne i dettagli e i log.
Log dello scheduler Airflow:
Vai alla pagina Dettagli dell'ambiente.
Vai alla scheda Log.
Controlla i log dello scheduler di Airflow.
Log dei pod nella console Google Cloud, nella sezione Workload GKE. Questi log includono il file YAML di definizione del pod, gli eventi del pod e i dettagli del pod.
Codici di ritorno diversi da zero
Quando utilizzi KubernetesPodOperator (e GKEStartPodOperator), il codice di ritorno del punto di contatto del contenitore determina se l'attività è considerata riuscita o meno. I codici di ritorno diversi da zero indicano un errore.
Un pattern comune è eseguire uno script shell come punto di contatto del contenitore per riunire più operazioni al suo interno.
Se stai scrivendo uno script di questo tipo, ti consigliamo di includere il comando set -e nella parte superiore dello script in modo che i comandi non riusciti nello script interrompano lo script e propaghino l'errore all'istanza dell'attività Airflow.
Timeout dei pod
Il timeout predefinito per KubernetesPodOperator è 120 secondi, il che può comportare timeout prima del download di immagini di dimensioni maggiori. Puoi
aumentare il timeout modificando il parametro startup_timeout_seconds quando
crei KubernetesPodOperator.
Quando un pod scade, il log specifico dell'attività è disponibile nell'interfaccia utente di Airflow. Ad esempio:
Executing <Task(KubernetesPodOperator): ex-all-configs> on 2018-07-23 19:06:58.133811
Running: ['bash', '-c', u'airflow run kubernetes-pod-example ex-all-configs 2018-07-23T19:06:58.133811 --job_id 726 --raw -sd DAGS_FOLDER/kubernetes_pod_operator_sample.py']
Event: pod-name-9a8e9d06 had an event of type Pending
...
...
Event: pod-name-9a8e9d06 had an event of type Pending
Traceback (most recent call last):
  File "/usr/local/bin/airflow", line 27, in <module>
    args.func(args)
  File "/usr/local/lib/python2.7/site-packages/airflow/bin/cli.py", line 392, in run
    pool=args.pool,
  File "/usr/local/lib/python2.7/site-packages/airflow/utils/db.py", line 50, in wrapper
    result = func(*args, **kwargs)
  File "/usr/local/lib/python2.7/site-packages/airflow/models.py", line 1492, in _run_raw_task
    result = task_copy.execute(context=context)
  File "/usr/local/lib/python2.7/site-packages/airflow/contrib/operators/kubernetes_pod_operator.py", line 123, in execute
    raise AirflowException('Pod Launching failed: {error}'.format(error=ex))
airflow.exceptions.AirflowException: Pod Launching failed: Pod took too long to start
I timeout dei pod possono verificarsi anche quando l'account di servizio Cloud Composer manca delle autorizzazioni IAM necessarie per eseguire l'attività in questione. Per verificare, controlla gli errori a livello di pod utilizzando le dashboard GKE per esaminare i log relativi al tuo determinato carico di lavoro oppure utilizza Cloud Logging.
Impossibile stabilire una nuova connessione
L'upgrade automatico è abilitato per impostazione predefinita nei cluster GKE. Se un pool di nodi si trova in un cluster di cui è in corso l'upgrade, potresti visualizzare il seguente errore:
<Task(KubernetesPodOperator): gke-upgrade> Failed to establish a new
connection: [Errno 111] Connection refused
Per verificare se è in corso l'upgrade del cluster, nella console Google Cloud vai alla pagina Cluster Kubernetes e cerca l'icona di caricamento accanto al nome del cluster dell'ambiente.