Cloud Composer 3 | Cloud Composer 2 | Cloud Composer 1
이 페이지에서는 DataflowTemplateOperator를 사용하여 Cloud Composer에서 Dataflow 파이프라인을 실행하는 방법을 설명합니다.
Cloud Storage Text to BigQuery 파이프라인은 Cloud Storage에 저장된 텍스트 파일을 업로드하고 제공된 JavaScript 사용자 정의 함수(UDF)를 사용하여 변환하고 결과를 BigQuery에 출력할 수 있게 해주는 일괄 파이프라인입니다.
개요
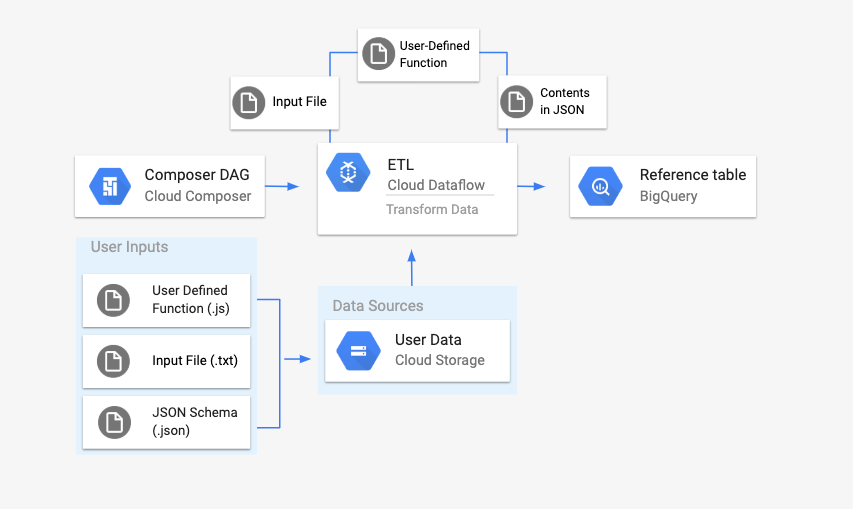
워크플로를 시작하기 전에 다음 항목을 만듭니다.
location,average_temperature,month및 선택 사항으로inches_of_rain,is_current,latest_measurement열이 있는 빈 데이터 세트의 빈 BigQuery 테이블.txt파일의 데이터를 BigQuery 테이블 스키마의 올바른 형식으로 정규화하는 JSON 파일. JSON 객체에는BigQuery Schema배열이 있습니다. 여기서 각 객체에는 열 이름, 입력 유형, 필수 필드인지 여부가 포함됩니다.BigQuery 테이블에 일괄 업로드할 데이터를 저장할 입력
.txt파일.txt파일의 각 행을 테이블의 관련 변수로 변환하는 자바스크립트로 작성된 사용자 정의 함수이러한 파일의 위치를 가리키는 Airflow DAG 파일
다음으로
.txt파일,.jsUDF 파일,.json스키마 파일을 Cloud Storage 버킷에 업로드합니다. DAG를 Cloud Composer 환경에도 업로드합니다.DAG가 업로드되면 Airflow가 여기에서 태스크를 실행합니다. 이 태스크에서는 사용자 정의 함수를
.txt파일에 적용하고 형식을 JSON 스키마에 따라 지정하는 Dataflow 파이프라인을 실행합니다.마지막으로 데이터는 앞에서 만든 BigQuery 테이블에 업로드됩니다.
시작하기 전에
- 이 가이드를 따라 사용자 정의 함수를 작성하려면 JavaScript에 익숙해야 합니다.
- 이 가이드는 Cloud Composer 환경이 이미 있다고 가정하고 작성되었습니다. 환경을 만들려면 환경 만들기를 참조하세요. 이 가이드에서는 모든 버전의 Cloud Composer를 사용할 수 있습니다.
-
Enable the Cloud Composer, Dataflow, Cloud Storage, BigQuery APIs.
스키마 정의가 있는 빈 BigQuery 테이블 만들기
스키마 정의가 있는 BigQuery 테이블을 만듭니다. 이 스키마 정의는 이 가이드의 후반부에서 사용됩니다. 이 BigQuery 테이블에는 일괄 업로드 결과가 저장됩니다.
스키마 정의가 있는 빈 테이블을 만들려면 다음과 같이 하세요.
콘솔
Google Cloud 콘솔에서 BigQuery 페이지로 이동합니다.
탐색 패널의 리소스 섹션에서 프로젝트를 확장합니다.
세부정보 패널에서 데이터 세트 만들기를 클릭합니다.
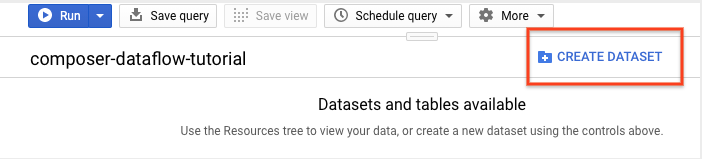
데이터 세트 만들기 페이지의 데이터 세트 ID 섹션에서 데이터 세트 이름을
average_weather로 지정합니다. 다른 모든 필드를 기본 상태로 둡니다.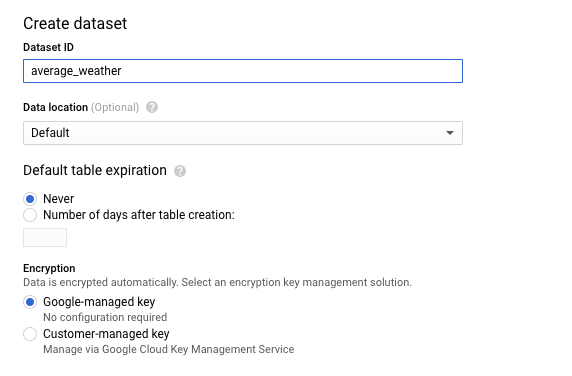
데이터 세트 만들기를 클릭합니다.
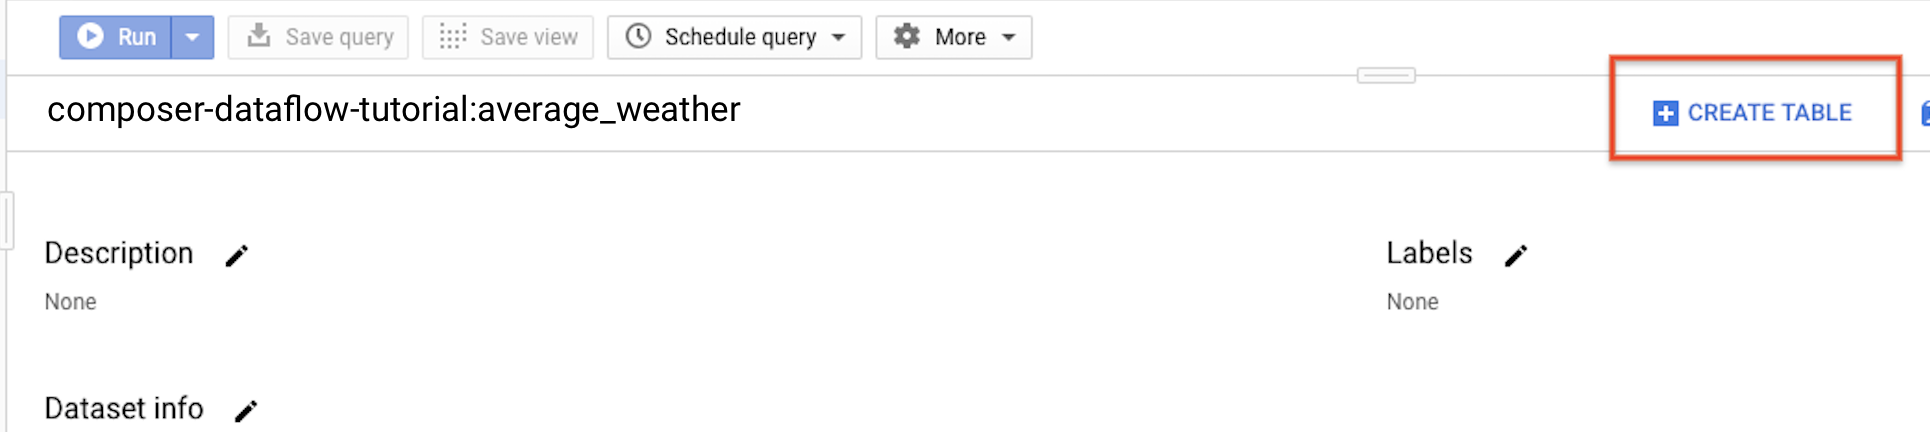
탐색 패널로 돌아가 리소스 섹션에서 프로젝트를 펼칩니다. 그런 다음
average_weather데이터 세트를 클릭합니다.세부정보 패널에서 테이블 만들기를 클릭합니다.
테이블 만들기 페이지의 소스 섹션에서 빈 테이블을 선택합니다.
테이블 만들기 페이지의 대상 섹션에서 다음을 수행합니다.
데이터 세트 이름에서
average_weather데이터 세트를 선택합니다.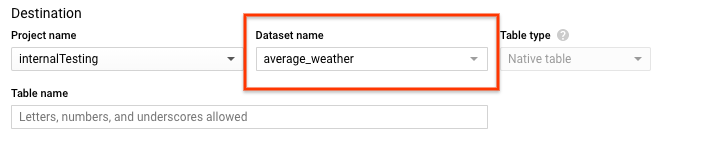
테이블 이름 필드에
average_weather라는 이름을 입력합니다.테이블 유형이 기본 테이블로 설정되어 있는지 확인합니다.
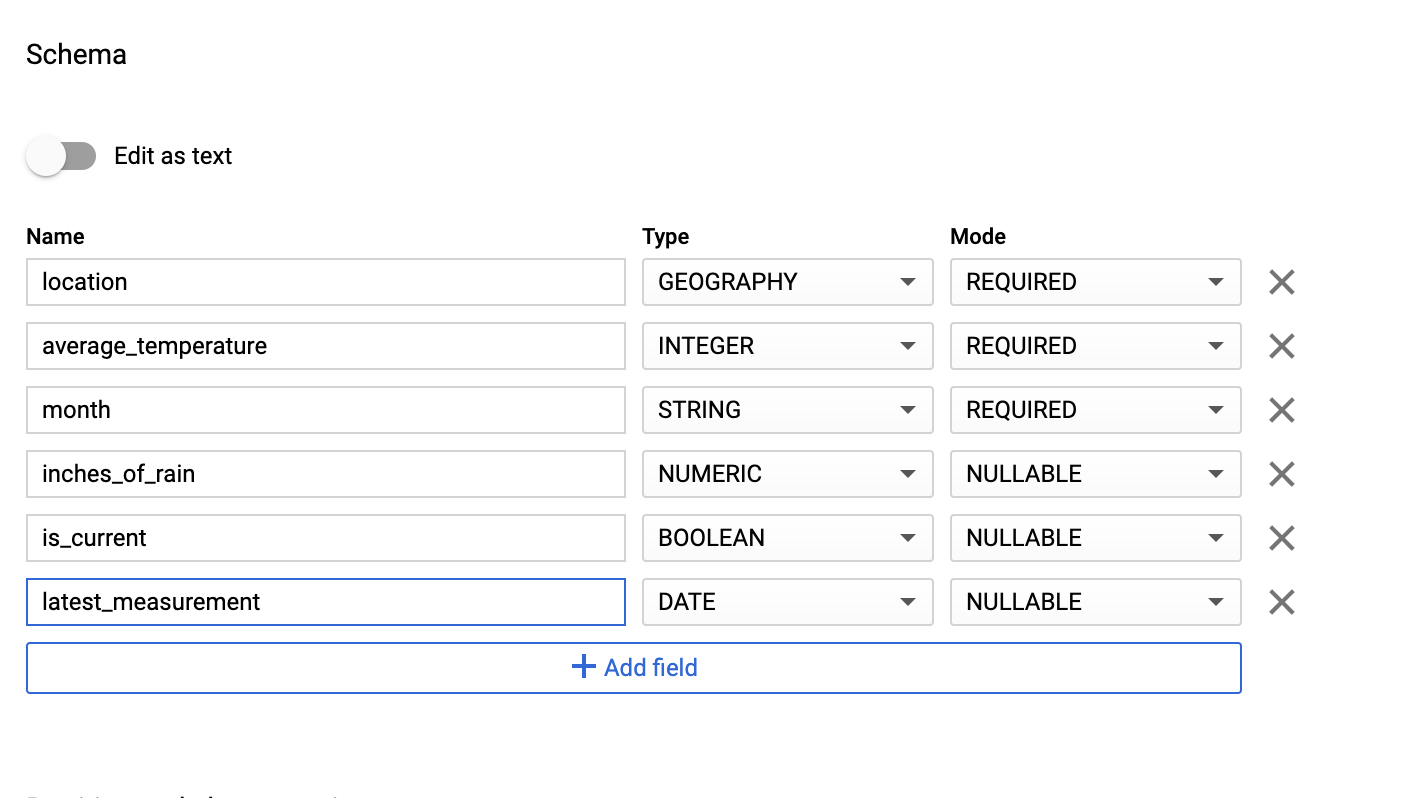
스키마 섹션에 스키마 정의를 입력합니다. 다음 방법 중 하나를 사용할 수 있습니다.
텍스트로 편집을 사용 설정하고 테이블 스키마를 JSON 배열로 입력하여 스키마 정보를 수동으로 입력합니다. 다음 필드를 입력합니다.
[
    {
        "name": "location",
        "type": "GEOGRAPHY",
        "mode": "REQUIRED"
    },
    {
        "name": "average_temperature",
        "type": "INTEGER",
        "mode": "REQUIRED"
    },
    {
        "name": "month",
        "type": "STRING",
        "mode": "REQUIRED"
    },
    {
        "name": "inches_of_rain",
        "type": "NUMERIC"
    },
    {
        "name": "is_current",
        "type": "BOOLEAN"
    },
    {
        "name": "latest_measurement",
        "type": "DATE"
    }
]
필드 추가를 사용하여 스키마를 수동으로 입력합니다.
파티션 및 클러스터 설정에 기본값(
No partitioning)을 그대로 둡니다.고급 옵션 섹션의 암호화에 기본값(
Google-owned and managed key)을 그대로 둡니다.테이블 만들기를 클릭합니다.
bq
bq mk 명령어를 사용하여 빈 데이터 세트를 만들고 이 데이터 세트에 테이블을 만듭니다.
다음 명령어를 실행하여 전 세계 평균 날씨 데이터 세트를 만듭니다.
bq --location=LOCATION mk \
    --dataset PROJECT_ID:average_weather
다음을 바꿉니다.
LOCATION: 환경이 위치한 리전PROJECT_ID: 프로젝트 ID
다음 명령어를 실행하여 이 데이터 세트에 스키마 정의가 있는 빈 테이블을 만듭니다.
bq mk --table \
PROJECT_ID:average_weather.average_weather \
location:GEOGRAPHY,average_temperature:INTEGER,month:STRING,inches_of_rain:NUMERIC,is_current:BOOLEAN,latest_measurement:DATE
테이블을 만든 후 테이블의 만료 시간, 설명, 라벨을 업데이트할 수 있습니다. 또한 스키마 정의를 수정할 수 있습니다.
Python
이 코드를 dataflowtemplateoperator_create_dataset_and_table_helper.py로 저장하고 프로젝트와 위치가 반영되도록 변수를 업데이트한 후 다음 명령어로 실행합니다.
python dataflowtemplateoperator_create_dataset_and_table_helper.py
Python
Cloud Composer에 인증하려면 애플리케이션 기본 사용자 인증 정보를 설정합니다. 자세한 내용은 로컬 개발 환경의 인증 설정을 참조하세요.
Cloud Storage 버킷 만들기
워크플로에 필요한 모든 파일을 저장할 버킷을 만듭니다. 이 가이드의 후반부에서 만들 DAG에서 이 스토리지 버킷에 업로드하는 파일을 참조합니다. 새 저장소 버킷을 만들려면 다음 안내를 따르세요.
콘솔
Google Cloud 콘솔에서 Cloud Storage를 엽니다.
버킷 만들기를 클릭하여 버킷 생성 양식을 엽니다.
각 단계를 완료하려면 버킷 정보를 입력하고 계속을 클릭합니다.
버킷의 전역 고유 이름을 지정합니다. 이 가이드에서는
bucketName을 예시로 사용합니다.위치 유형으로 리전을 선택합니다. 그런 다음 버킷 데이터를 저장할 위치를 선택합니다.
데이터의 기본 스토리지 클래스로 표준을 선택합니다.
균일 액세스 제어를 선택하여 객체에 액세스합니다.
완료를 클릭합니다.
gcloud
gcloud storage buckets create 명령어를 사용합니다.
gcloud storage buckets create gs://bucketName/
다음을 바꿉니다.
bucketName: 이 가이드의 앞부분에서 만든 버킷의 이름
코드 샘플
C#
Cloud Composer에 인증하려면 애플리케이션 기본 사용자 인증 정보를 설정합니다. 자세한 내용은 로컬 개발 환경의 인증 설정을 참조하세요.
Go
Cloud Composer에 인증하려면 애플리케이션 기본 사용자 인증 정보를 설정합니다. 자세한 내용은 로컬 개발 환경의 인증 설정을 참조하세요.
Java
Cloud Composer에 인증하려면 애플리케이션 기본 사용자 인증 정보를 설정합니다. 자세한 내용은 로컬 개발 환경의 인증 설정을 참조하세요.
Python
Cloud Composer에 인증하려면 애플리케이션 기본 사용자 인증 정보를 설정합니다. 자세한 내용은 로컬 개발 환경의 인증 설정을 참조하세요.
Ruby
Cloud Composer에 인증하려면 애플리케이션 기본 사용자 인증 정보를 설정합니다. 자세한 내용은 로컬 개발 환경의 인증 설정을 참조하세요.
출력 테이블용 JSON 형식 BigQuery 스키마 만들기
앞에서 만든 출력 테이블과 일치하는 JSON 형식의 BigQuery 스키마 파일을 만듭니다. 필드 이름, 유형, 모드는 앞에서 BigQuery 테이블 스키마에 정의한 것과 일치해야 합니다. 이 파일은 .txt 파일의 데이터를 BigQuery 스키마와 호환되는 형식으로 정규화합니다. 이 파일 이름을 jsonSchema.json으로 지정합니다.
{
    "BigQuery Schema": [
    {
        "name": "location",
        "type": "GEOGRAPHY",
        "mode": "REQUIRED"
    },
    {
        "name": "average_temperature",
        "type": "INTEGER",
        "mode": "REQUIRED"
    },
    {
        "name": "month",
        "type": "STRING",
        "mode": "REQUIRED"
    },
    {
        "name": "inches_of_rain",
        "type": "NUMERIC"
    },
    {
        "name": "is_current",
        "type": "BOOLEAN"
    },
    {
        "name": "latest_measurement",
        "type": "DATE"
    }]
}
데이터 형식을 지정하도록 JavaScript 파일 만들기
이 파일에서 입력 파일의 텍스트 줄을 변환하는 로직을 제공하는 UDF(사용자 정의 함수)를 정의합니다. 이 함수는 입력 파일의 각 텍스트 줄을 자체 인수로 취하므로 함수는 입력 파일의 줄마다 한 번씩 실행됩니다. 이 파일 이름을 transformCSVtoJSON.js로 지정합니다.
입력 파일 만들기
이 파일에는 BigQuery 테이블에 업로드할 정보가 저장됩니다. 이 파일을 로컬에서 복사하고 이름을 inputFile.txt로 지정합니다.
POINT(40.7128 74.006),45,'July',null,true,2020-02-16
POINT(41.8781 87.6298),23,'October',13,false,2015-02-13
POINT(48.8566 2.3522),80,'December',null,true,null
POINT(6.5244 3.3792),15,'March',14,true,null
버킷에 파일 업로드
앞에서 만든 Cloud Storage 버킷에 다음 파일을 업로드합니다.
- JSON 형식의 BigQuery 스키마(
.json) - 자바 스크립트 사용자 정의 함수(
transformCSVtoJSON.js) 처리하려는 텍스트의 입력 파일(
.txt)
콘솔
- Google Cloud 콘솔에서 Cloud Storage 버킷 페이지로 이동합니다.
버킷 목록에서 버킷을 클릭합니다.
버킷의 객체 탭에서 다음 중 하나를 수행합니다.
원하는 파일을 바탕화면이나 파일 관리자에서 Google Cloud 콘솔의 기본 창으로 드래그 앤 드롭합니다.
파일 업로드 버튼을 클릭하고 나타나는 대화상자에서 업로드할 파일을 선택한 후 열기를 클릭합니다.
gcloud
gcloud storage cp 명령어를 실행합니다.
gcloud storage cp OBJECT_LOCATION gs://bucketName
다음을 바꿉니다.
bucketName: 이 가이드의 앞부분에서 만든 버킷의 이름OBJECT_LOCATION: 객체의 로컬 경로. 예를 들면Desktop/transformCSVtoJSON.js입니다.
코드 샘플
Python
Cloud Composer에 인증하려면 애플리케이션 기본 사용자 인증 정보를 설정합니다. 자세한 내용은 로컬 개발 환경의 인증 설정을 참조하세요.
Ruby
Cloud Composer에 인증하려면 애플리케이션 기본 사용자 인증 정보를 설정합니다. 자세한 내용은 로컬 개발 환경의 인증 설정을 참조하세요.
DataflowTemplateOperator 구성
DAG를 실행하기 전에 다음 Airflow 변수를 설정합니다.
| Airflow 변수 | 값 |
|---|---|
project_id
|
프로젝트 ID |
gce_zone
|
Dataflow 클러스터를 만들어야 하는 Compute Engine 영역 |
bucket_path
|
앞에서 만든 Cloud Storage 버킷의 위치 |
이제 앞서 만든 파일을 참조하여 Dataflow 워크플로를 시작하는 DAG를 만듭니다. 이 DAG를 복사하여 composer-dataflow-dag.py로 로컬에 저장합니다.
Airflow 2
Airflow 1
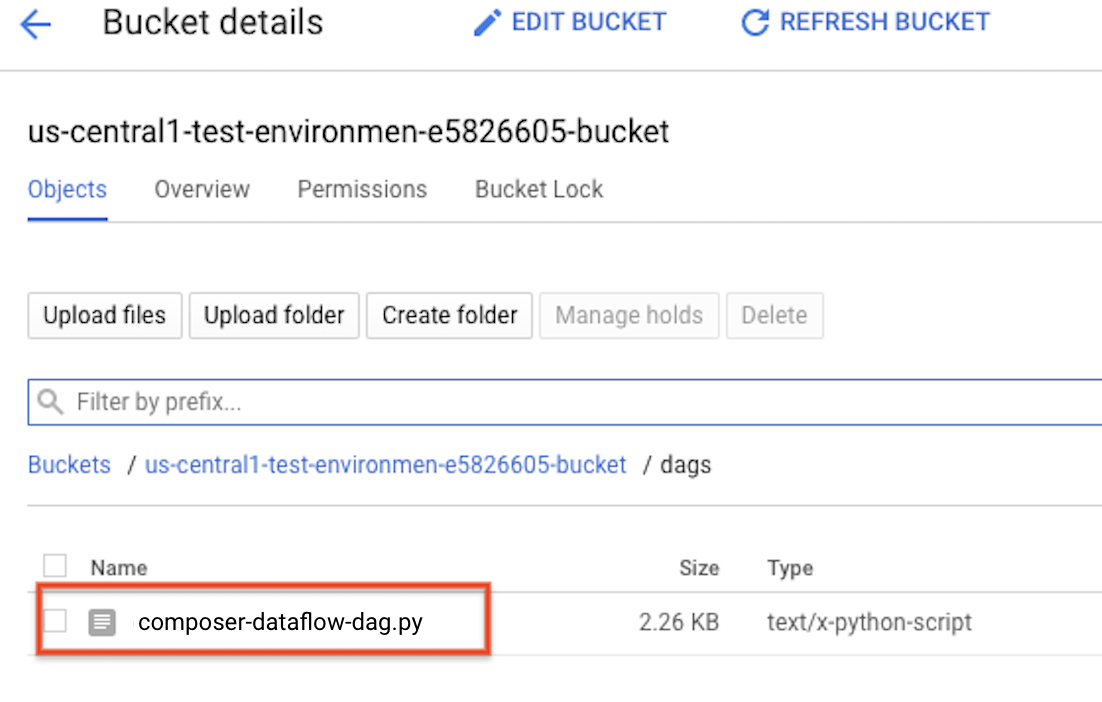
Cloud Storage에 DAG 업로드
DAG를 환경 버킷의 /dags 폴더에 업로드합니다. 업로드가 성공적으로 완료되면 Cloud Composer 환경 페이지에서 DAG 폴더 링크를 클릭하여 확인할 수 있습니다.
태스크 상태 보기
- Airflow 웹 인터페이스로 이동합니다.
- DAG 페이지에서 DAG 이름(예:
composerDataflowDAG)을 클릭합니다. - DAG 세부정보 페이지에서 그래프 보기를 클릭합니다.
상태를 확인합니다.
Failed: 태스크 주변에 빨간색 상자가 있습니다. 태스크 위로 마우스 포인터를 올려놓고 상태: 실패를 찾을 수도 있습니다.Success: 태스크 주변에 녹색 상자가 있습니다. 태스크 위로 마우스 포인터를 올려놓고 상태: 성공을 확인할 수도 있습니다.
몇 분 후 Dataflow와 BigQuery에서 결과를 확인할 수 있습니다.
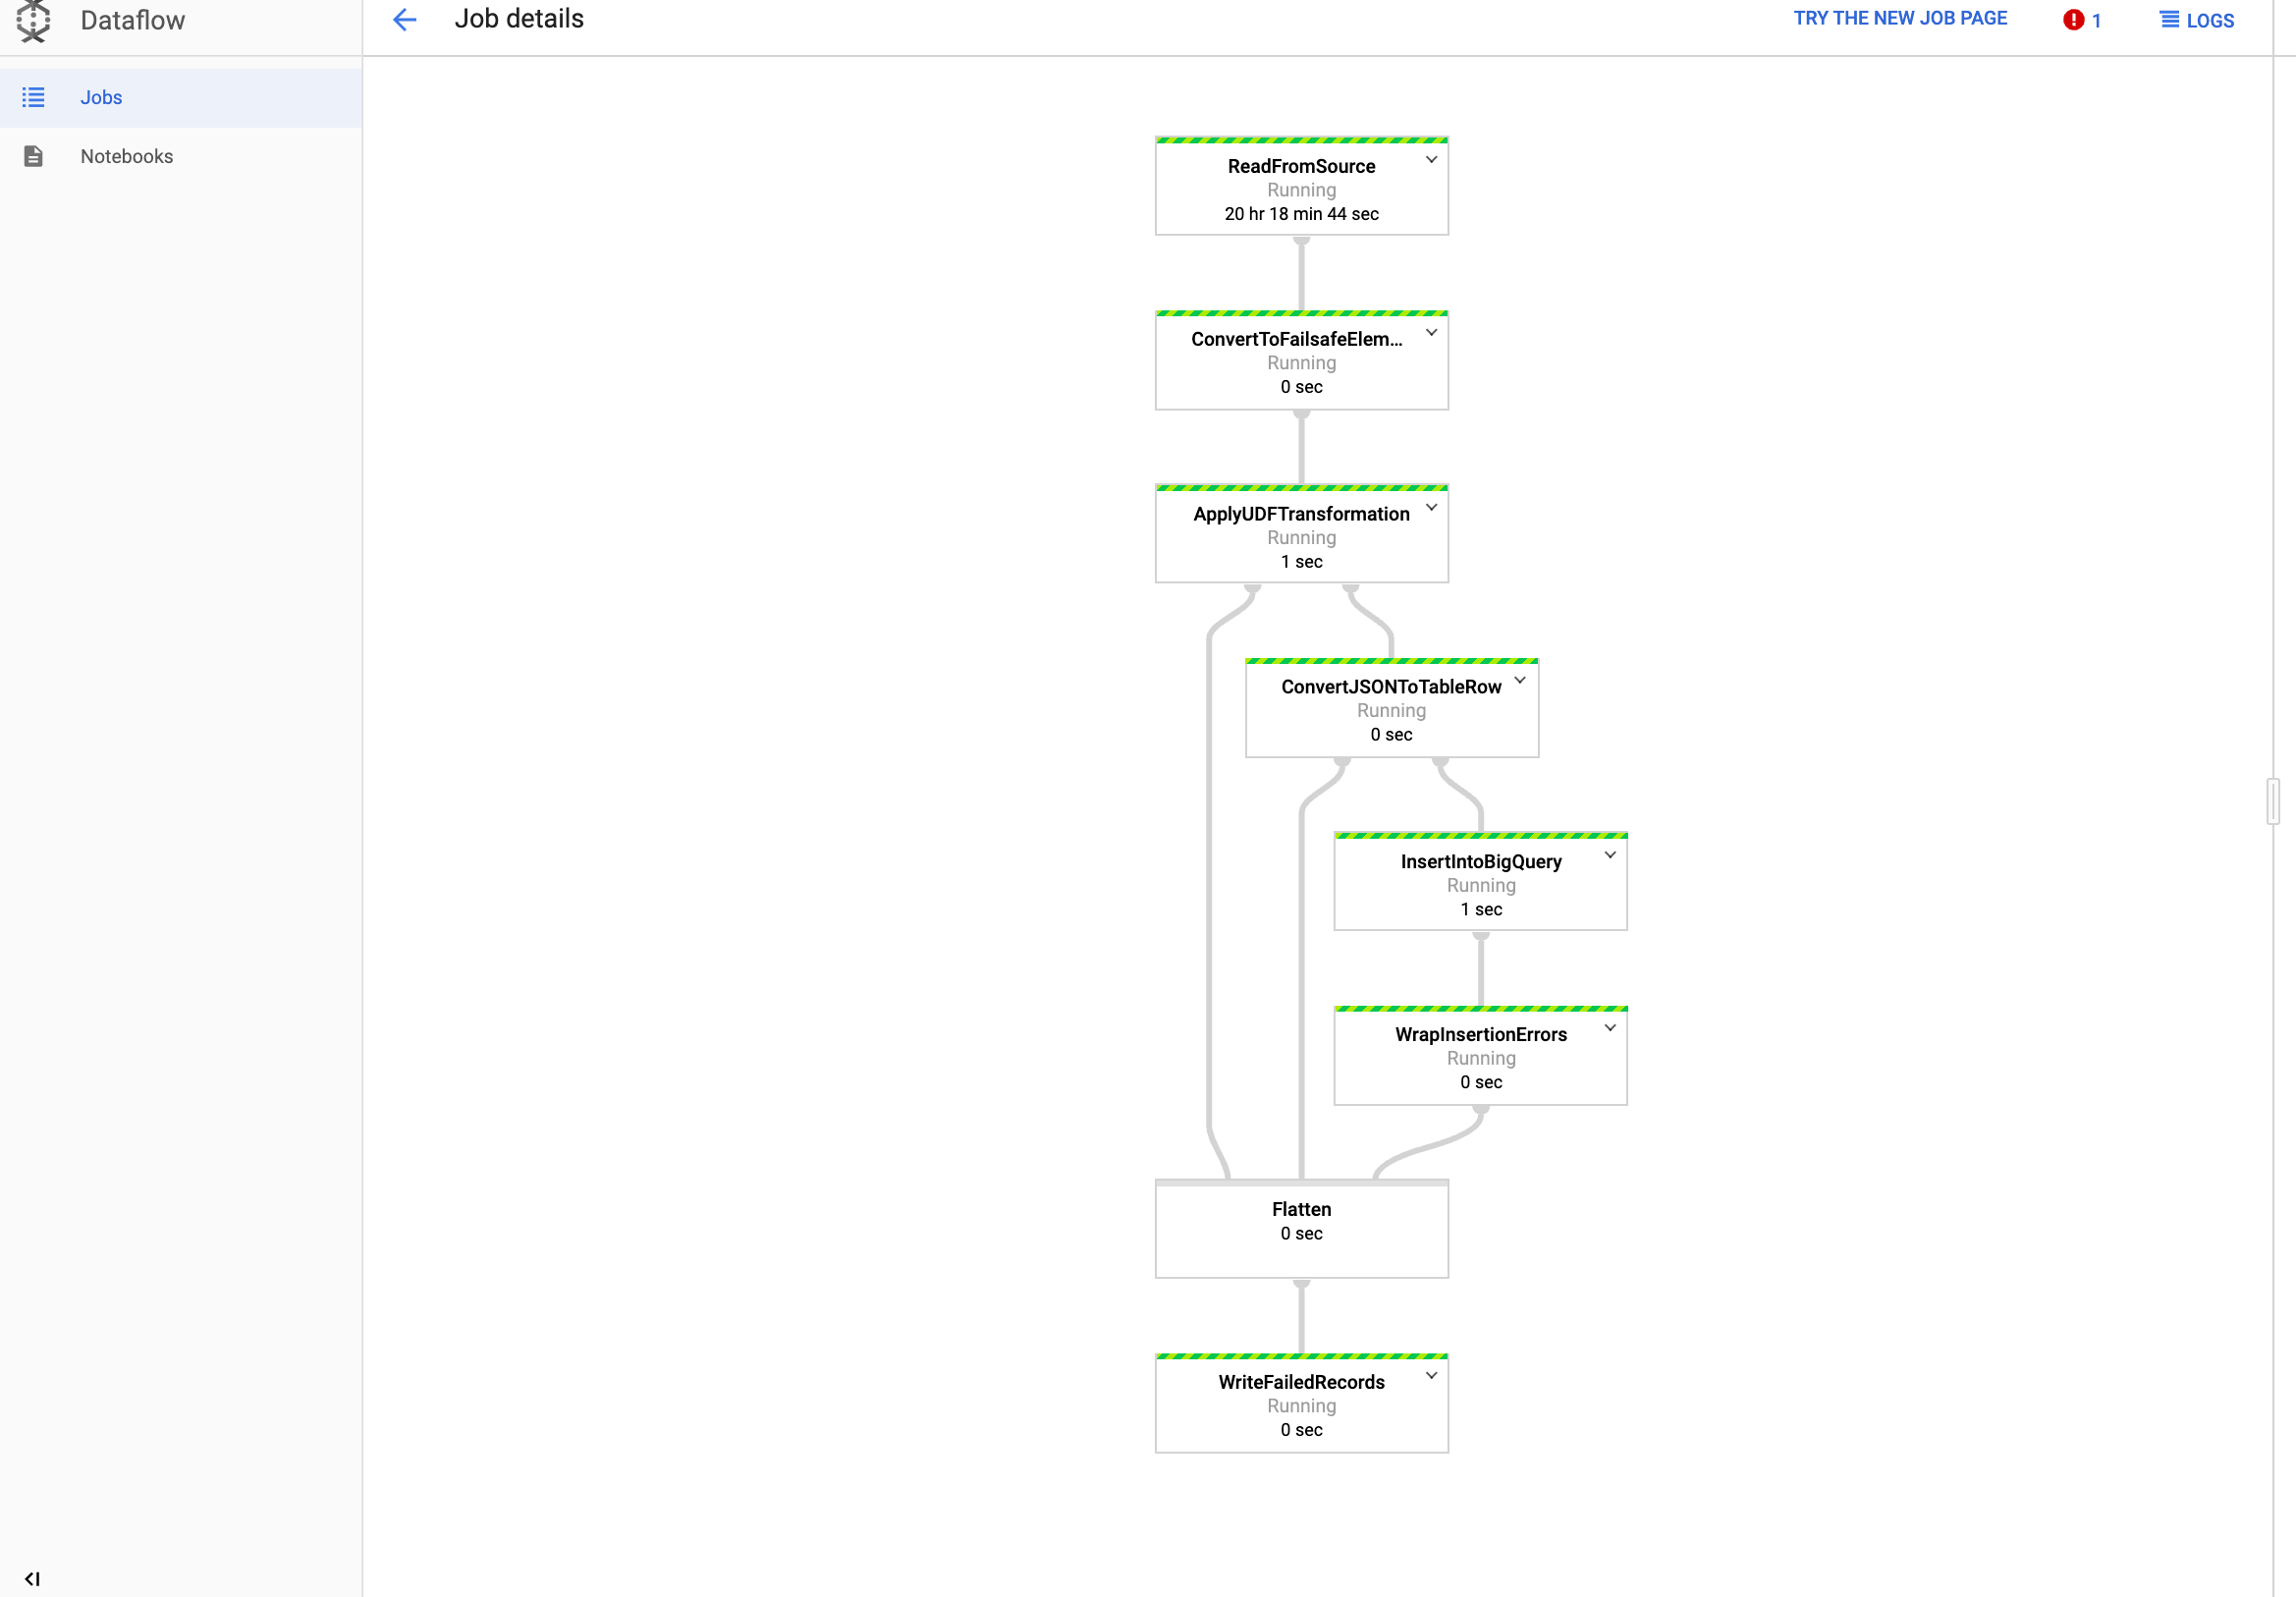
Dataflow에서 작업 보기
Google Cloud 콘솔에서 Dataflow 페이지로 이동합니다.
작업 이름은 다음과 같이 하이픈으로 이름 끝에 연결된 고유한 ID가 있는
dataflow_operator_transform_csv_to_bq로 지정됩니다.
작업 세부정보를 확인하려면 이름을 클릭합니다.
BigQuery에서 결과 보기
Google Cloud 콘솔에서 BigQuery 페이지로 이동합니다.
표준 SQL을 사용하여 쿼리를 제출할 수 있습니다. 다음 쿼리를 사용하여 테이블에 추가된 행을 확인합니다.
SELECT * FROM projectId.average_weather.average_weather