통합 변수는 프로그래밍 언어에 사용되는 변수와 유사합니다. 변수의 데이터는 통합이 실행되는 동안 읽고 쓸 수 있습니다.
통합 변수는 다음과 같은 방법으로 사용할 수 있습니다.
통합의 입력으로 사용합니다(입력 변수).
통합의 출력으로 반환됩니다(출력 변수).
통합 실행 중에 임시 상태를 유지하는 데 사용됩니다.
변수 값은 통합에서 정적으로 정의될 필요는 없습니다. 트리거를 사용하여 변수 값을 통합으로 전달할 수 있습니다. 그러나 변수가 통합에서 정적으로 정의되고 동일한 변수가 트리거와 함께 동적으로 제공되면 동적 값 할당은 정적 할당을 덮어씁니다.
지원되는 데이터 유형
통합 변수에 지원되는 데이터 유형은 다음과 같습니다.
문자열 및 문자열 배열
정수 및 정수 배열
실수 및 실수 배열
불리언 및 불리언 배열
JSON
작업 변수
작업 변수는 태스크의 사전 정의된 자동 생성 변수입니다. 작업에 출력이 있으면 이러한 모든 출력을 작업 변수에서 사용할 수 있습니다. 작업 변수를 삭제하거나 수정할 수 없습니다.
예를 들어 Call REST Endpoint 작업에서 응답 본문은 responseBody 변수에 저장됩니다.
구성 변수
구성 변수를 사용하면 통합의 구성을 외부화할 수 있습니다. 구성 변수를 사용하면 개발 환경(QA, 스테이징 또는 프로덕션)을 기반으로 하는 커넥터 세부정보, 인증 세부정보 또는 URL 엔드포인트와 같은 통합 측면을 구성할 수 있습니다. 새 환경에 통합을 업로드하기 전에 통합을 수동으로 업데이트할 필요가 없습니다. 통합을 게시할 때 Application Integration을 사용하여 구성 변수의 값을 입력할 수 있습니다.
통합에 정의된 구성 변수를 보고 수정하려면 변수 창에서
variable_add
통합 구성 변수를 클릭합니다. 구성 변수를 만들고 사용하는 방법을 알아보려면 통합을 위한 CICD 빌드 튜토리얼을 참고하세요.
시스템 변수
통합을 만들면 시스템 변수가 자동으로 생성됩니다. 통합 작업 및 오류 처리에 이러한 변수를 사용할 수 있습니다. 통합에는 다음과 같은 시스템 생성 변수가 포함됩니다.
ErrorInfo: 실행이 실패하면 ErrorInfo 변수로 오류 세부정보에 액세스할 수 있습니다.
{
  "ErrorInfo": {
  "message": String,
  "code": Number
  }
}
현재 ErrorMessage라는 통합 변수를 만들어 오류 메시지에 액세스할 수 있습니다. 하지만 시스템에서 생성된 ErrorInfo.message 변수를 사용하여 오류 메시지에 액세스하는 것이 좋습니다.
ExecutionMode: 트리거에 기반한 실행 모드입니다. 유효한 값은 SYNC 및 ASYNC입니다.
ExecutionId: 통합의 실행 ID입니다.
IntegrationName: 통합의 이름입니다.
Region: 통합의 리전입니다.
ProjectId: 통합이 포함된 프로젝트 ID입니다.
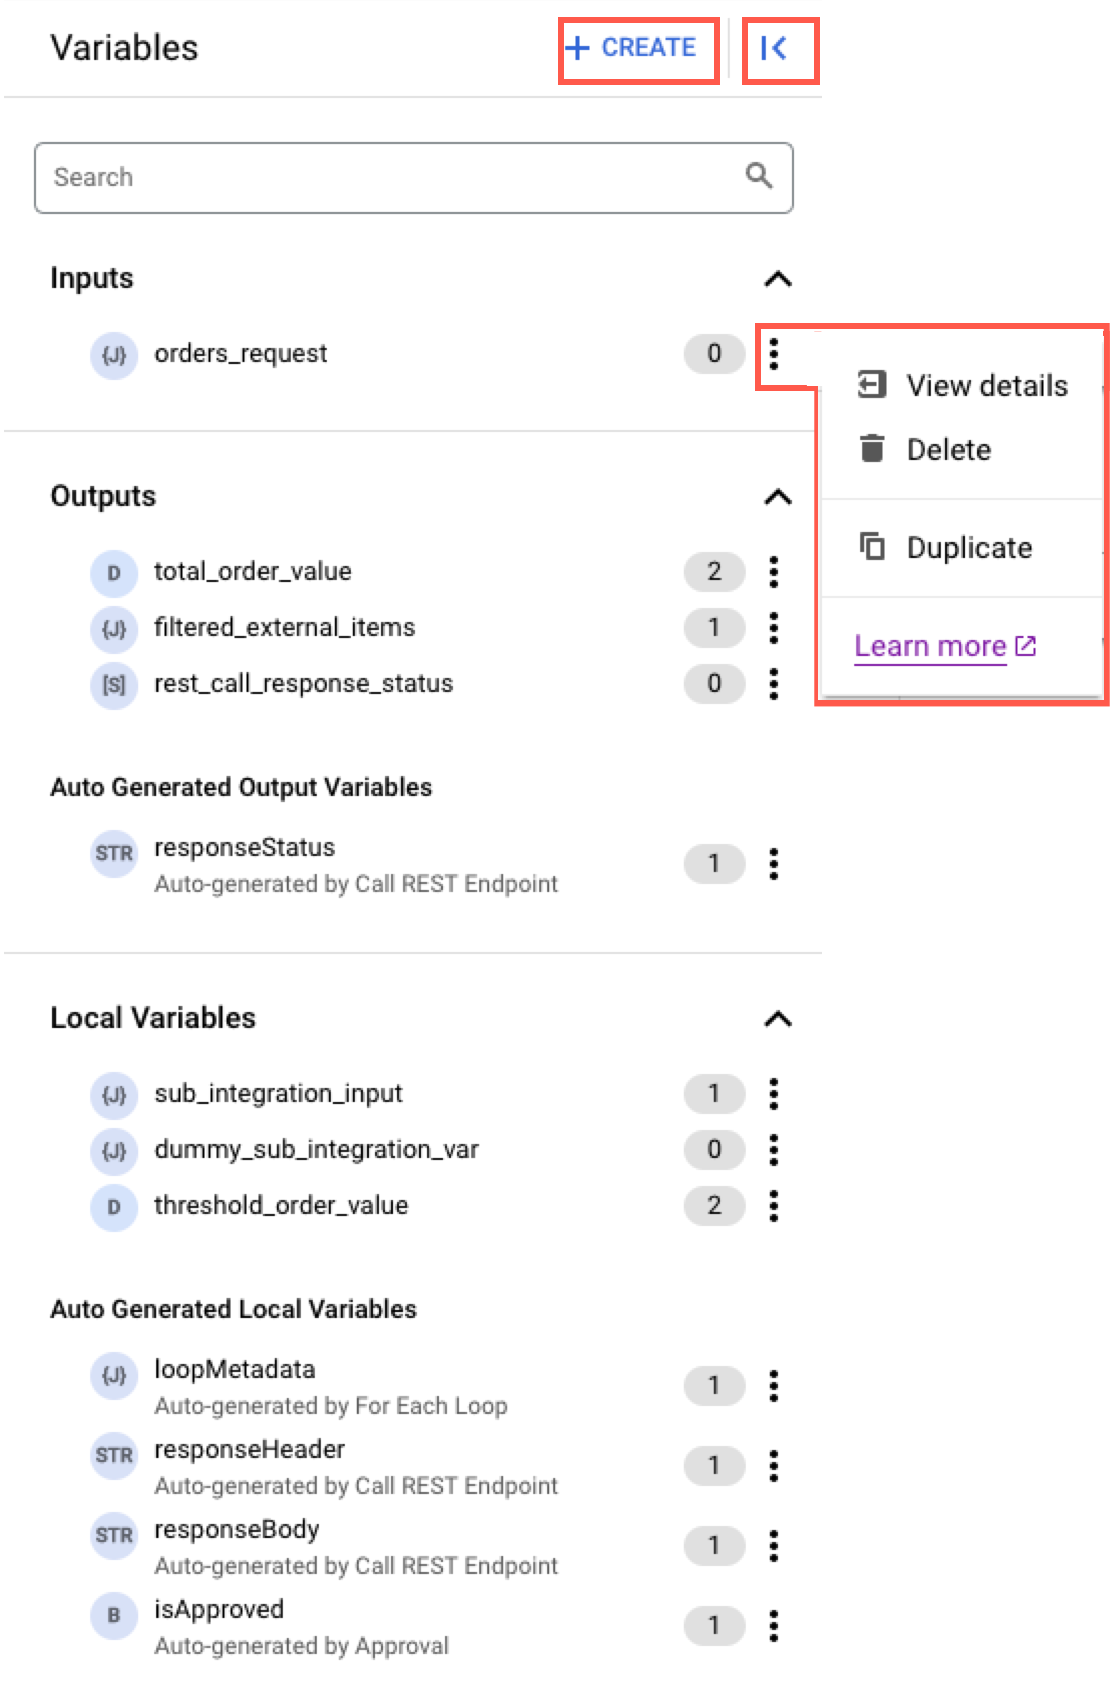
변수 보기
변수 창을 사용하여 통합에서 변수를 만들고, 수정하고, 보고, 복제하고, 삭제할 수 있습니다. 변수 창에는 통합 내에 있는 총 변수 참조의 수도 표시됩니다.
변수 창을 보려면 디자이너 탐색 메뉴에서 last_page (패널 전환)을 클릭합니다.
다음 이미지는 변수 창의 샘플 레이아웃을 보여줍니다.
구성 변수 보기 및 수정
통합에 정의된 구성 변수를 보려면 변수 창에서
variable_add
통합 구성 변수를 클릭합니다. 그러면 통합에 정의된 모든 구성 변수가 표시된 구성 변수 창이 표시됩니다. 값 필드를 클릭하여 구성 변수의 값을 수정할 수 있습니다.
다음 이미지는 구성 변수 창의 샘플 레이아웃을 보여줍니다.
변수 만들기
변수를 만들려면 다음 단계를 수행합니다.
통합 편집기 탐색 메뉴에서 last_page(전환 패널)를 클릭하여 변수 창을 불러옵니다.
샘플 JSON 페이로드에서 유추: 샘플 JSON 페이로드에서 JSON 스키마를 생성합니다. 샘플 페이로드는 스키마가 생성된 후 삭제됩니다. 생성된 스키마만 저장됩니다.
JSON 스키마 입력: 전체 JSON 스키마를 수동으로 입력합니다.
기본값에서 추론: 제공된 기본값을 사용하여 JSON 스키마를 생성합니다.
없음: JSON 스키마가 없습니다.
로그에서 변수 마스킹(미리보기): 통합 실행 로그에서 변수에 마스킹을 사용 설정하려면 이 옵션을 선택합니다. 변수에 마스킹을 사용 설정하려면 통합 및 리전에 대한 마스킹 변수를 사용 설정해야 합니다. 통합 및 리전에 마스킹을 사용 설정하는 방법에 대한 자세한 내용은 통합 수정 및 리전 수정을 참조하세요.
통합을 실행하는 동안 런타임 데이터가 통합 또는 태스크에 선언된 변수로 전달됩니다. 실행이 시작되면 입력 데이터가 Event라는 메모리 내 객체로 변환됩니다.
Event 객체가 생성되면 태스크의 메모리 내 그래프가 통합 정의를 사용하여 생성됩니다.
들어오는 변수 값은 구성에 따라 태스크에 전달됩니다.
통합이 실행되면 태스크는 Event 객체에서 데이터를 다시 읽고 작성하며 이는 후속 태스크에서 사용되거나 통합의 출력 데이터를 형성합니다.
변수 참조
통합의 태스크, 트리거, 에지는 변수 참조를 사용하여 변수를 읽고 씁니다.
변수 참조는 $paramKey$ 형식을 사용합니다. 여기서 paramKey는 변수의 이름입니다. 예를 들어 에지 조건부는 다음과 같을 수 있습니다.
NOT ($isNameUnique$ = false OR $numAccounts$ > 1)
이 예시에서 isNameUnique는 데이터 유형 부울의 변수이고 numAccounts는 데이터 유형 정수의 매개변수입니다.
[[["이해하기 쉬움","easyToUnderstand","thumb-up"],["문제가 해결됨","solvedMyProblem","thumb-up"],["기타","otherUp","thumb-up"]],[["이해하기 어려움","hardToUnderstand","thumb-down"],["잘못된 정보 또는 샘플 코드","incorrectInformationOrSampleCode","thumb-down"],["필요한 정보/샘플이 없음","missingTheInformationSamplesINeed","thumb-down"],["번역 문제","translationIssue","thumb-down"],["기타","otherDown","thumb-down"]],["최종 업데이트: 2025-09-03(UTC)"],[[["\u003cp\u003eVariables are integration elements that store and transfer data between tasks, triggers, and edges, and can be statically defined or dynamically passed at runtime.\u003c/p\u003e\n"],["\u003cp\u003eApplication Integration supports four types of variables: Integration, Task, Config, and System, each serving different purposes in managing data flow and configuration.\u003c/p\u003e\n"],["\u003cp\u003eIntegration variables are used for input, output, and temporary state storage throughout an integration's execution, and they support various data types like strings, integers, booleans, and JSON.\u003c/p\u003e\n"],["\u003cp\u003eConfig variables allow externalizing integration configurations for different environments, making it easy to adapt to QA, staging, or production without manual updates, and can be viewed/edited in the integration's Config variables pane.\u003c/p\u003e\n"],["\u003cp\u003eSystem Variables are automatically generated upon integration creation, which include data like error details (ErrorInfo), execution mode (ExecutionMode), and integration identifiers (ExecutionId, IntegrationName), as well as Project and Region information.\u003c/p\u003e\n"]]],[],null,["# Variables\n\nSee the [supported connectors](/integration-connectors/docs/connector-reference-overview) for Application Integration.\n\nVariables\n=========\n\nA *variable* is an integration element that holds and transports data between the tasks, triggers,\nand edges of an integration.\n\n- Variables can be statically defined at design time or dynamically passed to the integration at runtime.\n- Variables can reference other variables in an integration.\n- Variables can be globally accessible to all tasks, or locally accessible to a specific task.\n\nTypes of variables\n------------------\n\nApplication Integration supports four types of variables:\n\n- [Integration variables](#integration_var): Keep track of data throughout the course of an entire integration execution.\n- [Task variables](#task_var): Keep track of data for the duration of a single task.\n- [Config variables](#config_var): Store the configuration data of the integration.\n- [System variables](#system_var): Store the configuration data of the integration.\n\n### Integration variables\n\n\n*Integration variables* are similar to variables used in a programming language. Data\nin the variables can be read and written throughout the execution of the integration.\n\n\nIntegration variables can be used in the following ways:\n\n- Taken in as inputs to the integration (*input variables*).\n- Returned as outputs of the integration (*output variables*).\n- Used to hold temporary state during the execution of an integration.\n| **Note**: The variable roles listed above are not mutually exclusive. Any given variable can be an input variable, an output variable, both, or neither.\n\nThe value of a variables does not have to be statically defined in the integration. Variable values can\nbe passed into an integration through the use of a trigger. However, if a variable is statically defined\nin the integration, and the same variable is supplied dynamically with trigger, the dynamic value assignment\nwill overwrite the static assignment.\n\n#### Supported data types\n\n\nThe following data types are supported for integration variables:\n\n- String and String array\n- Integer and Integer array\n- Double and Double array\n- Boolean and Boolean array\n- JSON\n\n### Task variables\n\n*Task variables* are pre-defined auto-generated variables of a [task](/application-integration/docs/tasks). If a task has an output, all such\nouputs are available in a task variable. You cannot delete or edit a task variable.\nFor example, for the **Call REST Endpoint** task, the response body is stored in the\n`responseBody` variable.\n\n### Config variables\n\n|\n| **Preview**\n|\n|\n| This product or feature is subject to the \"Pre-GA Offerings Terms\" in the General Service Terms section\n| of the [Service Specific Terms](/terms/service-terms#1).\n|\n| Pre-GA products and features are available \"as is\" and might have limited support.\n|\n| For more information, see the\n| [launch stage descriptions](/products#product-launch-stages).\n\n*Config variables* enable you to externalize configuration for integration. With config variables, you can configure aspects of your integration such as connector details, authentication details, or URL endpoints that are based on the development environment (QA, staging, or production). You don't need to update your integration manually before uploading the integration to a new environment. Application Integration lets you enter values for the config variables when you publish the integration.\n\n\nTo [view and edit](#view_config_var) the config variables defined in your integration, click the variable_add **Integration config variable** in the **Variables** pane. To learn how to create config variables and use them, see the tutorial [Build CICD for your integration](/application-integration/docs/build-cicd).\n\n### System variables\n\n*System variables* are automatically generated when you create an integration. You can use these variables in your integration tasks and for [error handling](/application-integration/docs/error-handling-strategy). The integration contains the following system generated variables:\n\n- `ErrorInfo`: When your execution fails, you can access the error details with the `ErrorInfo` variable: \n\n ```\n {\n \"ErrorInfo\": {\n \"message\": String,\n \"code\": Number\n }\n }\n ```\n\n Currently, you can access the error messages by creating an [integration variable](#integration_var) named `ErrorMessage`. However, we recommend you to use the system-generated `ErrorInfo.message` variable to access error messages.\n- `ExecutionMode`: The [mode of execution](/application-integration/docs/triggers#execution-modes) based on the trigger. Valid values are **SYNC** and **ASYNC**.\n- `ExecutionId`: The execution ID of the integration.\n- `IntegrationName`: The name of the integration.\n- `Region`: The region of the integration.\n- `ProjectId`: The project ID that contains the integration.\n\nView variables\n--------------\n\nYou can use the **Variables** pane to create, edit, view, duplicate, and delete variables in your integration. The **Variables** pane also displays a count of the total variable references within the integration.\n\nTo view the **Variables** pane, click last_page (Toggle panel) in the designer navigation bar.\n\nThe following image shows a sample layout of the **Variables** pane:\n\n\n### View and edit config variables\n\n|\n| **Preview**\n|\n|\n| This product or feature is subject to the \"Pre-GA Offerings Terms\" in the General Service Terms section\n| of the [Service Specific Terms](/terms/service-terms#1).\n|\n| Pre-GA products and features are available \"as is\" and might have limited support.\n|\n| For more information, see the\n| [launch stage descriptions](/products#product-launch-stages).\n\nTo view the config variables defined in your integration, click the variable_add **Integration config variable** in the **Variables** pane. This brings up the **Config variables** pane displaying all the config variables defined in your integration. You can simply click the **Value** field to edit the value of the config variable.\n\nThe following image shows a sample layout of the **Config variables** pane:\n\n\nCreate a variable\n-----------------\n\nTo create a variable, perform the following steps:\n\n1. In the integration editor navigation bar, click last_page (Toggle panel) to bring up the **Variables** pane.\n2. Click **+Create**.\n3. Do the following in the **Create Variable** pane:\n 1. **Name:** Enter the name of the variable.\n 2. **Variable Type:** Choose the type of the variable.\n\n 3. **Data Type:** Choose the data type of the variable. You can identity the data type of a variable using the icon next to the variable name.\n\n\n For information about the supported data types, see [Supported data types](#datatype).\n 4. **Default Value:** Enter the default value for the variable. This is an optional field.\n 5. **Schema:** Select the JSON schema for the variable.\n - **Infer from a sample JSON payload:** Generates a JSON schema from a sample JSON payload. The sample payload is discarded after the schema is generated. Only the generated schema will be saved.\n - **Enter a JSON schema:** Manually enter an entire JSON schema.\n - **Infer from the default value:** Generates a JSON schema using the provided default value.\n - **None:** No JSON schema.\n\n | **Note:** This field is displayed only for **JSON** data type variables.\n 6. **Mask the variable in logs ([preview](/products#product-launch-stages)):** Select this option to enable masking for the variable in the integration execution logs. To enable masking for the variable, you must enable masking variables for your integration and region. For information about how to enable masking for the integration and the region, see [Edit an integration](/application-integration/docs/view-integration-details) and [Edit regions](//application-integration/docs/enable-new-region#edit-region).\n\n For information about masking, see [Mask sensitive data in logs](/application-integration/docs/mask-sensitive-data-logs).\n4. Click **Create**.\n\nUse variables in integrations\n-----------------------------\n\nDuring the execution of an integration, run-time data is passed in as variables that are\ndeclared for the integration or task. Once execution begins, input data is converted into an in-memory object called\nan *Event*.\n\n\nAfter the Event object is created, an in-memory graph of tasks is built using the integration definition.\nIncoming variable values are passed to tasks based on your configuration.\nAs the integration executes, the tasks read and write data back into the Event object,to be\nused by subsequent tasks or to form the output data of the integration.\n\nVariable references\n-------------------\n\nThe tasks, triggers, and edges in an integration read and write to variables using **variable references** .\nA variable reference takes the form `$`\u003cvar translate=\"no\"\u003eparamKey\u003c/var\u003e`$` where \u003cvar translate=\"no\"\u003eparamKey\u003c/var\u003e is the name\nof the variable. For example, an edge conditional could look like this:\n`NOT ($isNameUnique$ = false OR $numAccounts$ \u003e 1)`\n\n\nIn this example, `isNameUnique` is a variable of data type **boolean** and\n`numAccounts` is a parameter of data type **integer**.\n\nQuotas and limits\n-----------------\n\nFor information about quotas and limits, see [Quotas and limits](/application-integration/docs/quotas).\n\nWhat's next\n-----------\n\n- Learn how to [build CI/CD for your integration](/application-integration/docs/build-cicd).\n- Learn how to [mask sensitive data in logs](/application-integration/docs/mask-sensitive-data-logs).\n- Add and configure a [Data Mapping task](/application-integration/docs/data-mapping-task)"]]

 문자열
문자열
 정수
정수
 실수
실수
 불리언
불리언
 JSON
JSON
 문자열 배열
 정수 배열
정수 배열
 실수 배열
실수 배열
 불리언 배열