El Editor de integración es una interfaz de arrastrar y soltar que te permite diseñar y desarrollar todo tu flujo de integración con poco o nada de código. Puedes crear, modificar y ejecutar todas tus integraciones en el Editor de integración. En general, puedes pensar en el editor de integración como un espacio de trabajo unificado para administrar tu integración.
Application Integration proporciona activadores y tareas listos para usar a fin de ayudarte aún más con el desarrollo de tu integración. Cada elemento de tarea o activador se conecta mediante un perímetro junto con la bifurcación y la unión respectivas.
Los bordes también indican el flujo de control de una tarea/activador a otro. Si deseas obtener más información sobre cómo especificar las condiciones para los perímetros y las tareas, consulta Condiciones perimetrales.
Abre el editor de integración
Para abrir tu integración en el editor de integración, haz lo siguiente:
En la consola de Google Cloud, ve a la página Application Integration.
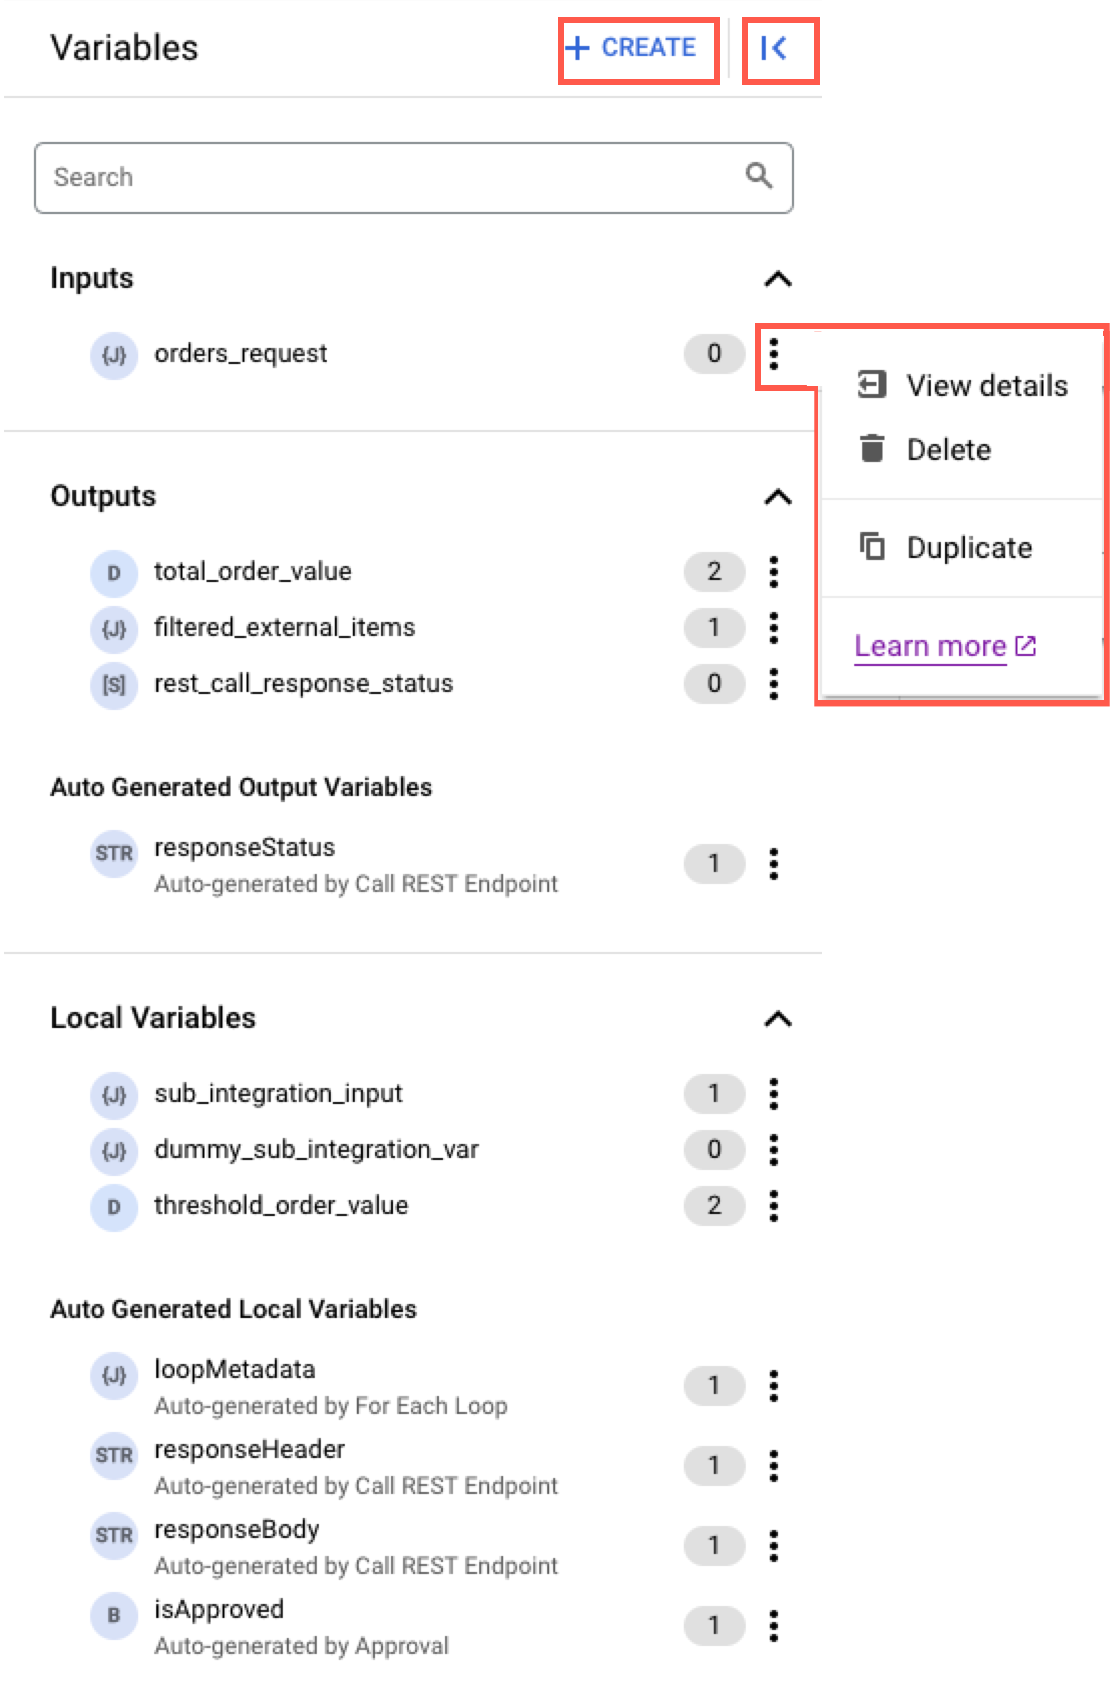
En los paneles Variables, se enumeran todas las variables de integración y tareas disponibles en la integración. También muestra un recuento de las referencias de variables totales dentro de la integración.
Para realizar acciones como borrar o duplicar una variable, haz clic en
more_vert
(menú de acciones) junto a la variable correspondiente.
Para obtener más información sobre la variable, consulta Variables.
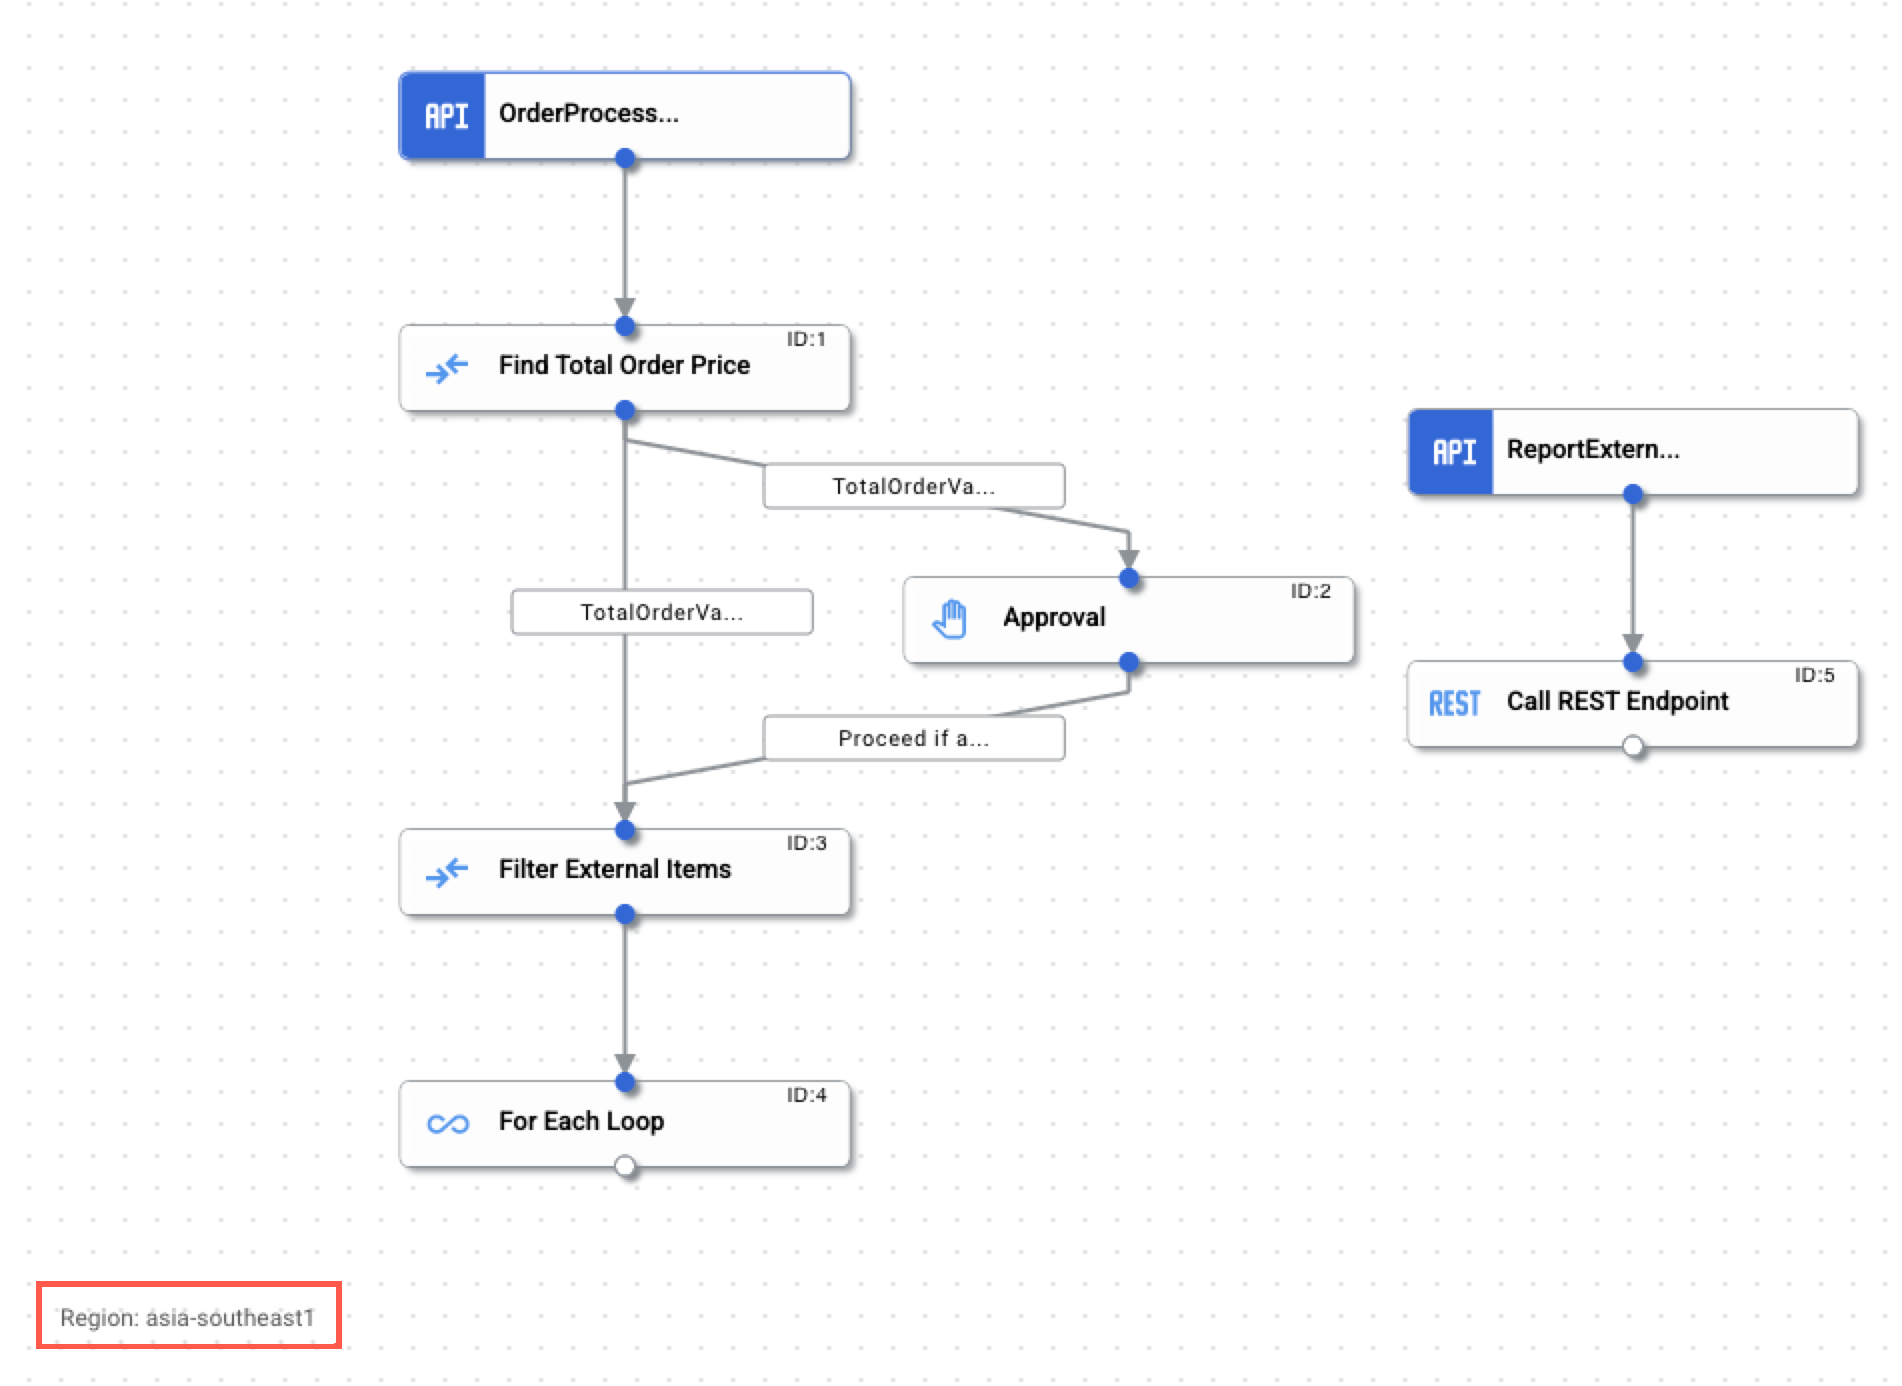
Lienzo de diseñador
El lienzo de diseñador es el fondo en el que puedes diseñar y desarrollar tu flujo de integración.
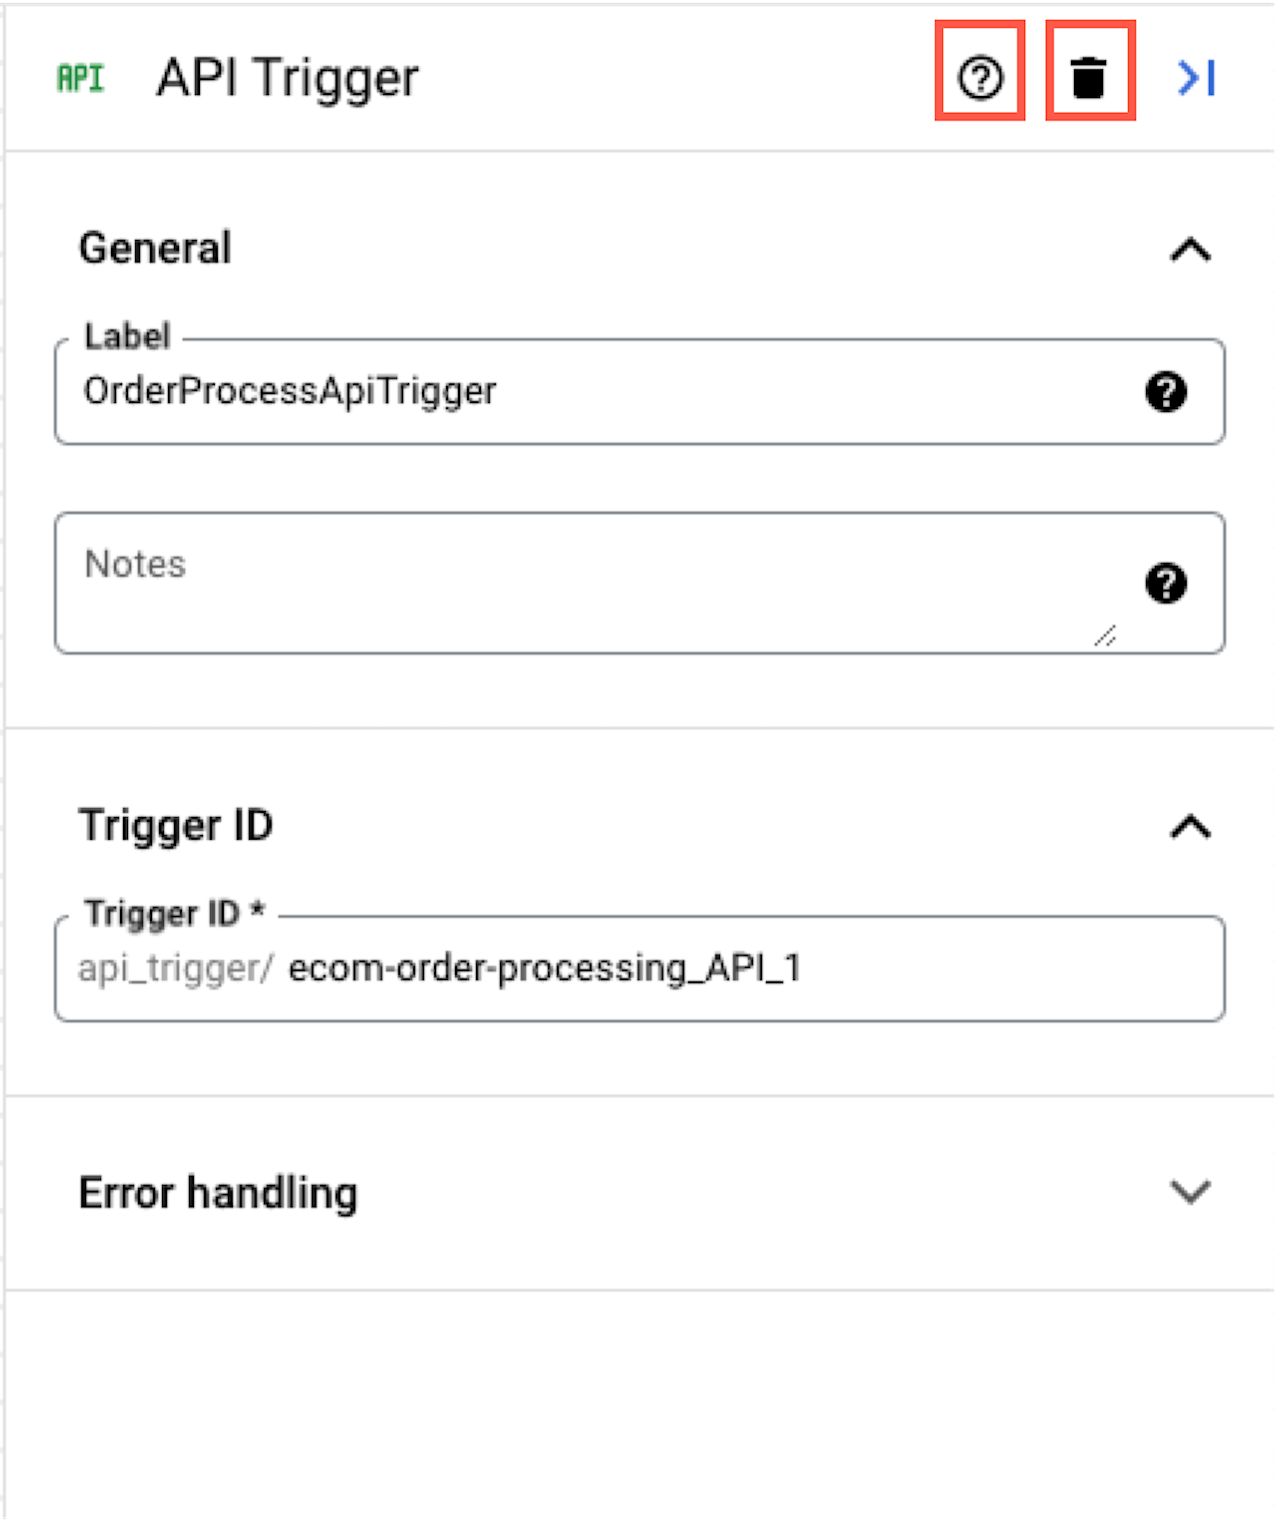
Panel de configuración
El panel de configuración muestra los ajustes de configuración para cada uno de los activadores y las tareas que se agregan en tu lienzo de diseño.
Para obtener información sobre cómo configurar un activador o una tarea, consulta Activadores y tareas.
[[["Fácil de comprender","easyToUnderstand","thumb-up"],["Resolvió mi problema","solvedMyProblem","thumb-up"],["Otro","otherUp","thumb-up"]],[["Difícil de entender","hardToUnderstand","thumb-down"],["Información o código de muestra incorrectos","incorrectInformationOrSampleCode","thumb-down"],["Faltan la información o los ejemplos que necesito","missingTheInformationSamplesINeed","thumb-down"],["Problema de traducción","translationIssue","thumb-down"],["Otro","otherDown","thumb-down"]],["Última actualización: 2025-09-03 (UTC)"],[[["\u003cp\u003eThe Integration editor is a drag-and-drop interface for designing, developing, modifying, and running integrations with minimal coding.\u003c/p\u003e\n"],["\u003cp\u003eApplication Integration offers built-in triggers and tasks that can be connected via edges to rapidly create integrations, and edges indicate the flow of control between elements.\u003c/p\u003e\n"],["\u003cp\u003eThe Integration editor is accessible from the Application Integration page in the Google Cloud console, either by selecting an existing integration or creating a new one.\u003c/p\u003e\n"],["\u003cp\u003eThe Integration editor's layout includes a toolbar, navigation bar, variables pane, designer canvas, and configuration pane, each serving distinct purposes in the integration design process.\u003c/p\u003e\n"],["\u003cp\u003eThe editor allows you to view connectors, execution logs and monitoring dashboard and also perform actions like cloning, downloading and uploading, and deleting integrations.\u003c/p\u003e\n"]]],[],null,["# Explore the Integration editor layout\n\nSee the [supported connectors](/integration-connectors/docs/connector-reference-overview) for Application Integration.\n\nExplore the Integration editor layout\n=====================================\n\nThe *Integration editor* is a drag-and-drop interface that lets you design and develop your entire integration flow\nwith little or no code. You can create, modify, and run all your integrations in the *Integration editor* . Overall, you can think of the *Integration editor* as a unified workspace for managing your integration.\n\n\nApplication Integration provides out-of-the-box\n[triggers](/application-integration/docs/trigger-overview) and\n[tasks](/application-integration/docs/task-overview) to further assist you in rapid\ndevelopment of your integration. Every task or trigger element is connected using an\n[edge](/application-integration/docs/edge-overview) along with its respective\n[fork and join](/application-integration/docs/forks-joins).\nEdges also indicate the flow of control from one task/trigger to another. For information on specifying conditions for edges and tasks, see\n[Edge conditions](/application-integration/docs/edge-overview#edge_condition).\n\nOpen integration editor\n-----------------------\n\n\nTo open your integration in the *Integration editor*, do the following:\n\n1. In the Google Cloud console, go to the **Application Integration** page.\n\n [Go to Application Integration](https://console.cloud.google.com/integrations)\n2. Click **Integrations** from the left navigation menu to open the **Integrations** page.\n3. Select an existing integration or create a new integration by clicking **Create integration** .\n\n\n If you are creating a new integration:\n 1. Enter a name and description in the **Create Integration** dialog.\n 2. Select a region for the integration. **Note:** The **Regions** dropdown only lists the regions provisioned in your Google Cloud project. To provision a new region, Click **Enable Region** . See [Enable new region](/application-integration/docs/enable-new-region) for more information.\n 3. Click **Create** . The newly created integration opens in the *integration editor*.\n\n\nExplore integration editor layout\n---------------------------------\n\nThe following figure shows a sample layout of the *Integration editor*.\n\n\nThe following table describes the different sections that comprise the integration editor:\n\nWhat's next\n-----------\n\n- Start a [quickstart](/application-integration/docs/quickstarts).\n- Learn about the [canvas view](/application-integration/docs/canvas-view).\n- Get a deeper understanding of the fundamental Application Integration [concepts](/application-integration/docs/concepts).\n- Learn how to add and configure the available [triggers and tasks](/application-integration/docs/all-triggers-tasks)."]]