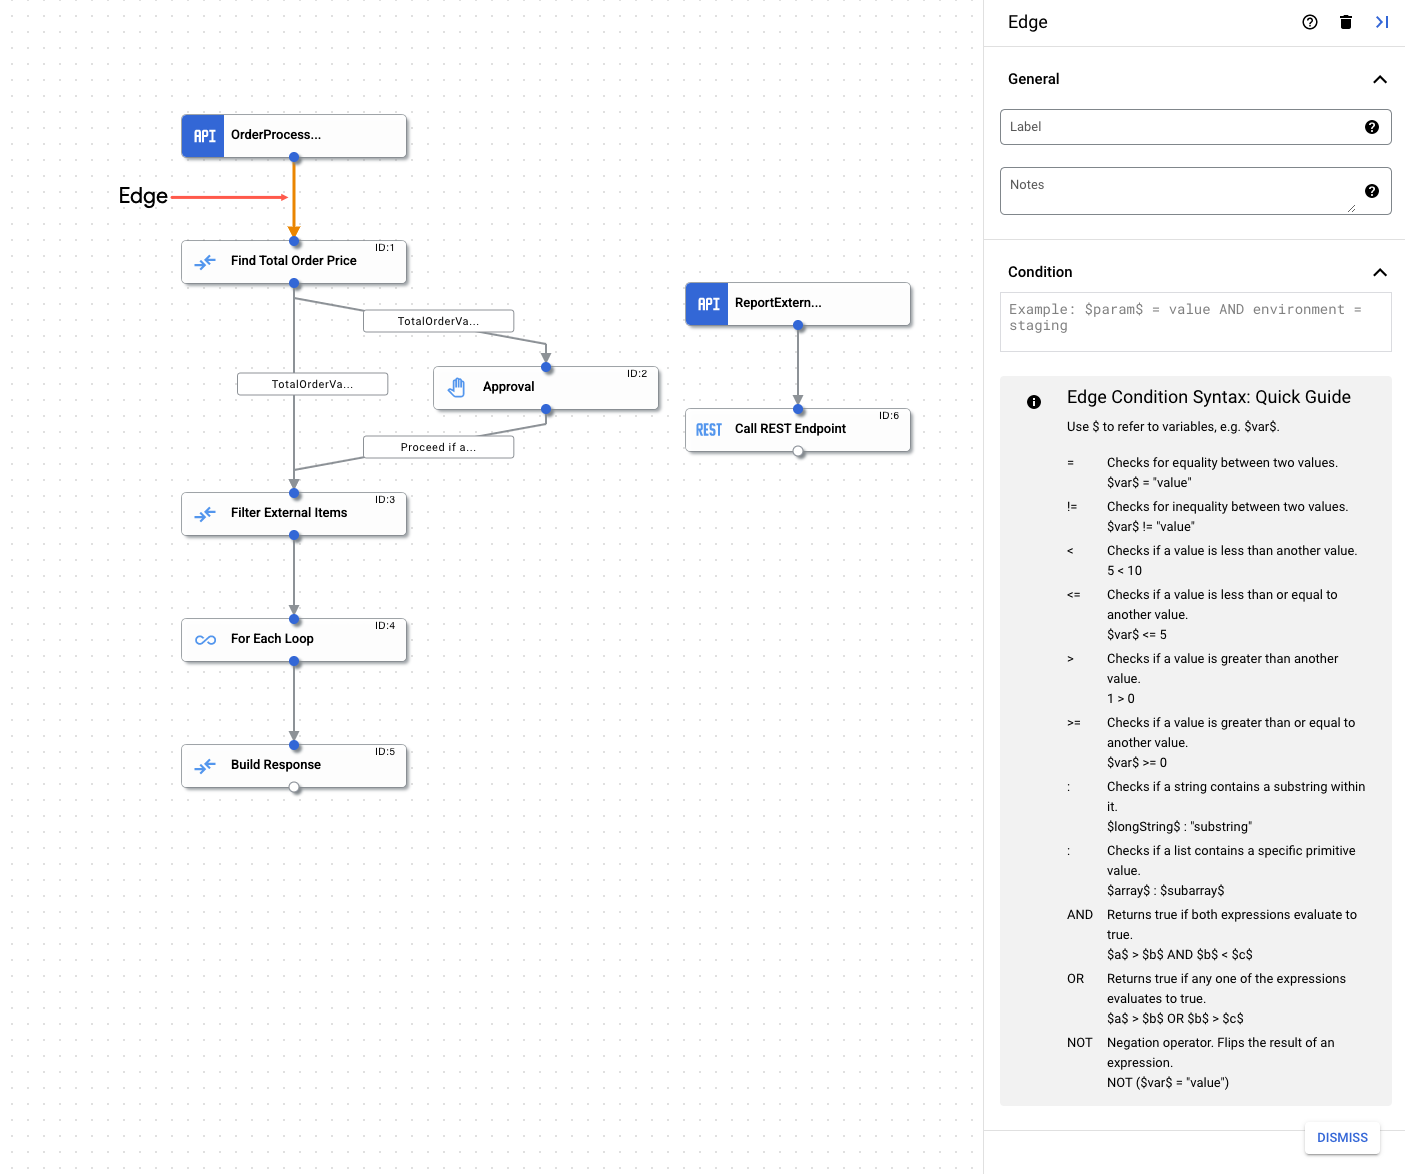
Une arête est une connexion entre deux éléments d'une intégration.
La connexion indique la direction du flux de contrôle d'un élément (tâche ou déclencheur) à un autre.
La connexion peut être établie entre un déclencheur et une tâche, ou entre une tâche et une autre tâche.
En utilisant une arête avec une duplication et une jointure, vous pouvez implémenter des ramifications et des conditions complexes dans votre intégration. Pour plus d'informations, consultez la section Duplications et jointures.
Par exemple, si il y a une arête d'une tâche Envoyer un e-mail à une tâche d'appel d'intégration, cela signifie qu'après l'exécution de la tâche Envoyer un e-mail, la tâche suivante à exécuter est la tâche appel d'intégration. Une arête prend également en charge les vérifications conditionnelles. Avant que la commande ne passe à la tâche suivante, vous pouvez rechercher une condition dans l'arête et, en fonction du résultat, décider d'exécuter la tâche ou non.
Pour en savoir plus sur les vérifications conditionnelles compatibles, consultez la section Conditions de périphérie.
Conditions de périphérie
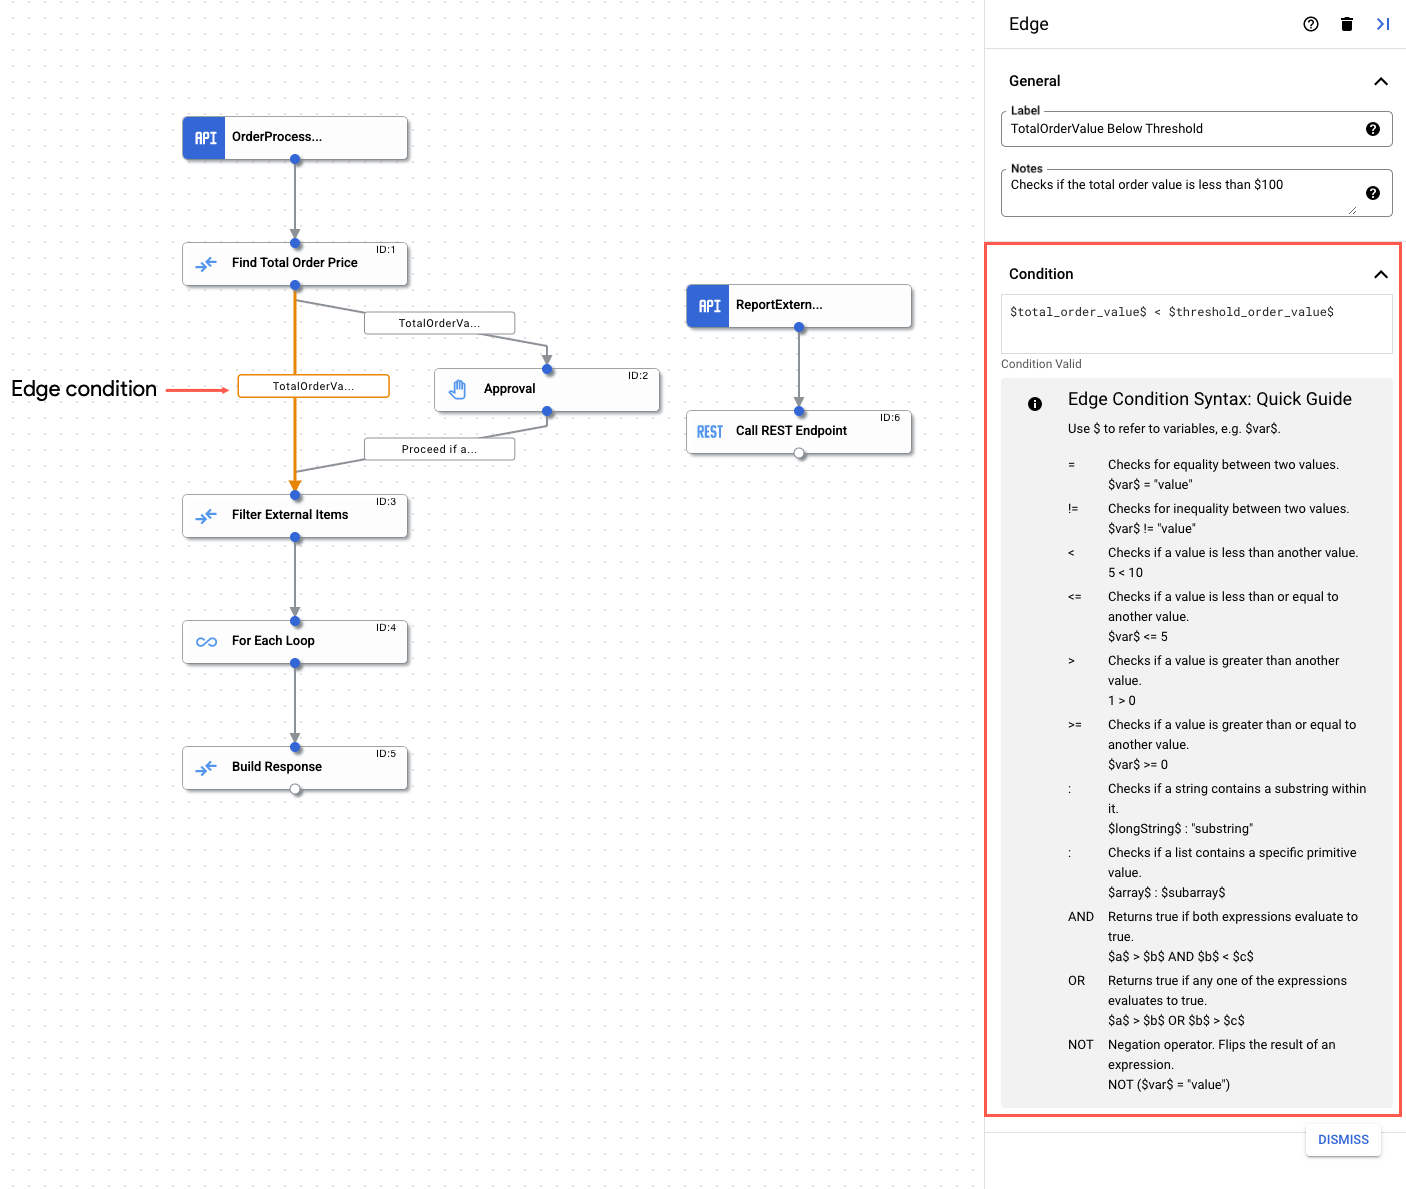
Les conditions de périphérie vous permettent de spécifier les conditions à remplir pour que le contrôle d'une intégration soit transmis à la tâche connectée par l'arête. La tâche n'est exécutée que si les conditions spécifiées sont remplies. Les conditions de périphérie sont utiles dans les cas où il existe plusieurs arêtes entrantes dans une tâche, chaque arête vérifiant les conditions spécifiques avant d'exécuter la tâche.
Spécifiez les conditions de périphérie en procédant comme suit :
Dans la console Google Cloud , accédez à la page Application Integration (Intégration d'applications).
Dans le menu de navigation, cliquez sur Intégrations.
La page Intégrations s'affiche et liste toutes les intégrations disponibles dans le projet Google Cloud.
Sélectionnez une intégration existante ou cliquez sur Créer une intégration pour en créer une.
Si vous créez une intégration :
Saisissez un nom et une description dans le volet Créer une intégration.
Sélectionnez une région pour l'intégration.
Sélectionnez un compte de service pour l'intégration. Vous pouvez modifier ou mettre à jour les informations du compte de service d'une intégration à tout moment dans le volet infoRécapitulatif de l'intégration de la barre d'outils d'intégration.
Cliquez sur Créer. L'intégration nouvellement créée s'ouvre dans l'éditeur d'intégration.
Dans la barre de navigation de l'éditeur d'intégrations, cliquez sur Tâches pour afficher la liste des tâches et des connecteurs disponibles.
Sélectionnez une intégration existante ou créez-en une.
Dans l'éditeur d'intégrations, cliquez sur l'arête pour ouvrir le volet de configuration d'arête.
Configurez l'arête :
Libellé (facultatif) : ajoutez un nom personnalisé à la périphérie.
Condition : définissez une condition de périphérie à l'aide des opérateurs et des fonctions compatibles.
Opérateurs compatibles
Le tableau suivant décrit les opérateurs compatibles pouvant être utilisés dans des conditions de périphérie.
Opérateur
Description
Exemple
=
Vérifie l'égalité entre deux valeurs.
$var$ = "value"
!=
Vérifie l'inégalité entre deux valeurs.
$var$ != "value"
<
Vérifie si une valeur est inférieure à une autre.
5 < 10
<=
Vérifie si une valeur est inférieure ou égale à une autre valeur.
$var$ <= 5
>
Vérifie si une valeur est supérieure à une autre.
1 > 0
>=
Vérifie si une valeur est supérieure ou égale à une autre valeur.
$var$ >= 0
:
Vérifie si une chaîne contient une sous-chaîne ou si une liste contient une valeur primitive spécifique.
$longString$ : "substring"
$list of values$ : "value"
"AND"
Vérifie deux expressions et renvoie la valeur "true" si les deux expressions renvoient la valeur "true".
$a$ > $b$ AND $b$ < $c$
OU
Vérifie deux expressions et renvoie la valeur "true" si l'une des expressions renvoie la valeur true.
$a$ > $b$ OR $b$ < $c$
NOT
Opérateur de négation. Inverse le résultat d'une expression.
NOT($var$ = "value")
Fonctions compatibles
Le tableau suivant décrit les fonctions compatibles qui peuvent être utilisées dans des conditions périphériques.
Fonction
Description
exists(VARIABLE)
Vérifie si une variable donnée existe.
does_not_exist(VARIABLE)
Vérifie si une variable donnée n'existe pas.
is_empty(VARIABLE)
Vérifie si une variable donnée est une liste ET est vide. Compatible avec le type de variable de tableau, à l'exception du tableau JSON.
is_not_empty(VARIABLE)
Vérifie si une variable donnée est une liste ET n'est pas vide. Compatible avec le type de variable de tableau, à l'exception du tableau JSON.
Quotas et limites
Pour plus d'informations sur les quotas et les limites, consultez la section Quotas et limites.
Sauf indication contraire, le contenu de cette page est régi par une licence Creative Commons Attribution 4.0, et les échantillons de code sont régis par une licence Apache 2.0. Pour en savoir plus, consultez les Règles du site Google Developers. Java est une marque déposée d'Oracle et/ou de ses sociétés affiliées.
Dernière mise à jour le 2025/09/03 (UTC).
[[["Facile à comprendre","easyToUnderstand","thumb-up"],["J'ai pu résoudre mon problème","solvedMyProblem","thumb-up"],["Autre","otherUp","thumb-up"]],[["Difficile à comprendre","hardToUnderstand","thumb-down"],["Informations ou exemple de code incorrects","incorrectInformationOrSampleCode","thumb-down"],["Il n'y a pas l'information/les exemples dont j'ai besoin","missingTheInformationSamplesINeed","thumb-down"],["Problème de traduction","translationIssue","thumb-down"],["Autre","otherDown","thumb-down"]],["Dernière mise à jour le 2025/09/03 (UTC)."],[[["\u003cp\u003eEdges represent connections between elements in an integration, defining the control flow direction between triggers and tasks or between tasks themselves.\u003c/p\u003e\n"],["\u003cp\u003eEdge conditions allow you to set specific criteria that must be met for the control to pass to the task connected by the edge, enabling conditional execution.\u003c/p\u003e\n"],["\u003cp\u003eOperators such as \u003ccode\u003e=\u003c/code\u003e, \u003ccode\u003e!=\u003c/code\u003e, \u003ccode\u003e<\u003c/code\u003e, \u003ccode\u003e<=\u003c/code\u003e, \u003ccode\u003e>\u003c/code\u003e, \u003ccode\u003e>=\u003c/code\u003e, \u003ccode\u003e:\u003c/code\u003e, \u003ccode\u003eAND\u003c/code\u003e, \u003ccode\u003eOR\u003c/code\u003e, and \u003ccode\u003eNOT\u003c/code\u003e are supported for constructing edge conditions, allowing for a variety of logical checks.\u003c/p\u003e\n"],["\u003cp\u003eFunctions like \u003ccode\u003eexists\u003c/code\u003e, \u003ccode\u003edoes_not_exist\u003c/code\u003e, \u003ccode\u003eis_empty\u003c/code\u003e, and \u003ccode\u003eis_not_empty\u003c/code\u003e can be used within edge conditions to check for the presence, absence, or state of variables.\u003c/p\u003e\n"],["\u003cp\u003eTo use variables within the conditions, it is necessary to use dollar signs on either side of the variable name (i.e. \u003ccode\u003e$variableName$\u003c/code\u003e), and when checking multiple conditions they should be split into individual checks combined with AND/OR.\u003c/p\u003e\n"]]],[],null,["# Edge and edge conditions\n\nSee the [supported connectors](/integration-connectors/docs/connector-reference-overview) for Application Integration.\n\nEdge and edge conditions\n========================\n\nEdge\n----\n\n\nAn edge is a connection between any two elements in an integration.\nThe connection denotes the direction of the control flow from one element(task or trigger) to another.\nThe connection can be between a [trigger](/application-integration/docs/trigger-overview) and a [task](/application-integration/docs/task-overview) or between a task and another task.\nBy using an edge along with fork and join, you can implement\ncomplex branching and conditions in your integration. For more information, see\n[Forks and joins](/application-integration/docs/forks-joins).\n\n\nFor example, if there is an edge from a **Send Email** task to a\n**Call Integration** task, it means that after the **Send Email** task is run,\nthe next task to run is the **Call Integration** task. An edge also supports\nconditional checks. Before the control passes to the next task, you can check for a\ncondition in the edge and based on the result, decide to run the task or not.\nFor more information about the supported conditional checks, see [Edge conditions](#edge_condition).\n\nEdge conditions\n---------------\n\n\nEdge conditions let you specify the conditions that must be met\nfor control of an integration to pass to the task connected by the edge. The task is run *only if*\nthe specified conditions are met. Edge conditions are useful in cases where there are multiple incoming edges\nto a task, where each edge checks for specific conditions before the task.\n\nSpecify edge conditions using the following steps:\n\n1. In the Google Cloud console, go to the **Application Integration** page.\n\n [Go to Application Integration](https://console.cloud.google.com/integrations)\n2. In the navigation menu, click **Integrations** .\n\n\n The **Integrations** page appears listing all the integrations available in the Google Cloud project.\n3. Select an existing integration or click **Create integration** to create a new one.\n\n\n If you are creating a new integration:\n 1. Enter a name and description in the **Create Integration** pane.\n 2. Select a region for the integration. **Note:** The **Regions** dropdown only lists the regions provisioned in your Google Cloud project. To provision a new region, click **Enable Region** . See [Enable new region](/application-integration/docs/enable-new-region) for more information.\n 3. Select a service account for the integration. You can change or update the service account details of an integration any time from the info **Integration summary** pane in the integration toolbar. **Note:** The option to select a service account is displayed only if you have enabled integration governance for the selected region.\n 4. Click **Create** . The newly created integration opens in the *integration editor*.\n\n\n4. In the *integration editor* navigation bar, click **Tasks** to view the list of available tasks and connectors.\n5. Select an existing integration or create a new one.\n6. In the integration editor, click on the edge to open the Edge configuration pane.\n7. Configure the edge:\n - **Label** (optional): Add a custom name for the edge.\n - **Condition** : Set an edge condition using the [supported operators](#operators) and [functions](#functions).\n\n| Important tips for specifying conditions:\n|\n| - To reference a variable value, use dollar sign notation (`$`) before and after the variable name. For example, if you want to check if a variable `productId` is greater than 10, the syntax is `$productId$ \u003e 10`.\n| - Text without dollar sign notation is interpreted as a literal value. For example the text `customerId` is interpreted as a literal value.\n| - To check multiple conditions, split the conditions into individual checks and combine them using **AND** or **OR** . For example, instead of using `$productId$ \u003e 5 AND \u003c 9 `, use ` $productId$ \u003e 5 AND $productId$ \u003c 9`.\n\nSupported operators\n-------------------\n\n\nThe following table describes the supported operators available for use in edge conditions.\n\nSupported functions\n-------------------\n\n\nThe following table describes supported functions available for use in edge conditions.\n\nQuotas and limits\n-----------------\n\nFor information about quotas and limits, see [Quotas and limits](/application-integration/docs/quotas).\n\nWhat's next\n-----------\n\n- Learn about [all tasks and triggers](/application-integration/docs/all-triggers-tasks).\n- Learn how to [test and publish an integration](/application-integration/docs/test-publish-integrations).\n\n- Learn about [error handling](/application-integration/docs/error-handling-strategy).\n- Learn about [integration execution logs](/application-integration/docs/introduction-logs)."]]