Un perímetro es una conexión entre dos elementos en una integración.
La conexión denota la dirección del flujo de control de un elemento (tarea o activador) a otro.
La conexión puede estar entre un activador y una tarea o entre una tarea y otra.
Si usas un perímetro junto con la bifurcación y la unión, puedes implementar ramificaciones y condiciones complejas en tu integración. Para obtener más información, consulta Bifurcaciones y uniones.
Por ejemplo, si hay un perímetro de una tarea Enviar correo electrónico a una de Integración de llamadas, significa que después de que se ejecuta Enviar el correo electrónico, la siguiente tarea que se ejecutará es la de Integración de llamadas. Un perímetro también admite verificaciones condicionales. Antes de que el control pase a la siguiente tarea, puedes verificar si hay una condición en el perímetro y, según el resultado, decidir si ejecutar la tarea o no.
Para obtener más información sobre las verificaciones condicionales compatibles, consulta Condiciones perimetrales.
Condiciones perimetrales
Las condiciones perimetrales te permiten especificar las condiciones que deben cumplirse para que una integración pueda pasar a la tarea conectada por el perímetro. La tarea se ejecutará solo si se cumplen las condiciones especificadas. Las condiciones perimetrales son útiles en los casos en los que hay varios perímetros entrantes en una tarea, donde cada perímetro verifica condiciones específicas antes de la tarea.
Especifica las condiciones perimetrales mediante los siguientes pasos:
En la consola de Google Cloud , ve a la página Integración de aplicaciones.
En el menú de navegación, haz clic en Integraciones.
Aparecerá la página Integraciones, en la que se enumeran todas las integraciones disponibles en el proyecto de Google Cloud.
Selecciona una integración existente o haz clic en Crear integración para crear una nueva.
Si creas una integración nueva, haz lo siguiente:
Ingresa un nombre y una descripción en el panel Crear integración.
Selecciona una región para la integración.
Selecciona una cuenta de servicio para la integración. Puedes cambiar o actualizar los detalles de la cuenta de servicio de una integración en cualquier momento desde el panel infoResumen de la integración en la barra de herramientas de la integración.
Haz clic en Crear. La integración recién creada se abrirá en el editor de integración.
En la barra de navegación del editor de integración, haz clic en Tareas para ver la lista de tareas y conectores disponibles.
Selecciona una integración existente o crea uno nuevo.
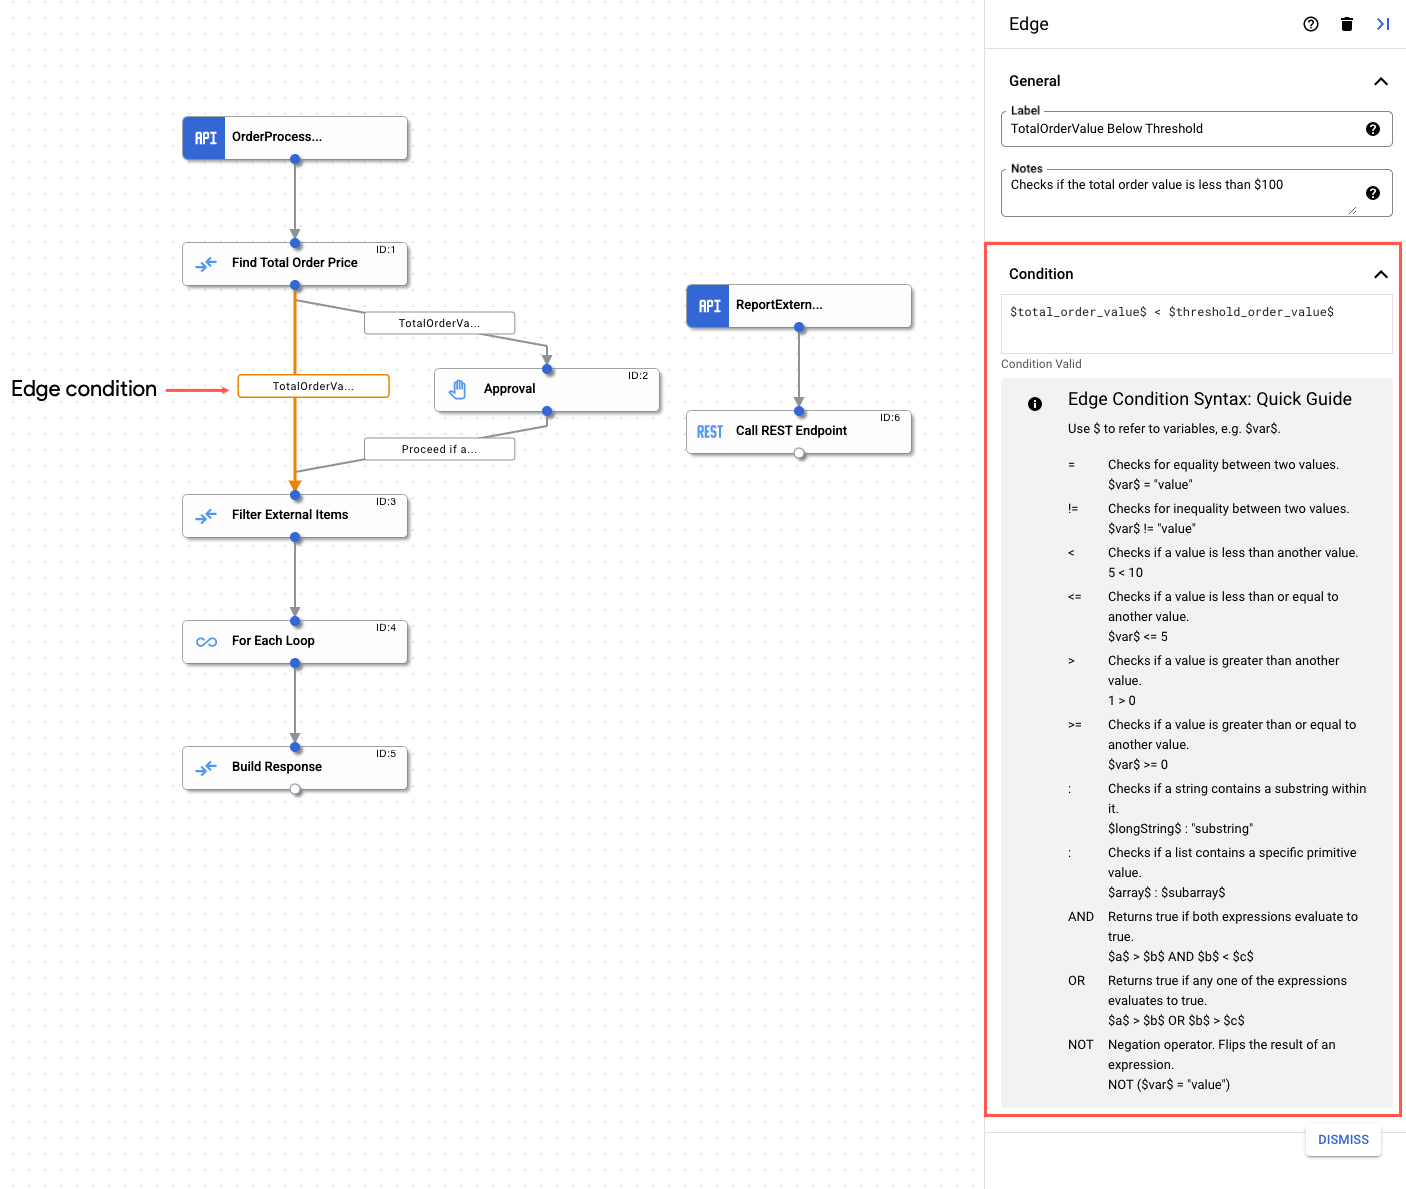
En el editor de integración, haz clic en el borde para abrir el panel de configuración de Edge.
Configura el perímetro:
Etiqueta (opcional): Agrega un nombre personalizado para el perímetro.
Condición: Configura una condición perimetral con los operadores y las funciones compatibles.
Operadores admitidos
En la siguiente tabla, se describen los operadores compatibles disponibles para usar en condiciones perimetrales.
Operador
Descripción
Ejemplo
=
Comprueba la igualdad entre dos valores.
$var$ = "value"
!=
Comprueba la desigualdad entre dos valores
$var$ != "value"
<
Comprueba si un valor es menor que otro
5 < 10
<=
Comprueba si un valor es menor o igual que otro
$var$ <= 5
>
Comprueba si un valor es mayor que otro.
1 > 0
>=
Comprueba si un valor es superior o igual que otro
$var$ >= 0
:
Comprueba si una cadena contiene una subcadena dentro de ella o si una lista contiene un valor primitivo específico.
$longString$ : "substring"
$list of values$ : "value"
Y
Comprueba dos expresiones y muestra un valor verdadero si ambas expresiones se evalúan como verdaderas.
$a$ > $b$ AND $b$ < $c$
O
Verifica dos expresiones y muestra verdadero si una de las expresiones se evalúa como verdadera.
$a$ > $b$ OR $b$ < $c$
NOT
Operador de negación. Cambia el resultado de una expresión.
NOT($var$ = "value")
Funciones compatibles
En la siguiente tabla, se describen las funciones compatibles disponibles para usar en condiciones perimetrales.
Función
Descripción
exists(VARIABLE)
Comprueba si existe una variable determinada
does_not_exist(VARIABLE)
Comprueba si no existe una variable determinada
is_empty(VARIABLE)
Comprueba si una variable determinada es una lista AND está vacía. Admite el tipo de variable de array, excepto el array JSON.
is_not_empty(VARIABLE)
Comprueba si una variable determinada es una lista Y no está vacía. Admite el tipo de variable de array, excepto el array JSON.
Cuotas y límites
Para obtener más información sobre las cuotas y los límites, consulta Cuotas y límites.
[[["Fácil de comprender","easyToUnderstand","thumb-up"],["Resolvió mi problema","solvedMyProblem","thumb-up"],["Otro","otherUp","thumb-up"]],[["Difícil de entender","hardToUnderstand","thumb-down"],["Información o código de muestra incorrectos","incorrectInformationOrSampleCode","thumb-down"],["Faltan la información o los ejemplos que necesito","missingTheInformationSamplesINeed","thumb-down"],["Problema de traducción","translationIssue","thumb-down"],["Otro","otherDown","thumb-down"]],["Última actualización: 2025-09-03 (UTC)"],[[["\u003cp\u003eEdges represent connections between elements in an integration, defining the control flow direction between triggers and tasks or between tasks themselves.\u003c/p\u003e\n"],["\u003cp\u003eEdge conditions allow you to set specific criteria that must be met for the control to pass to the task connected by the edge, enabling conditional execution.\u003c/p\u003e\n"],["\u003cp\u003eOperators such as \u003ccode\u003e=\u003c/code\u003e, \u003ccode\u003e!=\u003c/code\u003e, \u003ccode\u003e<\u003c/code\u003e, \u003ccode\u003e<=\u003c/code\u003e, \u003ccode\u003e>\u003c/code\u003e, \u003ccode\u003e>=\u003c/code\u003e, \u003ccode\u003e:\u003c/code\u003e, \u003ccode\u003eAND\u003c/code\u003e, \u003ccode\u003eOR\u003c/code\u003e, and \u003ccode\u003eNOT\u003c/code\u003e are supported for constructing edge conditions, allowing for a variety of logical checks.\u003c/p\u003e\n"],["\u003cp\u003eFunctions like \u003ccode\u003eexists\u003c/code\u003e, \u003ccode\u003edoes_not_exist\u003c/code\u003e, \u003ccode\u003eis_empty\u003c/code\u003e, and \u003ccode\u003eis_not_empty\u003c/code\u003e can be used within edge conditions to check for the presence, absence, or state of variables.\u003c/p\u003e\n"],["\u003cp\u003eTo use variables within the conditions, it is necessary to use dollar signs on either side of the variable name (i.e. \u003ccode\u003e$variableName$\u003c/code\u003e), and when checking multiple conditions they should be split into individual checks combined with AND/OR.\u003c/p\u003e\n"]]],[],null,["# Edge and edge conditions\n\nSee the [supported connectors](/integration-connectors/docs/connector-reference-overview) for Application Integration.\n\nEdge and edge conditions\n========================\n\nEdge\n----\n\n\nAn edge is a connection between any two elements in an integration.\nThe connection denotes the direction of the control flow from one element(task or trigger) to another.\nThe connection can be between a [trigger](/application-integration/docs/trigger-overview) and a [task](/application-integration/docs/task-overview) or between a task and another task.\nBy using an edge along with fork and join, you can implement\ncomplex branching and conditions in your integration. For more information, see\n[Forks and joins](/application-integration/docs/forks-joins).\n\n\nFor example, if there is an edge from a **Send Email** task to a\n**Call Integration** task, it means that after the **Send Email** task is run,\nthe next task to run is the **Call Integration** task. An edge also supports\nconditional checks. Before the control passes to the next task, you can check for a\ncondition in the edge and based on the result, decide to run the task or not.\nFor more information about the supported conditional checks, see [Edge conditions](#edge_condition).\n\nEdge conditions\n---------------\n\n\nEdge conditions let you specify the conditions that must be met\nfor control of an integration to pass to the task connected by the edge. The task is run *only if*\nthe specified conditions are met. Edge conditions are useful in cases where there are multiple incoming edges\nto a task, where each edge checks for specific conditions before the task.\n\nSpecify edge conditions using the following steps:\n\n1. In the Google Cloud console, go to the **Application Integration** page.\n\n [Go to Application Integration](https://console.cloud.google.com/integrations)\n2. In the navigation menu, click **Integrations** .\n\n\n The **Integrations** page appears listing all the integrations available in the Google Cloud project.\n3. Select an existing integration or click **Create integration** to create a new one.\n\n\n If you are creating a new integration:\n 1. Enter a name and description in the **Create Integration** pane.\n 2. Select a region for the integration. **Note:** The **Regions** dropdown only lists the regions provisioned in your Google Cloud project. To provision a new region, click **Enable Region** . See [Enable new region](/application-integration/docs/enable-new-region) for more information.\n 3. Select a service account for the integration. You can change or update the service account details of an integration any time from the info **Integration summary** pane in the integration toolbar. **Note:** The option to select a service account is displayed only if you have enabled integration governance for the selected region.\n 4. Click **Create** . The newly created integration opens in the *integration editor*.\n\n\n4. In the *integration editor* navigation bar, click **Tasks** to view the list of available tasks and connectors.\n5. Select an existing integration or create a new one.\n6. In the integration editor, click on the edge to open the Edge configuration pane.\n7. Configure the edge:\n - **Label** (optional): Add a custom name for the edge.\n - **Condition** : Set an edge condition using the [supported operators](#operators) and [functions](#functions).\n\n| Important tips for specifying conditions:\n|\n| - To reference a variable value, use dollar sign notation (`$`) before and after the variable name. For example, if you want to check if a variable `productId` is greater than 10, the syntax is `$productId$ \u003e 10`.\n| - Text without dollar sign notation is interpreted as a literal value. For example the text `customerId` is interpreted as a literal value.\n| - To check multiple conditions, split the conditions into individual checks and combine them using **AND** or **OR** . For example, instead of using `$productId$ \u003e 5 AND \u003c 9 `, use ` $productId$ \u003e 5 AND $productId$ \u003c 9`.\n\nSupported operators\n-------------------\n\n\nThe following table describes the supported operators available for use in edge conditions.\n\nSupported functions\n-------------------\n\n\nThe following table describes supported functions available for use in edge conditions.\n\nQuotas and limits\n-----------------\n\nFor information about quotas and limits, see [Quotas and limits](/application-integration/docs/quotas).\n\nWhat's next\n-----------\n\n- Learn about [all tasks and triggers](/application-integration/docs/all-triggers-tasks).\n- Learn how to [test and publish an integration](/application-integration/docs/test-publish-integrations).\n\n- Learn about [error handling](/application-integration/docs/error-handling-strategy).\n- Learn about [integration execution logs](/application-integration/docs/introduction-logs)."]]