Sie können eine Integration ändern, indem Sie Aufgaben, Trigger oder Edge-Verbindungen konfigurieren. Sie können auch die Integrationsdetails aktualisieren, z. B. die Einstellung für die Maskierung von Variablen in Protokollen, Cloud Logging, lokale Protokollierung und das Dienstkonto und die Beschreibung der Integration.
Bearbeitungssperren für Integrationen
Integrationen sind Elemente während der Entwicklung, die häufig in Zusammenarbeit mit mehreren Autoren entwickelt werden.
Die Integration kann immer nur von jeweils einem Autor bearbeitet werden. Teams können aber für eine Integration zusammenarbeiten und Änderungen im Status für ihre Versionen verfolgen.
Sie können nur eine DRAFT-Version der Integration bearbeiten und nur die ACTIVE-Version der Integration ausführen. Informationen zu den verschiedenen Integrationsversionen finden Sie unter Integrationsversionen.
Wenn Sie eine Integration öffnen, wird im Integrationseditor möglicherweise eine Meldung ähnlich der folgenden angezeigt:
Wenn Sie eine Integration öffnen, die gerade von einem anderen Nutzer bearbeitet wird, wird im Integrationseditor die folgende Meldung angezeigt, da die Integration jeweils nur von einem Nutzer aktualisiert werden kann:
test-user@gmail.com is currently editing the integration. Edit features are temporarily disabled.
Klicken Sie auf Übernehmen, um die Integration zu bearbeiten. In der Integration wird für Sie eine neue Version im Status DRAFT erstellt und die Bearbeitungsfunktion für die anderen Nutzer deaktiviert. Die folgende Abbildung zeigt die Bearbeitungssperre im Integrationseditor.
Wenn Sie eine veröffentlichte Integration öffnen, befindet sich die Integrationsversion im Status ACTIVE. Klicken Sie auf Bearbeitung aktivieren, um die Integration zu bearbeiten. Es wird eine neue Version mit dem Status DRAFT erstellt.
This version is currently active. Editing features are disabled.
Klicken Sie auf Bearbeitung aktivieren, um die Integration zu bearbeiten. In der Integration wird eine neue Version im Status DRAFT für Sie erstellt.
Die folgende Abbildung zeigt die Bearbeitungssperre im Integrationseditor.
Verknüpfung bearbeiten
So rufen Sie einen Integrationsablauf auf und bearbeiten ihn:
Rufen Sie in der Google Cloud Console die Seite Application Integration auf.
Die Seite Integrationen wird angezeigt. Auf dieser Seite sind alle Integrationen aufgeführt, die im Google Cloud Projekt verfügbar sind.
Klicken Sie auf die Integration, die Sie bearbeiten möchten. Dadurch wird die Integration im Integrationseditor geöffnet.
Wenn die Integration nicht den Status DRAFT hat, ist sie für die Bearbeitung gesperrt. Informationen zu Bearbeitungssperren finden Sie unter Bearbeitungssperren für Integrationen.
Integrationen löschen
Führen Sie die folgenden Schritte aus, um die Veröffentlichung einer Integration zu löschen:
Rufen Sie in der Google Cloud Console die Seite Application Integration auf.
Klicken Sie im linken Navigationsmenü auf Integrationen, um die Seite Integrationen zu öffnen.
Führen Sie einen der folgenden Schritte auf der Seite Integrationsliste aus:
Klicken Sie für die vorhandene Integration, die Sie löschen möchten, auf more_vertAktionen.
Wählen Sie im Drop-down-Menü Löschen aus.
Ein Bestätigungsdialog wird geöffnet.
oder
Klicken Sie auf die vorhandene Integration, die Sie löschen möchten.
Dadurch wird die Integration auf der Seite Integrationseditor geöffnet.
Klicken Sie in der Symbolleiste des Designers auf
more_vert
(Aktionsmenü) und wählen Sie Integration klonen > Alle Versionen löschen aus.
Ein Bestätigungsdialog wird geöffnet.
Klicken Sie auf Löschen, um die Integration endgültig zu löschen.
Integrationsdetails verwalten
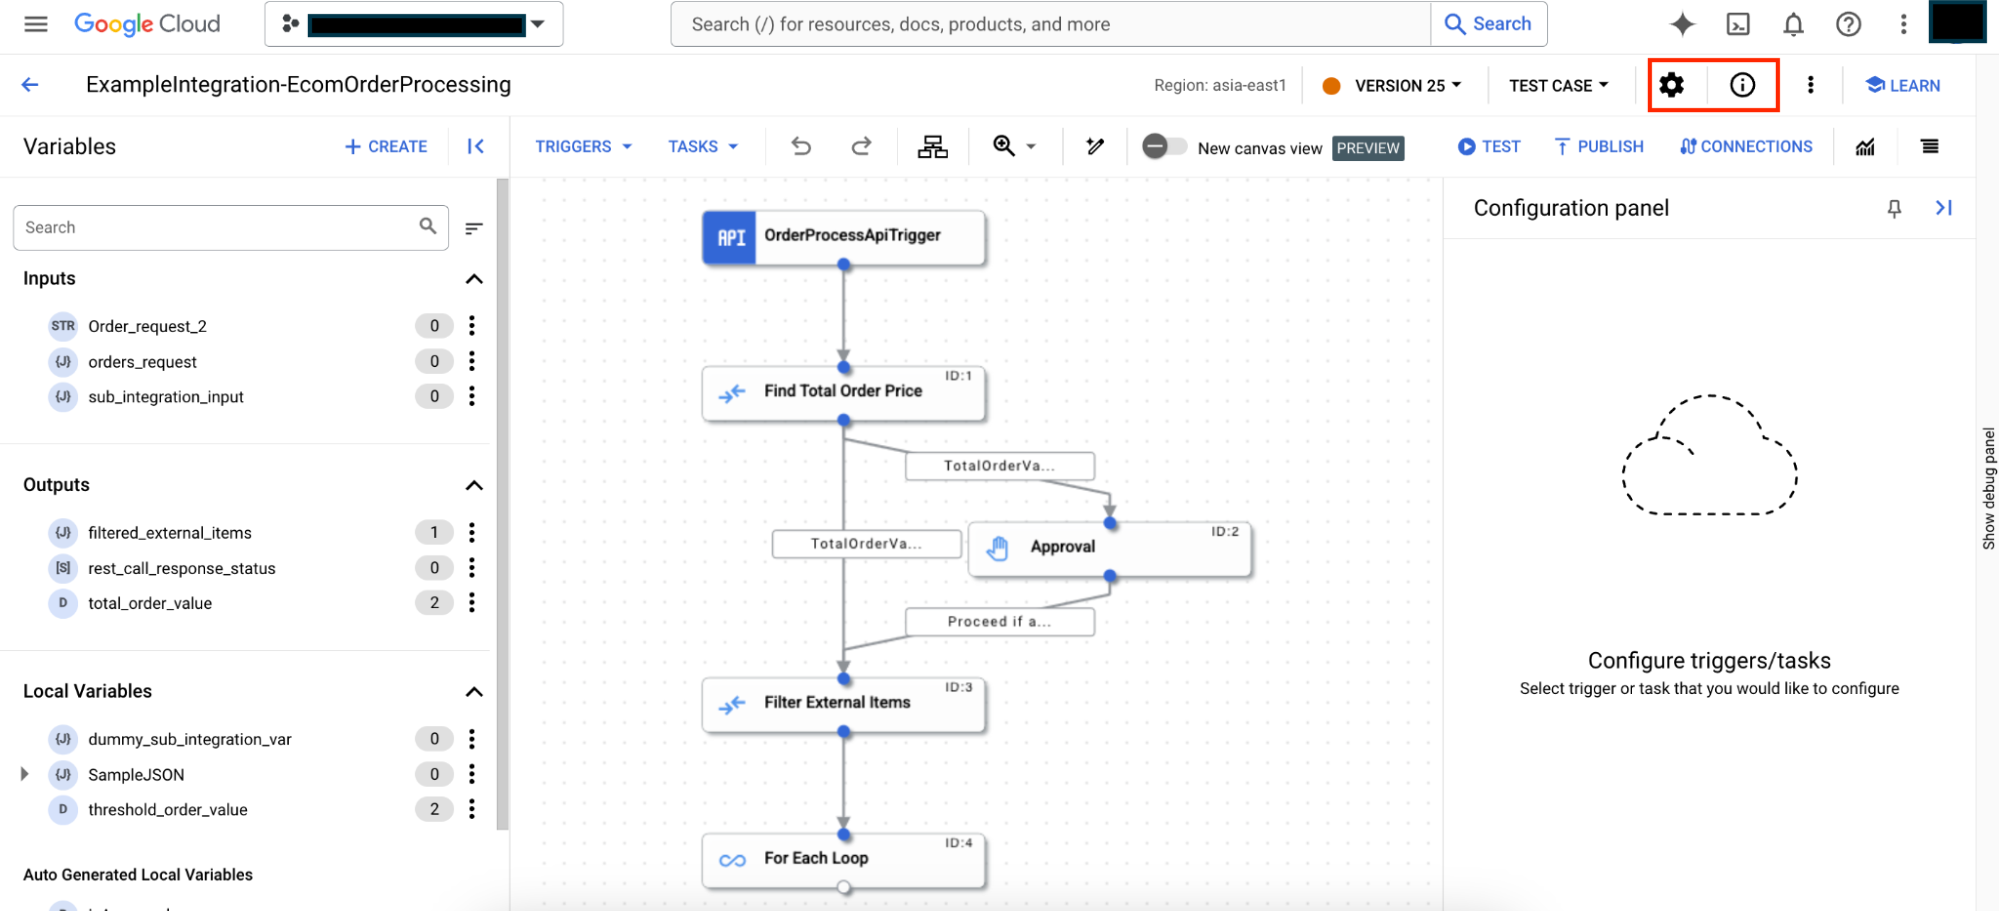
Sie können sich die Integrationsübersicht ansehen und die Einstellungen für die Integration aktualisieren. Die folgende Abbildung zeigt die Symbole settings Integrationseinstellungen und info Integrationsinformationen in der Symbolleiste des Editors für Application Integration:
Integrationsdetails ansehen
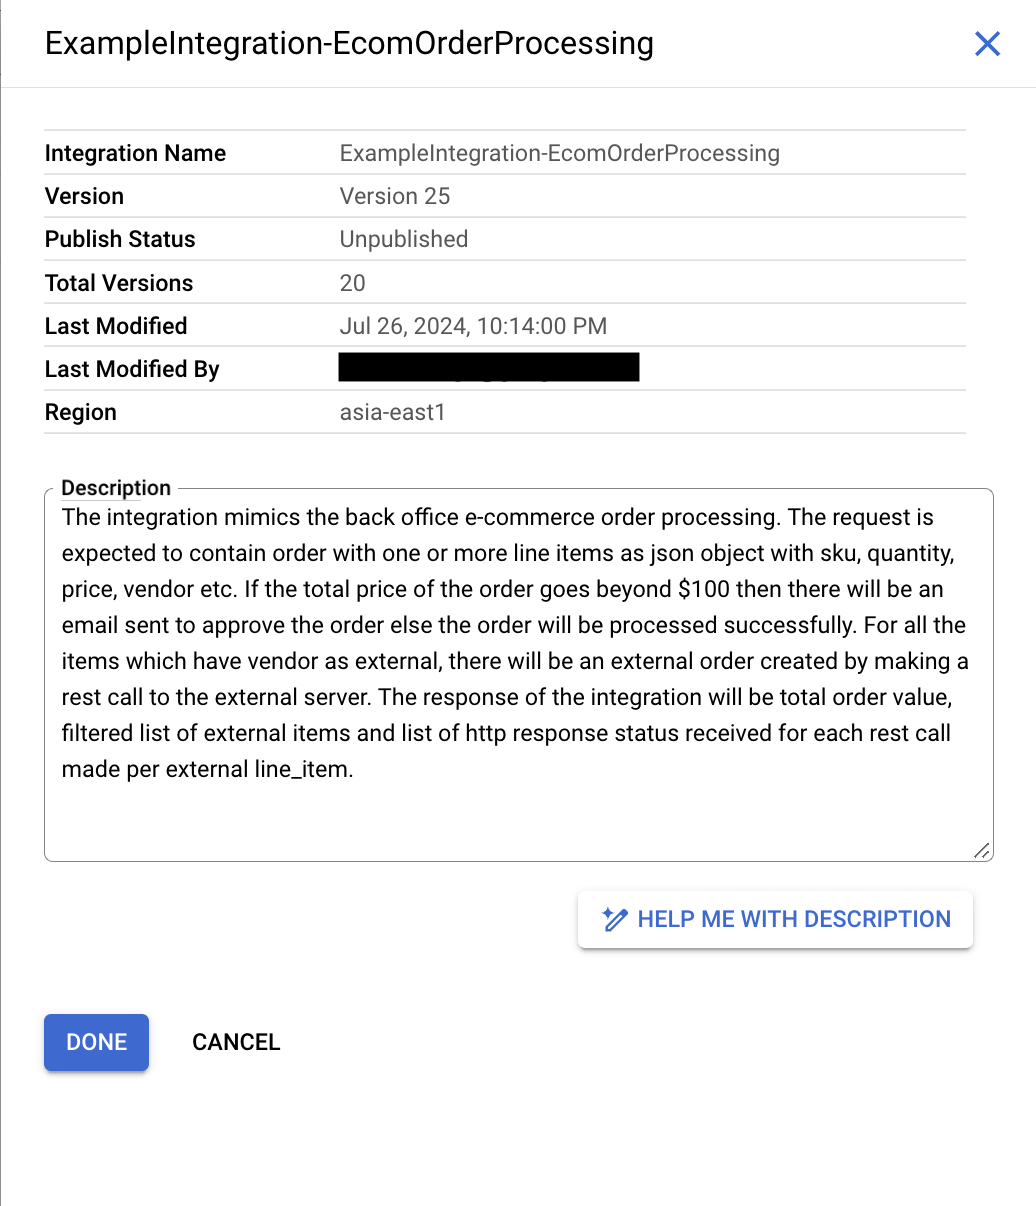
Wenn Sie die Details einer Integration aufrufen möchten, öffnen Sie die Integration im Integrationseditor und klicken Sie in der Symbolleiste des Designers auf info (Integrationsinformationen). Die folgende Abbildung zeigt die Integrationsdetails:
Die Integrationsübersicht enthält die folgenden Informationen:
Name der Integration:Der Name der Integration.
Version:Die aktuelle Version der Integration und gegebenenfalls der Versionsname. Informationen zur Versionierung finden Sie unter Versionen.
Veröffentlichungsstatus: Der Veröffentlichungsstatus der aktuellen Version der Integration: Veröffentlicht oder Nicht veröffentlicht.
Versionen insgesamt:Die Gesamtzahl der für die Integration erstellten Integrationsversionen.
Letzte Änderung:Datum und Uhrzeit der letzten Bearbeitung der aktuellen Integrationsversion.
Zuletzt geändert von: Der Name des Nutzers, der die Integrationsversion zuletzt bearbeitet hat.
Region:Der Standort, an dem die Integration erstellt wurde.
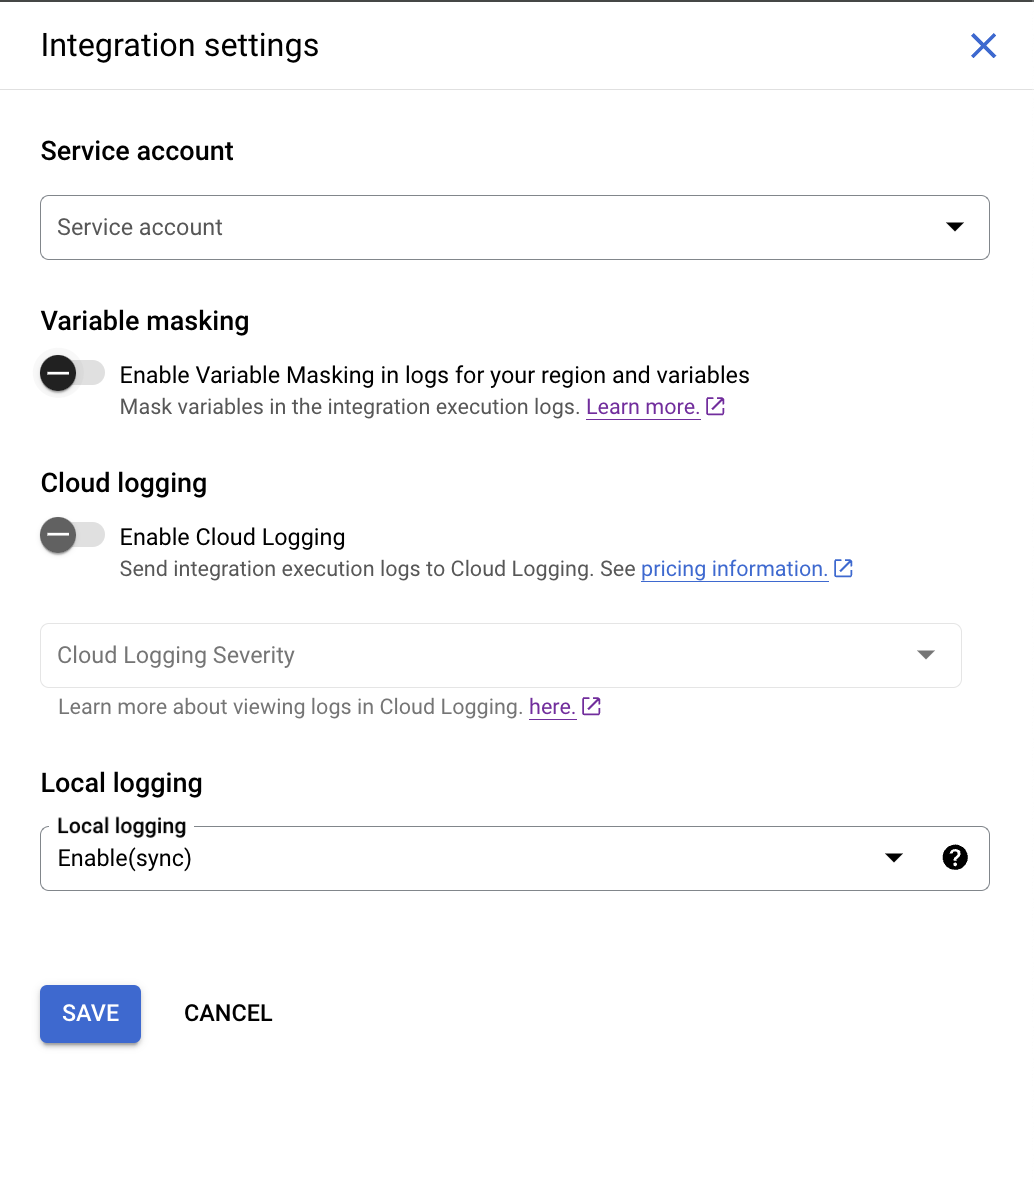
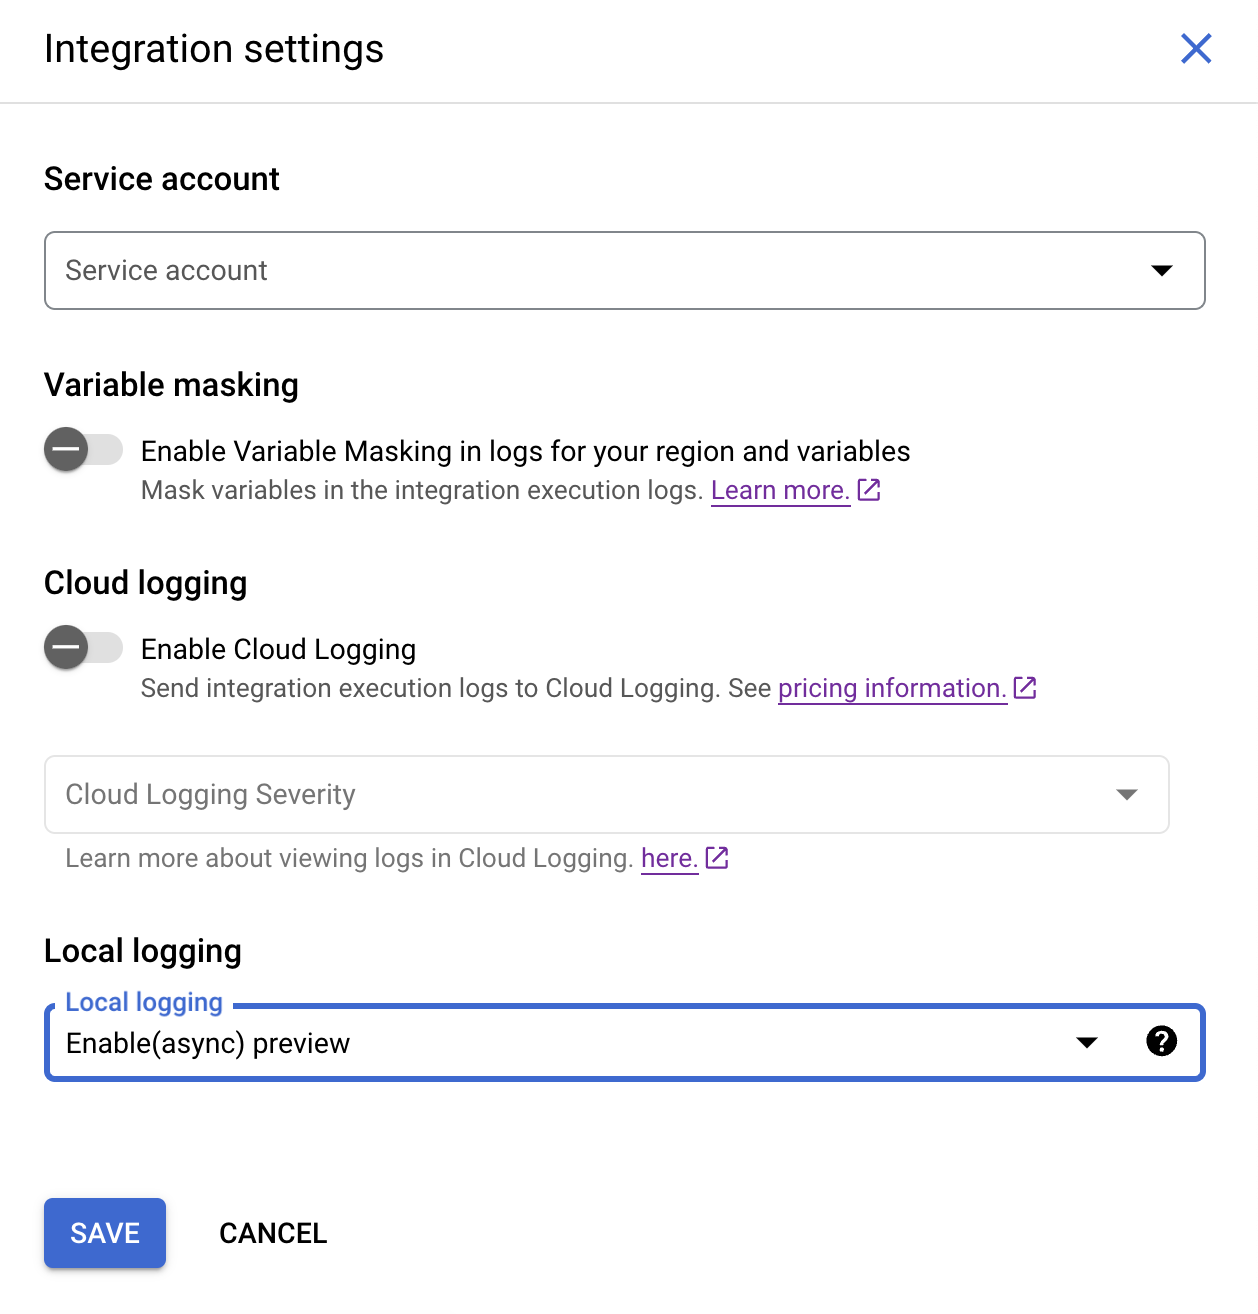
Wenn Sie die Details einer Integration bearbeiten möchten, öffnen Sie die Integration im Integrationseditor und klicken Sie in der Symbolleiste des Designers auf settings (Integrationseinstellungen). Die folgende Abbildung zeigt den Bereich Integrationseinstellungen:
Die Integrationsübersicht enthält die folgenden Informationen:
Dienstkonto:Das Dienstkonto, das mit der Integration verknüpft ist.
Variablenmaskierung in Logs aktivieren (Vorabversion): Mit dieser Einstellung können Sie die Maskierung von Variablen in den Ausführungslogs der Integration aktivieren. Wenn Sie die Maskierung für Ihre Integration aktivieren, müssen Sie sie auch auf Regions- und Variablenebene aktivieren.
Cloud Logging aktivieren:Mit dieser Einstellung können Sie Cloud Logging aktivieren oder deaktivieren. Weitere Informationen finden Sie unter Logs in Cloud Logging ansehen.
Lokales Logging:Mit dieser Einstellung können Sie das Speichern der Daten oder Metadaten der Integration während der Ausführung aktivieren oder deaktivieren. Standardmäßig ist die lokale Logging-Funktion auf Aktivieren(async) eingestellt. In diesem Modus dauert die Ausführung der Einbindung im Vergleich zum Modus Aktivieren(synchron) weniger Zeit, da die Anwendungsintegration die Logdaten während der Einbindungsausführung asynchron schreibt. Dieser Modus sichert jedoch nicht, dass für alle Ausführungen Logs generiert werden. In seltenen Fällen, z. B. bei einem physischen Serverausfall, werden möglicherweise keine Logs für die Ausführung einer Integration generiert. Weitere Informationen finden Sie unter Lokales Logging.
[[["Leicht verständlich","easyToUnderstand","thumb-up"],["Mein Problem wurde gelöst","solvedMyProblem","thumb-up"],["Sonstiges","otherUp","thumb-up"]],[["Schwer verständlich","hardToUnderstand","thumb-down"],["Informationen oder Beispielcode falsch","incorrectInformationOrSampleCode","thumb-down"],["Benötigte Informationen/Beispiele nicht gefunden","missingTheInformationSamplesINeed","thumb-down"],["Problem mit der Übersetzung","translationIssue","thumb-down"],["Sonstiges","otherDown","thumb-down"]],["Zuletzt aktualisiert: 2025-09-03 (UTC)."],[[["\u003cp\u003eIntegrations can be modified by configuring tasks, triggers, or edge connections, and by updating details such as logging settings, service accounts, and descriptions.\u003c/p\u003e\n"],["\u003cp\u003eOnly one user can edit an integration at a time, with edits limited to \u003ccode\u003eDRAFT\u003c/code\u003e versions, while \u003ccode\u003eACTIVE\u003c/code\u003e versions are for execution, and a 15 minute lock is in place when a user makes a change.\u003c/p\u003e\n"],["\u003cp\u003eDeleting an integration is permanent and removes all versions, variables, triggers, tasks, and data mappings associated with it.\u003c/p\u003e\n"],["\u003cp\u003eIntegration details, such as name, version, publish status, last modified information, region, and description, can be viewed within the integration editor.\u003c/p\u003e\n"],["\u003cp\u003eSettings for service accounts, variable masking, Cloud Logging, and local logging can be modified within the integration's settings.\u003c/p\u003e\n"]]],[],null,["# Manage integrations\n\nSee the [supported connectors](/integration-connectors/docs/connector-reference-overview) for Application Integration.\n\nManage integrations\n===================\n\nYou can modify an integration by configuring tasks, triggers, or edge connections. You can also update the integration details, such as modifying the setting for masking variables in logs, Cloud Logging, local logging, and updating the service account and the description of your integration.\n\nIntegration edit locks\n----------------------\n\nIntegrations are design time entities that are often developed in collaboration with multiple authors.\nAlthough an integration can only be actively edited by one author at a time,\nteams can collaborate on an integration and track changes in state through its *versions*.\n\nYou can edit only a `DRAFT` version of the integration, and execute only the `ACTIVE` version of the integration. For information about different integration versions, see [Integration versions](/application-integration/docs/integration-versions).\n\nWhen you open an integration, you might find a message similar to the following in the integration editor:\n\n- If you open the integration that is being edited by another user, the following message appears in the integration editor because only one user can update the integration at a given time: \n\n ```\n test-user@gmail.com is currently editing the integration. Edit features are temporarily disabled.\n ```\n | **Note:** The integration is locked for editing by others for 15 minutes from the last update. Locks are released after 15 minutes from the last update.\n\n To edit the integration, click **Take Over** . A new version in the `DRAFT` state is created in the integration for you and the editing capability is disabled for the other users. The following figure shows the edit lock in the integration editor.\n\n\n- If you open a published integration, then the integration version is in the `ACTIVE` state. To edit the integration, click **Enable Editing** . A new version is created with the `DRAFT` state.\n\n ```\n This version is currently active. Editing features are disabled.\n ```\n\n To edit the integration, click **Enable Editing** . A new version in the `DRAFT` state is created in the integration for you.\n The following figure shows the edit lock in the integration editor.\n\n\nEdit an integration\n-------------------\n\nTo view and edit an integration flow, follow these steps:\n\n1. In the Google Cloud console, go to the **Application Integration** page.\n\n [Go to Application Integration](https://console.cloud.google.com/integrations)\n2. In the navigation menu, click **Integrations** .\n\n\n The **Integrations** page appears, listing all the integrations available in the Google Cloud project.\n3. Click the integration that you want to edit. This opens the integration in the integration editor.If the integration is not in `DRAFT` state, then the integration is locked for editing. For information about edit locks, see [Integration edit locks](#edit-locks).\n\nDelete integrations\n-------------------\n\n| **Warning:** When you delete an integration, you permanently delete all the versions of that integration, including all the integration variables, configured triggers, tasks, and data mappings. Deleting an integration cannot be undone.\n\nTo delete an integration, perform the following steps:\n\n1. In the Google Cloud console, go to the **Application Integration** page.\n\n [Go to Application Integration](https://console.cloud.google.com/integrations)\n2. Click **Integrations** from the left navigation menu to open the **Integrations** page.\n3. Do any one of the following steps in the **Integrations List** page:\n 1. For the existing integration that you want to delete, click more_vert **Actions**.\n 2. Select **Delete** in the drop-down menu.\n\n A confirmation dialog appears.\n\n Or\n \u003c!-- --\u003e\n\n 1. Click the existing integration that you want to delete. This opens the integration in the *integration editor*.\n\n 2. In the designer toolbar, click more_vert (Actions menu) and select **Clone integration \\\u003e Delete all versions** .\n\n A confirmation dialog appears.\n 3. Click **Delete** to permanently delete the integration.\n\nManage integration details\n--------------------------\n\nYou can view the integration summary and update settings for your integration. The following image shows the **settings Integration settings** and **info Integration information** icons on the Application Integration editor toolbar:\n\n\n### View integration details\n\nTo view the details of an integration, open the integration in the integration editor and click info (**Integration information**) in the designer toolbar. The following image shows the integration details:\n\n\nThe integration summary includes the following information:\n\n- **Integration name:** The name of the integration.\n- **Version:** The current version of the integration along with the version name (if any). For information about versioning, see [Versions](/application-integration/docs/integration-versions).\n- **Publish status:** The publish status of the current version of the integration; **Published** or **Unpublished**.\n- **Total versions:** The count of the total number of integration versions created for the integration.\n- **Last modified:** The date and time when the current integration version was last edited or modified.\n- **Last modified by** The name of the user who last edited or modified the integration version.\n- **Region:** The regional location where the integration was created.\n- **Description:** The integration description. To generate integration description using Gemini, see [Build integrations with Gemini Code Assist](/application-integration/docs/build-integrations-gemini).\n\n### Edit integration details\n\nTo edit the details of an integration, open the integration in the integration editor and click settings (**Integration settings** ) in the designer toolbar. The following image shows the **Integration Settings** pane:\n\n\nThe integration summary includes the following information:\n\n- **Service account:** The service account attached to the integration.\n- **Enable Variable Masking in logs ([preview](/products#product-launch-stages)):** The setting to enable masking of variables in the integration execution logs. If you enable masking for your integration, ensure that you have also enabled masking at the [region](/application-integration/docs/enable-new-region#edit-region) and the [variable](/application-integration/docs/variables) levels.\n\n For information about masking, see [Mask sensitive data in logs](/application-integration/docs/mask-sensitive-data-logs).\n- **Enable Cloud Logging:** The setting to enable or disable Cloud Logging. For more information, see [View logs in Cloud Logging](/application-integration/docs/cloud-logging).\n- **Local logging:** The setting to enable or disable saving integration's data or metadata during its execution. By default, local logging is set to **Enable(async)** . In this mode, the integration takes a relatively lesser time to execute when compared to the **Enable(sync)** mode, because Application Integration writes the log data asynchronously during the integration execution. However, this mode doesn't guarantee the generation of logs for all the executions. In rare cases--such as a physical server failure--it's possible that logs aren't generated for an integration execution. For more information, see [Local logging](/application-integration/docs/local-logging).\n\n| **Note:** Except for the **Service account** and **Description** fields, you can't edit or change any of the other integration information.\n\nWhat's next\n-----------\n\n- Learn how to [test and publish integrations](/application-integration/docs/test-publish-integrations).\n- Learn how to [create an integration](/application-integration/docs/create-integrations#create-a-new-integration).\n- Learn how to [clone integrations](/application-integration/docs/clone-integrations).\n- Learn about [logs in Application Integration](/application-integration/docs/introduction-logs)."]]