Consulte os conetores suportados para a solução Application Integration.
Acionador de captura de erros
O acionador Gestor de erros permite-lhe invocar um gestor de erros definido ou personalizado para processar a falha de um acionador, uma tarefa ou uma condição de limite identificados na sua integração.
Adicione um acionador de captura de erros
Para adicionar um acionador Error Catcher na sua integração, siga estes passos:- Na Google Cloud consola, aceda à página Application Integration.
- No menu de navegação, clique em Integrações
A página Lista de integrações é apresentada com todas as integrações disponíveis no projeto do Google Cloud.
- Selecione uma integração existente ou clique em Criar integração para criar uma nova.
Se estiver a criar uma nova integração:
- Introduza um nome e uma descrição no painel Criar integração.
- Selecione uma região para a integração.
- Selecione uma conta de serviço para a integração. Pode alterar ou atualizar os detalhes da conta de serviço de uma integração em qualquer altura no painel Resumo da integração na barra de ferramentas de integração.
- Clique em Criar.
A integração recém-criada é aberta no editor de integração.
- Na barra de navegação do editor de integração, clique em Acionadores para ver a lista de acionadores disponíveis.
- Clique e coloque o elemento do acionador Error Catcher no criador de integrações.
Configure o acionador Error Catcher
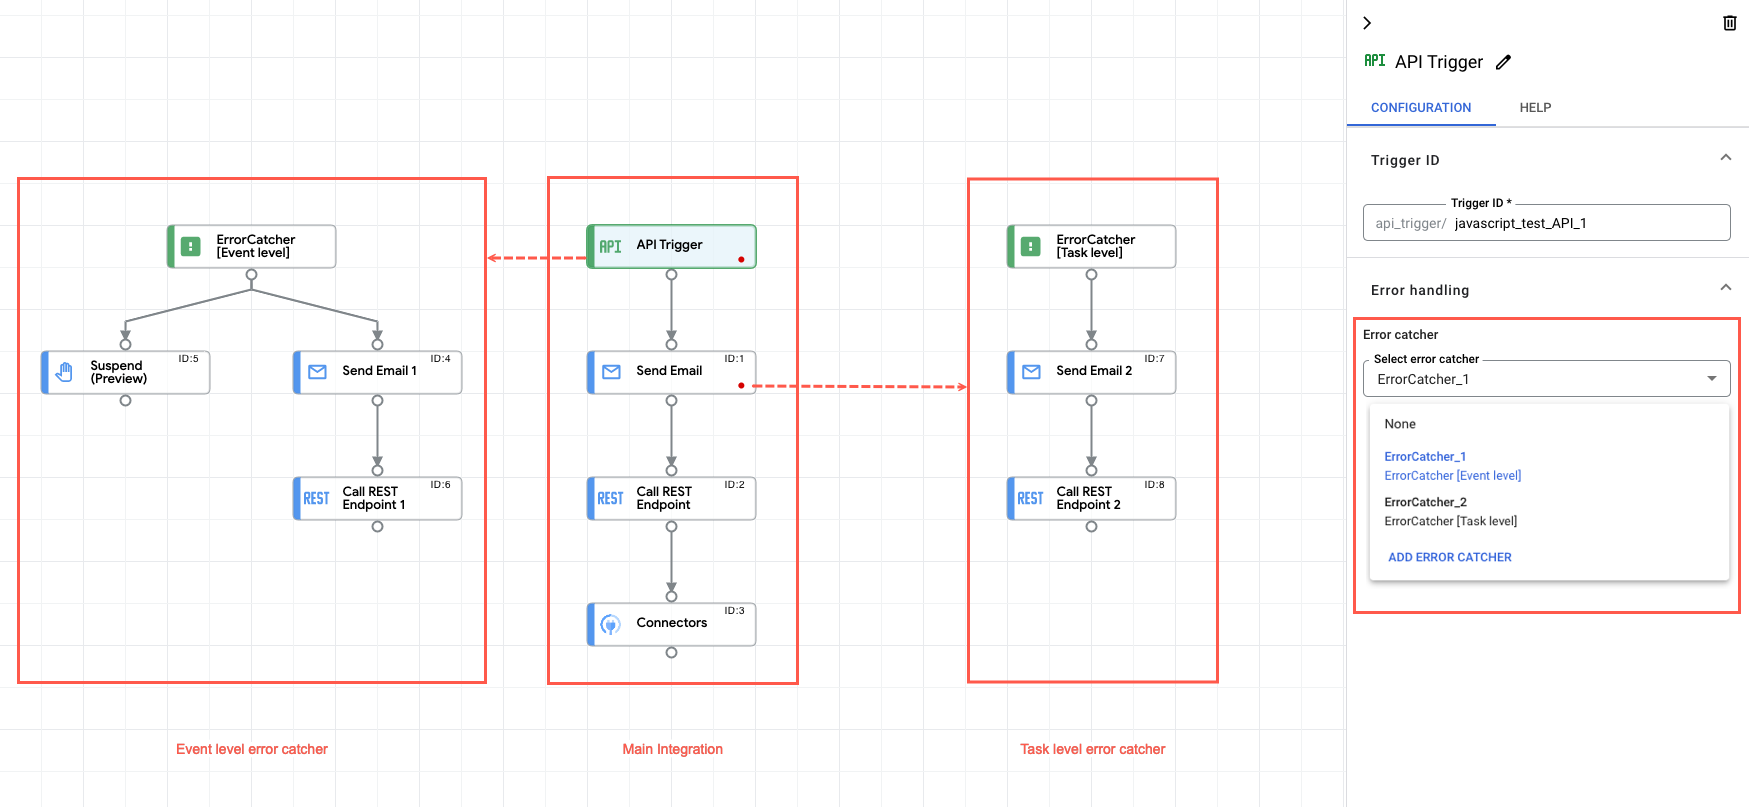
Clique no elemento do acionador Error Catcher no estruturador de integrações para ver o painel de configuração do acionador.
O separador Configuração apresenta o ID do captador de erros, que é gerado automaticamente quando adiciona o acionador no criador de integrações. Opcionalmente, pode editar o ID gerado automaticamente, se necessário. Não é necessária nenhuma configuração adicional para este acionador.
Crie a lógica do captador de erros
Depois de adicionar o acionador Error Catcher no criador de integrações, pode criar a sua lógica de Error Catcher personalizada através das tarefas disponíveis na integração de aplicações. Clique e coloque os elementos de tarefas de integração desejados no criador de integrações e associe-os ao acionador Error Catcher.
Anexe o captador de erros
Depois de criar a lógica de captura de erros personalizada, pode usá-la para processar os erros ou as falhas de execução nos níveis de tarefa e evento. Para usar ou anexar um gestor de erros na sua integração principal, siga estes passos:
- Clique no acionador ou na tarefa existente na integração principal para abrir o painel de configuração do acionador ou da tarefa.
- No painel de configuração, expanda a secção Processamento de erros e aceda a Captador de erros.
- Clique em Selecionar captador de erros e selecione o ID do acionador Captador de erros que quer usar.
É apresentado um indicador vermelho no elemento de acionador ou tarefa respetivo, indicando que o elemento está anexado a um captador de erros.
A imagem seguinte mostra um fluxo de integração de exemplo que usa o captador de erros:
Quotas e limites
Para informações sobre quotas e limites, consulte o artigo Quotas e limites.
O que se segue?
- Saiba mais sobre todas as tarefas e acionadores.
- Saiba como testar e publicar uma integração.
- Saiba mais acerca do processamento de erros.
- Saiba mais sobre os registos de execução da integração.