Mit dem Error Catcher-Trigger können Sie einen Error Capture aufrufen, der für den Ausfall eines erkannten Triggers, einer Aufgabe oder einer Edge-Bedingung in Ihrer Integration definiert oder angepasst ist.
Error Capture-Trigger hinzufügen
Führen Sie folgende Schritte aus, um in Ihrer Integration einen Error Capture-Trigger hinzuzufügen:
Rufen Sie in der Google Cloud Console die Seite Application Integration auf.
Die Seite Liste der Integrationen wird angezeigt. Auf dieser Seite sind alle Integrationen aufgeführt, die im Google Cloud-Projekt verfügbar sind.
Wählen Sie eine vorhandene Integration aus oder klicken Sie auf Integration erstellen, um eine neue zu erstellen.
Wenn Sie eine neue Integration erstellen, gehen Sie so vor:
Geben Sie im Bereich Integration erstellen einen Namen und eine Beschreibung ein.
Wählen Sie eine Region für die Integration aus.
Wählen Sie ein Dienstkonto für die Integration aus. Sie können die Details des Dienstkontos einer Integration jederzeit im Bereich infoIntegrationsübersicht in der Symbolleiste für Integrationen ändern oder aktualisieren.
Klicken Sie auf Erstellen.
Die neu erstellte Integration wird im Integrationseditor geöffnet.
Klicken Sie in der Navigationsleiste des Integrationseditors auf Trigger, um eine Liste der verfügbaren Trigger aufzurufen.
Klicken Sie auf das Triggerelement Error Catcher und platzieren Sie es im Integrationsdesigner.
Error Catcher-Trigger konfigurieren
Klicken Sie im Integrationsdesigner auf das Triggerelement Error Catcher, um den Bereich für die Triggerkonfiguration aufzurufen.
Auf dem Tab Konfiguration wird die Error Capture-ID angezeigt, die automatisch generiert wird, wenn Sie den Trigger in Ihren Integrationsdesigner einfügen. Optional können Sie die automatisch generierte ID bei Bedarf bearbeiten. Für diesen Trigger ist keine weitere Konfiguration erforderlich.
Error Catcher-Logik erstellen
Nachdem Sie den Error Catcher-Trigger im Integrationsdesigner hinzugefügt haben, können Sie Ihre benutzerdefinierte Error Catcher-Logik mit den verfügbaren Aufgaben in der Anwendungsintegration erstellen. Klicken Sie auf die gewünschten Elemente für die Integrationsaufgaben im Integrationsdesigner und verbinden Sie sie mit dem Trigger Error Catcher.
Error Catcher-Fehler anhängen
Nachdem Sie die benutzerdefinierte Fehlerlogik erstellt haben, können Sie diese zur Verarbeitung von Fehlern oder Ausführungsfehlern auf den Aufgaben-Aufgaben- und Ereignisebenen verwenden. Führen Sie die folgenden Schritte aus, um einen Error Catcher in Ihrer Hauptintegration zu verwenden oder anzuhängen:
Klicken Sie in der Hauptintegration auf den vorhandenen Trigger oder die vorhandene Aufgabe, um den Trigger oder den Konfigurationsbereich der Aufgabe zu öffnen.
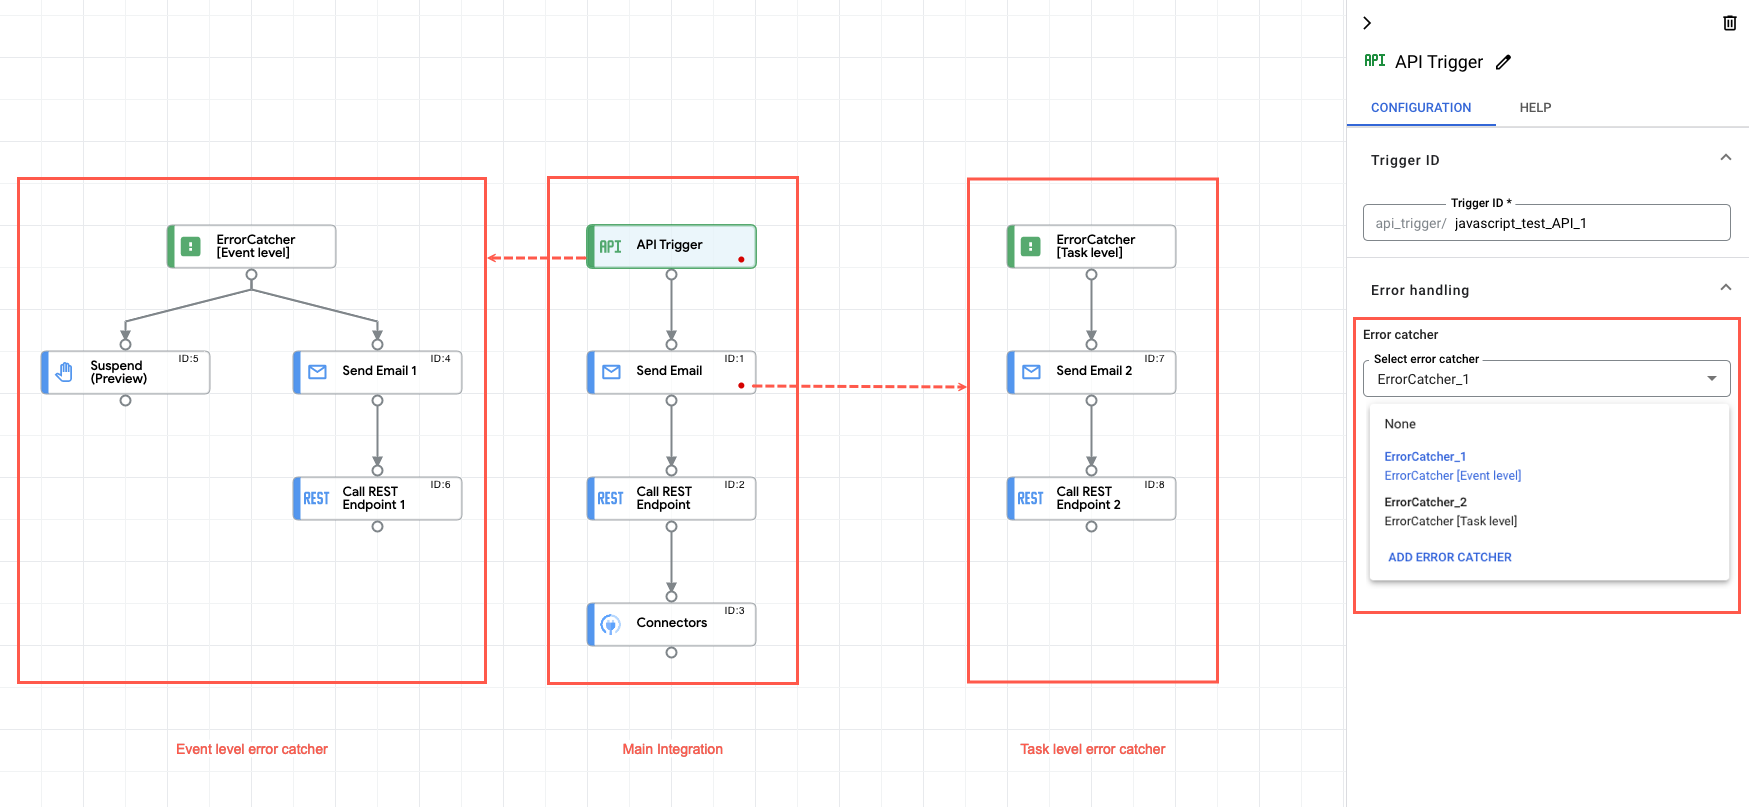
Maximieren Sie im Konfigurationsbereich den Abschnitt Fehlerbehandlung und gehen Sie zu Error Catcher.
Klicken Sie auf Error Catcher auswählen und wählen Sie die Trigger-ID Error Catcher aus.
Auf dem entsprechenden Trigger oder Aufgabenelement wird ein roter Indikator angezeigt, der darauf hinweist, dass das Element an einen Fehleranhang angehängt ist.
Die folgende Abbildung zeigt einen Beispielintegrationsvorgang mit dem Error Catcher:
Kontingente und Limits
Weitere Informationen zu allen Kontingenten und Limits finden Sie unter Kontingente und Limits.
[[["Leicht verständlich","easyToUnderstand","thumb-up"],["Mein Problem wurde gelöst","solvedMyProblem","thumb-up"],["Sonstiges","otherUp","thumb-up"]],[["Schwer verständlich","hardToUnderstand","thumb-down"],["Informationen oder Beispielcode falsch","incorrectInformationOrSampleCode","thumb-down"],["Benötigte Informationen/Beispiele nicht gefunden","missingTheInformationSamplesINeed","thumb-down"],["Problem mit der Übersetzung","translationIssue","thumb-down"],["Sonstiges","otherDown","thumb-down"]],["Zuletzt aktualisiert: 2025-09-03 (UTC)."],[[["\u003cp\u003eThe Error Catcher trigger allows you to define custom logic to handle failures in your integration at the trigger, task, or edge level.\u003c/p\u003e\n"],["\u003cp\u003eAdding the Error Catcher trigger involves placing it in the integration designer, after navigating to the integration editor and selecting the triggers panel.\u003c/p\u003e\n"],["\u003cp\u003eThe Error Catcher trigger has an auto-generated ID that can be edited, and this ID is unique, meaning no other Error Catcher trigger can share it.\u003c/p\u003e\n"],["\u003cp\u003eAfter creating the Error Catcher trigger, you can build custom error-handling logic using the available tasks in Application Integration.\u003c/p\u003e\n"],["\u003cp\u003eTo attach the Error Catcher, you select the desired ID in the error handling section of a trigger or task in the main integration.\u003c/p\u003e\n"]]],[],null,["# Error catcher trigger\n\nSee the [supported connectors](/integration-connectors/docs/connector-reference-overview) for Application Integration.\n\nError catcher trigger\n=====================\n\n\nThe **Error Catcher** trigger lets you invoke an [error catcher](/application-integration/docs/error-catcher) that is defined or customized to handle the failure of an identified trigger, task, or edge condition in your integration.\n\nAdd an Error Catcher trigger\n----------------------------\n\nTo add an **Error Catcher** trigger in your integration, perform the following steps:\n\n1. In the Google Cloud console, go to the **Application Integration** page.\n\n [Go to Application Integration](https://console.cloud.google.com/integrations)\n2. In the navigation menu, click **Integrations**\n\n\n The **Integrations List** page appears listing all the integrations available in the Google Cloud project.\n3. Select an existing integration or click **Create integration** to create a new one.\n\n\n If you are creating a new integration:\n 1. Enter a name and description in the **Create Integration** pane.\n 2. Select a region for the integration. **Note:** The **Regions** dropdown only lists the regions provisioned in your Google Cloud project. To provision a new region, Click **Enable Region** . See [Enable new region](/application-integration/docs/enable-new-region) for more information.\n 3. Select a service account for the integration. You can change or update the service account details of an integration any time from the info **Integration summary** pane in the integration toolbar. **Note:** The option to select a service account is displayed only if you have enabled integration governance for the selected region.\n 4. Click **Create**.\n\n\n The newly created integration opens in the *integration editor*.\n4. In the *integration editor* navigation bar, click **Triggers** to view the list of available triggers.\n5. Click and place the **Error Catcher** trigger element in the integration designer.\n\nConfigure the Error Catcher trigger\n-----------------------------------\n\nClick the **Error Catcher** trigger element in the integration designer to view the trigger configuration\npane.\n\nThe **Configuration** tab displays the **Error catcher ID**, which is auto-generated when you add the trigger in your integration designer. You can optionally edit the auto-generated ID if needed. No further configuration is required for this trigger.\n| **Note:** Error catcher IDs are unique to each **Error Catcher** trigger, therefore you can't have more than one **Error Catcher** trigger with the same **Error catcher ID**.\n\n\u003cbr /\u003e\n\nCreate the error catcher logic\n------------------------------\n\n\nOnce you have added the **Error Catcher** trigger in the integration designer, you can create your custom [error catcher](/application-integration/docs/error-catcher) logic using the available tasks in Application Integration. Click and place the desired\n[integration tasks](/application-integration/docs/how-to-guides#configure-integration-tasks)\nelements in the integration designer and connect them with your **Error Catcher** trigger.\n\n\n### Attach the error catcher\n\nOnce you have created your custom error catcher logic, you can use it to handle the errors or execution failures at both, the [task](/application-integration/docs/error-catcher#task) and [event](/application-integration/docs/error-catcher#event) levels. To use or attach an error catcher in your main integration, perform the following steps:\n\n1. Click the existing trigger or task in your main integration to open the trigger or task configuration pane.\n2. In the configuration pane, expand the **Error handling** section and go to **Error catcher**.\n3. Click **Select error catcher** and select the **Error Catcher** trigger ID that you want to use.\n\n A red indicator appears on the respective trigger or task element indicating that the element is attached to an error catcher.\n\n| **Notes:**\n|\n| - You can't attach multiple error catchers to the same task or trigger in your main integration.\n| - Error catchers can't be nested. This means that you cannot invoke an Error catcher trigger using another Error catcher trigger in your integration.\n| - You cannot establish an edge connection between the tasks configured inside an error catcher and the tasks or triggers used in your main integration flow.\n\nThe following image shows a sample integration flow that uses error catcher:\n\n\nQuotas and limits\n-----------------\n\nFor information about quotas and limits, see [Quotas and limits](/application-integration/docs/quotas).\n\nWhat's next\n-----------\n\n- Learn about [all tasks and triggers](/application-integration/docs/all-triggers-tasks).\n- Learn how to [test and publish an integration](/application-integration/docs/test-publish-integrations).\n\n- Learn about [error handling](/application-integration/docs/error-handling-strategy).\n- Learn about [integration execution logs](/application-integration/docs/introduction-logs)."]]