L'attivatore Rilevamento errori ti consente di richiamare un rilevamento errori definito o personalizzato per gestire l'errore di un attivatore, di un'attività o di una condizione perimetrale identificata nell'integrazione.
Aggiungere un attivatore di errore
Per aggiungere un trigger Error Catcher all'integrazione, segui questi passaggi:
Nella Google Cloud console, vai alla pagina Application Integration.
Nel menu di navigazione, fai clic su Integrations (Integrazioni).
Viene visualizzata la pagina Elenco integrazioni, che elenca tutte le integrazioni disponibili nel progetto Google Cloud.
Seleziona un'integrazione esistente o fai clic su Crea integrazione per crearne una nuova.
Se stai creando una nuova integrazione:
Inserisci un nome e una descrizione nel riquadro Crea integrazione.
Seleziona una regione per l'integrazione.
Seleziona un account di servizio per l'integrazione. Puoi modificare o aggiornare i dettagli dell'account di servizio di un'integrazione in qualsiasi momento dal riquadro infoRiepilogo dell'integrazione nella barra degli strumenti di integrazione.
Fai clic su Crea.
L'integrazione appena creata si apre nell'editor di integrazione.
Nella barra di navigazione dell'editor dell'integrazione, fai clic su Attivatori per visualizzare l'elenco degli attivatori disponibili.
Fai clic e posiziona l'elemento trigger Raccogli errori nel designer di integrazione.
Configurare l'attivatore Error Catcher
Fai clic sull'elemento attivatore Raccogli errori nel designer di integrazione per visualizzare il riquadro di configurazione dell'attivatore.
La scheda Configurazione mostra l'ID del validatore degli errori, generato automaticamente quando aggiungi l'attivatore nel designer dell'integrazione. Se necessario, puoi modificare l'ID generato automaticamente. Non è necessaria alcuna ulteriore configurazione per questo attivatore.
Crea la logica di rilevamento degli errori
Dopo aver aggiunto l'attivatore Raccogli errori nel designer di integrazione, puoi creare la logica del raccogli errori personalizzato utilizzando le attività disponibili in Application Integration. Fai clic e posiziona gli elementi di
attività di integrazione
nel designer di integrazione e collegali all'attivatore Raccogli errori.
Collega il fermo di sicurezza
Dopo aver creato la logica di rilevamento degli errori personalizzata, puoi utilizzarla per gestire gli errori o i fallimenti di esecuzione sia a livello di attività che di evento. Per utilizzare o collegare un rilevatore degli errori nell'integrazione principale:
Fai clic sull'attivatore o sull'attività esistente nell'integrazione principale per aprire il riquadro di configurazione dell'attivatore o dell'attività.
Nel riquadro di configurazione, espandi la sezione Gestione degli errori e vai a Raccogli errori.
Fai clic su Seleziona il fermo errori e seleziona l'ID attivatore Fermo errori che vuoi utilizzare.
Sul rispettivo elemento trigger o task viene visualizzato un indicatore rosso che indica che l'elemento è collegato a un'apposita funzionalità.
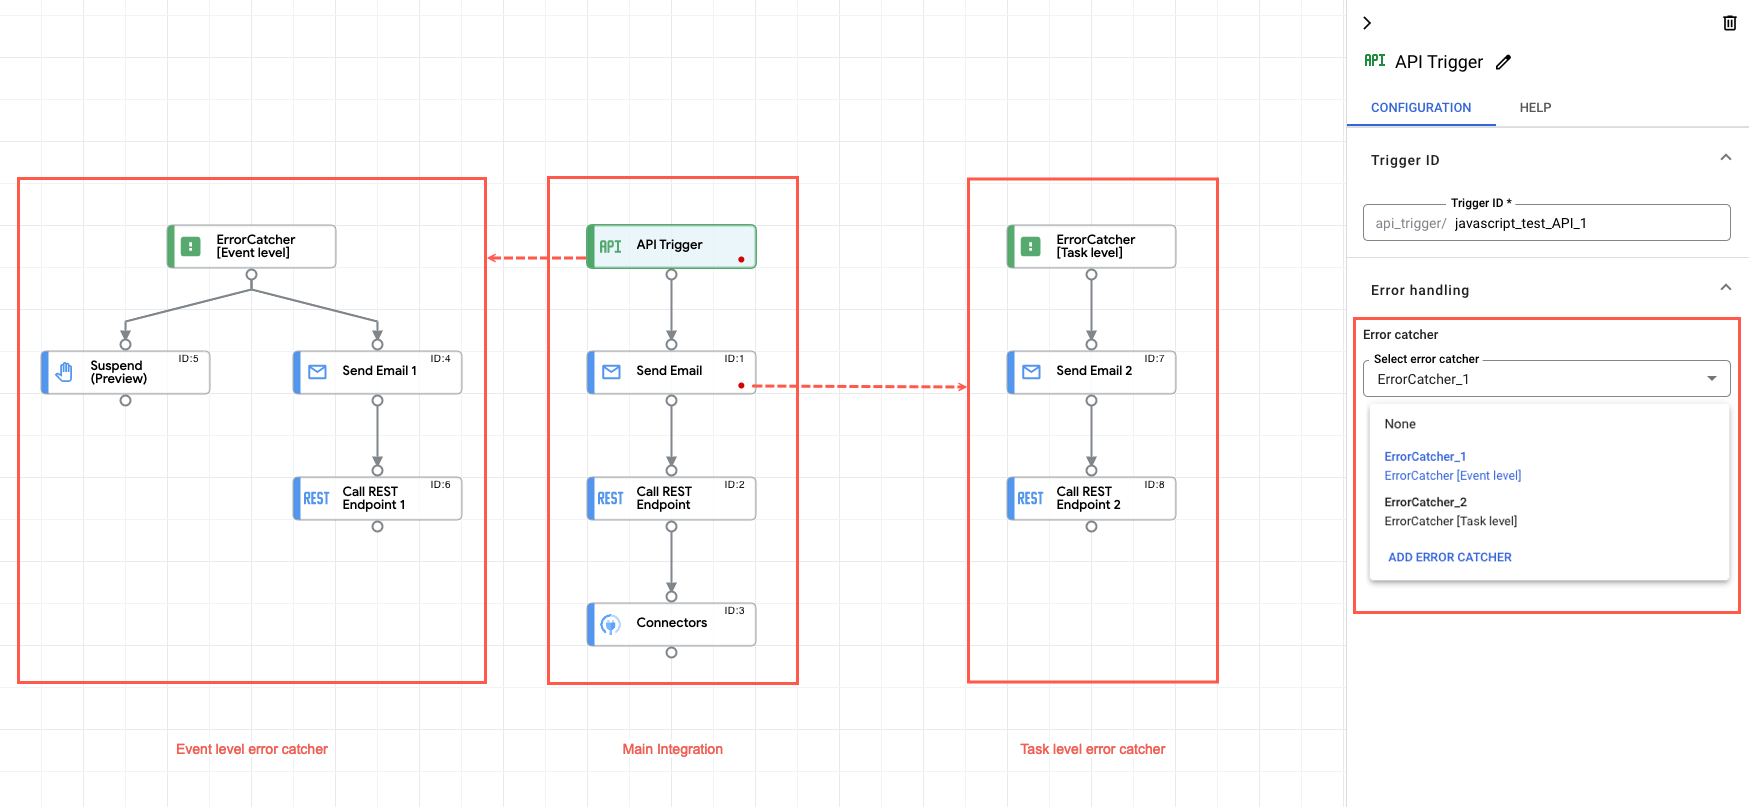
L'immagine seguente mostra un flusso di integrazione di esempio che utilizza l'error catcher:
Quote e limiti
Per informazioni su quote e limiti, consulta Quote e limiti.
[[["Facile da capire","easyToUnderstand","thumb-up"],["Il problema è stato risolto","solvedMyProblem","thumb-up"],["Altra","otherUp","thumb-up"]],[["Difficile da capire","hardToUnderstand","thumb-down"],["Informazioni o codice di esempio errati","incorrectInformationOrSampleCode","thumb-down"],["Mancano le informazioni o gli esempi di cui ho bisogno","missingTheInformationSamplesINeed","thumb-down"],["Problema di traduzione","translationIssue","thumb-down"],["Altra","otherDown","thumb-down"]],["Ultimo aggiornamento 2025-09-03 UTC."],[[["\u003cp\u003eThe Error Catcher trigger allows you to define custom logic to handle failures in your integration at the trigger, task, or edge level.\u003c/p\u003e\n"],["\u003cp\u003eAdding the Error Catcher trigger involves placing it in the integration designer, after navigating to the integration editor and selecting the triggers panel.\u003c/p\u003e\n"],["\u003cp\u003eThe Error Catcher trigger has an auto-generated ID that can be edited, and this ID is unique, meaning no other Error Catcher trigger can share it.\u003c/p\u003e\n"],["\u003cp\u003eAfter creating the Error Catcher trigger, you can build custom error-handling logic using the available tasks in Application Integration.\u003c/p\u003e\n"],["\u003cp\u003eTo attach the Error Catcher, you select the desired ID in the error handling section of a trigger or task in the main integration.\u003c/p\u003e\n"]]],[],null,["# Error catcher trigger\n\nSee the [supported connectors](/integration-connectors/docs/connector-reference-overview) for Application Integration.\n\nError catcher trigger\n=====================\n\n\nThe **Error Catcher** trigger lets you invoke an [error catcher](/application-integration/docs/error-catcher) that is defined or customized to handle the failure of an identified trigger, task, or edge condition in your integration.\n\nAdd an Error Catcher trigger\n----------------------------\n\nTo add an **Error Catcher** trigger in your integration, perform the following steps:\n\n1. In the Google Cloud console, go to the **Application Integration** page.\n\n [Go to Application Integration](https://console.cloud.google.com/integrations)\n2. In the navigation menu, click **Integrations**\n\n\n The **Integrations List** page appears listing all the integrations available in the Google Cloud project.\n3. Select an existing integration or click **Create integration** to create a new one.\n\n\n If you are creating a new integration:\n 1. Enter a name and description in the **Create Integration** pane.\n 2. Select a region for the integration. **Note:** The **Regions** dropdown only lists the regions provisioned in your Google Cloud project. To provision a new region, Click **Enable Region** . See [Enable new region](/application-integration/docs/enable-new-region) for more information.\n 3. Select a service account for the integration. You can change or update the service account details of an integration any time from the info **Integration summary** pane in the integration toolbar. **Note:** The option to select a service account is displayed only if you have enabled integration governance for the selected region.\n 4. Click **Create**.\n\n\n The newly created integration opens in the *integration editor*.\n4. In the *integration editor* navigation bar, click **Triggers** to view the list of available triggers.\n5. Click and place the **Error Catcher** trigger element in the integration designer.\n\nConfigure the Error Catcher trigger\n-----------------------------------\n\nClick the **Error Catcher** trigger element in the integration designer to view the trigger configuration\npane.\n\nThe **Configuration** tab displays the **Error catcher ID**, which is auto-generated when you add the trigger in your integration designer. You can optionally edit the auto-generated ID if needed. No further configuration is required for this trigger.\n| **Note:** Error catcher IDs are unique to each **Error Catcher** trigger, therefore you can't have more than one **Error Catcher** trigger with the same **Error catcher ID**.\n\n\u003cbr /\u003e\n\nCreate the error catcher logic\n------------------------------\n\n\nOnce you have added the **Error Catcher** trigger in the integration designer, you can create your custom [error catcher](/application-integration/docs/error-catcher) logic using the available tasks in Application Integration. Click and place the desired\n[integration tasks](/application-integration/docs/how-to-guides#configure-integration-tasks)\nelements in the integration designer and connect them with your **Error Catcher** trigger.\n\n\n### Attach the error catcher\n\nOnce you have created your custom error catcher logic, you can use it to handle the errors or execution failures at both, the [task](/application-integration/docs/error-catcher#task) and [event](/application-integration/docs/error-catcher#event) levels. To use or attach an error catcher in your main integration, perform the following steps:\n\n1. Click the existing trigger or task in your main integration to open the trigger or task configuration pane.\n2. In the configuration pane, expand the **Error handling** section and go to **Error catcher**.\n3. Click **Select error catcher** and select the **Error Catcher** trigger ID that you want to use.\n\n A red indicator appears on the respective trigger or task element indicating that the element is attached to an error catcher.\n\n| **Notes:**\n|\n| - You can't attach multiple error catchers to the same task or trigger in your main integration.\n| - Error catchers can't be nested. This means that you cannot invoke an Error catcher trigger using another Error catcher trigger in your integration.\n| - You cannot establish an edge connection between the tasks configured inside an error catcher and the tasks or triggers used in your main integration flow.\n\nThe following image shows a sample integration flow that uses error catcher:\n\n\nQuotas and limits\n-----------------\n\nFor information about quotas and limits, see [Quotas and limits](/application-integration/docs/quotas).\n\nWhat's next\n-----------\n\n- Learn about [all tasks and triggers](/application-integration/docs/all-triggers-tasks).\n- Learn how to [test and publish an integration](/application-integration/docs/test-publish-integrations).\n\n- Learn about [error handling](/application-integration/docs/error-handling-strategy).\n- Learn about [integration execution logs](/application-integration/docs/introduction-logs)."]]